
Operating Instructions
Page 3
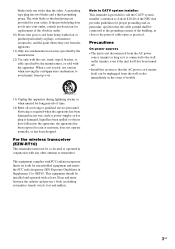
... wall outlet (mains), even if the unit itself has been turned off. • Install this system so that provides guidelines for proper grounding and, in any other . Note to CATV system installer: This reminder is connected to Article 820-40 of trouble. 13) Unplug this apparatus during ...in Supplement C to qualified service personnel. This equipment should be connected to the grounding system of the building, as close to the point of time. 14) Refer all servicing to OET65. For the wireless transceiver (EZW-RT10) This transmitter must not be unplugged from tip-over. blades ...
... wall outlet (mains), even if the unit itself has been turned off. • Install this system so that provides guidelines for proper grounding and, in any other . Note to CATV system installer: This reminder is connected to Article 820-40 of trouble. 13) Unplug this apparatus during ...in Supplement C to qualified service personnel. This equipment should be connected to the grounding system of the building, as close to the point of time. 14) Refer all servicing to OET65. For the wireless transceiver (EZW-RT10) This transmitter must not be unplugged from tip-over. blades ...
Operating Instructions
Page 4
...system: • Surround amplifier: You can enjoy surround speaker sound wirelessly. • S-AIR receiver: You can also use the controls on the unit if they have the same or similar names as a general term for a DVD VIDEO, DVD+RW/DVD+R, and DVDRW/DVD-R. • Measurements are for DAVHDX277WC, DAV-HDX279W, and DAVHDX576WF. DAV-HDX277WC...be used for illustration purposes. The configuration of sound between S-AIR products wirelessly. Any difference in operation is clearly indicated in the text, for example, "DAV-HDX277WC only." • The Control Menu items may vary depending on the...
...system: • Surround amplifier: You can enjoy surround speaker sound wirelessly. • S-AIR receiver: You can also use the controls on the unit if they have the same or similar names as a general term for a DVD VIDEO, DVD+RW/DVD+R, and DVDRW/DVD-R. • Measurements are for DAVHDX277WC, DAV-HDX279W, and DAVHDX576WF. DAV-HDX277WC...be used for illustration purposes. The configuration of sound between S-AIR products wirelessly. Any difference in operation is clearly indicated in the text, for example, "DAV-HDX277WC only." • The Control Menu items may vary depending on the...
Operating Instructions
Page 5
... the S-AIR function 4 Playable Discs 6 Getting Started Step 1: Assembling the Speakers 13 Step 2: Positioning the System... 18 Step 3: Connecting the System... 22 Step 4: Setting up the Wireless System 42 Step 5: Performing the Quick Setup 44 Step 6: Enjoying Sound from all the Speakers 47 Sound Adjustment Enjoying...Presetting Radio Stations 76 Listening to the Radio 77 Control for HDMI/External Audio Device Using the Control for HDMI Function for "BRAVIA" Sync 79 Using the DIGITAL MEDIA PORT Adapter 82 Using an S-AIR Product 83 Other Operations Getting Optimal Surround Sound for...
... the S-AIR function 4 Playable Discs 6 Getting Started Step 1: Assembling the Speakers 13 Step 2: Positioning the System... 18 Step 3: Connecting the System... 22 Step 4: Setting up the Wireless System 42 Step 5: Performing the Quick Setup 44 Step 6: Enjoying Sound from all the Speakers 47 Sound Adjustment Enjoying...Presetting Radio Stations 76 Listening to the Radio 77 Control for HDMI/External Audio Device Using the Control for HDMI Function for "BRAVIA" Sync 79 Using the DIGITAL MEDIA PORT Adapter 82 Using an S-AIR Product 83 Other Operations Getting Optimal Surround Sound for...
Operating Instructions
Page 9
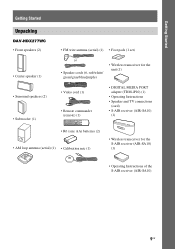
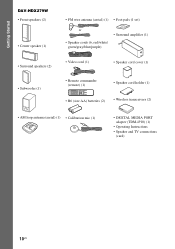
Getting Started Getting Started Unpacking DAV-HDX277WC • Front speakers (2) • Center speaker (1) • Surround speakers (2) • Subwoofer (1) • FM wire antenna (aerial) (1) • Foot pads (1 set) or • Speaker cords (6, red/white/ green/gray/blue/purple) • Wireless transceiver for the unit (1) • ...SA10) (1) • R6 (size AA) batteries (2) • AM loop antenna (aerial) (1) • Calibration mic (1) • Wireless transceiver for the S-AIR receiver (AIR-SA10) (1) • Operating Instructions of the S-AIR receiver (AIR-SA10) 9US
Getting Started Getting Started Unpacking DAV-HDX277WC • Front speakers (2) • Center speaker (1) • Surround speakers (2) • Subwoofer (1) • FM wire antenna (aerial) (1) • Foot pads (1 set) or • Speaker cords (6, red/white/ green/gray/blue/purple) • Wireless transceiver for the unit (1) • ...SA10) (1) • R6 (size AA) batteries (2) • AM loop antenna (aerial) (1) • Calibration mic (1) • Wireless transceiver for the S-AIR receiver (AIR-SA10) (1) • Operating Instructions of the S-AIR receiver (AIR-SA10) 9US
Operating Instructions
Page 10
Getting Started DAV-HDX279W • Front speakers (2) • Center speaker (1) • Surround speakers (2) • Subwoofer (1) • FM wire antenna (aerial) (1) • Foot pads (1 set) or •.../purple) • Video cord (1) • Speaker cord cover (1) • Remote commander (remote) (1) • Speaker cord holder (1) • R6 (size AA) batteries (2) • Wireless transceivers (2) • AM loop antenna (aerial) (1) • Calibration mic (1) • DIGITAL MEDIA PORT adapter (TDM-iP10) (1) • Operating Instructions • Speaker and TV connections (...
Getting Started DAV-HDX279W • Front speakers (2) • Center speaker (1) • Surround speakers (2) • Subwoofer (1) • FM wire antenna (aerial) (1) • Foot pads (1 set) or •.../purple) • Video cord (1) • Speaker cord cover (1) • Remote commander (remote) (1) • Speaker cord holder (1) • R6 (size AA) batteries (2) • Wireless transceivers (2) • AM loop antenna (aerial) (1) • Calibration mic (1) • DIGITAL MEDIA PORT adapter (TDM-iP10) (1) • Operating Instructions • Speaker and TV connections (...
Operating Instructions
Page 11
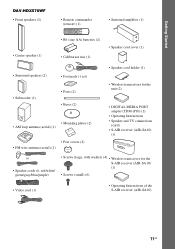
Getting Started DAV-HDX576WF • Front speakers (2) • Remote commander (remote) (1) • Surround amplifier (1) • Center speaker (1) • R6 (size AA) batteries (2) • Calibration mic (1)... • Bases (2) • Mounting plates (2) • AM loop antenna (aerial) (1) • Post covers (2) • FM wire antenna (aerial) (1) • Speaker cord holder (1) • Wireless transceivers for the unit (2) • DIGITAL MEDIA PORT adapter (TDM-iP10) (1) • Operating Instructions • Speaker and TV connections (card) • S-AIR receiver (AIR-SA10...
Getting Started DAV-HDX576WF • Front speakers (2) • Remote commander (remote) (1) • Surround amplifier (1) • Center speaker (1) • R6 (size AA) batteries (2) • Calibration mic (1)... • Bases (2) • Mounting plates (2) • AM loop antenna (aerial) (1) • Post covers (2) • FM wire antenna (aerial) (1) • Speaker cord holder (1) • Wireless transceivers for the unit (2) • DIGITAL MEDIA PORT adapter (TDM-iP10) (1) • Operating Instructions • Speaker and TV connections (card) • S-AIR receiver (AIR-SA10...
Operating Instructions
Page 22
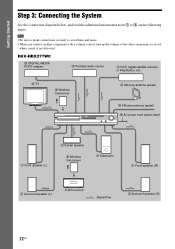
Getting Started Step 3: Connecting the System See the connection diagram below, and read the additional information from 1 to a level where sound is not distorted. Note • Be sure to make connections ... another component with a volume control, turn up the volume of the other components to 6 on the following pages. DAV-HDX277WC 3 DIGITAL MEDIA PORT adapter 3 Portable audio source 3 VCR, digital satellite receiver, or PlayStation, etc. 2 TV 5 Wireless transceiver 4 AM loop antenna (aerial) 4 FM wire antenna (aerial) 6 AC power cord (mains lead) 1 Front speaker (L) 1 Center...
Getting Started Step 3: Connecting the System See the connection diagram below, and read the additional information from 1 to a level where sound is not distorted. Note • Be sure to make connections ... another component with a volume control, turn up the volume of the other components to 6 on the following pages. DAV-HDX277WC 3 DIGITAL MEDIA PORT adapter 3 Portable audio source 3 VCR, digital satellite receiver, or PlayStation, etc. 2 TV 5 Wireless transceiver 4 AM loop antenna (aerial) 4 FM wire antenna (aerial) 6 AC power cord (mains lead) 1 Front speaker (L) 1 Center...
Operating Instructions
Page 23
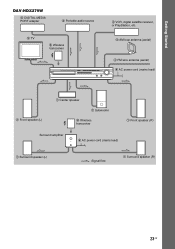
Getting Started DAV-HDX279W 3 DIGITAL MEDIA PORT adapter 3 Portable audio source 2 TV 5 Wireless transceiver 3 VCR, digital satellite receiver, or PlayStation, etc. 4 AM loop antenna (aerial) 4 FM wire antenna (aerial) 6 AC power cord (mains lead) 1 Front speaker (L) 1 Center speaker 1 Subwoofer 5 Wireless transceiver 1 Front speaker (R) Surround amplifier 6 AC power cord (mains lead) 1 Surround speaker (L) :Signal flow 1 Surround speaker (R) 23US
Getting Started DAV-HDX279W 3 DIGITAL MEDIA PORT adapter 3 Portable audio source 2 TV 5 Wireless transceiver 3 VCR, digital satellite receiver, or PlayStation, etc. 4 AM loop antenna (aerial) 4 FM wire antenna (aerial) 6 AC power cord (mains lead) 1 Front speaker (L) 1 Center speaker 1 Subwoofer 5 Wireless transceiver 1 Front speaker (R) Surround amplifier 6 AC power cord (mains lead) 1 Surround speaker (L) :Signal flow 1 Surround speaker (R) 23US
Operating Instructions
Page 38
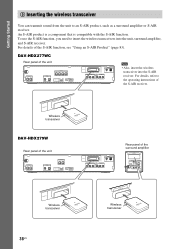
To use the S-AIR function, you need to an S-AIR product, such as a surround amplifier or S-AIR receiver. EZW-RT10 Wireless transceiver DAV-HDX279W Rear panel of the unit SPEAKER CENTER SUBWOOFER SPEAKER TV/VIDEO DIGITAL IN COAXIAL OPTICAL FRONT R FRONT L HDMI OUT DMPORT DC5V 0.7A MAX EZW-... EZW-RT10 COMPONENT VIDEO OUT VIDEO OUT ANTENNA FM AM COAXIAL 75 TV/VIDEO Y PB/CB PR/CR R AUDIO IN L Note • Also, insert the wireless transceiver into the unit, surround amplifier, and S-AIR receiver. DAV-HDX277WC Rear panel of the S-AIR receiver.
To use the S-AIR function, you need to an S-AIR product, such as a surround amplifier or S-AIR receiver. EZW-RT10 Wireless transceiver DAV-HDX279W Rear panel of the unit SPEAKER CENTER SUBWOOFER SPEAKER TV/VIDEO DIGITAL IN COAXIAL OPTICAL FRONT R FRONT L HDMI OUT DMPORT DC5V 0.7A MAX EZW-... EZW-RT10 COMPONENT VIDEO OUT VIDEO OUT ANTENNA FM AM COAXIAL 75 TV/VIDEO Y PB/CB PR/CR R AUDIO IN L Note • Also, insert the wireless transceiver into the unit, surround amplifier, and S-AIR receiver. DAV-HDX277WC Rear panel of the S-AIR receiver.
Operating Instructions
Page 39
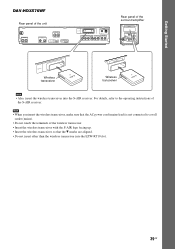
Getting Started DAV-HDX576WF Rear panel of the unit SPEAKER CENTER SUBWOOFER SPEAKER TV DIGITAL IN COAXIAL OPTICAL FRONT R FRONT L HDMI OUT DMPORT DC5V 0.7A MAX EZW-RT10 ... amplifier EZW-RT10 S-AIR ID A B C PAIRING SPEAKER L SURROUND SELECTOR R SURROUND SURROUND BACK EZW-RT10 Wireless transceiver EZW-RT10 Wireless transceiver Note • Also, insert the wireless transceiver into the EZW-RT10 slot. 39US Note • When you insert the wireless transceiver, make sure that the V marks are aligned. • Do not insert other than...
Getting Started DAV-HDX576WF Rear panel of the unit SPEAKER CENTER SUBWOOFER SPEAKER TV DIGITAL IN COAXIAL OPTICAL FRONT R FRONT L HDMI OUT DMPORT DC5V 0.7A MAX EZW-RT10 ... amplifier EZW-RT10 S-AIR ID A B C PAIRING SPEAKER L SURROUND SELECTOR R SURROUND SURROUND BACK EZW-RT10 Wireless transceiver EZW-RT10 Wireless transceiver Note • Also, insert the wireless transceiver into the EZW-RT10 slot. 39US Note • When you insert the wireless transceiver, make sure that the V marks are aligned. • Do not insert other than...
Operating Instructions
Page 42
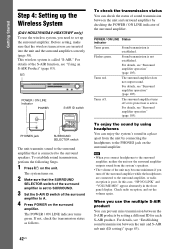
.... The surround amplifier turns off . For details, see "Surround amplifier operation" (page 105). When you use the wireless system, you need to the surround speakers. The system turns on the surround amplifier. For details, see "Surround amplifier operation" (page 105). Note • When you...AIR ID switch of the surround amplifier to the PHONES jack on . 2 Make sure that is connected to set up the Wireless System (DAV-HDX279W/DAV-HDX576WF only) To use the multiple S-AIR product You can check the status of sound transmission between the unit and surround ...
.... The surround amplifier turns off . For details, see "Surround amplifier operation" (page 105). When you use the wireless system, you need to the surround speakers. The system turns on the surround amplifier. For details, see "Surround amplifier operation" (page 105). Note • When you...AIR ID switch of the surround amplifier to the PHONES jack on . 2 Make sure that is connected to set up the Wireless System (DAV-HDX279W/DAV-HDX576WF only) To use the multiple S-AIR product You can check the status of sound transmission between the unit and surround ...
Operating Instructions
Page 82
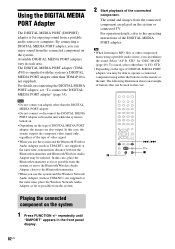
...be reduced. For operation details, refer to the Bluetooth transmitter. • When you use the system and the Bluetooth Wireless Audio Adapter (such as possible from the connected component on the system. MODE" (page 49). Select "A.F.D. By connecting a DIGITAL MEDIA PORT adapter, you can be ...used in this case, place the Bluetooth transmitter as far as possible from the system, or move the Bluetooth Wireless Audio Adapter closer to the operating instructions of DIGITAL MEDIA PORT adapter, the images are played on connecting the DIGITAL ...
...be reduced. For operation details, refer to the Bluetooth transmitter. • When you use the system and the Bluetooth Wireless Audio Adapter (such as possible from the connected component on the system. MODE" (page 49). Select "A.F.D. By connecting a DIGITAL MEDIA PORT adapter, you can be ...used in this case, place the Bluetooth transmitter as far as possible from the system, or move the Bluetooth Wireless Audio Adapter closer to the operating instructions of DIGITAL MEDIA PORT adapter, the images are played on connecting the DIGITAL ...
Operating Instructions
Page 83
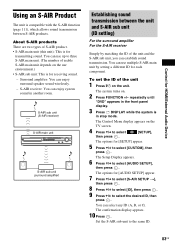
...component. S-AIR sub unit (S-AIR receiver) S-AIR main unit S-AIR sub unit (surround amplifier) Establishing sound transmission between S-AIR products. The system turns on the use up to select [AUDIO SETUP], then press . S-AIR receiver: You can establish sound transmission. To set the ID ...[S-AIR SETUP t], then press . 8 Press X/x to select [ID], then press . 9 Press X/x to the same ID. 83US You can enjoy surround speaker sound wirelessly. - You can use multiple S-AIR main unit by matching the ID of the unit 1 Press "/1 on the TV screen. 4 Press X/x to select [CUSTOM], ...
...component. S-AIR sub unit (S-AIR receiver) S-AIR main unit S-AIR sub unit (surround amplifier) Establishing sound transmission between S-AIR products. The system turns on the use up to select [AUDIO SETUP], then press . S-AIR receiver: You can establish sound transmission. To set the ID ...[S-AIR SETUP t], then press . 8 Press X/x to select [ID], then press . 9 Press X/x to the same ID. 83US You can enjoy surround speaker sound wirelessly. - You can use multiple S-AIR main unit by matching the ID of the unit 1 Press "/1 on the TV screen. 4 Press X/x to select [CUSTOM], ...
Operating Instructions
Page 85
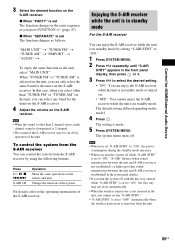
... the S-AIR receiver while the unit is in standby mode by using the following buttons. For details, refer to "OFF" automatically when the wireless transceiver is in standby mode or turned on. • "OFF": You cannot enjoy the S-AIR receiver while the unit is removed from the...x When "SEPARATE" is made. 5 Press SYSTEM MENU. The setting is set The function changes in the front panel display, then press or c. 3 Press X/x to 2 channel. • The sound of the S-AIR receiver may not close automatically. • When the wireless transceiver is not inserted in standby mode For the...
... the S-AIR receiver while the unit is in standby mode by using the following buttons. For details, refer to "OFF" automatically when the wireless transceiver is in standby mode or turned on. • "OFF": You cannot enjoy the S-AIR receiver while the unit is removed from the...x When "SEPARATE" is made. 5 Press SYSTEM MENU. The setting is set The function changes in the front panel display, then press or c. 3 Press X/x to 2 channel. • The sound of the S-AIR receiver may not close automatically. • When the wireless transceiver is not inserted in standby mode For the...
Operating Instructions
Page 87
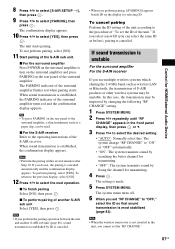
... ID as before), pairing is unstable For the surround amplifier For the S-AIR receiver If you use multiple wireless systems which sharing the 2.4 GHz band, such as wireless LAN or Bluetooth, the transmission of the surround amplifier turns red and the confirmation display appears. The unit... display, select [NO]. 12 Press C/c to select [YES], then press . The setting is established, the PAIRING indicator of S-AIR products or other wireless systems may be improved by fixing the channel for HDMI/External Audio Device 8 Press X/x to select [S-AIR SETUP t], then press . 9 Press X/x to...
... ID as before), pairing is unstable For the surround amplifier For the S-AIR receiver If you use multiple wireless systems which sharing the 2.4 GHz band, such as wireless LAN or Bluetooth, the transmission of the surround amplifier turns red and the confirmation display appears. The unit... display, select [NO]. 12 Press C/c to select [YES], then press . The setting is established, the PAIRING indicator of S-AIR products or other wireless systems may be improved by fixing the channel for HDMI/External Audio Device 8 Press X/x to select [S-AIR SETUP t], then press . 9 Press X/x to...
Operating Instructions
Page 88
S-AIR ID A: equivalent channel for Wi-Fi channel 6 - For details, refer to "OFF," transmission between the unit and S-AIR sub unit can be improved by changing the transmission channel (frequency) of the other wireless system(s). 88US S-AIR ID B: equivalent channel for Wi-Fi channel 1 - S-AIR ID C: equivalent channel for Wi-Fi channel 11 • The transmission may be performed using one of the following channels. - • In most cases, you will not need to change this setting. • If "RF CHANGE" is set to the operating instructions of the other wireless system(s).
S-AIR ID A: equivalent channel for Wi-Fi channel 6 - For details, refer to "OFF," transmission between the unit and S-AIR sub unit can be improved by changing the transmission channel (frequency) of the other wireless system(s). 88US S-AIR ID B: equivalent channel for Wi-Fi channel 1 - S-AIR ID C: equivalent channel for Wi-Fi channel 11 • The transmission may be performed using one of the following channels. - • In most cases, you will not need to change this setting. • If "RF CHANGE" is set to the operating instructions of the other wireless system(s).

Operating Instructions
Page 98
...the disc with sound transmission. • As the S-AIR function uses the radio waves that share the same frequency as other wireless systems, such as benzine, thinner, commercially available cleaners, or anti-static spray intended for vinyl LPs. Using neither standard nor circular discs... other wireless systems at the same time. • The transmission distance differs depending on the bottom exterior. This system can only play back a standard circular disc. In this case, take the following steps: - About the surround amplifier (DAV-HDX279W/DAV-HDX576WF only) • The ...
...the disc with sound transmission. • As the S-AIR function uses the radio waves that share the same frequency as other wireless systems, such as benzine, thinner, commercially available cleaners, or anti-static spray intended for vinyl LPs. Using neither standard nor circular discs... other wireless systems at the same time. • The transmission distance differs depending on the bottom exterior. This system can only play back a standard circular disc. In this case, take the following steps: - About the surround amplifier (DAV-HDX279W/DAV-HDX576WF only) • The ...
Operating Instructions
Page 102
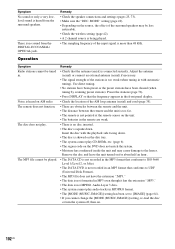
...• Check the speaker connections and settings (pages 25, 73). • Make sure the "DEC. The MP3 file cannot be less noticeable. • Check the wireless setting (page 42). • A 2 channel source is being played. • The sampling frequency of the AM loop antenna (aerial) and cord (page 35). ...Symptom No sound or only a very lowlevel sound is not MPEG1 Audio Layer 3 data. • The system cannot play audio tracks in MP3PRO format. • The [MODE (MUSIC, IMAGE)] setting has been set to [IMAGE] (page 64). • If you ...
...• Check the speaker connections and settings (pages 25, 73). • Make sure the "DEC. The MP3 file cannot be less noticeable. • Check the wireless setting (page 42). • A 2 channel source is being played. • The sampling frequency of the AM loop antenna (aerial) and cord (page 35). ...Symptom No sound or only a very lowlevel sound is not MPEG1 Audio Layer 3 data. • The system cannot play audio tracks in MP3PRO format. • The [MODE (MUSIC, IMAGE)] setting has been set to [IMAGE] (page 64). • If you ...
Operating Instructions
Page 104
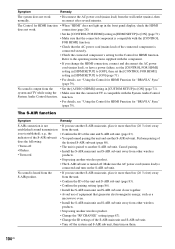
...; Install the S-AIR main unit and S-AIR sub unit away from other wireless products. • Stop using another S-AIR sub unit. No sound is compatible with the System Audio Control System Audio Control function. Symptom Remedy The system does not work . • When "HDMI" does not light up in...(page 86). • The unit is paired to [ON] (page 71). • For details, see "Using the Control for HDMI Function for "BRAVIA" Sync" (page 79). Perform pairing of the S-AIR sub unit does the following: • Turns off . The S-AIR function Symptom Remedy S-AIR ...
...; Install the S-AIR main unit and S-AIR sub unit away from other wireless products. • Stop using another S-AIR sub unit. No sound is compatible with the System Audio Control System Audio Control function. Symptom Remedy The system does not work . • When "HDMI" does not light up in...(page 86). • The unit is paired to [ON] (page 71). • For details, see "Using the Control for HDMI Function for "BRAVIA" Sync" (page 79). Perform pairing of the S-AIR sub unit does the following: • Turns off . The S-AIR function Symptom Remedy S-AIR ...
Operating Instructions
Page 105
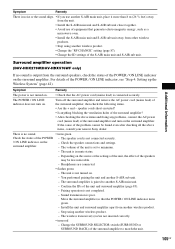
... of the POWER / ON LINE indicator on the surround amplifier. - Surround amplifier operation (DAV-HDX279W/DAV-HDX576WF only) If no sound. • turns green Check the status of the POWER ..."Step 4: Setting up the Wireless System" (page 42). Symptom Remedy The power is not turned on the surround amplifier. There is no sound is output from another wireless product. - The volume of ...• After checking the above items, consult your nearest Sony dealer. The unit is not turned on . The surround amplifier is paired to another wireless product. • Change the "RF CHANGE" setting ...
... of the POWER / ON LINE indicator on the surround amplifier. - Surround amplifier operation (DAV-HDX279W/DAV-HDX576WF only) If no sound. • turns green Check the status of the POWER ..."Step 4: Setting up the Wireless System" (page 42). Symptom Remedy The power is not turned on the surround amplifier. There is no sound is output from another wireless product. - The volume of ...• After checking the above items, consult your nearest Sony dealer. The unit is not turned on . The surround amplifier is paired to another wireless product. • Change the "RF CHANGE" setting ...


