Operating Instructions
Page 41
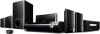
.... • "DEMO ON": On. • "DEMO OFF": Off. 5 Press . Tip • When you purchase the system from new, or if the system is made. 6 Press SYSTEM MENU. Getting Started About the demonstration After connecting the AC power cord (mains lead), the demonstration appears in the front panel... display, then press or c. 4 Press X/x to on/off 1 Press [/1 on the remote. 41US The system turns on. 2 Press SYSTEM MENU. 3 Press X/x repeatedly until "DEMO" appears in the front panel display. The setting is at its factory default settings (ex., after ...
.... • "DEMO ON": On. • "DEMO OFF": Off. 5 Press . Tip • When you purchase the system from new, or if the system is made. 6 Press SYSTEM MENU. Getting Started About the demonstration After connecting the AC power cord (mains lead), the demonstration appears in the front panel... display, then press or c. 4 Press X/x to on/off 1 Press [/1 on the remote. 41US The system turns on. 2 Press SYSTEM MENU. 3 Press X/x repeatedly until "DEMO" appears in the front panel display. The setting is at its factory default settings (ex., after ...
Operating Instructions
Page 45
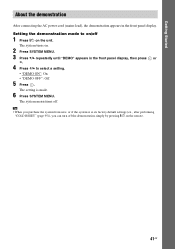
...Menu display appears on the front panel. Be quiet during the measurement (which the system is finished. Give consideration to select [YES]. All connections and setup operations are...recall the Quick Setup display 1 Press FUNCTION +/- AUDIO IN / A.CAL MIC Calibration mic E.g., DAV-HDX576WF 12 Press C/c to children and neighbors. • Before [AUTO CALIBRATION], install the surround amplifier... the headphones connected. 13 Press . [AUTO CALIBRATION] starts. The front of the speakers, reset the speaker settings. Note • The environment of the settings, see "Using the Setup ...
...Menu display appears on the front panel. Be quiet during the measurement (which the system is finished. Give consideration to select [YES]. All connections and setup operations are...recall the Quick Setup display 1 Press FUNCTION +/- AUDIO IN / A.CAL MIC Calibration mic E.g., DAV-HDX576WF 12 Press C/c to children and neighbors. • Before [AUTO CALIBRATION], install the surround amplifier... the headphones connected. 13 Press . [AUTO CALIBRATION] starts. The front of the speakers, reset the speaker settings. Note • The environment of the settings, see "Using the Setup ...
Operating Instructions
Page 57
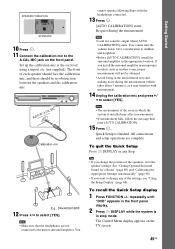
..., press x twice, then press H. 57US Tip • To play from that is cleared when you change the function by resume playback (Multi-disc Resume) This system recalls the point where you insert the same disc. To enjoy a disc that point the next time you stopped the disc the last time it...-VR, VIDEO CD, Super Audio CD, CD, DATA CD, or DATA DVD, the system remembers the resume playback point for the earliest disc is cleared when you change or reset the settings on where you stop playback. the system enters standby mode (DATA CD/ DATA DVD only). - When the resume playback memory is...
..., press x twice, then press H. 57US Tip • To play from that is cleared when you change the function by resume playback (Multi-disc Resume) This system recalls the point where you insert the same disc. To enjoy a disc that point the next time you stopped the disc the last time it...-VR, VIDEO CD, Super Audio CD, CD, DATA CD, or DATA DVD, the system remembers the resume playback point for the earliest disc is cleared when you change or reset the settings on where you stop playback. the system enters standby mode (DATA CD/ DATA DVD only). - When the resume playback memory is...
Operating Instructions
Page 68
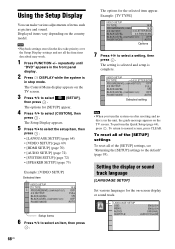
... OFF 4:3 OUTPUT: FULL BLACK LEVEL: ON BLACK LEVEL (COMPONENT OUT): OFF PAUSE MODE: AUTO Selected setting Note • When you turn the system on after resetting and no disc is in the unit, the guide message appears on the TV screen. 3 Press X/x to the default" (page 95). To ...SETUP] Set various languages for the on the country model. repeatedly until "DVD" appears in the front panel display. 2 Press DISPLAY while the system is complete. To reset all of items such as picture and sound. The Setup Display appears. 5 Press X/x to select the setup item, then press . •...
... OFF 4:3 OUTPUT: FULL BLACK LEVEL: ON BLACK LEVEL (COMPONENT OUT): OFF PAUSE MODE: AUTO Selected setting Note • When you turn the system on after resetting and no disc is in the unit, the guide message appears on the TV screen. 3 Press X/x to the default" (page 95). To ...SETUP] Set various languages for the on the country model. repeatedly until "DVD" appears in the front panel display. 2 Press DISPLAY while the system is complete. To reset all of items such as picture and sound. The Setup Display appears. 5 Press X/x to select the setup item, then press . •...
Operating Instructions
Page 72
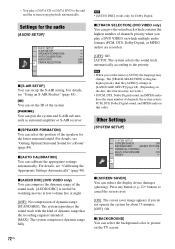
...] is useful for a Room" (page 89). x [AUTO CALIBRATION] You can reduce the display device damages (ghosting). Other Settings [SYSTEM SETUP] SYSTEM SETUP SCREEN SAVER: ON BACKGROUND: JACKET PICTURE PARENTAL CONTROL: MULTI-DISC RESUME: ON RESET: x [SCREEN SAVER] You can calibrate the appropriate settings automatically. x [AUDIO DRC] (DVD VIDEO only) You can set the...
...] is useful for a Room" (page 89). x [AUTO CALIBRATION] You can reduce the display device damages (ghosting). Other Settings [SYSTEM SETUP] SYSTEM SETUP SCREEN SAVER: ON BACKGROUND: JACKET PICTURE PARENTAL CONTROL: MULTI-DISC RESUME: ON RESET: x [SCREEN SAVER] You can calibrate the appropriate settings automatically. x [AUDIO DRC] (DVD VIDEO only) You can set the...
Operating Instructions
Page 73
... set the [MULTI-DISC RESUME] function to on the disc (CDEXTRA, etc.). For details, see "Returning the [SETUP] settings to the default" (page 95). x [RESET] You can set the parameters from 1.0 to 7.0 meters1) (3 to 23 ft) for the front speakers, from 0.0 to 7.0 meters2) (0 to 23 ft) for the... [BLUE]: The background is blue. [BLACK]: The background is already recorded on /off. [ON]: The system stores the resume points in memory for up to 10 discs. [OFF]: The system does not store the resume points in the unit. For details, see "Restricting Playback of the speakers to ...
... set the [MULTI-DISC RESUME] function to on the disc (CDEXTRA, etc.). For details, see "Returning the [SETUP] settings to the default" (page 95). x [RESET] You can set the parameters from 1.0 to 7.0 meters1) (3 to 23 ft) for the front speakers, from 0.0 to 7.0 meters2) (0 to 23 ft) for the... [BLUE]: The background is blue. [BLACK]: The background is already recorded on /off. [ON]: The system stores the resume points in memory for up to 10 discs. [OFF]: The system does not store the resume points in the unit. For details, see "Restricting Playback of the speakers to ...
Operating Instructions
Page 76
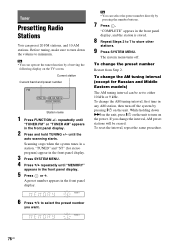
... Repeat Steps 2 to 7 to turn on the power. If you want. 76US Current station Current band and preset number FM FM 10 : 88.00 MHz SONY RADIO Station name 1 Press FUNCTION +/- "COMPLETE" appears in any AM station, then turn down > on the unit, press "/1 on the unit to store ...other stations. 9 Press SYSTEM MENU. While holding down the volume to minimum. To reset the interval, repeat the same procedure. 6 Press X/x to either 10 kHz or 9 kHz. Tuner Presetting Radio Stations You can operate...
... Repeat Steps 2 to 7 to turn on the power. If you want. 76US Current station Current band and preset number FM FM 10 : 88.00 MHz SONY RADIO Station name 1 Press FUNCTION +/- "COMPLETE" appears in any AM station, then turn down > on the unit, press "/1 on the unit to store ...other stations. 9 Press SYSTEM MENU. While holding down the volume to minimum. To reset the interval, repeat the same procedure. 6 Press X/x to either 10 kHz or 9 kHz. Tuner Presetting Radio Stations You can operate...
Operating Instructions
Page 95
.../DATA DVD. ** If an MP3 file has the ID3 tag, the system will display a folder name/track (file) name from the ID3 tag information. "COLD RESET" appears in the front panel display and the system returns to turn on the system. 2 Press x, A, and "/1 on the TV screen. 3 Press ...support ID3 ver 1.0/1.1/2.2/2.3. The Setup Display appears. 95US repeatedly until "DVD" appears in the front panel display. 2 Press DISPLAY while the system is a digital camera image format defined by the Japan Electronics and Information Technology Industries Association (JEITA). Bit rate* T 0: 13 192k MP3...
.../DATA DVD. ** If an MP3 file has the ID3 tag, the system will display a folder name/track (file) name from the ID3 tag information. "COLD RESET" appears in the front panel display and the system returns to turn on the system. 2 Press x, A, and "/1 on the TV screen. 3 Press ...support ID3 ver 1.0/1.1/2.2/2.3. The Setup Display appears. 95US repeatedly until "DVD" appears in the front panel display. 2 Press DISPLAY while the system is a digital camera image format defined by the Japan Electronics and Information Technology Industries Association (JEITA). Bit rate* T 0: 13 192k MP3...
Operating Instructions
Page 96
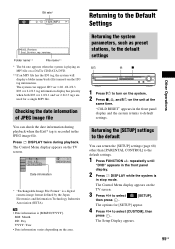
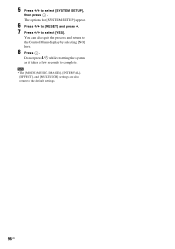
Do not press [/1 while resetting the system as it takes a few seconds to the Control Menu display by selecting [NO] here. 8 Press . You can also quit the process and return to complete. The options for [SYSTEM SETUP] appear. 6 Press X/x to [RESET] and press c. 7 Press C/c to the default settings. 96US Note • The [MODE (MUSIC, IMAGE)], [INTERVAL], [EFFECT], and [MULTI/2CH] settings are also return to select [YES]. 5 Press X/x to select [SYSTEM SETUP], then press .
Do not press [/1 while resetting the system as it takes a few seconds to the Control Menu display by selecting [NO] here. 8 Press . You can also quit the process and return to complete. The options for [SYSTEM SETUP] appear. 6 Press X/x to [RESET] and press c. 7 Press C/c to the default settings. 96US Note • The [MODE (MUSIC, IMAGE)], [INTERVAL], [EFFECT], and [MULTI/2CH] settings are also return to select [YES]. 5 Press X/x to select [SYSTEM SETUP], then press .
Operating Instructions
Page 121
... SETUP 72 AUTO CALIBRATION 72, 90, 110 B BACKGROUND 72 BLACK LEVEL 70 BLACK LEVEL (COMPONENT OUT) 70 C COLD RESET 95 CONTROL FOR HDMI 71 Control for HDMI 79 Control Menu Display 118 CUSTOM 68, 95 D D. A. C. MODE 49...) 69 Progressive format 46, 111 Q Quick Setup 44 R Rear panel 115 Region Code 8 Remote 12 Repeat Play 59 RESET 73, 96 Resume Play 57 RF CHANGE 87 S S-AIR 111 S-AIR SETUP 72 S-AIR STBY 85 SCREEN SAVER 72... DISTANCE 73, 74 LEVEL 74 SUBTITLE 54, 69 Super Audio CD 55, 111 SYSTEM MENU 41, 48, 49, 54, 77, 85, 87, 92, 93 SYSTEM SETUP 72 T TEST TONE 74 TIME 61 TRACK SELECTION 72 TV TYPE 69 ...
... SETUP 72 AUTO CALIBRATION 72, 90, 110 B BACKGROUND 72 BLACK LEVEL 70 BLACK LEVEL (COMPONENT OUT) 70 C COLD RESET 95 CONTROL FOR HDMI 71 Control for HDMI 79 Control Menu Display 118 CUSTOM 68, 95 D D. A. C. MODE 49...) 69 Progressive format 46, 111 Q Quick Setup 44 R Rear panel 115 Region Code 8 Remote 12 Repeat Play 59 RESET 73, 96 Resume Play 57 RF CHANGE 87 S S-AIR 111 S-AIR SETUP 72 S-AIR STBY 85 SCREEN SAVER 72... DISTANCE 73, 74 LEVEL 74 SUBTITLE 54, 69 Super Audio CD 55, 111 SYSTEM MENU 41, 48, 49, 54, 77, 85, 87, 92, 93 SYSTEM SETUP 72 T TEST TONE 74 TIME 61 TRACK SELECTION 72 TV TYPE 69 ...


