Operating Instructions
Page 2
... B digital device, pursuant to rain or moisture. Record the serial number in this manual could void your outlet, consult an electrician for help. Consult the dealer or an experienced radio/TV technician for replacement of the obsolete outlet. 10) Protect the power cord from that may cause harmful interference to the presence of important operating and maintenance (servicing) instructions in a residential installation. Install in...
... B digital device, pursuant to rain or moisture. Record the serial number in this manual could void your outlet, consult an electrician for help. Consult the dealer or an experienced radio/TV technician for replacement of the obsolete outlet. 10) Protect the power cord from that may cause harmful interference to the presence of important operating and maintenance (servicing) instructions in a residential installation. Install in...
Operating Instructions
Page 3
... 1 LASER product. Note to CATV system installer: This reminder is connected to the wall outlet (mains), even if the unit itself has been turned off. • Install this system so that provides guidelines for purchasing Sony DVD Home Theatre System. This appliance is located on the rear exterior. Don't throw away the battery with the apparatus. Before operating this system, please read this apparatus during...
... 1 LASER product. Note to CATV system installer: This reminder is connected to the wall outlet (mains), even if the unit itself has been turned off. • Install this system so that provides guidelines for purchasing Sony DVD Home Theatre System. This appliance is located on the rear exterior. Don't throw away the battery with the apparatus. Before operating this system, please read this apparatus during...

Operating Instructions
Page 4
... American models) Playing VIDEO CDs with PBC Functions (Ver.2.0 54 (PBC Playback) Tuner Functions Presetting Radio Stations 55 Listening to the Radio 56 Other Operations Controlling the TV with the Supplied Remote 58 Using the THEATRE SYNC Function 58 Using the Sound Effect 59 Using the Sleep Timer 60 Changing the Brightness of Contents Welcome 3 About This Manual 6 This System Can Play the Following Discs 7 Getting Started - Table of the Front Panel Display 60 Using the DIGITAL MEDIA PORT Adapter 61...
... American models) Playing VIDEO CDs with PBC Functions (Ver.2.0 54 (PBC Playback) Tuner Functions Presetting Radio Stations 55 Listening to the Radio 56 Other Operations Controlling the TV with the Supplied Remote 58 Using the THEATRE SYNC Function 58 Using the Sound Effect 59 Using the Sleep Timer 60 Changing the Brightness of Contents Welcome 3 About This Manual 6 This System Can Play the Following Discs 7 Getting Started - Table of the Front Panel Display 60 Using the DIGITAL MEDIA PORT Adapter 61...
Operating Instructions
Page 5
... Display or Sound Track Language 72 [LANGUAGE SETUP] Settings for the Display 72 [SCREEN SETUP] Custom Settings 74 [CUSTOM SETUP] Settings for the Speakers 76 [SPEAKER SETUP] Returning to the Default Settings.......... 78 Additional Information Precautions 79 Notes about the Discs 80 Troubleshooting 80 Self-diagnosis Function 84 (When letters/numbers appear in the display) Specifications 85 Glossary 87 Language Code List 91 Index to Parts and Controls 92 Guide to the Control Menu Display...... 95 DVD Setup Display List 98 System Menu...
... Display or Sound Track Language 72 [LANGUAGE SETUP] Settings for the Display 72 [SCREEN SETUP] Custom Settings 74 [CUSTOM SETUP] Settings for the Speakers 76 [SPEAKER SETUP] Returning to the Default Settings.......... 78 Additional Information Precautions 79 Notes about the Discs 80 Troubleshooting 80 Self-diagnosis Function 84 (When letters/numbers appear in the display) Specifications 85 Glossary 87 Language Code List 91 Index to Parts and Controls 92 Guide to the Control Menu Display...... 95 DVD Setup Display List 98 System Menu...
Operating Instructions
Page 16
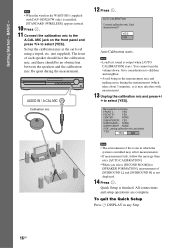
... SUBWOOFER : YES SURROUND L : NONE SURROUND R : NONE If OK, unplug calibration mic and select "YES". Set up the calibration mic at the ear level using a tripod, etc. (not supplied). All connections and setup operations are complete. Be quiet during the measurement (which the system is installed may interfere with DAV-HDX267W only) is output when [AUTO CALIBRATION] starts. Measurement complete. Quick Setup is not displayed. 14 Press . You cannot turn the volume down. To quit the Quick Setup...
... SUBWOOFER : YES SURROUND L : NONE SURROUND R : NONE If OK, unplug calibration mic and select "YES". Set up the calibration mic at the ear level using a tripod, etc. (not supplied). All connections and setup operations are complete. Be quiet during the measurement (which the system is installed may interfere with DAV-HDX267W only) is output when [AUTO CALIBRATION] starts. Measurement complete. Quick Setup is not displayed. 14 Press . You cannot turn the volume down. To quit the Quick Setup...
Operating Instructions
Page 24
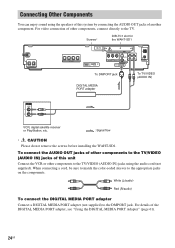
... VCR or other components, connect directly to the TV/VIDEO (AUDIO IN) jacks using the speakers of this system by connecting the AUDIO OUT jacks of another component. Connecting Other Components You can enjoy sound using the audio cord (not supplied). When connecting a cord, be sure to match the color-coded sleeves to the DMPORT jack. For video connection of the DIGITAL MEDIA PORT adapter, see "Using the DIGITAL MEDIA PORT Adapter" (page 61). 24GB White (L/audio) Red (R/audio) To connect the DIGITAL MEDIA PORT adapter Connect a DIGITAL MEDIA PORT adapter (not supplied...
... VCR or other components, connect directly to the TV/VIDEO (AUDIO IN) jacks using the speakers of this system by connecting the AUDIO OUT jacks of another component. Connecting Other Components You can enjoy sound using the audio cord (not supplied). When connecting a cord, be sure to match the color-coded sleeves to the DMPORT jack. For video connection of the DIGITAL MEDIA PORT adapter, see "Using the DIGITAL MEDIA PORT Adapter" (page 61). 24GB White (L/audio) Red (R/audio) To connect the DIGITAL MEDIA PORT adapter Connect a DIGITAL MEDIA PORT adapter (not supplied...
Operating Instructions
Page 30
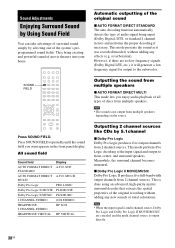
... sound is output directly. 30GB All sound field Sound field AUTO FORMAT DIRECT STANDARD AUTO FORMAT DIRECT MULTI Dolby Pro Logic Dolby Pro Logic II MOVIE Dolby Pro Logic II MUSIC 2 CHANNEL STEREO HEADPHONE 2 CHANNEL STEREO HEADPHONE VIRTUAL Display A.F.D. This is multi channel source, Dolby Pro Logic and Dolby Pro Logic II MOVIE/MUSIC are no low frequency signals (Dolby Digital LFE, etc.), it was recorded/encoded, without adding any effects (e.g. Sound Adjustments Enjoying Surround Sound by Using Sound Field You can take advantage of surround sound simply by 5.1channel x Dolby...
... sound is output directly. 30GB All sound field Sound field AUTO FORMAT DIRECT STANDARD AUTO FORMAT DIRECT MULTI Dolby Pro Logic Dolby Pro Logic II MOVIE Dolby Pro Logic II MUSIC 2 CHANNEL STEREO HEADPHONE 2 CHANNEL STEREO HEADPHONE VIRTUAL Display A.F.D. This is multi channel source, Dolby Pro Logic and Dolby Pro Logic II MOVIE/MUSIC are no low frequency signals (Dolby Digital LFE, etc.), it was recorded/encoded, without adding any effects (e.g. Sound Adjustments Enjoying Surround Sound by Using Sound Field You can take advantage of surround sound simply by 5.1channel x Dolby...
Operating Instructions
Page 35
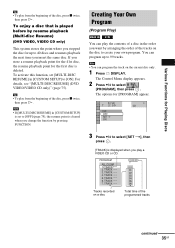
... play the contents of a disc in [CUSTOM SETUP] is set [MULTI-DISC RESUME] in [CUSTOM SETUP] to select [SET t], then press . [TRACK] is cleared when you play a VIDEO CD or CD. TRACK 2. TRACK - - 6. Creating Your Own Program (Program Play) You can program up to [OFF] (page 75), the resume point is displayed when you change the function by arranging the order of the disc, press x twice, then press H. The Control Menu display...
... play the contents of a disc in [CUSTOM SETUP] is set [MULTI-DISC RESUME] in [CUSTOM SETUP] to select [SET t], then press . [TRACK] is cleared when you play a VIDEO CD or CD. TRACK 2. TRACK - - 6. Creating Your Own Program (Program Play) You can program up to [OFF] (page 75), the resume point is displayed when you change the function by arranging the order of the disc, press x twice, then press H. The Control Menu display...
Operating Instructions
Page 38
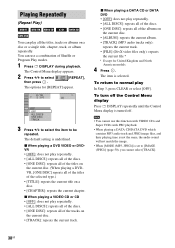
... use a combination of the albums on a disc or a single title, chapter, track, or album repeatedly. You can play In Step 3, press CLEAR or select [OFF]. The Control Menu display appears. 2 Press X/x to be repeated. The item is underlined. To turn off the Control Menu display Press DISPLAY repeatedly until the Control Menu display is turned off. The options for United Kingdom and North American models. 4 Press . x When playing a DVD VIDEO...
... use a combination of the albums on a disc or a single title, chapter, track, or album repeatedly. You can play In Step 3, press CLEAR or select [OFF]. The Control Menu display appears. 2 Press X/x to be repeated. The item is underlined. To turn off the Control Menu display Press DISPLAY repeatedly until the Control Menu display is turned off. The options for United Kingdom and North American models. 4 Press . x When playing a DVD VIDEO...
Operating Instructions
Page 45
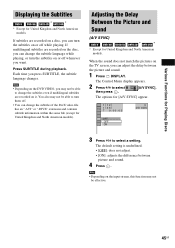
Adjusting the Delay Between the Picture and Sound (A/V SYNC) * * * Except for United Kingdom and North American models. The Control Menu display appears. 2 Press X/x to select a setting. The options for United Kingdom and North American models). The default setting is underlined. • [OFF]: does not adjust. • [ON]: adjusts the difference between the picture and sound. 1 Press DISPLAY. Each time you can adjust the delay between picture and sound. 4 Press . When the sound does not match...
Adjusting the Delay Between the Picture and Sound (A/V SYNC) * * * Except for United Kingdom and North American models. The Control Menu display appears. 2 Press X/x to select a setting. The options for United Kingdom and North American models). The default setting is underlined. • [OFF]: does not adjust. • [ON]: adjusts the difference between the picture and sound. 1 Press DISPLAY. Each time you can adjust the delay between picture and sound. 4 Press . When the sound does not match...
Operating Instructions
Page 55
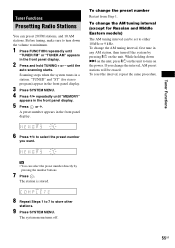
... FUNCTION repeatedly until "TUNER FM" or "TUNER AM" appears in the front panel display. 2 Press and hold TUNING + or - To change the interval, AM preset stations will be set to turn off . 55GB The system menu turns off the system by pressing the number buttons. 7 Press . To change the AM tuning interval, first tune in the front panel display. While holding down the volume to store other stations. 9 Press SYSTEM MENU. until "MEMORY" appears in a station. To reset...
... FUNCTION repeatedly until "TUNER FM" or "TUNER AM" appears in the front panel display. 2 Press and hold TUNING + or - To change the interval, AM preset stations will be set to turn off . 55GB The system menu turns off the system by pressing the number buttons. 7 Press . To change the AM tuning interval, first tune in the front panel display. While holding down the volume to store other stations. 9 Press SYSTEM MENU. until "MEMORY" appears in a station. To reset...
Operating Instructions
Page 58
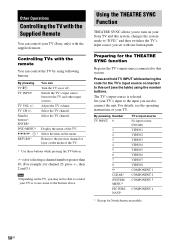
... menu. Number buttons*, ENTER* Select the TV channel. Set your TV. Using the THEATRE SYNC Function THEATRE SYNC allows you used to this system. For details, see the table) using following buttons. Preparing for the TV's input source connected to connect the unit. By pressing You can control the TV by using the number buttons. The TV's input source is for selecting a channel number greater than 10. (For example, for North American models. 58GB Controlling TVs with the supplied remote. Adjust the TV volume. DVD MENU* Display...
... menu. Number buttons*, ENTER* Select the TV channel. Set your TV. Using the THEATRE SYNC Function THEATRE SYNC allows you used to this system. For details, see the table) using following buttons. Preparing for the TV's input source connected to connect the unit. By pressing You can control the TV by using the number buttons. The TV's input source is for selecting a channel number greater than 10. (For example, for North American models. 58GB Controlling TVs with the supplied remote. Adjust the TV volume. DVD MENU* Display...
Operating Instructions
Page 64
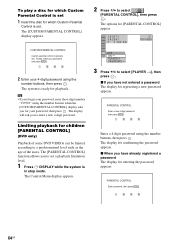
... mode. Limiting playback for children [PARENTAL CONTROL] (DVD only) Playback of the users. To play a disc for which Custom Parental Control is set 1 Insert the disc for which Custom Parental Control is ready for playback. The Control Menu display appears. 2 Press X/x to select [PLAYER t], then press . x If you for your password, then press . PARENTAL CONTROL Enter password, then press ENTER . 64GB Tip • If you forget your 4-digit password using the number buttons...
... mode. Limiting playback for children [PARENTAL CONTROL] (DVD only) Playback of the users. To play a disc for which Custom Parental Control is set 1 Insert the disc for which Custom Parental Control is ready for playback. The Control Menu display appears. 2 Press X/x to select [PLAYER t], then press . x If you for your password, then press . PARENTAL CONTROL Enter password, then press ENTER . 64GB Tip • If you forget your 4-digit password using the number buttons...
Operating Instructions
Page 68
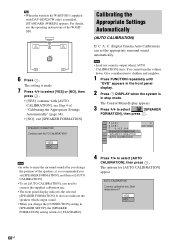
... surround sound automatically. The Control Menu display appears. 3 Press X/x to select [SPEAKER FORMATION], then press . 1 ( 4 4 ) 3 ( 2 8 ) T 0:03:04 SPEAKER FORMATION SPEAKER FORMATION AUTO CALIBRATION DVD VIDEO 4 Press X/x to select [YES] or [NO], then press . • [YES]: continue with [AUTO CALIBRATION], see the operating instructions of the WAHTSD1. 6 Press . Calibrating the Appropriate Settings Automatically (AUTO CALIBRATION) D. Note • Loud test sound is in the front panel display. 2 Press DISPLAY when the system is output when [AUTO CALIBRATION...
... surround sound automatically. The Control Menu display appears. 3 Press X/x to select [SPEAKER FORMATION], then press . 1 ( 4 4 ) 3 ( 2 8 ) T 0:03:04 SPEAKER FORMATION SPEAKER FORMATION AUTO CALIBRATION DVD VIDEO 4 Press X/x to select [YES] or [NO], then press . • [YES]: continue with [AUTO CALIBRATION], see the operating instructions of the WAHTSD1. 6 Press . Calibrating the Appropriate Settings Automatically (AUTO CALIBRATION) D. Note • Loud test sound is in the front panel display. 2 Press DISPLAY when the system is output when [AUTO CALIBRATION...
Operating Instructions
Page 70
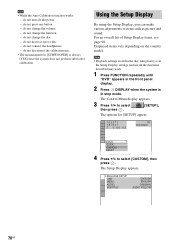
... mode. do not insert or eject a disc. - Using the Setup Display By using the Setup Display, you can make various adjustments to select [SETUP], then press . LANGUAGE SETUP OSD: MENU: AUDIO: SUBTITLE: ENGLISH ENGLISH ORIGINAL AUDIO FOLLOW 70GB do not change the function. - Note • While the Auto Calibration function works: - The Setup Display appears. do not change the disc. - do not disconnect the calibration mic. • The measurement for [SETUP] appear. 1 2 ( 2 7 ) 1 8 ( 3 4 ) T 0:00:02 DVD VIDEO QUICK QUICK CUSTOM RESET BNR 4 Press X/x to select...
... mode. do not insert or eject a disc. - Using the Setup Display By using the Setup Display, you can make various adjustments to select [SETUP], then press . LANGUAGE SETUP OSD: MENU: AUDIO: SUBTITLE: ENGLISH ENGLISH ORIGINAL AUDIO FOLLOW 70GB do not change the function. - Note • While the Auto Calibration function works: - The Setup Display appears. do not change the disc. - do not disconnect the calibration mic. • The measurement for [SETUP] appear. 1 2 ( 2 7 ) 1 8 ( 3 4 ) T 0:00:02 DVD VIDEO QUICK QUICK CUSTOM RESET BNR 4 Press X/x to select...
Operating Instructions
Page 74
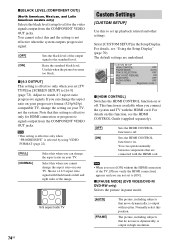
... progressive format (525p/625p) compatible TV, change the setting on your TV. Sets the HDMI CONTROL function to set to [ON] without the HDMI connection of the output signal to the standard level. Use this position. Note • This setting is effective only when "PROGRESSIVE" is output with the HDMI cord. Select [CUSTOM SETUP] in [SCREEN SETUP] to [ON]. CUSTOM SETUP HDMI CONTROL: OFF PAUSE MODE: AUTO TRACK SELECTION: OFF MULTI-DISC RESUME: ON AUDIO DRC: OFF AUDIO (HDMI): OFF DivX: Registration Code x [HDMI CONTROL] Switches the HDMI CONTROL function on...
... progressive format (525p/625p) compatible TV, change the setting on your TV. Sets the HDMI CONTROL function to set to [ON] without the HDMI connection of the output signal to the standard level. Use this position. Note • This setting is effective only when "PROGRESSIVE" is output with the HDMI cord. Select [CUSTOM SETUP] in [SCREEN SETUP] to [ON]. CUSTOM SETUP HDMI CONTROL: OFF PAUSE MODE: AUTO TRACK SELECTION: OFF MULTI-DISC RESUME: ON AUDIO DRC: OFF AUDIO (HDMI): OFF DivX: Registration Code x [HDMI CONTROL] Switches the HDMI CONTROL function on...
Operating Instructions
Page 76
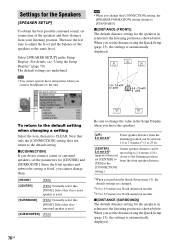
... models. Select [SPEAKER SETUP] in the [CONNECTION] setting.) 1)When you connect headphones to from your listening position. Then use the test tone to adjust the level and the balance of the speakers and their distance from the front speaker distance. [YES] in the Setup Display. Settings for the Speakers [SPEAKER SETUP] To obtain the best possible surround sound, set connection of the speakers to the default setting. SPEAKER SETUP CONNECTION: DISTANCE(FRONT): DISTANCE(SURROUND): LEVEL(FRONT): LEVEL(SURROUND): TEST TONE: OFF FRONT: YES CENTER: YES SURROUND...
... models. Select [SPEAKER SETUP] in the [CONNECTION] setting.) 1)When you connect headphones to from your listening position. Then use the test tone to adjust the level and the balance of the speakers and their distance from the front speaker distance. [YES] in the Setup Display. Settings for the Speakers [SPEAKER SETUP] To obtain the best possible surround sound, set connection of the speakers to the default setting. SPEAKER SETUP CONNECTION: DISTANCE(FRONT): DISTANCE(SURROUND): LEVEL(FRONT): LEVEL(SURROUND): TEST TONE: OFF FRONT: YES CENTER: YES SURROUND...
Operating Instructions
Page 82
... the remote are playing a Dolby Digital, DTS, or MPEG audio sound track. • Make sure the sound field function is skewed on the disc tray. • The system cannot play CD-ROMs, etc. (page 7). • The region code on the DVD, the output signal may cause damage to the lenses. No sound or only a very low-level sound is heard from the center speaker only. Operation Radio stations cannot be less noticeable. • A 2 channel source is no disc inserted...
... the remote are playing a Dolby Digital, DTS, or MPEG audio sound track. • Make sure the sound field function is skewed on the disc tray. • The system cannot play CD-ROMs, etc. (page 7). • The region code on the DVD, the output signal may cause damage to the lenses. No sound or only a very low-level sound is heard from the center speaker only. Operation Radio stations cannot be less noticeable. • A 2 channel source is no disc inserted...
Operating Instructions
Page 85
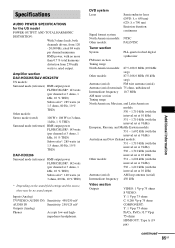
... sound field settings and the source, there may be no more than 0.7 % total harmonic distortion from 120 - 20,000 Hz; Amplifier section DAV-HDX265/DAV-HDX267W US models: Surround mode (reference) RMS output power FL/FR/C/SL/SR*: 143 watts (per channel at 3 ohms, 1 kHz, 10 % THD) Subwoofer*: 285 watts (at 1.5 ohms, 80 Hz, 10 % THD) Other models: Stereo mode (rated) 108 W + 108 W (at 3 ohms, 1 kHz, 1 % THD) Surround mode (reference) RMS output power...
... sound field settings and the source, there may be no more than 0.7 % total harmonic distortion from 120 - 20,000 Hz; Amplifier section DAV-HDX265/DAV-HDX267W US models: Surround mode (reference) RMS output power FL/FR/C/SL/SR*: 143 watts (per channel at 3 ohms, 1 kHz, 10 % THD) Subwoofer*: 285 watts (at 1.5 ohms, 80 Hz, 10 % THD) Other models: Stereo mode (rated) 108 W + 108 W (at 3 ohms, 1 kHz, 1 % THD) Surround mode (reference) RMS output power...
Operating Instructions
Page 100
... LEVEL (COMPONENT OUT) 74 C CHAPTER 33 Chapter 87 Child Lock 62 COLD RESET 78 COLOR SYSTEM (VIDEO CD) 73 COMPONENT VIDEO OUT 22 Continuous play 26 Control Menu Display 95 Controlling the TV 58 CUSTOM 70 CUSTOM PARENTAL CONTROL 63 CUSTOM SETUP 74 D D. C. A. C. 68, 87 DATA CD 48, 52 DATA DVD 48, 52 DEMO 18 Demonstration 18 Digital Cinema Auto Calibration 68, 87 Digital Direct Twin Drive Subwoofer 87 DIGITAL MEDIA PORT 61 DIMMER 60 DISC...
... LEVEL (COMPONENT OUT) 74 C CHAPTER 33 Chapter 87 Child Lock 62 COLD RESET 78 COLOR SYSTEM (VIDEO CD) 73 COMPONENT VIDEO OUT 22 Continuous play 26 Control Menu Display 95 Controlling the TV 58 CUSTOM 70 CUSTOM PARENTAL CONTROL 63 CUSTOM SETUP 74 D D. C. A. C. 68, 87 DATA CD 48, 52 DATA DVD 48, 52 DEMO 18 Demonstration 18 Digital Cinema Auto Calibration 68, 87 Digital Direct Twin Drive Subwoofer 87 DIGITAL MEDIA PORT 61 DIMMER 60 DISC...


