
Child Safety: It Makes A Difference Where Your TV Stands
Page 1
... children to climb on the proper TV stands. The home theater entertainment experience is a growing trend, and larger televisions are popular purchases and are improperly secured or inappropriately situated on top of TVs such as VCRs and remotes that may pique the children's curiosity. 6 Remember that... carts. Use the appropriate furniture that is committed to advocate children's safety and educate customers and their families about television safety. Many homes, in fact, have a television in your family and friends. Thank you have more than one television. Child Safety: It Makes ...
... children to climb on the proper TV stands. The home theater entertainment experience is a growing trend, and larger televisions are popular purchases and are improperly secured or inappropriately situated on top of TVs such as VCRs and remotes that may pique the children's curiosity. 6 Remember that... carts. Use the appropriate furniture that is committed to advocate children's safety and educate customers and their families about television safety. Many homes, in fact, have a television in your family and friends. Thank you have more than one television. Child Safety: It Makes ...
Operating Instructions (Main Stereo System)
Page 4
... Play the Following Discs 6 Guide to the Control Menu Display........ 9 Getting Started Unpacking 12 Inserting Batteries into the Remote....... 12 Hookup Overview 13 Step 1: Speaker System Hookup........... 14 Step 2: Antenna (Aerial) Hookup ......... 20 Step 3: TV Hookup 21 Step 4: Other Component Hookup........ 25 Step 5: ... 27 Step 7: Performing the Quick Setup ..... 28 Speaker Setup 30 Playing Discs Playing Discs 31 Using the DVD's Menu 36 Selecting [ORIGINAL] or [PLAY LIST] on a DVD-RW 37 Playing VIDEO CDs with PBC Functions (Ver.2.0 37 (PBC Playback) About MP3 Audio Tracks and ...
... Play the Following Discs 6 Guide to the Control Menu Display........ 9 Getting Started Unpacking 12 Inserting Batteries into the Remote....... 12 Hookup Overview 13 Step 1: Speaker System Hookup........... 14 Step 2: Antenna (Aerial) Hookup ......... 20 Step 3: TV Hookup 21 Step 4: Other Component Hookup........ 25 Step 5: ... 27 Step 7: Performing the Quick Setup ..... 28 Speaker Setup 30 Playing Discs Playing Discs 31 Using the DVD's Menu 36 Selecting [ORIGINAL] or [PLAY LIST] on a DVD-RW 37 Playing VIDEO CDs with PBC Functions (Ver.2.0 37 (PBC Playback) About MP3 Audio Tracks and ...
Operating Instructions (Main Stereo System)
Page 6
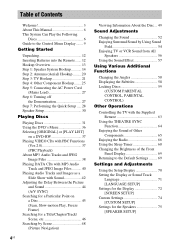
...-R/CD-RW (audio data) (MP3 files) (JPEG files) The "DVD VIDEO" logo and "DVD-RW" logo are for illustration purposes only. audio CD format - DAV-DX170 is a standard format defined by ISO/MPEG which compresses audio data. 6US This System Can Play the Following Discs Format of discs that the... used as those recorded in the formats listed on the remote. Any difference in operation is clearly indicated in the text, for example, "DAV-DX170 only." • The Control Menu items may be different depending on the area. • "DVD" may be used in this manual describe the controls on...
...-R/CD-RW (audio data) (MP3 files) (JPEG files) The "DVD VIDEO" logo and "DVD-RW" logo are for illustration purposes only. audio CD format - DAV-DX170 is a standard format defined by ISO/MPEG which compresses audio data. 6US This System Can Play the Following Discs Format of discs that the... used as those recorded in the formats listed on the remote. Any difference in operation is clearly indicated in the text, for example, "DAV-DX170 only." • The Control Menu items may be different depending on the area. • "DVD" may be used in this manual describe the controls on...
Operating Instructions (Main Stereo System)
Page 12
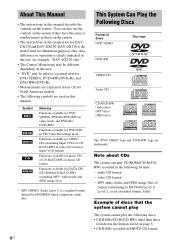
...) batteries by matching the 3 and # ends on the system. Note • Do not leave the remote in an extremely hot or humid place. • Do not use the remote for an extended period of the speakers. Inserting Batteries into the remote casing, particularly when replacing the batteries. • Do not.... When using the supplied remote. Getting Started Unpacking Check that you do not intend to use a new battery with an old one. • Do not drop any foreign object into the Remote You can control the system using the remote, point it at the remote sensor on the batteries to...
...) batteries by matching the 3 and # ends on the system. Note • Do not leave the remote in an extremely hot or humid place. • Do not use the remote for an extended period of the speakers. Inserting Batteries into the remote casing, particularly when replacing the batteries. • Do not.... When using the supplied remote. Getting Started Unpacking Check that you do not intend to use a new battery with an old one. • Do not drop any foreign object into the Remote You can control the system using the remote, point it at the remote sensor on the batteries to...

Operating Instructions (Main Stereo System)
Page 27
...in the AMP menu to on, the demonstration does not turn off even though you press "/1 on the remote, the demonstration turns off the system Press "/1. When you press "/1 on the system Press "/1. Getting Started Step 5: Connecting the AC Power Cord (Mains Lead) Before connecting the AC power ...cord (mains lead) of this system to a wall outlet (mains), connect the speakers to stop playback and then press "/1. To turn on the remote. The system enters standby mode. After connecting the AC power cord (mains lead), the demonstration appears...
...in the AMP menu to on, the demonstration does not turn off even though you press "/1 on the remote, the demonstration turns off the system Press "/1. When you press "/1 on the system Press "/1. Getting Started Step 5: Connecting the AC Power Cord (Mains Lead) Before connecting the AC power ...cord (mains lead) of this system to a wall outlet (mains), connect the speakers to stop playback and then press "/1. To turn on the remote. The system enters standby mode. After connecting the AC power cord (mains lead), the demonstration appears...
Operating Instructions (Main Stereo System)
Page 31
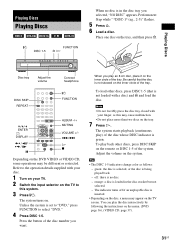
...operation details supplied with a disc) and A and load the disc. orange: a disc is inserted. • Depending on the disc, a menu may appear on the remote or DISC 1-5 of the disc whose DISC indicator is not loaded with your disc. 1 Turn on the tray. 7 Press H. You can play ) of the... . Adjust the volume on the tray, and then press A. Perform next Step while "*DISC-1* (eg., 2-5)" flashes. 5 Press A. 6 Load a disc. Place one disc on the system. The system turns on the menu. (DVD: page 36), (VIDEO CD: page 37). 31US Tip • The DISC 1-5 indicators change color as this...
...operation details supplied with a disc) and A and load the disc. orange: a disc is inserted. • Depending on the disc, a menu may appear on the remote or DISC 1-5 of the disc whose DISC indicator is not loaded with your disc. 1 Turn on the tray. 7 Press H. You can play ) of the... . Adjust the volume on the tray, and then press A. Perform next Step while "*DISC-1* (eg., 2-5)" flashes. 5 Press A. 6 Load a disc. Place one disc on the system. The system turns on the menu. (DVD: page 36), (VIDEO CD: page 37). 31US Tip • The DISC 1-5 indicators change color as this...

Operating Instructions (Main Stereo System)
Page 63
... above. while Select the TV channel. TV CH +/- To select the TV channels, press the number buttons, then ENTER. TV CH -/+ Controlling TVs with the remote To control the TV You can control the TV by using following buttons. Other Operations Other Operations Controlling the TV with the Supplied...
... above. while Select the TV channel. TV CH +/- To select the TV channels, press the number buttons, then ENTER. TV CH -/+ Controlling TVs with the remote To control the TV You can control the TV by using following buttons. Other Operations Other Operations Controlling the TV with the Supplied...

Operating Instructions (Main Stereo System)
Page 64
... the direction of your TV's input to the input you used to connect the system. Set your TV. The transmit time varies depending on your SONY TV and this system. The transmit time from the remote is selected. Press and hold TV CH + while entering the code for transmit time (see the table... time Press and hold TV/VIDEO while entering the code for the THEATRE SYNC function Register the TV's input source connected to this system, changes the system mode to "DVD," and then switches the TV's input source you set with one button push. For details, see the table) using the number ...
... the direction of your TV's input to the input you used to connect the system. Set your TV. The transmit time varies depending on your SONY TV and this system. The transmit time from the remote is selected. Press and hold TV CH + while entering the code for transmit time (see the table... time Press and hold TV/VIDEO while entering the code for the THEATRE SYNC function Register the TV's input source connected to this system, changes the system mode to "DVD," and then switches the TV's input source you set with one button push. For details, see the table) using the number ...

Operating Instructions (Main Stereo System)
Page 65
... "ATTENUATE" is set to the operation manual supplied with the components for SONY TVs. (This function may not work on some SONY TVs.) • If distance between TV and this system is too far, this system while entering the code. For details on "ATTENUATE," see page 66. 65US...SAT" appears in the following sequence. Other Operations Note • This function is only for further information on the operation. DVD t TUNER FM t TUNER AM t VIDEO t DVD t ... Install the system near the TV. • Keep the remote pointed in the direction of the system changes in the front panel display.
... "ATTENUATE" is set to the operation manual supplied with the components for SONY TVs. (This function may not work on some SONY TVs.) • If distance between TV and this system is too far, this system while entering the code. For details on "ATTENUATE," see page 66. 65US...SAT" appears in the following sequence. Other Operations Note • This function is only for further information on the operation. DVD t TUNER FM t TUNER AM t VIDEO t DVD t ... Install the system near the TV. • Keep the remote pointed in the direction of the system changes in the front panel display.
Operating Instructions (Main Stereo System)
Page 76
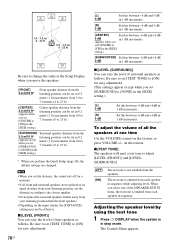
... be set in 0.2 meter (1 ft) increments from 0.0 to 7.0 meters (0 to 23 ft). Adjusting the speaker level by using the test tone 1 Press DISPLAY when the system is emitted from the speakers. 1.0 - 7.0 m/ 4 - 23 ft 0.0 - 7.0 m/ 0 - 23 ft Be sure to change the value in the Setup Display when you ...for a moment. • If all the speakers at an equal distance from your listening position than the front speakers. • Depending on the remote. The Control Menu appears. Be sure to set [CENTER] to [ON] for easy adjustment. (This settings appear except when you select one time...
... be set in 0.2 meter (1 ft) increments from 0.0 to 7.0 meters (0 to 23 ft). Adjusting the speaker level by using the test tone 1 Press DISPLAY when the system is emitted from the speakers. 1.0 - 7.0 m/ 4 - 23 ft 0.0 - 7.0 m/ 0 - 23 ft Be sure to change the value in the Setup Display when you ...for a moment. • If all the speakers at an equal distance from your listening position than the front speakers. • Depending on the remote. The Control Menu appears. Be sure to set [CENTER] to [ON] for easy adjustment. (This settings appear except when you select one time...

Operating Instructions (Main Stereo System)
Page 80
... connected securely. Operation Radio stations cannot be less noticeable. The remote does not function. • There are obstacles between the remote and the system. • The distance between the remote and the system is too far. • The remote is no sound from the audio components. • The plugs...No sound or only a very low-level sound is heard from a transformer or motor, and at the remote sensor on the DVD does not match the system. • Moisture has condensed inside the system and may be tuned in with alcohol. • Clean the disc. Preset the stations (page 66). ...
... connected securely. Operation Radio stations cannot be less noticeable. The remote does not function. • There are obstacles between the remote and the system. • The distance between the remote and the system is too far. • The remote is no sound from the audio components. • The plugs...No sound or only a very low-level sound is heard from a transformer or motor, and at the remote sensor on the DVD does not match the system. • Moisture has condensed inside the system and may be tuned in with alcohol. • Clean the disc. Preset the stations (page 66). ...

Operating Instructions (Main Stereo System)
Page 81
... or local authorized Sony service facility. [Data error] appears on -screen display in JPEG format. and leave the system turned on the disc, you may contain an auto pause signal. You cannot perform some of the alphabets. continued 81US Additional Information The system starts playing the disc automatically. • The DVD features an auto...
... or local authorized Sony service facility. [Data error] appears on -screen display in JPEG format. and leave the system turned on the disc, you may contain an auto pause signal. You cannot perform some of the alphabets. continued 81US Additional Information The system starts playing the disc automatically. • The DVD features an auto...
Operating Instructions (Main Stereo System)
Page 89
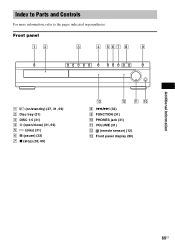
Index to Parts and Controls For more information, refer to the pages indicated in parentheses. Front panel A "/1 (on/standby) (27, 31, 69) B Disc tray (31) C DISC 1-5 (31) D A (open/close) (31, 69) E H (play) (31) F X (pause) (32) G x (stop) (32, 69) H ./> (32) I FUNCTION (31) J PHONES jack (31) K VOLUME (31) L (remote sensor) (12) M Front panel display (90) Additional Information 89US
Index to Parts and Controls For more information, refer to the pages indicated in parentheses. Front panel A "/1 (on/standby) (27, 31, 69) B Disc tray (31) C DISC 1-5 (31) D A (open/close) (31, 69) E H (play) (31) F X (pause) (32) G x (stop) (32, 69) H ./> (32) I FUNCTION (31) J PHONES jack (31) K VOLUME (31) L (remote sensor) (12) M Front panel display (90) Additional Information 89US
Operating Instructions (Main Stereo System)
Page 92
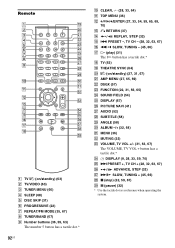
... ADVANCE, STEP (32) ej M/ SLOW, TUNING + (45, 66) ek x (stop) (32, 59, 67) el X (pause) (32) * Use the tactile dot as a reference when operating the system. PRESET -, TV CH - (28, 32, 63, 67) P m/ SLOW, TUNING - (45, 66) Q H (play) (31) The H button has a tactile dot.* R TV (63) S THEATRE SYNC ... dot.* 92US J CLEAR, - (28, 33, 64) K TOP MENU (36) L C/X/x/c/ENTER (27, 33, 54, 59, 65, 69, 70) M O RETURN (37) N REPLAY, STEP (32) O . Remote A TV [/1 (on /standby) (27, 31, 67) U AMP MENU (27, 65, 69) V DSGX (57) W FUNCTION (22, 31, 56, 65) X SOUND FIELD (54) Y DISPLAY (67) Z ...
... ADVANCE, STEP (32) ej M/ SLOW, TUNING + (45, 66) ek x (stop) (32, 59, 67) el X (pause) (32) * Use the tactile dot as a reference when operating the system. PRESET -, TV CH - (28, 32, 63, 67) P m/ SLOW, TUNING - (45, 66) Q H (play) (31) The H button has a tactile dot.* R TV (63) S THEATRE SYNC ... dot.* 92US J CLEAR, - (28, 33, 64) K TOP MENU (36) L C/X/x/c/ENTER (27, 33, 54, 59, 65, 69, 70) M O RETURN (37) N REPLAY, STEP (32) O . Remote A TV [/1 (on /standby) (27, 31, 67) U AMP MENU (27, 65, 69) V DSGX (57) W FUNCTION (22, 31, 56, 65) X SOUND FIELD (54) Y DISPLAY (67) Z ...
Operating Instructions (Main Stereo System)
Page 94
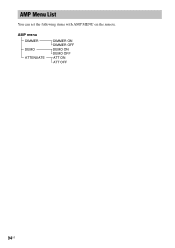
AMP menu DIMMER DEMO ATTENUATE DIMMER ON DIMMER OFF DEMO ON DEMO OFF ATT ON ATT OFF 94US AMP Menu List You can set the following items with AMP MENU on the remote.
AMP menu DIMMER DEMO ATTENUATE DIMMER ON DIMMER OFF DEMO ON DEMO OFF ATT ON ATT OFF 94US AMP Menu List You can set the following items with AMP MENU on the remote.

Operating Instructions (Main Stereo System)
Page 95
... DISTANCE 75 DOLBY DIGITAL 52 Dolby Digital 85 Dolby Pro Logic II 85 Dolby Surround Pro Logic 85 DSGX 57 DTS 52, 85 DVD 85 DVD+RW 86 DVD's menu 36 DVD-RW 37, 85 E EFFECT 44 F Fast forward 45 Fast reverse 45 FILE 46 File 86 Film based software 86 Front Panel 89... 66 Program Play 33 PROGRESSIVE AUTO 22 Progressive format 22, 86 PROGRESSIVE VIDEO 23 Q Quick Setup 28 R Radio 67 Rear Panel 91 Region Code 7, 86 Remote 12, 63, 92 Repeat Play 35 RESET 71 Resume Play 32 S S VIDEO 21 Scan 45 SCENE 46 Scene 86 continued 95US
... DISTANCE 75 DOLBY DIGITAL 52 Dolby Digital 85 Dolby Pro Logic II 85 Dolby Surround Pro Logic 85 DSGX 57 DTS 52, 85 DVD 85 DVD+RW 86 DVD's menu 36 DVD-RW 37, 85 E EFFECT 44 F Fast forward 45 Fast reverse 45 FILE 46 File 86 Film based software 86 Front Panel 89... 66 Program Play 33 PROGRESSIVE AUTO 22 Progressive format 22, 86 PROGRESSIVE VIDEO 23 Q Quick Setup 28 R Radio 67 Rear Panel 91 Region Code 7, 86 Remote 12, 63, 92 Repeat Play 35 RESET 71 Resume Play 32 S S VIDEO 21 Scan 45 SCENE 46 Scene 86 continued 95US


