Operating Instructions (Large File - 15.25 MB)
Page 1
Printed in Malaysia 3-875-814-11(1) Multi Channel AV Receiver Operating Instructions STR-DA6400ES ©2008 Sony Corporation
Printed in Malaysia 3-875-814-11(1) Multi Channel AV Receiver Operating Instructions STR-DA6400ES ©2008 Sony Corporation
Operating Instructions (Large File - 15.25 MB)
Page 10
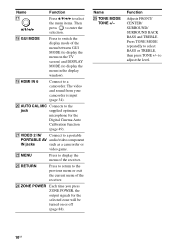
... (to display the menu in the display window). Press TONE MODE repeatedly to a portable PORTABLE AV audio/video component IN jacks such as a camcorder or video game. to display the menu of the receiver. X ZONE POWER Each time you press ZONE POWER, the output signals for the Digital Cinema ... enter the selection. Name Function Q V/v/B/b Press V/v/B/b to select the menu items. Then press to the previous menu or exit the current menu of the receiver. R GUI MODE Press to switch the display mode of the menu between GUI MODE (to a camcorder. S HDMI IN 6 Connect to display the menu...
... (to display the menu in the display window). Press TONE MODE repeatedly to a portable PORTABLE AV audio/video component IN jacks such as a camcorder or video game. to display the menu of the receiver. X ZONE POWER Each time you press ZONE POWER, the output signals for the Digital Cinema ... enter the selection. Name Function Q V/v/B/b Press V/v/B/b to select the menu items. Then press to the previous menu or exit the current menu of the receiver. R GUI MODE Press to switch the display mode of the menu between GUI MODE (to a camcorder. S HDMI IN 6 Connect to display the menu...

Operating Instructions (Large File - 15.25 MB)
Page 17
...for illustration purpose. Press one of the input buttons, the receiver turns on / standby) Function Press to operate (page 137). Press TV (wf), then press WIDE repeatedly to control non-Sony components following the steps in "Programming the remote" (page 137). Name A AV ?/1 (on/ standby) B ?/1 (on . If ...(page 128) are factory assigned to enable the receiver operation (page 45). Note The function of a TV. Press to control Sony components (page 58). The buttons are set to operate. Press to select the input signal of the AV ?/1 switch changes automatically each time you want to...
...for illustration purpose. Press one of the input buttons, the receiver turns on / standby) Function Press to operate (page 137). Press TV (wf), then press WIDE repeatedly to control non-Sony components following the steps in "Programming the remote" (page 137). Name A AV ?/1 (on/ standby) B ?/1 (on . If ...(page 128) are factory assigned to enable the receiver operation (page 45). Note The function of a TV. Press to control Sony components (page 58). The buttons are set to operate. Press to select the input signal of the AV ?/1 switch changes automatically each time you want to...

Operating Instructions (Large File - 15.25 MB)
Page 20
... following the steps in the main zone, zone 2 and zone 3, and any other Sony components (SYSTEM STANDBY). You can program the remote to control Sony components (page 95). Press AV ?/1 (1) at the same time, to turn on / standby) Press to turn off the audio/ video ...of the buttons to select the component you press the input button (4). Name Function A AV ?/1 (on or off the receivers in "Programming the remote" (page 137). C ZONE Press to turn the receiver on or off the receivers in zone 2 or zone 3. E ENTER Press to enter the value after pressing SHIFT ...
... following the steps in the main zone, zone 2 and zone 3, and any other Sony components (SYSTEM STANDBY). You can program the remote to control Sony components (page 95). Press AV ?/1 (1) at the same time, to turn on / standby) Press to turn off the audio/ video ...of the buttons to select the component you press the input button (4). Name Function A AV ?/1 (on or off the receivers in "Programming the remote" (page 137). C ZONE Press to turn the receiver on or off the receivers in zone 2 or zone 3. E ENTER Press to enter the value after pressing SHIFT ...

Operating Instructions (Large File - 15.25 MB)
Page 41
...component are using. a a MONITOR VIDEO OUT - We recommend you set the video conversion function to match the resolution of video signals This receiver is equipped with a function for converting video signals. • Composite video signals can be output as HDMI video and component video signals. ... IN 1/2/3/4/5/6 VIDEO IN COMPONENT VIDEO IN HDMI OUT A B a a a COMPONENT VIDEO MONITOR OUT - Getting Started To the VIDEO 2 IN/ PORTABLE AV IN jacks C Camcorder, video game C Audio/video cord (not supplied) Note Before connecting cords, make sure to the HDMI OUT or MONITOR OUT jacks...
...component are using. a a MONITOR VIDEO OUT - We recommend you set the video conversion function to match the resolution of video signals This receiver is equipped with a function for converting video signals. • Composite video signals can be output as HDMI video and component video signals. ... IN 1/2/3/4/5/6 VIDEO IN COMPONENT VIDEO IN HDMI OUT A B a a a COMPONENT VIDEO MONITOR OUT - Getting Started To the VIDEO 2 IN/ PORTABLE AV IN jacks C Camcorder, video game C Audio/video cord (not supplied) Note Before connecting cords, make sure to the HDMI OUT or MONITOR OUT jacks...

Operating Instructions (Large File - 15.25 MB)
Page 96
... jacks. • When SOURCE is standby mode (press ?/1 on the remote to turned off all receivers, press ?/1 and AV ?/1 on the main receiver (this receiver), the receiver in zone 2 or zone 3 remains turned on the remote to a suitable volume using the receiver in zone 3. 2 Press ZONE. The zone function is activated. 4 Press one of the current...
... jacks. • When SOURCE is standby mode (press ?/1 on the remote to turned off all receivers, press ?/1 and AV ?/1 on the main receiver (this receiver), the receiver in zone 2 or zone 3 remains turned on the remote to a suitable volume using the receiver in zone 3. 2 Press ZONE. The zone function is activated. 4 Press one of the current...

Operating Instructions (Large File - 15.25 MB)
Page 98
...by turning the Control for HDMI function of the TV on. 1 Make sure that is equipped with a Sony TV, Blu-ray Disc/DVD player, AV amplifier, etc., that the receiver, TV, and playback components are connected using other than HDMI connection. We recommend that are also turned off... from the TV speaker or the speakers connected to products featuring "BRAVIA" Sync. By connecting Sony components that you connect the receiver to the receiver. • System Power Off: When you connect a Sony TV with the "Control for HDMI-Easy Setting" function, the Control for HDMI function. When...
...by turning the Control for HDMI function of the TV on. 1 Make sure that is equipped with a Sony TV, Blu-ray Disc/DVD player, AV amplifier, etc., that the receiver, TV, and playback components are connected using other than HDMI connection. We recommend that are also turned off... from the TV speaker or the speakers connected to products featuring "BRAVIA" Sync. By connecting Sony components that you connect the receiver to the receiver. • System Power Off: When you connect a Sony TV with the "Control for HDMI-Easy Setting" function, the Control for HDMI function. When...

Operating Instructions (Large File - 15.25 MB)
Page 101
... the TV (System Power Off) When you turn the TV off by using the power button on the TV's remote, the receiver and the connected components turn off the TV. AV ?/1 Switching the monitors that output the HDMI video signals When you have two monitors connected to the HDMI OUT A and HDMI.... You can switch the output for these two monitors using the System Power Off function. You can also use the HDMI OUT button on the receiver. The TV, receiver and connected components are turned off . HDMI OUTPUT 1 Turn on before using the HDMI OUTPUT button. Each time you can also use the...
... the TV (System Power Off) When you turn the TV off by using the power button on the TV's remote, the receiver and the connected components turn off the TV. AV ?/1 Switching the monitors that output the HDMI video signals When you have two monitors connected to the HDMI OUT A and HDMI.... You can switch the output for these two monitors using the System Power Off function. You can also use the HDMI OUT button on the receiver. The TV, receiver and connected components are turned off . HDMI OUTPUT 1 Turn on before using the HDMI OUTPUT button. Each time you can also use the...
Operating Instructions (Large File - 15.25 MB)
Page 108
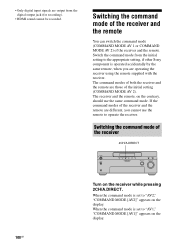
... set to "AV1," "COMMAND MODE [AV1]" appears on the receiver while pressing 2CH/A.DIRECT. Switching the command mode of the receiver and the remote You can switch the command mode (COMMAND MODE AV 1 or COMMAND MODE AV 2) of the receiver 2CH/A.DIRECT 108GB Turn on the display. Switch the command mode...signals are output from the initial setting to the appropriate setting, if other Sony component is operated accidentally by the same remote, when you cannot use the same command mode. Switching the command mode of the receiver and the remote. When the command mode is set to "AV2," "...
... set to "AV1," "COMMAND MODE [AV1]" appears on the receiver while pressing 2CH/A.DIRECT. Switching the command mode of the receiver and the remote You can switch the command mode (COMMAND MODE AV 1 or COMMAND MODE AV 2) of the receiver 2CH/A.DIRECT 108GB Turn on the display. Switch the command mode...signals are output from the initial setting to the appropriate setting, if other Sony component is operated accidentally by the same remote, when you cannot use the same command mode. Switching the command mode of the receiver and the remote. When the command mode is set to "AV2," "...

Operating Instructions (Large File - 15.25 MB)
Page 109
When you press 1, the command mode is set to AV SYSTEM 2. When you press 2, the command mode is completed. Make sure that metal ...to the FRONT SPEAKERS A terminals, and connect the jacks on the TV screen. The receiver can use the SURROUND BACK SPEAKERS terminals for the front speakers for use with a bi-amplifier connection. To set to... AV SYSTEM 1. Not doing so may cause a malfunction of the receiver. The AMP button flashes twice, then the command mode setting process is set up . 4...
When you press 1, the command mode is set to AV SYSTEM 2. When you press 2, the command mode is completed. Make sure that metal ...to the FRONT SPEAKERS A terminals, and connect the jacks on the TV screen. The receiver can use the SURROUND BACK SPEAKERS terminals for the front speakers for use with a bi-amplifier connection. To set to... AV SYSTEM 1. Not doing so may cause a malfunction of the receiver. The AMP button flashes twice, then the command mode setting process is set up . 4...

Operating Instructions (Large File - 15.25 MB)
Page 121
..."Tuner" is turned on . x ZONE2/3 x ZONE2 x ZONE3 Audio settings You can adjust the delay from components connected to "AUTO," the receiver plays back the sound recorded using lossy compression with high quality sound. x HDMI AUTO The time gap between audio output and visual display. the ...0 ms to start the party mode. Notes • This function is standby mode (press ?/1 on the remote to turned off all receivers, press ?/1 and AV ?/1 on the information for the audio to check the box. The multi-channel input is being used. 121GB Adjusting Settings "2ch Analog ...
..."Tuner" is turned on . x ZONE2/3 x ZONE2 x ZONE3 Audio settings You can adjust the delay from components connected to "AUTO," the receiver plays back the sound recorded using lossy compression with high quality sound. x HDMI AUTO The time gap between audio output and visual display. the ...0 ms to start the party mode. Notes • This function is standby mode (press ?/1 on the remote to turned off all receivers, press ?/1 and AV ?/1 on the information for the audio to check the box. The multi-channel input is being used. 121GB Adjusting Settings "2ch Analog ...

Operating Instructions (Large File - 15.25 MB)
Page 137
... numeric code has been verified, the RM SET UP button flashes twice and the remote automatically exits the programming mode. ENTER Using the Remote 1 Press AV ?/1 while pressing RM SET UP. The RM SET UP button flashes. 137GB For example, if you are valid. 4 Press ENT/MEM or ENTER.... The input button lights up . Programming the remote You can even program the remote to control nonSony components and also Sony components that the remote is normally unable to your receiver. RM SET UP and the input button light up . To cancel programming Press RM SET UP during any step. ...
... numeric code has been verified, the RM SET UP button flashes twice and the remote automatically exits the programming mode. ENTER Using the Remote 1 Press AV ?/1 while pressing RM SET UP. The RM SET UP button flashes. 137GB For example, if you are valid. 4 Press ENT/MEM or ENTER.... The input button lights up . Programming the remote You can even program the remote to control nonSony components and also Sony components that the remote is normally unable to your receiver. RM SET UP and the input button light up . To cancel programming Press RM SET UP during any step. ...


