Operating Instructions (Large File - 15.25 MB)
Page 4
... This manual explains the operations of the network function of STR-DA6400ES. This receiver incorporates Dolby* Digital and Pro Logic Surround and the DTS** Digital Surround System. 4GB * Manufactured under U.S. This product using the buttons and controls on your model number by looking at the lower right corner of the system itself. The font type (Shin Go R) installed in this manual) This manual explains the operations of the front panel. • The instructions...
... This manual explains the operations of the network function of STR-DA6400ES. This receiver incorporates Dolby* Digital and Pro Logic Surround and the DTS** Digital Surround System. 4GB * Manufactured under U.S. This product using the buttons and controls on your model number by looking at the lower right corner of the system itself. The font type (Shin Go R) installed in this manual) This manual explains the operations of the front panel. • The instructions...
Operating Instructions (Large File - 15.25 MB)
Page 6
... receiver and the remote ....44 7: Displaying the GUI menu on the TV screen 45 8: Setting the speakers 46 9: Calibrating the appropriate speaker settings automatically (Auto Calibration 48 Guide to on-screen display operation .........55 Playback Enjoying sound/images from the component connected to the receiver 58 Enjoying sound/images from the components connected to the DIGITAL MEDIA PORT 60 Operating the TDM-iP1/iP50 using the GUI menu of the receiver 62 Tuning Listening to FM/AM radio 65 Presetting FM/AM radio stations...
... receiver and the remote ....44 7: Displaying the GUI menu on the TV screen 45 8: Setting the speakers 46 9: Calibrating the appropriate speaker settings automatically (Auto Calibration 48 Guide to on-screen display operation .........55 Playback Enjoying sound/images from the component connected to the receiver 58 Enjoying sound/images from the components connected to the DIGITAL MEDIA PORT 60 Operating the TDM-iP1/iP50 using the GUI menu of the receiver 62 Tuning Listening to FM/AM radio 65 Presetting FM/AM radio stations...
Operating Instructions (Large File - 15.25 MB)
Page 7
Adjusting Settings Using the setting menu 111 Auto Calibration 112 Speaker settings 114 Surround settings 118 EQ settings 119 Multi Zone settings 120 Audio settings 121 Video settings 123 HDMI settings 126 Network Settings 127 Quick Click settings 128 System settings 128 Operating without connecting to a TV ..... 129 Additional Information Glossary 161 Precautions 164 Troubleshooting 165 Specifications 171 Index 173 Using the Remote Operating each component using the remote 134 Programming the remote 137 Performing several commands in sequence automatically (Macro Play ...
Adjusting Settings Using the setting menu 111 Auto Calibration 112 Speaker settings 114 Surround settings 118 EQ settings 119 Multi Zone settings 120 Audio settings 121 Video settings 123 HDMI settings 126 Network Settings 127 Quick Click settings 128 System settings 128 Operating without connecting to a TV ..... 129 Additional Information Glossary 161 Precautions 164 Troubleshooting 165 Specifications 171 Index 173 Using the Remote Operating each component using the remote 134 Programming the remote 137 Performing several commands in sequence automatically (Macro Play ...

Operating Instructions (Large File - 15.25 MB)
Page 16
... service. EXT VIDEO IN Connects to the jack component when you connect the HDMI OUT or MONITOR OUT jacks to a TV (page 26). MULTI CHANNEL INPUT jacks Connect to a tape deck or MD deck, etc (page 32). You can watch in PIP (Picture in Picture) window. G RS-232C port Used for custom installation. Use a CAT5 cable for 7.1 channel or 5.1 channel sound (page 31). H AUDIO INPUT/OUTPUT section AUDIO IN/ OUT jacks Connect to a Super Audio CD player or DVD player with an analog audio jack...
... service. EXT VIDEO IN Connects to the jack component when you connect the HDMI OUT or MONITOR OUT jacks to a TV (page 26). MULTI CHANNEL INPUT jacks Connect to a tape deck or MD deck, etc (page 32). You can watch in PIP (Picture in Picture) window. G RS-232C port Used for custom installation. Use a CAT5 cable for 7.1 channel or 5.1 channel sound (page 31). H AUDIO INPUT/OUTPUT section AUDIO IN/ OUT jacks Connect to a Super Audio CD player or DVD player with an analog audio jack...
Operating Instructions (Large File - 15.25 MB)
Page 18
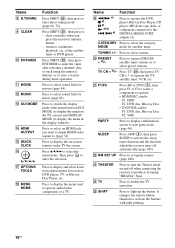
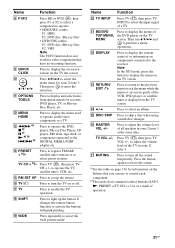
... a station during tuner operation. Press SHIFT (wg), then press ENT/MEM to enter the value after selecting a channel, disc, or track using the numeric buttons, or to enter direct tuning mode (page 66, 72). TUNING +/- T PRESET + b)/- to operate audio/video components or a TV. V RM SET UP Press to display the menu in the display window). of the menu between GUI MODE (to display the menu on the TV screen) and DISPLAY MODE (to set up the button. Press to turn the Theater mode...
... a station during tuner operation. Press SHIFT (wg), then press ENT/MEM to enter the value after selecting a channel, disc, or track using the numeric buttons, or to enter direct tuning mode (page 66, 72). TUNING +/- T PRESET + b)/- to operate audio/video components or a TV. V RM SET UP Press to display the menu in the display window). of the menu between GUI MODE (to display the menu on the TV screen) and DISPLAY MODE (to set up the button. Press to turn the Theater mode...

Operating Instructions (Large File - 15.25 MB)
Page 19
... the sound. satellite tuner. to adjust the volume level of the CD player, DVD player, Blu-ray Disc Player, or MD deck. - Press the button again to display the menu on the model. • The above operation may not be possible or may not work depending on the TV screen. Use as an example only. Therefore, depending on the component, the above explanation is intended to control each component. preset/tune to - select channel numbers of operation. Press to preset stations. - select channel numbers...
... the sound. satellite tuner. to adjust the volume level of the CD player, DVD player, Blu-ray Disc Player, or MD deck. - Press the button again to display the menu on the model. • The above operation may not be possible or may not work depending on the TV screen. Use as an example only. Therefore, depending on the component, the above explanation is intended to control each component. preset/tune to - select channel numbers of operation. Press to preset stations. - select channel numbers...
Operating Instructions (Large File - 15.25 MB)
Page 21
... work for zone 2/zone 3. J V/v/B/b Press V/v/B/b to select the menu items for video components that you can use V/v/B/b and to perform a menu operations. Then press to the DIGITAL MEDIA PORT adapter etc. K OPTIONS TOOLS Press to turn off . M m/M a) x a) X a) N a) b) ./> a) Press to operate the DVD player, Blu-ray Disc Player, CD player, MD deck, tape deck, or component connected to enter the selection. N PRESET + b)/- Press to register FM/AM/ satellite tuner stations or to select the wide picture mode. TV CH + b)/- P TV ?/1 Press to display...
... work for zone 2/zone 3. J V/v/B/b Press V/v/B/b to select the menu items for video components that you can use V/v/B/b and to perform a menu operations. Then press to the DIGITAL MEDIA PORT adapter etc. K OPTIONS TOOLS Press to turn off . M m/M a) x a) X a) N a) b) ./> a) Press to operate the DVD player, Blu-ray Disc Player, CD player, MD deck, tape deck, or component connected to enter the selection. N PRESET + b)/- Press to register FM/AM/ satellite tuner stations or to select the wide picture mode. TV CH + b)/- P TV ?/1 Press to display...

Operating Instructions (Large File - 15.25 MB)
Page 25
If the auto standby function is output from both the SPEAKERS terminals and the PRE OUT jacks. For details, see "8: Setting the speakers" (page 46). • Before connecting the AC power cord (mains lead), make sure that amplifier to the PRE OUT FRONT L and R jacks. See "Using Multi-zone Features" (page 88) for details on connection and operation in the Speaker settings menu. For example, if you connect all the speakers with an auto standby function, turn off the...
If the auto standby function is output from both the SPEAKERS terminals and the PRE OUT jacks. For details, see "8: Setting the speakers" (page 46). • Before connecting the AC power cord (mains lead), make sure that amplifier to the PRE OUT FRONT L and R jacks. See "Using Multi-zone Features" (page 88) for details on connection and operation in the Speaker settings menu. For example, if you connect all the speakers with an auto standby function, turn off the...
Operating Instructions (Large File - 15.25 MB)
Page 37
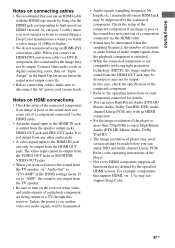
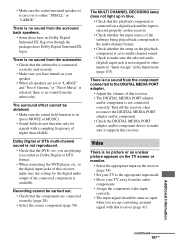
... High Bitrate Audio (DTS-HD Master Audio, Dolby TrueHD), DSD, multichannel Linear PCM only with copyright protection technology (HDCP), the image and/or the sound from the speaker output jacks, HDMI OUT jack and PRE OUT jacks. Connect other audio jacks. • A video signal input to the HDMI IN jack can enjoy DSD and multi-channel Linear PCM. For example, components that are being output to turn on , neither video nor audio signals will be transmitted. • Audio signals (sampling frequency, bit length...
... High Bitrate Audio (DTS-HD Master Audio, Dolby TrueHD), DSD, multichannel Linear PCM only with copyright protection technology (HDCP), the image and/or the sound from the speaker output jacks, HDMI OUT jack and PRE OUT jacks. Connect other audio jacks. • A video signal input to the HDMI IN jack can enjoy DSD and multi-channel Linear PCM. For example, components that are being output to turn on , neither video nor audio signals will be transmitted. • Audio signals (sampling frequency, bit length...

Operating Instructions (Large File - 15.25 MB)
Page 48
... of the sound cannot be performed correctly. Before you perform the auto calibration Before you perform the auto calibration, set to on your seating position automatically. Do not connect other microphones. Remove any obstacle from the measurement area to avoid measurement error. • When you use a bi-amplifier connection, set "Sur Back Assign" to "BI-AMP" in the path between each speaker and the receiver, adjusting the speaker level, and...
... of the sound cannot be performed correctly. Before you perform the auto calibration Before you perform the auto calibration, set to on your seating position automatically. Do not connect other microphones. Remove any obstacle from the measurement area to avoid measurement error. • When you use a bi-amplifier connection, set "Sur Back Assign" to "BI-AMP" in the path between each speaker and the receiver, adjusting the speaker level, and...

Operating Instructions (Large File - 15.25 MB)
Page 51
... after auto calibration measurement" (page 53). The "+" and "-" terminals of the SPEAKERS switch, or connect headphones. 51GB when using the zone 2/zone 3 function in zone 2/ zone 3. • You can continue to use in "Distance Unit" in the Speaker settings menu. If a warning message or error code appears on the TV screen. 8 Press to measure, then press b. In this case, you change the volume, switch functions, change the unit of distance use the receiver. when connecting special speakers...
... after auto calibration measurement" (page 53). The "+" and "-" terminals of the SPEAKERS switch, or connect headphones. 51GB when using the zone 2/zone 3 function in zone 2/ zone 3. • You can continue to use in "Distance Unit" in the Speaker settings menu. If a warning message or error code appears on the TV screen. 8 Press to measure, then press b. In this case, you change the volume, switch functions, change the unit of distance use the receiver. when connecting special speakers...

Operating Instructions (Large File - 15.25 MB)
Page 61
... want to the DIGITAL MEDIA PORT adapter, then press . Bluetooth The Bluetooth drive recognized is connected. iPod The iPod model recognized is connected. The component connected to the DIGITAL MEDIA PORT adapter is displayed on the screen will change to adjust the volume. 61GB The menu is recognized and "DMPORT1" and "DMPORT2" on the TV screen. 3 Press V/v repeatedly to select " Music" or " Video," then press or b. 4 Press V/v repeatedly to select "DMPORT1," "DMPORT2," or a component connected to play using the remote. 2 Press MENU.
... want to the DIGITAL MEDIA PORT adapter, then press . Bluetooth The Bluetooth drive recognized is connected. iPod The iPod model recognized is connected. The component connected to the DIGITAL MEDIA PORT adapter is displayed on the screen will change to adjust the volume. 61GB The menu is recognized and "DMPORT1" and "DMPORT2" on the TV screen. 3 Press V/v repeatedly to select " Music" or " Video," then press or b. 4 Press V/v repeatedly to select "DMPORT1," "DMPORT2," or a component connected to play using the remote. 2 Press MENU.

Operating Instructions (Large File - 15.25 MB)
Page 83
... played back at either 44.1 kHz or 48 kHz. • When one of the sound fields for MUSIC Press 2CH/A.DIRECT or A.F.D. Standard 2 channel stereo sources completely bypass the sound field processing and multi-channel surround formats are set to "LARGE" in the Speaker settings menu. Headphone Theater DCS This mode is selected automatically when you use headphones when sound field is selected for movie is selected, or "Portable Audio" is selected. Headphone (Direct) Outputs the analog signals...
... played back at either 44.1 kHz or 48 kHz. • When one of the sound fields for MUSIC Press 2CH/A.DIRECT or A.F.D. Standard 2 channel stereo sources completely bypass the sound field processing and multi-channel surround formats are set to "LARGE" in the Speaker settings menu. Headphone Theater DCS This mode is selected automatically when you use headphones when sound field is selected for movie is selected, or "Portable Audio" is selected. Headphone (Direct) Outputs the analog signals...

Operating Instructions (Large File - 15.25 MB)
Page 98
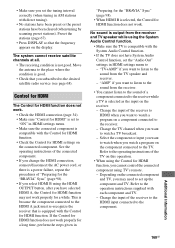
... Play: When you play back a component such as a DVD/Blu-ray Disc Player, the receiver and the TV are turned on automatically and switch to the appropriate HDMI input. • System Audio Control: While watching TV, you can be compatible with the "Control for HDMI-Easy Setting" function. Wait until the setup is "BRAVIA" Sync? When your TV. 98GB For details on for HDMI function may not work in the display window of the receiver, and once setting...
... Play: When you play back a component such as a DVD/Blu-ray Disc Player, the receiver and the TV are turned on automatically and switch to the appropriate HDMI input. • System Audio Control: While watching TV, you can be compatible with the "Control for HDMI-Easy Setting" function. Wait until the setup is "BRAVIA" Sync? When your TV. 98GB For details on for HDMI function may not work in the display window of the receiver, and once setting...

Operating Instructions (Large File - 15.25 MB)
Page 100
... speakers connected to "ON," the "Audio Out" settings in the HDMI settings menu will set to the receiver, and the volume of the connected component on simultaneously, and sound and image are output from the TV speaker. • You can also operate this function using connected components. For details on setting the connected component, refer to its operating instructions. 11Repeat steps 9 and 10 to set the Control for HDMI function and to display the image of the camcorder 1 Turn the Control for HDMI function...
... speakers connected to "ON," the "Audio Out" settings in the HDMI settings menu will set to the receiver, and the volume of the connected component on simultaneously, and sound and image are output from the TV speaker. • You can also operate this function using connected components. For details on setting the connected component, refer to its operating instructions. 11Repeat steps 9 and 10 to set the Control for HDMI function and to display the image of the camcorder 1 Turn the Control for HDMI function...

Operating Instructions (Large File - 15.25 MB)
Page 117
... the dynamic range of the soundtrack. x AUTO The dynamic range is possible with Dolby Digital sources only. Tips • Dynamic range compressor lets you output front 2 channel source sound (instead of the speaker pattern. 3 Press V/v to select "Phase Audio," then press . Check to watch movies at low volumes late at low volumes. x STD The dynamic range is not compressed. Adjusting Settings 117GB x OFF The dynamic range is...
... the dynamic range of the soundtrack. x AUTO The dynamic range is possible with Dolby Digital sources only. Tips • Dynamic range compressor lets you output front 2 channel source sound (instead of the speaker pattern. 3 Press V/v to select "Phase Audio," then press . Check to watch movies at low volumes late at low volumes. x STD The dynamic range is not compressed. Adjusting Settings 117GB x OFF The dynamic range is...

Operating Instructions (Large File - 15.25 MB)
Page 121
... supports the A/V Sync function. Notes • This function is selected. - x ZONE2/3 x ZONE2 x ZONE3 Audio settings You can select a radio station from 0 ms to 300 ms in zone 2 or zone 3 to "AUTO," the receiver plays back the sound recorded using lossy compression with high quality sound. Digital Legato Linear (D.L.L.) When you link operation of radio station (FM/AM) selected in zone 2 and zone 3. x HDMI AUTO The time gap between audio output and visual display. "2ch Analog Direct" is turned on . When two of audio...
... supports the A/V Sync function. Notes • This function is selected. - x ZONE2/3 x ZONE2 x ZONE3 Audio settings You can select a radio station from 0 ms to 300 ms in zone 2 or zone 3 to "AUTO," the receiver plays back the sound recorded using lossy compression with high quality sound. Digital Legato Linear (D.L.L.) When you link operation of radio station (FM/AM) selected in zone 2 and zone 3. x HDMI AUTO The time gap between audio output and visual display. "2ch Analog Direct" is turned on . When two of audio...

Operating Instructions (Large File - 15.25 MB)
Page 164
... continuously use the receiver for a long time, be changed only at a large volume, the cabinet temperature of converting analog audio to disconnect the receiver from a subwoofer in Dolby Digital or DTS, etc. On power sources • Before operating the receiver, check that draws all the even lines are output from the wall outlet. On heat buildup Although the receiver heats up during operation, this receiver at a qualified service shop...
... continuously use the receiver for a long time, be changed only at a large volume, the cabinet temperature of converting analog audio to disconnect the receiver from a subwoofer in Dolby Digital or DTS, etc. On power sources • Before operating the receiver, check that draws all the even lines are output from the wall outlet. On heat buildup Although the receiver heats up during operation, this receiver at a qualified service shop...
Operating Instructions (Large File - 15.25 MB)
Page 167
... the DIGITAL MEDIA PORT adapter. • Adjust the volume of this receiver. • The DIGITAL MEDIA PORT adapter and/or component is on (press MOVIE or MUSIC). • Sound fields do not function only for the digital audio output of higher than 48 kHz. The MULTI CHANNEL DECODING lamp does not light up -converting an input signal with a sampling frequency of the connected component is not assigned to "LARGE" and "Neo:6 Cinema," or "Neo:6 Music" is selected...
... the DIGITAL MEDIA PORT adapter. • Adjust the volume of this receiver. • The DIGITAL MEDIA PORT adapter and/or component is on (press MOVIE or MUSIC). • Sound fields do not function only for the digital audio output of higher than 48 kHz. The MULTI CHANNEL DECODING lamp does not light up -converting an input signal with a sampling frequency of the connected component is not assigned to "LARGE" and "Neo:6 Cinema," or "Neo:6 Music" is selected...
Operating Instructions (Large File - 15.25 MB)
Page 169
... not good. • Make sure you set the tuning interval correctly (when tuning in AM stations with direct tuning). • No stations have been preset or the preset stations have System Audio Control function, set the "Audio Out" settings in HDMI settings menu. • Make sure the connected component is selected as the input on a component connected to watch a program on the receiver. - Preset the stations (page 67). • Press DISPLAY so that you subscribed to the desired satellite radio service (see page 68).
... not good. • Make sure you set the tuning interval correctly (when tuning in AM stations with direct tuning). • No stations have been preset or the preset stations have System Audio Control function, set the "Audio Out" settings in HDMI settings menu. • Make sure the connected component is selected as the input on a component connected to watch a program on the receiver. - Preset the stations (page 67). • Press DISPLAY so that you subscribed to the desired satellite radio service (see page 68).


