Warranty Card
Page 1
...degree of protection, to any Sony authorized service facility. SONY SHALL NOT BE LIABLE FOR ANY INCIDENTAL OR CONSEQUENTIAL DAMAGES FOR BREACH OF ANY EXPRESS OR IMPLIED WARRANTY ON THIS PRODUCT. For your expense. 4-557-147-22 Tape Cassette Player/Recorder/CD Player/Mini Disc ® DAT.../Radio/Head Phone/Speaker/MIC/Personals Portable Audio LIMITED WARRANTY Sony Electronics Inc. ("Sony") warrants this Product is determined to be presented to any part of one (1) year...
...degree of protection, to any Sony authorized service facility. SONY SHALL NOT BE LIABLE FOR ANY INCIDENTAL OR CONSEQUENTIAL DAMAGES FOR BREACH OF ANY EXPRESS OR IMPLIED WARRANTY ON THIS PRODUCT. For your expense. 4-557-147-22 Tape Cassette Player/Recorder/CD Player/Mini Disc ® DAT.../Radio/Head Phone/Speaker/MIC/Personals Portable Audio LIMITED WARRANTY Sony Electronics Inc. ("Sony") warrants this Product is determined to be presented to any part of one (1) year...
Operating Instructions (primary manual)
Page 1
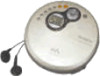
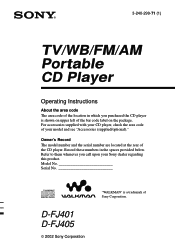
... is a trademark of the bar code label on upper left of Sony Corporation. Model No Serial No D-FJ401 D-FJ405 2002 Sony Corporation "WALKMAN" is shown on the package. 3-240-299-71 (1) TV/WB/FM/AM Portable CD Player Operating Instructions About the area code The area code of the ...provided below. Record these numbers in which you call upon your model and see "Accessories (supplied/optional)." For accessories supplied with your CD player, check the area code of the CD player. Owner's Record The model number and the serial number are located at the rear of your...
... is a trademark of the bar code label on upper left of Sony Corporation. Model No Serial No D-FJ401 D-FJ405 2002 Sony Corporation "WALKMAN" is shown on the package. 3-240-299-71 (1) TV/WB/FM/AM Portable CD Player Operating Instructions About the area code The area code of the ...provided below. Record these numbers in which you call upon your model and see "Accessories (supplied/optional)." For accessories supplied with your CD player, check the area code of the CD player. Owner's Record The model number and the serial number are located at the rear of your...
Operating Instructions (primary manual)
Page 3
... play 10 Playing tracks in random order (Shuffle play 10 Playing tracks in your favorite order (PGM play 11 Connecting your CD player Connecting a stereo system 20 Connecting to a power source Using the rechargeable batteries 21 Using the dry batteries 23 Notes ... interval 16 Available features G-PROTECTION function 17 Emphasizing the bass sound (SOUND) .... 17 Protecting your CD player 6 2. Insert a CD 6 3. Table of Contents Getting started Locating the controls 4 Playing a CD 1. Connect your hearing (AVLS 18 Locking the controls (HOLD 18 Turning off the operation beep sound...
... play 10 Playing tracks in random order (Shuffle play 10 Playing tracks in your favorite order (PGM play 11 Connecting your CD player Connecting a stereo system 20 Connecting to a power source Using the rechargeable batteries 21 Using the dry batteries 23 Notes ... interval 16 Available features G-PROTECTION function 17 Emphasizing the bass sound (SOUND) .... 17 Protecting your CD player 6 2. Insert a CD 6 3. Table of Contents Getting started Locating the controls 4 Playing a CD 1. Connect your hearing (AVLS 18 Locking the controls (HOLD 18 Turning off the operation beep sound...
Operating Instructions (primary manual)
Page 4
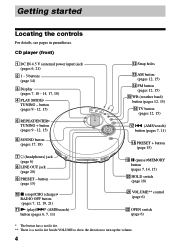
CD player (front) 1 DC IN 4.5 V (external power input) jack (pages 6, 21) 2 1 - 3 buttons (page 14) 3 Display (pages 7, 10 - 14, 17, 18) 4 PLAY MODE• TUNING - button (pages 9 - ...
CD player (front) 1 DC IN 4.5 V (external power input) jack (pages 6, 21) 2 1 - 3 buttons (page 14) 3 Display (pages 7, 10 - 14, 17, 18) 4 PLAY MODE• TUNING - button (pages 9 - ...
Operating Instructions (primary manual)
Page 5
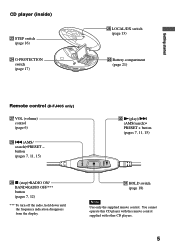
... ON/ BAND•RADIO OFF*** button (pages 7, 12) *** To turn off the radio, hold down until the frequency indication disappears from the display. Getting started CD player (inside) wd STEP switch (page 16) wf G-PROTECTION switch (page 17) wg LOCAL/DX switch (page 13) wh Battery compartment (page 21) Remote control... (D-FJ405 only) wj VOL (volume) control (page 6) wk .(AMS/ search)•PRESET - You cannot operate this CD player with the remote control supplied with other CD players. 5 button (pages 7, 11, 15) e;
... ON/ BAND•RADIO OFF*** button (pages 7, 12) *** To turn off the radio, hold down until the frequency indication disappears from the display. Getting started CD player (inside) wd STEP switch (page 16) wf G-PROTECTION switch (page 17) wg LOCAL/DX switch (page 13) wh Battery compartment (page 21) Remote control... (D-FJ405 only) wj VOL (volume) control (page 6) wk .(AMS/ search)•PRESET - You cannot operate this CD player with the remote control supplied with other CD players. 5 button (pages 7, 11, 15) e;
Operating Instructions (primary manual)
Page 6
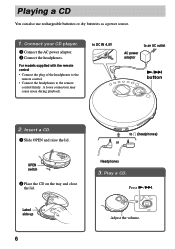
.... • Connect the headphones to an AC outlet N/> button 2. to DC IN 4.5V AC power adaptor to the remote control firmly. Insert a CD. 1 Slide OPEN and raise the lid. Press N/>. Label side up 6 to i (headphones) or Headphones 3. Adjust the volume. Play... a CD. Playing a CD You can also use rechargeable batteries or dry batteries as a power source. 1. Connect your CD player. 1 Connect the AC power adaptor. 2 Connect the headphones. OPEN switch 2 Place the CD on the tray and close the lid.
.... • Connect the headphones to an AC outlet N/> button 2. to DC IN 4.5V AC power adaptor to the remote control firmly. Insert a CD. 1 Slide OPEN and raise the lid. Press N/>. Label side up 6 to i (headphones) or Headphones 3. Adjust the volume. Play... a CD. Playing a CD You can also use rechargeable batteries or dry batteries as a power source. 1. Connect your CD player. 1 Connect the AC power adaptor. 2 Connect the headphones. OPEN switch 2 Place the CD on the tray and close the lid.
Operating Instructions (primary manual)
Page 7
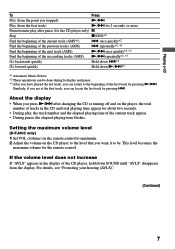
... track by pressing .. About the display • When you press N/> after pause (for 2 seconds or more Pause/resume play after changing the CD or turning off and on the CD player to the level that you want it to the beginning of the succeeding tracks (AMS) N/> repeatedly*2, *3 Go backwards quickly Hold down... have played the last track, you can locate the last track by pressing N/>. If the volume level does not increase If "AVLS" appears in the CD and total playing time appear for the remote control. Similarly, if you are at the first track, you can return to be done during both...
... track by pressing .. About the display • When you press N/> after pause (for 2 seconds or more Pause/resume play after changing the CD or turning off and on the CD player to the level that you want it to the beginning of the succeeding tracks (AMS) N/> repeatedly*2, *3 Go backwards quickly Hold down... have played the last track, you can locate the last track by pressing N/>. If the volume level does not increase If "AVLS" appears in the CD and total playing time appear for the remote control. Similarly, if you are at the first track, you can return to be done during both...
Operating Instructions (primary manual)
Page 8
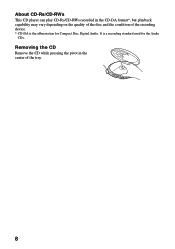
About CD-Rs/CD-RWs This CD player can play CD-Rs/CD-RWs recorded in the center of the recording device. * CD-DA is a recording standard used for Compact Disc Digital Audio. Removing the CD Remove the CD while pressing the pivot in the CD-DA format*, but playback capability may vary depending on the quality of the disc and the condition of the tray. 8 It is the abbreviation for the Audio CDs.
About CD-Rs/CD-RWs This CD player can play CD-Rs/CD-RWs recorded in the center of the recording device. * CD-DA is a recording standard used for Compact Disc Digital Audio. Removing the CD Remove the CD while pressing the pivot in the CD-DA format*, but playback capability may vary depending on the quality of the disc and the condition of the tray. 8 It is the abbreviation for the Audio CDs.
Operating Instructions (primary manual)
Page 11
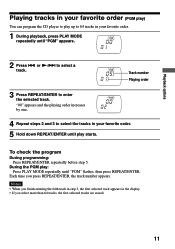
.... 11 Track number Playing order 3 Press REPEAT/ENTER to select a track. Playback options Playing tracks in your favorite order (PGM play) You can program the CD player to play up to 64 tracks in your favorite order. 1 During playback, press PLAY MODE repeatedly until "PGM" appears. 2 Press . Notes • When you...
.... 11 Track number Playing order 3 Press REPEAT/ENTER to select a track. Playback options Playing tracks in your favorite order (PGM play) You can program the CD player to play up to 64 tracks in your favorite order. 1 During playback, press PLAY MODE repeatedly until "PGM" appears. 2 Press . Notes • When you...
Operating Instructions (primary manual)
Page 12
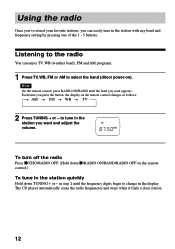
... to change in the station quickly Hold down x•RADIO ON/BAND•RADIO OFF on ). Each time you want and adjust the volume. The CD player automatically scans the radio frequencies and stops when it finds a clear station. 12 To turn off the radio Press x/CHG•RADIO OFF. (Hold...
... to change in the station quickly Hold down x•RADIO ON/BAND•RADIO OFF on ). Each time you want and adjust the volume. The CD player automatically scans the radio frequencies and stops when it finds a clear station. 12 To turn off the radio Press x/CHG•RADIO OFF. (Hold...
Operating Instructions (primary manual)
Page 13
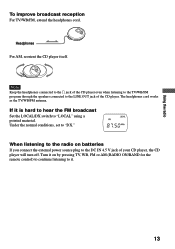
...hard to hear the FM broadcast Set the LOCAL/DX switch to the DC IN 4.5 V jack of the CD player. The headphones cord works as the TV/WB/FM antenna. If it . 13 Headphones For AM, reorient the... CD player itself. Turn it on batteries If you connect the external power source plug to "LOCAL" using a pointed... TV/WB/FM, extend the headphones cord. Note Keep the headphones connected to the i jack of the CD player even when listening to the TV/WB/FM program through the speakers connected to "DX."
...hard to hear the FM broadcast Set the LOCAL/DX switch to the DC IN 4.5 V jack of the CD player. The headphones cord works as the TV/WB/FM antenna. If it . 13 Headphones For AM, reorient the... CD player itself. Turn it on batteries If you connect the external power source plug to "LOCAL" using a pointed... TV/WB/FM, extend the headphones cord. Note Keep the headphones connected to the i jack of the CD player even when listening to the TV/WB/FM program through the speakers connected to "DX."
Operating Instructions (primary manual)
Page 14
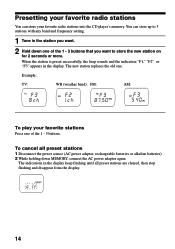
... the station you want to 3 stations with any band and frequency setting. 1 Tune in the display. You can store your favorite radio stations into the CD player's memory. Presetting your favorite radio stations You can store up to store the new station on for 2 seconds or more. To cancel all preset...
... the station you want to 3 stations with any band and frequency setting. 1 Tune in the display. You can store your favorite radio stations into the CD player's memory. Presetting your favorite radio stations You can store up to store the new station on for 2 seconds or more. To cancel all preset...

Operating Instructions (primary manual)
Page 15
... or AM to tune in a stored station. 15 Preset number 1 will replace the old ones. If you do not press MEMORY within the 3 seconds, the CD player will start scanning for about 3 seconds when a station is received. 3 If you want using TUNING +/-, and select a preset number using PRESET +/-. 4 To store,...preset number is preset on ). 2 Press MEMORY for the next receivable station. to select the band (direct power-on the preset number 1 and the CD player starts scanning for 2 seconds or more. To stop scanning • Press TV, WB, FM or AM. • Press x/CHG•RADIO OFF. The...
... or AM to tune in a stored station. 15 Preset number 1 will replace the old ones. If you do not press MEMORY within the 3 seconds, the CD player will start scanning for about 3 seconds when a station is received. 3 If you want using TUNING +/-, and select a preset number using PRESET +/-. 4 To store,...preset number is preset on ). 2 Press MEMORY for the next receivable station. to select the band (direct power-on the preset number 1 and the CD player starts scanning for 2 seconds or more. To stop scanning • Press TV, WB, FM or AM. • Press x/CHG•RADIO OFF. The...
Operating Instructions (primary manual)
Page 16
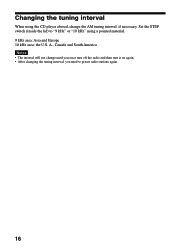
A., Canada and South America Notes • The interval will not change the AM tuning interval, if necessary. Changing the tuning interval When using a pointed material. 9 kHz area: Asia and Europe 10 kHz area: the U.S. Set the STEP switch (inside the lid) to "9 kHz" or "10 kHz" using the CD player abroad, change until you once turn off the radio and then turn it on again. • After changing the tuning interval, you need to preset radio stations again. 16
A., Canada and South America Notes • The interval will not change the AM tuning interval, if necessary. Changing the tuning interval When using a pointed material. 9 kHz area: Asia and Europe 10 kHz area: the U.S. Set the STEP switch (inside the lid) to "9 kHz" or "10 kHz" using the CD player abroad, change until you once turn off the radio and then turn it on again. • After changing the tuning interval, you need to preset radio stations again. 16
Operating Instructions (primary manual)
Page 17
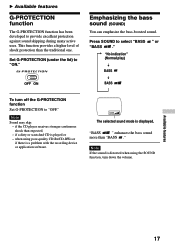
...." "No indication" (Normal play) BASS BASS To turn down the volume. Available features 17 if a dirty or scratched CD is displayed. Note If the sound is distorted when using poor-quality CD-Rs/CD-RWs or if there is a problem with the recording device or application software. if the... CD player receives stronger continuous shock than the traditional one. when using the SOUND function, turn off the G-PROTECTION...
...." "No indication" (Normal play) BASS BASS To turn down the volume. Available features 17 if a dirty or scratched CD is displayed. Note If the sound is distorted when using poor-quality CD-Rs/CD-RWs or if there is a problem with the recording device or application software. if the... CD player receives stronger continuous shock than the traditional one. when using the SOUND function, turn off the G-PROTECTION...
Operating Instructions (primary manual)
Page 18
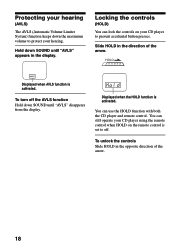
Displayed when AVLS function is activated. You can still operate your CD player using the remote control when HOLD on your CD player to protect your hearing. Slide HOLD in the direction of the arrow. 18 You can lock the controls on the remote control is set ... unlock the controls Slide HOLD in the opposite direction of the arrow. Locking the controls (HOLD) You can use the HOLD function with both the CD player and remote control. To turn off . Protecting your hearing (AVLS) The AVLS (Automatic Volume Limiter System) function keeps down SOUND until "AVLS" appears in...
Displayed when AVLS function is activated. You can still operate your CD player using the remote control when HOLD on your CD player to protect your hearing. Slide HOLD in the direction of the arrow. 18 You can lock the controls on the remote control is set ... unlock the controls Slide HOLD in the opposite direction of the arrow. Locking the controls (HOLD) You can use the HOLD function with both the CD player and remote control. To turn off . Protecting your hearing (AVLS) The AVLS (Automatic Volume Limiter System) function keeps down SOUND until "AVLS" appears in...
Operating Instructions (primary manual)
Page 19
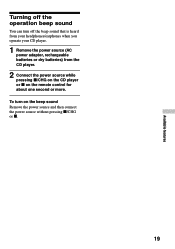
To turn off the beep sound that is heard from your headphones/earphones when you operate your CD player. 1 Remove the power source (AC power adaptor, rechargeable batteries or dry batteries) from the CD player. 2 Connect the power source while pressing x/CHG on the CD player or x on the beep sound Remove the power source and then connect the power source without pressing x/CHG or x. 19 Available features Turning off the operation beep sound You can turn on the remote control for about one second or more.
To turn off the beep sound that is heard from your headphones/earphones when you operate your CD player. 1 Remove the power source (AC power adaptor, rechargeable batteries or dry batteries) from the CD player. 2 Connect the power source while pressing x/CHG on the CD player or x on the beep sound Remove the power source and then connect the power source without pressing x/CHG or x. 19 Available features Turning off the operation beep sound You can turn on the remote control for about one second or more.
Operating Instructions (primary manual)
Page 20
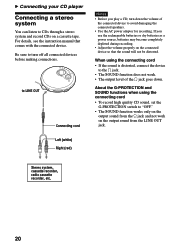
... damaging the connected speakers. • Use the AC power adaptor for recording. When using the connecting cord • To record high quality CD sound, set the G-PROTECTION switch to "OFF." • The SOUND function works only on the output sound from the LINE OUT jack....cassette recorder, radio cassette recorder, etc. 20 If you play a CD, turn off all connected devices before making connections. B Connecting your CD player Connecting a stereo system You can listen to CDs through a stereo system and record CDs on the connected device so that comes with the connected device. Be...
... damaging the connected speakers. • Use the AC power adaptor for recording. When using the connecting cord • To record high quality CD sound, set the G-PROTECTION switch to "OFF." • The SOUND function works only on the output sound from the LINE OUT jack....cassette recorder, radio cassette recorder, etc. 20 If you play a CD, turn off all connected devices before making connections. B Connecting your CD player Connecting a stereo system You can listen to CDs through a stereo system and record CDs on the connected device so that comes with the connected device. Be...
Operating Instructions (primary manual)
Page 21
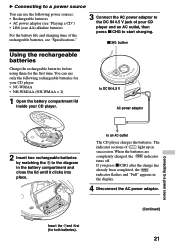
...charges the batteries. You can use only the following power sources: • Rechargeable batteries • AC power adaptor (see "Playing a CD") • LR6 (size AA) alkaline batteries For the battery life and charging time of the rechargeable batteries, see "Specifications." 3 Connect ... until it clicks into place. to start charging. When the batteries are completely charged, the indicator turns off. The indicator sections of your CD player. If you press x/CHG after the charge has already been completed, the indicator flashes and "Full" appears in the display. 4 ...
...charges the batteries. You can use only the following power sources: • Rechargeable batteries • AC power adaptor (see "Playing a CD") • LR6 (size AA) alkaline batteries For the battery life and charging time of the rechargeable batteries, see "Specifications." 3 Connect ... until it clicks into place. to start charging. When the batteries are completely charged, the indicator turns off. The indicator sections of your CD player. If you press x/CHG after the charge has already been completed, the indicator flashes and "Full" appears in the display. 4 ...
Operating Instructions (primary manual)
Page 23
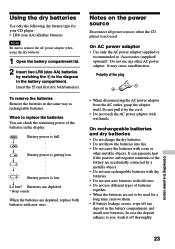
... with new ones. ○ ○ ○ ○ ○ ○ ○ ○ ○ Notes on the power source Disconnect all power sources when the CD player is low. When to a power source 23 Battery power is getting low. Do not pull it off any other metallic objects. r r Battery power is... deposit in the display. In case the deposit adheres to be used . Using the dry batteries Use only the following dry battery type for your CD player: • LR6 (size AA) alkaline batteries Note Be sure to remove the AC power adaptor when using the dry batteries. 1 Open the...
... with new ones. ○ ○ ○ ○ ○ ○ ○ ○ ○ Notes on the power source Disconnect all power sources when the CD player is low. When to a power source 23 Battery power is getting low. Do not pull it off any other metallic objects. r r Battery power is... deposit in the display. In case the deposit adheres to be used . Using the dry batteries Use only the following dry battery type for your CD player: • LR6 (size AA) alkaline batteries Note Be sure to remove the AC power adaptor when using the dry batteries. 1 Open the...


