Operating Instructions (primary manual)
Page 6
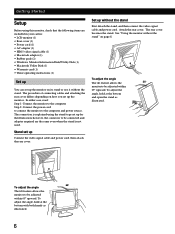
... adjust the angle The tilt feature allows the 25° monitorto be connected and adapter required are included in your carton: • LCD monitor (1) • Rear cover (1) • Power cord (1) • AC adapter (1) • HD15 video signal cable (1) • Macintosh adapter (1) • Rubber pads (2) • Windows Monitor Information Disk/Utility Disk (1) • Macintosh Utility...
... adjust the angle The tilt feature allows the 25° monitorto be connected and adapter required are included in your carton: • LCD monitor (1) • Rear cover (1) • Power cord (1) • AC adapter (1) • HD15 video signal cable (1) • Macintosh adapter (1) • Rubber pads (2) • Windows Monitor Information Disk/Utility Disk (1) • Macintosh Utility...

Operating Instructions (primary manual)
Page 7
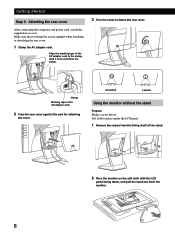
...Getting StarGteedtting Started Connecting to a power outlet Power cord (supplied) AC power adapter (supplied) 7 Macintosh or compatible computer to monitor output HD15 video signal cable (supplied) Macintosh adapter (supplied)* * Connect the supplied Macintosh adapter to the computer before January, 1999). to DC IN to a... (not supplied). If you are connecting to a Power Macintosh G3 series that sold after January 1999, you will need an adapter with Macintosh LC, Performa, Quadra, Power Macintosh and Power Macintosh G3 series computers (sold before connecting the cable. Step 1:...
...Getting StarGteedtting Started Connecting to a power outlet Power cord (supplied) AC power adapter (supplied) 7 Macintosh or compatible computer to monitor output HD15 video signal cable (supplied) Macintosh adapter (supplied)* * Connect the supplied Macintosh adapter to the computer before January, 1999). to DC IN to a... (not supplied). If you are connecting to a Power Macintosh G3 series that sold after January 1999, you will need an adapter with Macintosh LC, Performa, Quadra, Power Macintosh and Power Macintosh G3 series computers (sold before connecting the cable. Step 1:...
Operating Instructions (primary manual)
Page 8
... to fasten the rear cover. Make sure that you keep the screen upright when attaching or detaching the rear cover. 1 Clamp the AC adapter cord. Align the marking tape of the AC adapter cord to the clamp, wind it once and close the clamp. 3 Turn the screw to place under the LCD panel 1 Remove... the screws from the fixing shaft of the AC adapter cord 2 Press the rear cover against the part for attaching the cover. Clamp Marking tape of the stand. 2 Place the monitor on the soft cloth...
... to fasten the rear cover. Make sure that you keep the screen upright when attaching or detaching the rear cover. 1 Clamp the AC adapter cord. Align the marking tape of the AC adapter cord to the clamp, wind it once and close the clamp. 3 Turn the screw to place under the LCD panel 1 Remove... the screws from the fixing shaft of the AC adapter cord 2 Press the rear cover against the part for attaching the cover. Clamp Marking tape of the stand. 2 Place the monitor on the soft cloth...
Operating Instructions (primary manual)
Page 9
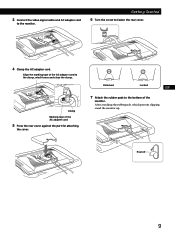
3 Connect the video signal cable and AC adapter cord to fasten the rear cover. 4 Clamp the AC adapter cord. Unlocked Locked GB 7 Attach the rubber pads to the bottom of the AC adapter cord to the clamp, wind it once and close the clamp. Align the marking tape of the F monitor. D After attaching the rubberpads, which prevent slipping, stand the monitor up. Clamp Marking tape of the AC adapter cord 5 Press the rear cover against the part for attaching the cover. ES I Peel off 9 Getting StarGteedtting Started 6 Turn the screw to the monitor.
3 Connect the video signal cable and AC adapter cord to fasten the rear cover. 4 Clamp the AC adapter cord. Unlocked Locked GB 7 Attach the rubber pads to the bottom of the AC adapter cord to the clamp, wind it once and close the clamp. Align the marking tape of the F monitor. D After attaching the rubberpads, which prevent slipping, stand the monitor up. Clamp Marking tape of the AC adapter cord 5 Press the rear cover against the part for attaching the cover. ES I Peel off 9 Getting StarGteedtting Started 6 Turn the screw to the monitor.
Operating Instructions (primary manual)
Page 18
... is VESA DPMS (Display Power Management Signaling) compliant, the monitor will automatically reduce power consumption in parentheses are power consumption of the monitor including the AC adapter. ** "Sleep" and "deep sleep" are stored automatically as a result, eliminate the need to the adjustment instructions. Set the time according to ensure that is connected...
... is VESA DPMS (Display Power Management Signaling) compliant, the monitor will automatically reduce power consumption in parentheses are power consumption of the monitor including the AC adapter. ** "Sleep" and "deep sleep" are stored automatically as a result, eliminate the need to the adjustment instructions. Set the time according to ensure that is connected...

Operating Instructions (primary manual)
Page 19
..., or televisions. • Move the monitor away from among the Sony monitors in the Windows 95/98 monitor selection screen. If the ... INPUT SIGNAL" message appears on ." • Check that the Macintosh adapter and the video signal cable are properly connected (page 6). If this ... picture. Install the Windows Monitor Information Disk/Utility Disk and select "CPD- If this does not work , adjust the pitch and phase ... in . I M151" from power lines or place a magnetic shield near the monitor. • Try plugging the monitor into a different AC outlet, preferably on...
..., or televisions. • Move the monitor away from among the Sony monitors in the Windows 95/98 monitor selection screen. If the ... INPUT SIGNAL" message appears on ." • Check that the Macintosh adapter and the video signal cable are properly connected (page 6). If this ... picture. Install the Windows Monitor Information Disk/Utility Disk and select "CPD- If this does not work , adjust the pitch and phase ... in . I M151" from power lines or place a magnetic shield near the monitor. • Try plugging the monitor into a different AC outlet, preferably on...
Operating Instructions (primary manual)
Page 21
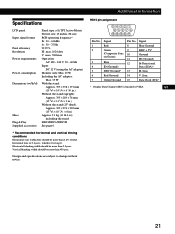
...* fh: 30 - 61 kHz fv: 50 - 75 Hz 99.99 % H: max. 1024 dots V: max. 768 lines Operation: AC 100 - 240 V, 50 - 60 Hz Input: DC 12 V (using the AC adapter) Monitor only: Max. 25 W Including the AC adapter: Max. 35 W With the stand: Approx. 395 × 358 × 173 mm (15 5/8 × 14 1/8 × 6 7/8 in...
...* fh: 30 - 61 kHz fv: 50 - 75 Hz 99.99 % H: max. 1024 dots V: max. 768 lines Operation: AC 100 - 240 V, 50 - 60 Hz Input: DC 12 V (using the AC adapter) Monitor only: Max. 25 W Including the AC adapter: Max. 35 W With the stand: Approx. 395 × 358 × 173 mm (15 5/8 × 14 1/8 × 6 7/8 in...


