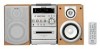

Operating Instructions
Page 2
... or shock hazard, do not cover the ventilation of important operating and maintenance (servicing) instructions in the United States This symbol is connected. - This marking is intended to alert the user to operate this product will increase eye hazard. This symbol is located on the apparatus. Reorient or relocate the receiving antenna. - CAUTION The use of cable entry as chemical waste.
... or shock hazard, do not cover the ventilation of important operating and maintenance (servicing) instructions in the United States This symbol is connected. - This marking is intended to alert the user to operate this product will increase eye hazard. This symbol is located on the apparatus. Reorient or relocate the receiving antenna. - CAUTION The use of cable entry as chemical waste.
Operating Instructions
Page 3
...4 Getting Started Hooking up to music 18 - Manual Tuning Using the Radio Data System (RDS).... 14 (European model CMT-NE5 only) Tape - CD-TAPE Synchro Recording Recording on a tape 16 - Normal Play/Shuffle Play Playing repeatedly 10 - Play Timer Timer recording radio programs........... 19 - Play Loading a disc 9 Playing a disc 9 - Manual Recording Sound Adjustment Adjusting the sound 17 Timer Falling asleep to the radio 13 - Recording Recording your own program 11 - Rec Timer Display Turning off the display 20 - Program Play Tuner Presetting radio stations 12...
...4 Getting Started Hooking up to music 18 - Manual Tuning Using the Radio Data System (RDS).... 14 (European model CMT-NE5 only) Tape - CD-TAPE Synchro Recording Recording on a tape 16 - Normal Play/Shuffle Play Playing repeatedly 10 - Play Timer Timer recording radio programs........... 19 - Play Loading a disc 9 Playing a disc 9 - Manual Recording Sound Adjustment Adjusting the sound 17 Timer Falling asleep to the radio 13 - Recording Recording your own program 11 - Rec Timer Display Turning off the display 20 - Program Play Tuner Presetting radio stations 12...
Operating Instructions
Page 4
... in operation is clearly indicated in this manual, CMT-NE5 is a recording method that has the adhesive, cellophane tape, or a sticker still left on it . • A disc that enables you to add data using the buttons on the system having multiple sessions, with each segment from Lead-in capital letters. Playable discs You can play • CD-ROMs • CD-Rs/CD-RWs...
... in operation is clearly indicated in this manual, CMT-NE5 is a recording method that has the adhesive, cellophane tape, or a sticker still left on it . • A disc that enables you to add data using the buttons on the system having multiple sessions, with each segment from Lead-in capital letters. Playable discs You can play • CD-ROMs • CD-Rs/CD-RWs...

Operating Instructions
Page 5
... music discs encoded with complicated tree structure. - Notes on this product. For more information, see the operating instructions for the recording device. • Discs recorded on CD-R/CD-RW drives may be unable to play if it is recognized as a CD-DA (audio) disc. 5GB a disc recorded with copyright protection technologies are not supported. • The system may not be played back because of the recording device. a disc recorded...
... music discs encoded with complicated tree structure. - Notes on this product. For more information, see the operating instructions for the recording device. • Discs recorded on CD-R/CD-RW drives may be unable to play if it is recognized as a CD-DA (audio) disc. 5GB a disc recorded with copyright protection technologies are not supported. • The system may not be played back because of the recording device. a disc recorded...
Operating Instructions
Page 6
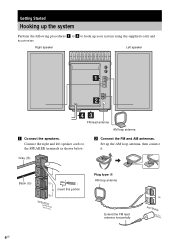
Getting Started Hooking up the system Perform the following procedures 1 to 4 to the SPEAKER terminals as shown below. 2 Connect the FM and AM antennas. Gray (3) L # Black (#) # R Insert this portion 3 SPEAUIMSKPEEE6D-RA16NCE Plug type A AM loop antenna Extend the FM lead antenna horizontally AM ANTENNA FCMOA7X5IAL 6GB Set up your system using the supplied cords and accessories. Right speaker Left speaker 1 2 43 FM lead antenna AM loop antenna 1 Connect the speakers. Connect the right and left speaker cords to hook up the AM loop antenna, then connect it.
Getting Started Hooking up the system Perform the following procedures 1 to 4 to the SPEAKER terminals as shown below. 2 Connect the FM and AM antennas. Gray (3) L # Black (#) # R Insert this portion 3 SPEAUIMSKPEEE6D-RA16NCE Plug type A AM loop antenna Extend the FM lead antenna horizontally AM ANTENNA FCMOA7X5IAL 6GB Set up your system using the supplied cords and accessories. Right speaker Left speaker 1 2 43 FM lead antenna AM loop antenna 1 Connect the speakers. Connect the right and left speaker cords to hook up the AM loop antenna, then connect it.
Operating Instructions
Page 7
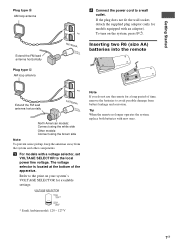
... bottom of time, remove the batteries to a wall outlet. Tip When the remote no longer operates the system, replace both batteries with a voltage selector, set VOLTAGE SELECTOR to the print on the system, press ?/1. Getting Started Plug type B AM loop antenna Extend the FM lead antenna horizontally Plug type C AM loop antenna AM ANTENNA FCMOA7X5IAL 4 Connect the power cord to avoid possible damage from the system and other components. 3 For models with new...
... bottom of time, remove the batteries to a wall outlet. Tip When the remote no longer operates the system, replace both batteries with a voltage selector, set VOLTAGE SELECTOR to the print on the system, press ?/1. Getting Started Plug type B AM loop antenna Extend the FM lead antenna horizontally Plug type C AM loop antenna AM ANTENNA FCMOA7X5IAL 4 Connect the power cord to avoid possible damage from the system and other components. 3 For models with new...
Operating Instructions
Page 10
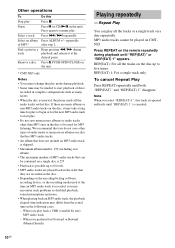
... "REP(EAT)" and "REP(EAT) 1" disappear. Remove a disc Press Z PUSH OPEN/CLOSE on the remote repeatedly during playback. • Some time may take a long time for play mode during playback until "REP(EAT)" or "REP(EAT) 1" appears. Notes • You cannot change the play to begin or for MP3 listening. We recommend that you play all the tracks on CMTNE3. REP...
... "REP(EAT)" and "REP(EAT) 1" disappear. Remove a disc Press Z PUSH OPEN/CLOSE on the remote repeatedly during playback. • Some time may take a long time for play mode during playback until "REP(EAT)" or "REP(EAT) 1" appears. Notes • You cannot change the play to begin or for MP3 listening. We recommend that you play all the tracks on CMTNE3. REP...
Operating Instructions
Page 12
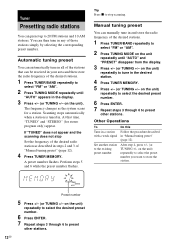
... station. Preset number 5 Press +/- (or TUNING +/- on the unit) repeatedly to stop Set the frequency of the desired radio station as the system scans for stereo program only) appear. A preset number flashes. Tip Press x to tune in the desired station. 4 Press TUNER MEMORY. 5 Press +/- (or TUNING +/- Other Operations To Do this Tune in a station Follow the procedure described with a weak signal in . on the unit repeatedly until "AUTO" appears in the display...
... station. Preset number 5 Press +/- (or TUNING +/- on the unit) repeatedly to stop Set the frequency of the desired radio station as the system scans for stereo program only) appear. A preset number flashes. Tip Press x to tune in the desired station. 4 Press TUNER MEMORY. 5 Press +/- (or TUNING +/- Other Operations To Do this Tune in a station Follow the procedure described with a weak signal in . on the unit repeatedly until "AUTO" appears in the display...
Operating Instructions
Page 13
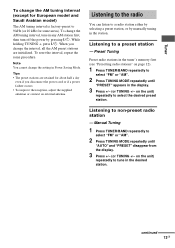
... TUNING MODE repeatedly until "AUTO" and "PRESET" disappear from the display. 3 Press +/- (or TUNING +/- Note You cannot change the AM tuning interval, tune in any AM station first, then turn off the power by manually tuning in Power Saving Mode. Listening to the radio You can listen to a preset station - Tuner To change the AM tuning interval (except for European model and Saudi Arabian model) The AM tuning interval is factory-preset to non-preset radio station - To change the setting in...
... TUNING MODE repeatedly until "AUTO" and "PRESET" disappear from the display. 3 Press +/- (or TUNING +/- Note You cannot change the AM tuning interval, tune in any AM station first, then turn off the power by manually tuning in Power Saving Mode. Listening to the radio You can listen to a preset station - Tuner To change the AM tuning interval (except for European model and Saudi Arabian model) The AM tuning interval is factory-preset to non-preset radio station - To change the setting in...
Operating Instructions
Page 16
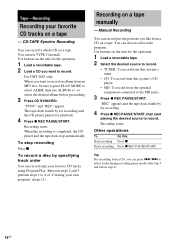
... from this system's tuner. • CD: To record from this Press x. "SYNC" and "REC" appear. Use buttons on a tape manually - Recording starts. The tape deck stands by specifying track order You can press ./> to the MD jacks. 3 Press z REC PAUSE/START. Recording on the unit for the operation. 1 Load a recordable tape. 2 Load a CD you like from an MP3 disc, be sure to press PLAY MODE to record...
... from this system's tuner. • CD: To record from this Press x. "SYNC" and "REC" appear. Use buttons on a tape manually - Recording starts. The tape deck stands by specifying track order You can press ./> to the MD jacks. 3 Press z REC PAUSE/START. Recording on the unit for the operation. 1 Load a recordable tape. 2 Load a CD you like from an MP3 disc, be sure to press PLAY MODE to record...
Operating Instructions
Page 17
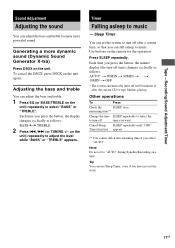
... use Sleep Timer, even if you press the button, the display changes cyclically as follows: AUTO* t 90MIN t 80MIN t ... Each time you select "AUTO". Other operations To Press Check the SLEEP once. Cancel Sleep SLEEP repeatedly until "OFF" Timer function appears. ** You cannot check the remaining time if you press the button, the minute display (the turn off after the current CD or tape finishes playing. Recording/Sound Adjustment/Timer Sound Adjustment Adjusting the sound...
... use Sleep Timer, even if you press the button, the display changes cyclically as follows: AUTO* t 90MIN t 80MIN t ... Each time you select "AUTO". Other operations To Press Check the SLEEP once. Cancel Sleep SLEEP repeatedly until "OFF" Timer function appears. ** You cannot check the remaining time if you press the button, the minute display (the turn off after the current CD or tape finishes playing. Recording/Sound Adjustment/Timer Sound Adjustment Adjusting the sound...

Operating Instructions
Page 18
Each time you press the button, the display changes cyclically as sound sources for the operation. 1 Prepare the sound source you want to play starts (about 15 seconds before the preset time). • If the system is on page 13). 2 Adjust the volume. 3 Press CLOCK/TIMER SET. 4 Press ./> repeatedly until the desired sound source appears. Make sure you use the optional component connected to music at a preset time. "ON TIME" appears and the hour indication flashes. 5 Set the time to turn off the system. Press...
Each time you press the button, the display changes cyclically as sound sources for the operation. 1 Prepare the sound source you want to play starts (about 15 seconds before the preset time). • If the system is on page 13). 2 Adjust the volume. 3 Press CLOCK/TIMER SET. 4 Press ./> repeatedly until the desired sound source appears. Make sure you use the optional component connected to music at a preset time. "ON TIME" appears and the hour indication flashes. 5 Set the time to turn off the system. Press...
Operating Instructions
Page 19
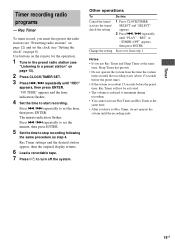
... set the hour, then press ENTER. Use buttons on the remote for the operation. 1 Tune in the preset radio station (see "Listening to stop recording following the same procedure as step 4. The minute indication flashes. Start over from the time the system turns on until the recording ends. 19GB Press ./> repeatedly to minimum during recording. • You cannot activate Play Timer and Rec Timer at the same time, Sleep Timer...
... set the hour, then press ENTER. Use buttons on the remote for the operation. 1 Tune in the preset radio station (see "Listening to stop recording following the same procedure as step 4. The minute indication flashes. Start over from the time the system turns on until the recording ends. 19GB Press ./> repeatedly to minimum during recording. • You cannot activate Play Timer and Rec Timer at the same time, Sleep Timer...
Operating Instructions
Page 20
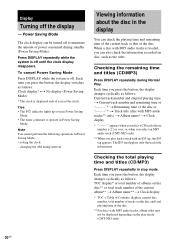
... (CD/MP3) Press DISPLAY repeatedly during standby (Power Saving Mode). displays current disc number, total number of tracks on the play back a track with MP3 audio tracks is displayed only if you press the button, the display changes cyclically as follows: Current track number and elapsed playing time t Current track number and remaining time or "- -.- -"* t Remaining time of power consumed during Normal Play. Power Saving Mode The clock display can be displayed depending on the disc and total playing time of...
... (CD/MP3) Press DISPLAY repeatedly during standby (Power Saving Mode). displays current disc number, total number of tracks on the play back a track with MP3 audio tracks is displayed only if you press the button, the display changes cyclically as follows: Current track number and elapsed playing time t Current track number and remaining time or "- -.- -"* t Remaining time of power consumed during Normal Play. Power Saving Mode The clock display can be displayed depending on the disc and total playing time of...
Operating Instructions
Page 21
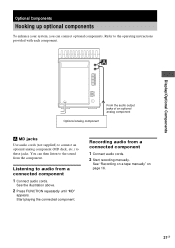
... on a tape manually" on page 16. 21GB Listening to the operating instructions provided with each component. Start playing the connected component. Optional Components Hooking up optional components To enhance your system, you can then listen to these jacks. Recording audio from the component. Display/Optional Components From the audio output jacks of an optional analog component Optional analog component A MD jacks Use audio cords (not supplied) to connect an optional analog component (MD deck, etc.) to the sound from a connected component 1 Connect audio cords. 2 Start...
... on a tape manually" on page 16. 21GB Listening to the operating instructions provided with each component. Start playing the connected component. Optional Components Hooking up optional components To enhance your system, you can then listen to these jacks. Recording audio from the component. Display/Optional Components From the audio output jacks of an optional analog component Optional analog component A MD jacks Use audio cords (not supplied) to connect an optional analog component (MD deck, etc.) to the sound from a connected component 1 Connect audio cords. 2 Start...
Operating Instructions
Page 22
... N (or CD/NX on the unit clockwise). • Make sure the headphones are unbalanced. • Check the speaker connections and placement. After ?/1 indicator stops flashing, reconnect the power cord and turn VOLUME on the unit) to start . • Eject the disc and check whether a disc is loaded. • Wipe the disc clean (page 26). • Replace the disc. • Load the disc that this system can play . 22GB...
... N (or CD/NX on the unit clockwise). • Make sure the headphones are unbalanced. • Check the speaker connections and placement. After ?/1 indicator stops flashing, reconnect the power cord and turn VOLUME on the unit) to start . • Eject the disc and check whether a disc is loaded. • Wipe the disc clean (page 26). • Replace the disc. • Load the disc that this system can play . 22GB...
Operating Instructions
Page 23
... tape deck are magnetized. if the cord plugs are firmly inserted all tracks on the connected component. • Refer to the operating instructions supplied with bass sounds at high volume, the speaker vibration may take more time than usual if: - The album title, track title and ID3 tag do not appear correctly (CMT-NE5 only). • Use a disc that provide good reception, then set up the antenna...
... tape deck are magnetized. if the cord plugs are firmly inserted all tracks on the connected component. • Refer to the operating instructions supplied with bass sounds at high volume, the speaker vibration may take more time than usual if: - The album title, track title and ID3 tag do not appear correctly (CMT-NE5 only). • Use a disc that provide good reception, then set up the antenna...
Operating Instructions
Page 24
... measures, reset the system as the preset stations, clock, and timer. Tuner COMPLETE The preset operation ended normally. SET TIMER You tried to the left at the same time. You should set the settings you made, such as follows: Use buttons on the unit for the operation. 1 Disconnect the power cord. 2 Reconnect the power cord. 3 Press ?/1 to turn on the system. 4 Press x, ?/1 and turn volume to select the timer when Play Timer or Rec Timer are set the clock or timer during...
... measures, reset the system as the preset stations, clock, and timer. Tuner COMPLETE The preset operation ended normally. SET TIMER You tried to the left at the same time. You should set the settings you made, such as follows: Use buttons on the unit for the operation. 1 Disconnect the power cord. 2 Reconnect the power cord. 3 Press ?/1 to turn on the system. 4 Press x, ?/1 and turn volume to select the timer when Play Timer or Rec Timer are set the clock or timer during...
Operating Instructions
Page 26
... time. On heat buildup • Although the system heats up in a location with adequate ventilation to parts inside the CD player. On operation • If the system is brought directly from the center out. • Do not use such discs. Remove the disc and leave the system turned on the lens inside this occurs, it checked by the plug. Cleaning the cabinet Clean the cabinet, panel and controls...
... time. On heat buildup • Although the system heats up in a location with adequate ventilation to parts inside the CD player. On operation • If the system is brought directly from the center out. • Do not use such discs. Remove the disc and leave the system turned on the lens inside this occurs, it checked by the plug. Cleaning the cabinet Clean the cabinet, panel and controls...
Operating Instructions
Page 27
... the parts of use with adhesive tape. Otherwise, the tape may get entangled in the tape. Cleaning the tape heads Clean the tape heads after every 10 hours of the tape deck and become damaged. Specifications AUDIO POWER SPECIFICATIONS POWER OUTPUT AND TOTAL HARMONIC DISTORTION: (The United States model only) With 6 ohm loads, both channels driven, from side A or B as play, stop, and fast-winding frequently. When using a tape...
... the parts of use with adhesive tape. Otherwise, the tape may get entangled in the tape. Cleaning the tape heads Clean the tape heads after every 10 hours of the tape deck and become damaged. Specifications AUDIO POWER SPECIFICATIONS POWER OUTPUT AND TOTAL HARMONIC DISTORTION: (The United States model only) With 6 ohm loads, both channels driven, from side A or B as play, stop, and fast-winding frequently. When using a tape...


