Primary User Manual
Page 3
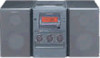
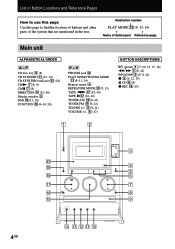
... component ... 18 Troubleshooting Problems and remedies 19 Additional Information Precautions 21 Specifications 22 * European model only 3GB Table of Contents List of Button Locations and Reference Pages Main unit 4 Remote Control 5 Getting Started Hooking up the system 6 Inserting two size-AA (R6) batteries into the remote control 7 Setting the clock 7 CD Loading the CD...
... component ... 18 Troubleshooting Problems and remedies 19 Additional Information Precautions 21 Specifications 22 * European model only 3GB Table of Contents List of Button Locations and Reference Pages Main unit 4 Remote Control 5 Getting Started Hooking up the system 6 Inserting two size-AA (R6) batteries into the remote control 7 Setting the clock 7 CD Loading the CD...
Primary User Manual
Page 4
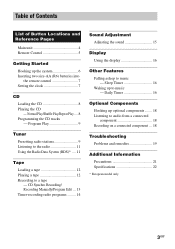
...8 9 qf qd qs qa 0 4GB F CD disc tray 9 (8) CD SYNCHRO qa (13, 14) CD SYNCHRO indicator w; (14) CD N 7 (8, 9) CD X 7 (8) DIRECTION q; (12-14) Display window 2 DSG qk (15, 18) FUNCTION ql (8-14, 18) P - Illustration number r PLAY MODE qg (9, 13, 14) R R Name of the system that are mentioned in the text. V PHONES ...) VOLUME +/- 6 (17) BUTTON DESCRIPTIONS @/1 (power) 1 (7, 10, 15, 17, 18) m/M 3 (8, 12) l/L 3 (8, 9, 14) x 5 (8, 12, 13) Z CD 8 (8) z REC qh (13) 1 2 ?/1 w; List of Button Locations and Reference Pages How to use this page Use this page to find the location of buttons and...
...8 9 qf qd qs qa 0 4GB F CD disc tray 9 (8) CD SYNCHRO qa (13, 14) CD SYNCHRO indicator w; (14) CD N 7 (8, 9) CD X 7 (8) DIRECTION q; (12-14) Display window 2 DSG qk (15, 18) FUNCTION ql (8-14, 18) P - Illustration number r PLAY MODE qg (9, 13, 14) R R Name of the system that are mentioned in the text. V PHONES ...) VOLUME +/- 6 (17) BUTTON DESCRIPTIONS @/1 (power) 1 (7, 10, 15, 17, 18) m/M 3 (8, 12) l/L 3 (8, 9, 14) x 5 (8, 12, 13) Z CD 8 (8) z REC qh (13) 1 2 ?/1 w; List of Button Locations and Reference Pages How to use this page Use this page to find the location of buttons and...
Primary User Manual
Page 5
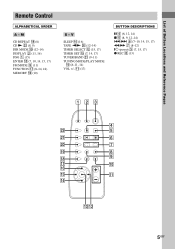
M CD REPEAT qk (8) CD N ws (8, 9) DIR MODE ql (12-14) DISPLAY 2 (11, 16) DSG 1 (15) ENTER qd (7, 10, 14, 15, 17) FM MODE 9 (11) FUNCTION qj (8-14, 18) MEMORY ...
M CD REPEAT qk (8) CD N ws (8, 9) DIR MODE ql (12-14) DISPLAY 2 (11, 16) DSG 1 (15) ENTER qd (7, 10, 14, 15, 17) FM MODE 9 (11) FUNCTION qj (8-14, 18) MEMORY ...
Primary User Manual
Page 8
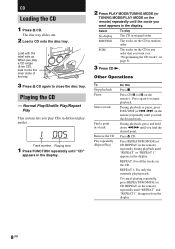
Normal Play/Shuffle Play/Repeat Play This system lets you play CDs in different play modes. 1 005 Track number Playing time 1 Press FUNCTION repeatedly until "CD" appears in the display. 2 Press PLAY MODE/TUNING MODE (or TUNING MODE/PLAY MODE on the remote) repeatedly until ...the desired point. Playing the CD -- Press Z CD. Press CD X (or X on the CD. REPEAT 1: For only the currently playing track. CD Loading the CD 1 Press Z CD. Select No display SHUFFLE PGM To play a CD single (8 cm CD), load it onto the inner circle of the tray. 3 Press Z CD again to resume playback. Other ...
Normal Play/Shuffle Play/Repeat Play This system lets you play CDs in different play modes. 1 005 Track number Playing time 1 Press FUNCTION repeatedly until "CD" appears in the display. 2 Press PLAY MODE/TUNING MODE (or TUNING MODE/PLAY MODE on the remote) repeatedly until ...the desired point. Playing the CD -- Press Z CD. Press CD X (or X on the CD. REPEAT 1: For only the currently playing track. CD Loading the CD 1 Press Z CD. Select No display SHUFFLE PGM To play a CD single (8 cm CD), load it onto the inner circle of the tray. 3 Press Z CD again to resume playback. Other ...
Primary User Manual
Page 9
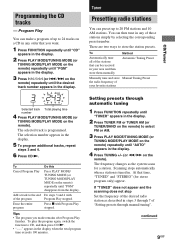
...the total program time exceeds 100 minutes. Press x with Program Play stopped. Scanning stops automatically when a station is programmed. continued 9GB CD/Tuner You can be received in your area and then store them manually Automatic Tuning Preset Manually tune and store Manual Tuning Preset the ...of those stations simply by selecting the corresponding preset number. The selected track is tuned in any of the desired radio station as the system scans for stereo program only) appear. Program Play You can preset up to select FM or AM. 3 Press PLAY MODE/TUNING MODE ...
...the total program time exceeds 100 minutes. Press x with Program Play stopped. Scanning stops automatically when a station is programmed. continued 9GB CD/Tuner You can be received in your area and then store them manually Automatic Tuning Preset Manually tune and store Manual Tuning Preset the ...of those stations simply by selecting the corresponding preset number. The selected track is tuned in any of the desired radio station as the system scans for stereo program only) appear. Program Play You can preset up to select FM or AM. 3 Press PLAY MODE/TUNING MODE ...
Primary User Manual
Page 13
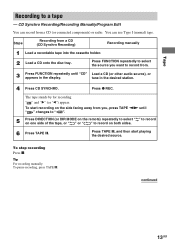
... The tape stands by for recording. Press TAPE X, and then start recording on the side facing away from a CD (or connected components) or radio. To stop recording Press x. CD Synchro Recording/Recording Manually/Program Edit You can use Type I (normal) tape. Press z REC. Tip For recording ..." to record on one side of the tape, or " " or " " to record from a CD (CD Synchro Recording) Recording manually 1 Load a recordable tape into the cassette holder. 2 Load a CD onto the disc tray. To start playing the desired source. Tape Recording to select the source you , ...
... The tape stands by for recording. Press TAPE X, and then start recording on the side facing away from a CD (or connected components) or radio. To stop recording Press x. CD Synchro Recording/Recording Manually/Program Edit You can use Type I (normal) tape. Press z REC. Tip For recording ..." to record on one side of the tape, or " " or " " to record from a CD (CD Synchro Recording) Recording manually 1 Load a recordable tape into the cassette holder. 2 Load a CD onto the disc tray. To start playing the desired source. Tape Recording to select the source you , ...
Primary User Manual
Page 14
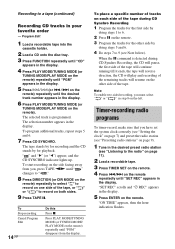
... in your favorite order -- To Stop recording Cancel Program Edit 14GB Do this Press x. Note To enable two-sided recording, you have set the system clock correctly (see "Setting the clock" on page 7) and preset the radio station (see "Presetting radio stations" on page 9). 1 Tune in ...the desired preset radio station (see Note below). " " and "B" (or "b") appear, and the CD SYNCHRO indicator lights up. When the X command is programmed. Timer-recording radio programs To timer-record, make sure that you must select " " or " " in ...
... in your favorite order -- To Stop recording Cancel Program Edit 14GB Do this Press x. Note To enable two-sided recording, you have set the system clock correctly (see "Setting the clock" on page 7) and preset the radio station (see "Presetting radio stations" on page 9). 1 Tune in ...the desired preset radio station (see Note below). " " and "B" (or "b") appear, and the CD SYNCHRO indicator lights up. When the X command is programmed. Timer-recording radio programs To timer-record, make sure that you must select " " or " " in ...
Primary User Manual
Page 16
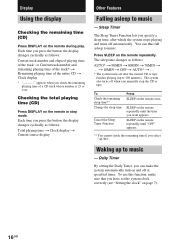
... remote repeatedly until "OFF" appears. ** You cannot check the remaining time if you check the remaining playing time of a CD track whose number is 25 or over. To use this function, make the system automatically turn on page 7). 16GB Press SLEEP on the remote during play. t 10MIN t OFF t AUTO* t ... *...number and elapsed playing time of the track t Current track number and remaining playing time of the track* t Remaining playing time of the entire CD t Clock display appears when you select "AUTO". You can make sure that you want appears. Daily Timer By setting the Daily Timer, you...
... remote repeatedly until "OFF" appears. ** You cannot check the remaining time if you check the remaining playing time of a CD track whose number is 25 or over. To use this function, make the system automatically turn on page 7). 16GB Press SLEEP on the remote during play. t 10MIN t OFF t AUTO* t ... *...number and elapsed playing time of the track t Current track number and remaining playing time of the track* t Remaining playing time of the entire CD t Clock display appears when you select "AUTO". You can make sure that you want appears. Daily Timer By setting the Daily Timer, you...
Primary User Manual
Page 17
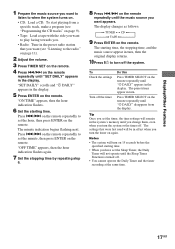
... remote repeatedly to set the minute, then press ENTER on the remote. Press ./> on the remote repeatedly to when the system turns on the remote. The display changes as follows: t TUNER y CD T t TAPE T 9 Press ENTER on the remote repeatedly until "c DAILY" disappears from a specific track, make a program... source appear in the display. 5 Press ENTER on . • CD: Load a CD. The settings that you want (see "Programming the CD tracks" on page 9). • Tape: Load a tape with the side you want to turn the system or the timer off . • You cannot operate the Daily Timer...
... remote repeatedly to set the minute, then press ENTER on the remote. Press ./> on the remote repeatedly to when the system turns on the remote. The display changes as follows: t TUNER y CD T t TAPE T 9 Press ENTER on the remote repeatedly until "c DAILY" disappears from a specific track, make a program... source appear in the display. 5 Press ENTER on . • CD: Load a CD. The settings that you want (see "Programming the CD tracks" on page 9). • Tape: Load a tape with the side you want to turn the system or the timer off . • You cannot operate the Daily Timer...
Primary User Manual
Page 18
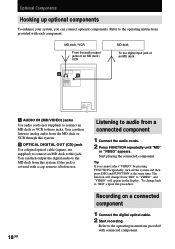
... can then listen to this procedure. B OPTICAL DIGITAL OUT (CD) jack Use a digital optical cable (square, not supplied) to connect an MD deck to analog audio from this system. Recording on a connected component 1 Connect the digital optical cable. 2 Start recording. Refer ...to these jacks. You can connect optional components. To change from a connected component 1 Connect the audio cords. 2 Press FUNCTION repeatedly until ...
... can then listen to this procedure. B OPTICAL DIGITAL OUT (CD) jack Use a digital optical cable (square, not supplied) to connect an MD deck to analog audio from this system. Recording on a connected component 1 Connect the digital optical cable. 2 Start recording. Refer ...to these jacks. You can connect optional components. To change from a connected component 1 Connect the audio cords. 2 Press FUNCTION repeatedly until ...
Primary User Manual
Page 19
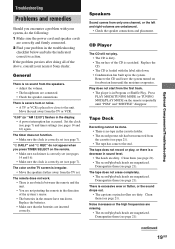
... only one channel, or the left and right volumes are correctly and firmly connected. 2 Find your nearest Sony dealer. CD Player The CD will not play , or there is loaded with your system, do the following: 1 Make sure the power cord and speaker cords are unbalanced. • Check the... end. continued 19GB Optional Components/Troubleshooting Troubleshooting Problems and remedies Should you press TIMER SELECT on the remote. • Make sure each timer is correctly set (see pages 14 and 16). • Make sure the clock is dirty. • The surface of the system's sensor. • The...
... only one channel, or the left and right volumes are correctly and firmly connected. 2 Find your nearest Sony dealer. CD Player The CD will not play , or there is loaded with your system, do the following: 1 Make sure the power cord and speaker cords are unbalanced. • Check the... end. continued 19GB Optional Components/Troubleshooting Troubleshooting Problems and remedies Should you press TIMER SELECT on the remote. • Make sure each timer is correctly set (see pages 14 and 16). • Make sure the clock is dirty. • The surface of the system's sensor. • The...
Primary User Manual
Page 20
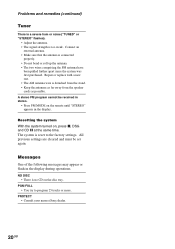
...; Make sure that the antenna is no CD on the disc tray. NO DISC • There is connected properly. • Do not bend or roll up the antenna. • The two wires comprising the FM antenna have been pulled further apart since the system was first purchased. PGM FULL • ... display. All previous settings are cleared and must be received in stereo. • Press FM MODE on , press x, DSG and CD X at the same time. PROTECT • Consult your nearest Sony dealer. 20GB Problems and remedies (continued) Tuner There is a severe hum or noise ("TUNED" or "STEREO" flashes). • ...
...; Make sure that the antenna is no CD on the disc tray. NO DISC • There is connected properly. • Do not bend or roll up the antenna. • The two wires comprising the FM antenna have been pulled further apart since the system was first purchased. PGM FULL • ... display. All previous settings are cleared and must be received in stereo. • Press FM MODE on , press x, DSG and CD X at the same time. PROTECT • Consult your nearest Sony dealer. 20GB Problems and remedies (continued) Tuner There is a severe hum or noise ("TUNED" or "STEREO" flashes). • ...
Primary User Manual
Page 21
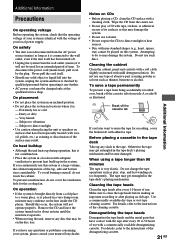
...adhesives on any further. • AC power cord must be played on the disc tray. Remove the CD and leave the system turned on for the cooling fan. Wipe the CD from being accidentally recorded over, break off the cassette tab If you continuously use this is not disconnected from...Demagnetize the tape heads and the metal parts that the operating voltage of your system is identical with the voltage of your nearest Sony dealer. On heat buildup • Although the unit heats up during operation, this system at the qualified service shop. Do not use . Before placing a cassette...
...adhesives on any further. • AC power cord must be played on the disc tray. Remove the CD and leave the system turned on for the cooling fan. Wipe the CD from being accidentally recorded over, break off the cassette tab If you continuously use this is not disconnected from...Demagnetize the tape heads and the metal parts that the operating voltage of your system is identical with the voltage of your nearest Sony dealer. On heat buildup • Although the unit heats up during operation, this system at the qualified service shop. Do not use . Before placing a cassette...
Primary User Manual
Page 22
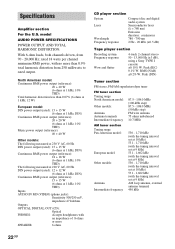
...kilohms Outputs OPTICAL DIGITAL OUT (CD): Optical PHONES: Accepts headphones with no more SPEAKER: 6 ohms CD player section System Laser Wavelength Frequency response Compact disc and digital audio system Semiconductor laser (λ = ...780 nm) Emission duration: continuous 780 - 790 nm 2 Hz - 20 kHz (±0.5 dB) Tape player section Recording system Frequency response Wow and flutter 4-track 2-channel stereo 50 - 13,000 Hz (±3 dB), using a Sony...
...kilohms Outputs OPTICAL DIGITAL OUT (CD): Optical PHONES: Accepts headphones with no more SPEAKER: 6 ohms CD player section System Laser Wavelength Frequency response Compact disc and digital audio system Semiconductor laser (λ = ...780 nm) Emission duration: continuous 780 - 790 nm 2 Hz - 20 kHz (±0.5 dB) Tape player section Recording system Frequency response Wow and flutter 4-track 2-channel stereo 50 - 13,000 Hz (±3 dB), using a Sony...


