
Operating Instructions
Page 3
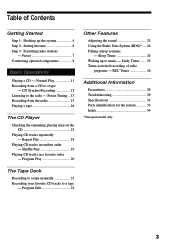
Preset 7 Connecting optional components 8 Basic Operations Playing a CD - Shuffle Play 19 Playing CD tracks in random order - Program Edit 22 3 Preset Tuning .. 13 Recording from a CD to a tape - Program Play 20 Other Features Adjusting the sound 23 Using the Radio Data System (RDS)* .... 24 ... Step 3: Presetting radio stations - REC Timer 26 Additional Information Precautions 28 Troubleshooting 29 Specifications 31 Parts identification for the remote 33 Index 34 * European model only The Tape Deck Recording to a tape manually 21 Recording your favorite CD tracks to...
Preset 7 Connecting optional components 8 Basic Operations Playing a CD - Shuffle Play 19 Playing CD tracks in random order - Program Edit 22 3 Preset Tuning .. 13 Recording from a CD to a tape - Program Play 20 Other Features Adjusting the sound 23 Using the Radio Data System (RDS)* .... 24 ... Step 3: Presetting radio stations - REC Timer 26 Additional Information Precautions 28 Troubleshooting 29 Specifications 31 Parts identification for the remote 33 Index 34 * European model only The Tape Deck Recording to a tape manually 21 Recording your favorite CD tracks to...
Operating Instructions
Page 5
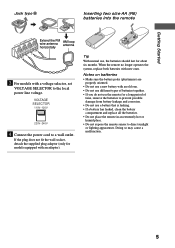
When the remote no longer operates the system, replace both batteries with an adaptor). Doing so may cause a malfunction. 5 e ...SELECTOR to the local power line voltage. Getting Started Jack type B Inserting two size-AA (R6) batteries into the remote ANTENNA AM U Extend the FM wire antenna horizontally FM75Ω U AM loop antenna 3 For models with an old... one. • Do not use different types of batteries together. • If you do not use the remote for a long period of time, remove the batteries to prevent possible damage from battery leakage and corrosion. • Do...
When the remote no longer operates the system, replace both batteries with an adaptor). Doing so may cause a malfunction. 5 e ...SELECTOR to the local power line voltage. Getting Started Jack type B Inserting two size-AA (R6) batteries into the remote ANTENNA AM U Extend the FM wire antenna horizontally FM75Ω U AM loop antenna 3 For models with an old... one. • Do not use different types of batteries together. • If you do not use the remote for a long period of time, remove the batteries to prevent possible damage from battery leakage and corrosion. • Do...
Operating Instructions
Page 7
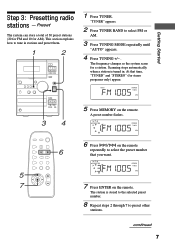
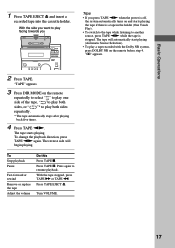
... - Getting Started Step 3: Presetting radio stations - AUTO STEREO FM1005 TUNED MHz 5 Press MEMORY on the remote. continued 7 "TUNER" appears. 2 Press TUNER BAND to preset other stations. The frequency changes as the system scans for AM). This section explains how to select the preset number that time, "TUNED" and "STEREO...to select FM or AM. 3 Press TUNING MODE repeatedly until "AUTO" appears. 4 Press TUNING +/- . Preset The system can store a total of 30 preset stations (20 for FM and 10 for a station. PRESET STEREO 1FM1005 TUNED MHz 6 Press l/L on...
... - Getting Started Step 3: Presetting radio stations - AUTO STEREO FM1005 TUNED MHz 5 Press MEMORY on the remote. continued 7 "TUNER" appears. 2 Press TUNER BAND to preset other stations. The frequency changes as the system scans for AM). This section explains how to select the preset number that time, "TUNED" and "STEREO...to select FM or AM. 3 Press TUNING MODE repeatedly until "AUTO" appears. 4 Press TUNING +/- . Preset The system can store a total of 30 preset stations (20 for FM and 10 for a station. PRESET STEREO 1FM1005 TUNED MHz 6 Press l/L on...

Operating Instructions
Page 13
...to record on both sides. 7 Press TAPE X. Z u x . > m M VOLUME 4 STEREO/ MONO continued 13 Basic Operations 6 Press DIR MODE on the remote repeatedly to select " " to record on one side of the tape, or " "or " " to the radio - Tips • To record with the Dolby NR... system on, press DOLBY NR on the system, press ?/1. 1 ?/1 (Power) 32 Z bB x m M X z + - Preset Tuning Presetting radio stations in the system's memory in advance makes it easy to tune in those stations later (see "Step 3: Presetting...
...to record on both sides. 7 Press TAPE X. Z u x . > m M VOLUME 4 STEREO/ MONO continued 13 Basic Operations 6 Press DIR MODE on the remote repeatedly to select " " to record on one side of the tape, or " "or " " to the radio - Tips • To record with the Dolby NR... system on, press DOLBY NR on the system, press ?/1. 1 ?/1 (Power) 32 Z bB x m M X z + - Preset Tuning Presetting radio stations in the system's memory in advance makes it easy to tune in those stations later (see "Step 3: Presetting...

Operating Instructions
Page 14
...to stereo. • To improve the reception, adjust the supplied antennas or connect an external antenna (see "Connecting external antennas" on the remote until "AUTO" and "PRESET" disappear, then press TUNING +/- Listening to display the preset number of the desired station. After "MONO" ...no longer be in the desired station (Manual Tuning). 14 repeatedly to the radio (continued) 1 Press TUNER. To Turn off , the system automatically turns on and tunes in a non-preset radio station In step 3, press TUNING MODE repeatedly until "MONO" appears. PRESET STEREO 3FM1005...
...to stereo. • To improve the reception, adjust the supplied antennas or connect an external antenna (see "Connecting external antennas" on the remote until "AUTO" and "PRESET" disappear, then press TUNING +/- Listening to display the preset number of the desired station. After "MONO" ...no longer be in the desired station (Manual Tuning). 14 repeatedly to the radio (continued) 1 Press TUNER. To Turn off , the system automatically turns on and tunes in a non-preset radio station In step 3, press TUNING MODE repeatedly until "MONO" appears. PRESET STEREO 3FM1005...

Operating Instructions
Page 15
" " and "B" (or "b") appear. 7 Press DIR MODE on the remote 7 DOLBY NR repeatedly to select " " to record on one side of the desired station. "TUNER" appears. 15 PRESET STEREO 3FM1005 TUNED MHz Preset number Frequency 5 ... to display the preset number of the tape, or " "or " " to record on both sides. The tape stands by for recording. To turn on the system, press ?/1.
" " and "B" (or "b") appear. 7 Press DIR MODE on the remote 7 DOLBY NR repeatedly to select " " to record on one side of the desired station. "TUNER" appears. 15 PRESET STEREO 3FM1005 TUNED MHz Preset number Frequency 5 ... to display the preset number of the tape, or " "or " " to record on both sides. The tape stands by for recording. To turn on the system, press ?/1.
Operating Instructions
Page 16
...I (normal), Type II (CrO2) and Type IV (metal). Z u x . > m M 2 VOLUME TAPE m/M 3 DOLBY NR 16 The system automatically detects the tape type so there is no need to tune in step 3 until " " changes to " ." • If you hear static.... Recording from a non-preset station, press TUNING MODE repeatedly in the desired station. • To record with the Dolby NR system on, press DOLBY NR on the remote before step 8. ";" appears. • To start recording on the system, press ?/1. 4 1 ?/1 (Power) TAPE X TAPE x Z bB x m M X z + - To stop recording Press...
...I (normal), Type II (CrO2) and Type IV (metal). Z u x . > m M 2 VOLUME TAPE m/M 3 DOLBY NR 16 The system automatically detects the tape type so there is no need to tune in step 3 until " " changes to " ." • If you hear static.... Recording from a non-preset station, press TUNING MODE repeatedly in the desired station. • To record with the Dolby NR system on, press DOLBY NR on the remote before step 8. ";" appears. • To start recording on the system, press ?/1. 4 1 ?/1 (Power) TAPE X TAPE x Z bB x m M X z + - To stop recording Press...
Operating Instructions
Page 17
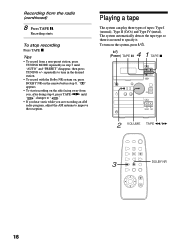
The tape starts playing. The reverse side will automatically start playing (Automatic Source Selection). • To play a tape recorded with the Dolby NR system, press DOLBY NR on the remote before step 4. Press TAPE X. With the tape stopped, press TAPE M or TAPE m. "TAPE" appears. 3 Press DIR MODE on and starts...the side you want to play facing towards you Z bB x m M X z Tips • If you press TAPE nN when the power is off, the system automatically turns on the remote repeatedly to select " " to play one side of the tape, " "to play both sides, or " "* to resume playback.
The tape starts playing. The reverse side will automatically start playing (Automatic Source Selection). • To play a tape recorded with the Dolby NR system, press DOLBY NR on the remote before step 4. Press TAPE X. With the tape stopped, press TAPE M or TAPE m. "TAPE" appears. 3 Press DIR MODE on and starts...the side you want to play facing towards you Z bB x m M X z Tips • If you press TAPE nN when the power is off, the system automatically turns on the remote repeatedly to select " " to play one side of the tape, " "to play both sides, or " "* to resume playback.

Operating Instructions
Page 21
... record from a CD. 1 TAPE nN TAPE x Z bB x m M X z + - ";" appears. • To start recording on the side facing away from you want from optional component 3 Press REC z. Z u x . > m M 25 3 4 DOLBY NR 1 Press TAPE EJECT Z and insert a recordable tape. 2 Press the button of the source you , after... from any source to a tape. " " and "B" (or "b") appear. 4 Press DIR MODE on the remote repeatedly to select " " to record on one side of the connected components. Tips • To record with the Dolby NR system on, press DOLBY NR on both sides. 5 Press TAPE X.
... record from a CD. 1 TAPE nN TAPE x Z bB x m M X z + - ";" appears. • To start recording on the side facing away from you want from optional component 3 Press REC z. Z u x . > m M 25 3 4 DOLBY NR 1 Press TAPE EJECT Z and insert a recordable tape. 2 Press the button of the source you , after... from any source to a tape. " " and "B" (or "b") appear. 4 Press DIR MODE on the remote repeatedly to select " " to record on one side of the connected components. Tips • To record with the Dolby NR system on, press DOLBY NR on both sides. 5 Press TAPE X.
Operating Instructions
Page 22
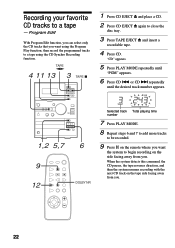
.... PGM 3 243 Selected track Total playing time number 7 Press PLAY MODE. 8 Repeat steps 6 and 7 to add more tracks to be recorded. 9 Press S on the remote where you want using the Program Play function, then record the programmed tracks to begin recording on the tape side facing away from you . 22... track on the side facing away from you . Program Edit With Program Edit function, you can select only the CD tracks that you want the system to a tape using the CD Synchro Recording function. Recording your favorite CD tracks to close the disc tray. 3 Press TAPE EJECT Z and insert a ...
.... PGM 3 243 Selected track Total playing time number 7 Press PLAY MODE. 8 Repeat steps 6 and 7 to add more tracks to be recorded. 9 Press S on the remote where you want using the Program Play function, then record the programmed tracks to begin recording on the tape side facing away from you . 22... track on the side facing away from you . Program Edit With Program Edit function, you can select only the CD tracks that you want the system to a tape using the CD Synchro Recording function. Recording your favorite CD tracks to close the disc tray. 3 Press TAPE EJECT Z and insert a ...

Operating Instructions
Page 23
... to be recorded on both sides. 13 Press TAPE X. " " and "B" (or "b") appear, and the CD SYNC indicator lights up. 12 Press DIR MODE on the remote repeatedly to select " " to record on one side of the tape facing away from you . 11 Press CD SYNC. Recording starts. Z u x . > m M Generating a more ...dynamic sound , Press DSG. The tape stands by for recording and the CD stands by for playback. Tips • To record with the Dolby NR system on, press DOLBY NR on the side facing away from you , after doing step 11, press TAPE nN until "PGM" disappears. Adjusting the treble ,...
... to be recorded on both sides. 13 Press TAPE X. " " and "B" (or "b") appear, and the CD SYNC indicator lights up. 12 Press DIR MODE on the remote repeatedly to select " " to record on one side of the tape facing away from you . 11 Press CD SYNC. Recording starts. Z u x . > m M Generating a more ...dynamic sound , Press DSG. The tape stands by for recording and the CD stands by for playback. Tips • To record with the Dolby NR system on, press DOLBY NR on the side facing away from you , after doing step 11, press TAPE nN until "PGM" disappears. Adjusting the treble ,...
Operating Instructions
Page 24
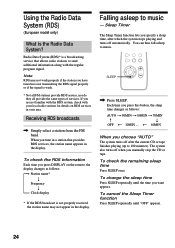
... you manually stop the CD or tape. T 60MIN When you choose "AUTO" The system turns off after which the system stops playing and turns off when you have tuned in your local radio stations for details on the remote, the display changes as follows: AUTO t 90MIN t 80MIN t 70MIN R r OFF... T 10MIN .... To change the sleep time Press SLEEP repeatedly until "OFF" appears. 24 Radio Data System (RDS)* is the Radio Data System? To check the remaining sleep time Press...
... you manually stop the CD or tape. T 60MIN When you choose "AUTO" The system turns off after which the system stops playing and turns off when you have tuned in your local radio stations for details on the remote, the display changes as follows: AUTO t 90MIN t 80MIN t 70MIN R r OFF... T 10MIN .... To change the sleep time Press SLEEP repeatedly until "OFF" appears. 24 Radio Data System (RDS)* is the Radio Data System? To check the remaining sleep time Press...
Operating Instructions
Page 29
...There is placed too close to 30 hours of the cleaning cassette. The color on the remote. • Make sure each timer is correctly set . too frequently. the sound becomes distorted...The tape is correctly set (see pages 25 and 26) again. Do not use with your nearest Sony dealer. "c DAILY" and "c REC" do the following: 1 Make sure the power cord and speaker... does not erase completely - For details, refer to the instructions of the above, consult your system, do not appear when you encounter a problem with a commercially available demagnetizing cassette. Demagnetizing the ...
...There is placed too close to 30 hours of the cleaning cassette. The color on the remote. • Make sure each timer is correctly set . too frequently. the sound becomes distorted...The tape is correctly set (see pages 25 and 26) again. Do not use with your nearest Sony dealer. "c DAILY" and "c REC" do the following: 1 Make sure the power cord and speaker... does not erase completely - For details, refer to the instructions of the above, consult your system, do not appear when you encounter a problem with a commercially available demagnetizing cassette. Demagnetizing the ...

Operating Instructions
Page 30
... CD is inserted with the label side down . The tape does not record or play . • The CD is dirty. • The surface of the system's sensor. • The batteries in the cassette holder. • The record protect tab has been removed from the cassette (see page 29). • The record..." disappear. Clean them (see page 29). CD Player The CD will not play , or there is a decrease in the system. Tape Deck Recording cannot be done. • There is no tape in the remote have run down . • Condensation has built up in sound level. • The heads are dirty. Demagnetize them...
... CD is inserted with the label side down . The tape does not record or play . • The CD is dirty. • The surface of the system's sensor. • The batteries in the cassette holder. • The record protect tab has been removed from the cassette (see page 29). • The record..." disappear. Clean them (see page 29). CD Player The CD will not play , or there is a decrease in the system. Tape Deck Recording cannot be done. • There is no tape in the remote have run down . • Condensation has built up in sound level. • The heads are dirty. Demagnetize them...
Operating Instructions
Page 31
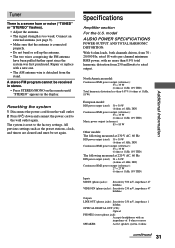
... the wall outlet again. A stereo FM program cannot be set again. rated 18 watts per channel minimum RMS power, with no more SPEAKER: Active speaker system, 6 ohms continued 31 Repair or replace with an impedance of 8 ohms or more than 0.07% (6 ohms at 1 kHz, 18 W) European model: DIN power output (rated.... All previous settings such as the preset stations, clock, and timers are cleared and must be received in stereo. • Press STEREO/MONO on the remote until "STEREO" appears in the display. The system is too weak. Specifications Amplifier section For the U.S.
... the wall outlet again. A stereo FM program cannot be set again. rated 18 watts per channel minimum RMS power, with no more SPEAKER: Active speaker system, 6 ohms continued 31 Repair or replace with an impedance of 8 ohms or more than 0.07% (6 ohms at 1 kHz, 18 W) European model: DIN power output (rated.... All previous settings such as the preset stations, clock, and timers are cleared and must be received in stereo. • Press STEREO/MONO on the remote until "STEREO" appears in the display. The system is too weak. Specifications Amplifier section For the U.S.
Operating Instructions
Page 32
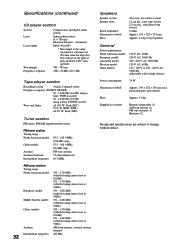
...790 nm 2 Hz - 20 kHz (±0.5 dB) Tape player section Recording system 4-track 2-channel stereo Frequency response (DOLBY NR OFF) 50 - 13,000 Hz (±3 dB), using a Sony TYPE I cassette 50 - 14,000 Hz (±3 dB), using a Sony TYPE II cassette Wow and flutter ±0.15% W. Peak (DIN) Tuner...(w/h/d) Approx. 190 × 252 × 310 mm incl. RMS (NAB) ±0.2% W. projecting parts and controls Mass Approx. 5.6 kg Supplied accessories Remote commander (1) AM loop antenna (1) FM wire antenna (1) Batteries (2) Design and specifications are subject to change without notice.
...790 nm 2 Hz - 20 kHz (±0.5 dB) Tape player section Recording system 4-track 2-channel stereo Frequency response (DOLBY NR OFF) 50 - 13,000 Hz (±3 dB), using a Sony TYPE I cassette 50 - 14,000 Hz (±3 dB), using a Sony TYPE II cassette Wow and flutter ±0.15% W. Peak (DIN) Tuner...(w/h/d) Approx. 190 × 252 × 310 mm incl. RMS (NAB) ±0.2% W. projecting parts and controls Mass Approx. 5.6 kg Supplied accessories Remote commander (1) AM loop antenna (1) FM wire antenna (1) Batteries (2) Design and specifications are subject to change without notice.
Operating Instructions
Page 33
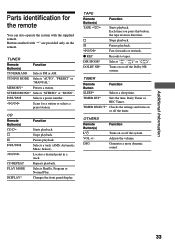
...S l/L j/J CD REPEAT PLAY MODE DISPLAY* Function Starts playback. Turns on or off the Dolby NR system. TIMER SELECT* Checks the settings and turns on or off the timer. TIMER Remote Button Function SLEEP* Selects a sleep time. Generates a more dynamic sound. 33 STEREO/MONO* Selects ...* Presets a station. j/J Scans for the remote You can also operate the system with "*" are provided only on or off the system. DSG Function Turns on the remote. Buttons marked with the supplied remote. Records to tapes. TUNER Remote Button(s) TUNER/BAND Function Selects FM or AM...
...S l/L j/J CD REPEAT PLAY MODE DISPLAY* Function Starts playback. Turns on or off the Dolby NR system. TIMER SELECT* Checks the settings and turns on or off the timer. TIMER Remote Button Function SLEEP* Selects a sleep time. Generates a more dynamic sound. 33 STEREO/MONO* Selects ...* Presets a station. j/J Scans for the remote You can also operate the system with "*" are provided only on or off the system. DSG Function Turns on the remote. Buttons marked with the supplied remote. Records to tapes. TUNER Remote Button(s) TUNER/BAND Function Selects FM or AM...


