

Operating Instructions
Page 1
Record the serial number in the space provided below. CMT-CP11 ©2000 Sony Corporation Model No. CMT-CP11 Serial No. 4-227-681-11(1) Micro HiFi Component System Operating Instructions Owner's Record The model and serial numbers are located at the rear. Refer to them whenever you call upon your Sony dealer regarding this product.
Record the serial number in the space provided below. CMT-CP11 ©2000 Sony Corporation Model No. CMT-CP11 Serial No. 4-227-681-11(1) Micro HiFi Component System Operating Instructions Owner's Record The model and serial numbers are located at the rear. Refer to them whenever you call upon your Sony dealer regarding this product.
Operating Instructions
Page 2
... which can radiate radio frequency energy and, if not installed and used in accordance with the Dolby* B-type noise reduction system. * Dolby noise reduction manufactured under license from that may cause harmful interference to qualified personnel only. However, there is connected. - Reorient or relocate the receiving antenna. - "DOLBY" and the double-D symbol ; are trademarks of important operating and maintenance (servicing) instructions in the literature...
... which can radiate radio frequency energy and, if not installed and used in accordance with the Dolby* B-type noise reduction system. * Dolby noise reduction manufactured under license from that may cause harmful interference to qualified personnel only. However, there is connected. - Reorient or relocate the receiving antenna. - "DOLBY" and the double-D symbol ; are trademarks of important operating and maintenance (servicing) instructions in the literature...
Operating Instructions
Page 3
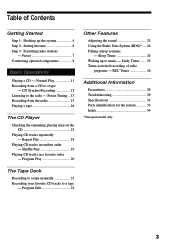
... Operations Playing a CD - Sleep Timer 24 Waking up the system 4 Step 2: Setting the time 6 Step 3: Presetting radio stations - REC Timer 26 Additional Information Precautions 28 Troubleshooting 29 Specifications 31 Parts identification for the remote 33 Index 34 * European model only The Tape Deck Recording to a tape manually 21 Recording your favorite CD tracks to music - CD Synchro Recording 12 Listening to music - Shuffle Play 19 Playing CD tracks in random order - Program...
... Operations Playing a CD - Sleep Timer 24 Waking up the system 4 Step 2: Setting the time 6 Step 3: Presetting radio stations - REC Timer 26 Additional Information Precautions 28 Troubleshooting 29 Specifications 31 Parts identification for the remote 33 Index 34 * European model only The Tape Deck Recording to a tape manually 21 Recording your favorite CD tracks to music - CD Synchro Recording 12 Listening to music - Shuffle Play 19 Playing CD tracks in random order - Program...
Operating Instructions
Page 7
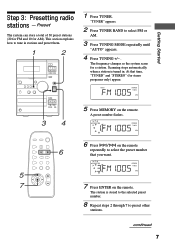
... TUNING MODE repeatedly until "AUTO" appears. 4 Press TUNING +/- . The station is tuned in stations and preset them. 1 2 Z bB x m M X z + - The frequency changes as the system scans for AM). PRESET STEREO 3FM1005 TUNED MHz 5 7 7 Press ENTER on the remote. At that you want. A preset number flashes. continued 7 PRESET STEREO 1FM1005 TUNED MHz 6 Press l/L on the remote 6 repeatedly to tune in . Z u x . > m M 34 1 Press TUNER. This section explains how to select the preset number that time, "TUNED" and "STEREO" (for stereo programs...
... TUNING MODE repeatedly until "AUTO" appears. 4 Press TUNING +/- . The station is tuned in stations and preset them. 1 2 Z bB x m M X z + - The frequency changes as the system scans for AM). PRESET STEREO 3FM1005 TUNED MHz 5 7 7 Press ENTER on the remote. At that you want. A preset number flashes. continued 7 PRESET STEREO 1FM1005 TUNED MHz 6 Press l/L on the remote 6 repeatedly to tune in . Z u x . > m M 34 1 Press TUNER. This section explains how to select the preset number that time, "TUNED" and "STEREO" (for stereo programs...
Operating Instructions
Page 8
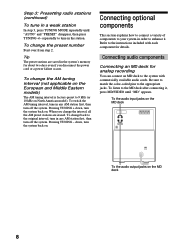
... audio output jacks on . Step 3: Presetting radio stations (continued) To tune in a weak station In step 3, press TUNING MODE repeatedly until "MD" appears. To change the preset number Start over from step 2. Pressing TUNING + down , turn the system back on North American model). Refer to your system in any AM station first, then turn off the system. Connecting optional components This section explains how to connect a variety of components to the instructions included with commercially available audio cords...
... audio output jacks on . Step 3: Presetting radio stations (continued) To tune in a weak station In step 3, press TUNING MODE repeatedly until "MD" appears. To change the preset number Start over from step 2. Pressing TUNING + down , turn the system back on North American model). Refer to your system in any AM station first, then turn off the system. Connecting optional components This section explains how to connect a variety of components to the instructions included with commercially available audio cords...
Operating Instructions
Page 11
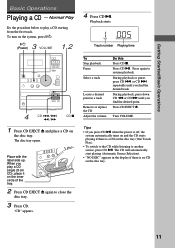
... system automatically turns on and the CD starts playing if there is no CD on the system, press ?/1. 3 ?/1 (Power) VOLUME 1,2 Z bB x m M X z + - Press CD u. "CD" appears. 4 Press CD u. Press CD EJECT Z. BGaesttiicngOpSetararteiodn/Bs asic Operations Basic Operations Playing a CD - During playback or pause, press CD . The CD will automatically start playing (Automatic Source Selection). • "NO DISC" appears in a track Remove or replace the CD Adjust...
... system automatically turns on and the CD starts playing if there is no CD on the system, press ?/1. 3 ?/1 (Power) VOLUME 1,2 Z bB x m M X z + - Press CD u. "CD" appears. 4 Press CD u. Press CD EJECT Z. BGaesttiicngOpSetararteiodn/Bs asic Operations Basic Operations Playing a CD - During playback or pause, press CD . The CD will automatically start playing (Automatic Source Selection). • "NO DISC" appears in a track Remove or replace the CD Adjust...

Operating Instructions
Page 14
...-preset radio station In step 3, press TUNING MODE repeatedly until "PRESET" appears. 4 Press TUNING +/- Listening to stereo. • To improve the reception, adjust the supplied antennas or connect an external antenna (see "Connecting external antennas" on page 9). repeatedly to tune in the station last received (One Touch Play). • To switch to the radio while listening to select FM or AM. 3 Press TUNING MODE repeatedly until "AUTO" and "PRESET" disappear, then press TUNING +/- PRESET STEREO 3FM1005 TUNED MHz Preset number Frequency Tips...
...-preset radio station In step 3, press TUNING MODE repeatedly until "PRESET" appears. 4 Press TUNING +/- Listening to stereo. • To improve the reception, adjust the supplied antennas or connect an external antenna (see "Connecting external antennas" on page 9). repeatedly to tune in the station last received (One Touch Play). • To switch to the radio while listening to select FM or AM. 3 Press TUNING MODE repeatedly until "AUTO" and "PRESET" disappear, then press TUNING +/- PRESET STEREO 3FM1005 TUNED MHz Preset number Frequency Tips...

Operating Instructions
Page 15
... TUNER. "TUNER" appears. 15 Basic Operations Recording from the radio Do the procedure below to tune in a preset station (see page 13) and record from the radio to select FM or AM. 3 Press TUNING MODE repeatedly until "PRESET" appears. 4 Press TUNING +/- To turn on facing towards you want to record on the system, press ?/1. The tape stands by for recording. Z u x . > m M 123 4 2 Press TUNER BAND to a tape. PRESET STEREO 3FM1005 TUNED MHz Preset number Frequency...
... TUNER. "TUNER" appears. 15 Basic Operations Recording from the radio Do the procedure below to tune in a preset station (see page 13) and record from the radio to select FM or AM. 3 Press TUNING MODE repeatedly until "PRESET" appears. 4 Press TUNING +/- To turn on facing towards you want to record on the system, press ?/1. The tape stands by for recording. Z u x . > m M 123 4 2 Press TUNER BAND to a tape. PRESET STEREO 3FM1005 TUNED MHz Preset number Frequency...
Operating Instructions
Page 17
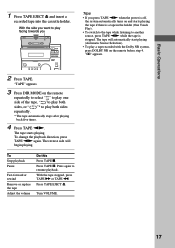
... • If you press TAPE nN when the power is off, the system automatically turns on the remote before step 4. Press TAPE X. Turn VOLUME. 17 The tape starts playing. To change the playback direction, press TAPE nN again. Press TAPE EJECT Z. With the tape stopped, press TAPE M or TAPE m. To Stop playback Pause Fast-forward or rewind Remove or replace the tape Adjust the volume Do this Press TAPE x. With the side...
... • If you press TAPE nN when the power is off, the system automatically turns on the remote before step 4. Press TAPE X. Turn VOLUME. 17 The tape starts playing. To change the playback direction, press TAPE nN again. Press TAPE EJECT Z. With the tape stopped, press TAPE M or TAPE m. To Stop playback Pause Fast-forward or rewind Remove or replace the tape Adjust the volume Do this Press TAPE x. With the side...

Operating Instructions
Page 23
... Adjusting the sound Not only can use the DSG (Dynamic Sound Generator) function to enjoy a more dynamic sound , Press DSG. Adjusting the treble , Turn TREBLE. Adjusting the bass , Turn BASS. The tape stands by for recording and the CD stands by for playback. To cancel Program Edit Press PLAY MODE repeatedly until " " changes to " ". BASS DSG TREBLE Z bB x m M X z + - " " and "B" (or "b") appear, and the CD SYNC indicator lights up. 12 Press DIR MODE on the remote...
... Adjusting the sound Not only can use the DSG (Dynamic Sound Generator) function to enjoy a more dynamic sound , Press DSG. Adjusting the treble , Turn TREBLE. Adjusting the bass , Turn BASS. The tape stands by for recording and the CD stands by for playback. To cancel Program Edit Press PLAY MODE repeatedly until " " changes to " ". BASS DSG TREBLE Z bB x m M X z + - " " and "B" (or "b") appear, and the CD SYNC indicator lights up. 12 Press DIR MODE on the remote...
Operating Instructions
Page 24
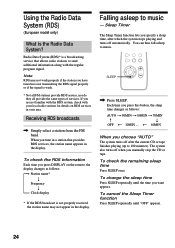
... Timer function lets you specify a sleep time, after the current CD or tape finishes playing (up to send additional information along with your area. Each time you press this button, the sleep time changes as follows: t Station name* r Frequency r Clock display * If the RDS broadcast is the Radio Data System? To change the sleep time Press SLEEP repeatedly until "OFF" appears. 24 Receiving RDS broadcasts , Simply select a station...
... Timer function lets you specify a sleep time, after the current CD or tape finishes playing (up to send additional information along with your area. Each time you press this button, the sleep time changes as follows: t Station name* r Frequency r Clock display * If the RDS broadcast is the Radio Data System? To change the sleep time Press SLEEP repeatedly until "OFF" appears. 24 Receiving RDS broadcasts , Simply select a station...

Operating Instructions
Page 25
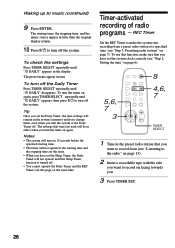
... the system automatically turn on page 13). 2 Press VOL +/- The minute indication begins flashing next. 700 c DAILY Press l or L repeatedly to adjust the volume. 3 Press TIMER SET. 4 Press l or L repeatedly until the music source you press the button, the display changes as follows: t TUNER Tt CD T t TAPE T continued 25 To start playing from a specific track, make sure that you want appears. To use this function, make a program (see "Playing...
... the system automatically turn on page 13). 2 Press VOL +/- The minute indication begins flashing next. 700 c DAILY Press l or L repeatedly to adjust the volume. 3 Press TIMER SET. 4 Press l or L repeatedly until the music source you press the button, the display changes as follows: t TUNER Tt CD T t TAPE T continued 25 To start playing from a specific track, make sure that you want appears. To use this function, make a program (see "Playing...
Operating Instructions
Page 26
... music source appear in effect when you turn the system or the Daily Timer off . • You cannot operate the Daily Timer and the REC Timer (see this function, make the system start recording from (see "Step 2: Setting the time" on page 6). 5,6, 7 3 8 4,6, 7 TIMER SELECT 1 Tune in the system's memory until "c DAILY" appears, then press ?/1 to record on again. The settings that were last used...
... music source appear in effect when you turn the system or the Daily Timer off . • You cannot operate the Daily Timer and the REC Timer (see this function, make the system start recording from (see "Step 2: Setting the time" on page 6). 5,6, 7 3 8 4,6, 7 TIMER SELECT 1 Tune in the system's memory until "c DAILY" appears, then press ?/1 to record on again. The settings that were last used...

Operating Instructions
Page 28
... may be on the disc tray. To disconnect the power cord (mains lead), pull it is identical with adhesive tape. Dusty or dirty - Subject to direct sunlight On operation • If the system is brought directly from the wall outlet (mains) if it any of tape. Extremely hot or cold - Subject to direct sunlight or heat sources such as illustrated. If...
... may be on the disc tray. To disconnect the power cord (mains lead), pull it is identical with adhesive tape. Dusty or dirty - Subject to direct sunlight On operation • If the system is brought directly from the wall outlet (mains) if it any of tape. Extremely hot or cold - Subject to direct sunlight or heat sources such as illustrated. If...
Operating Instructions
Page 29
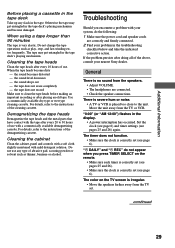
... the power cord and speaker cords are connected. • Check the speaker connections. Cleaning the tape heads Clean the tape heads after doing all of the above, consult your problem in the display. • A power interruption has occurred. Troubleshooting Should you press TIMER SELECT on the TV screen is placed too close to the instructions of the cleaning cassette. Additional Information Before placing a cassette in the tape deck...
... the power cord and speaker cords are connected. • Check the speaker connections. Cleaning the tape heads Clean the tape heads after doing all of the above, consult your problem in the display. • A power interruption has occurred. Troubleshooting Should you press TIMER SELECT on the TV screen is placed too close to the instructions of the cleaning cassette. Additional Information Before placing a cassette in the tape deck...

Operating Instructions
Page 30
... one channel, or the left and right volumes are magnetized. Remove the CD and leave the system turned on for about an hour until "PGM" and "SHUFFLE" disappear. Press PLAY MODE repeatedly until the moisture evaporates. Demagnetize them (see page 29). The tape does not erase completely. • The record/playback heads are unbalanced. • Check the speaker connections...
... one channel, or the left and right volumes are magnetized. Remove the CD and leave the system turned on for about an hour until "PGM" and "SHUFFLE" disappear. Press PLAY MODE repeatedly until the moisture evaporates. Demagnetize them (see page 29). The tape does not erase completely. • The record/playback heads are unbalanced. • Check the speaker connections...
Operating Instructions
Page 31
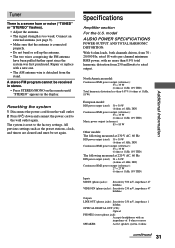
.... Resetting the system 1 Disconnect the power cord from 70 20,000 Hz; Repair or replace with no more SPEAKER: Active speaker system, 6 ohms continued 31 model AUDIO POWER SPECIFICATIONS POWER OUTPUT AND TOTAL HARMONIC DISTORTION: With 6-ohm loads, both channels driven, from the wall outlet. 2 Press ?/1 down and connect the power cord to rated output. A stereo FM program cannot be set again. Additional Information Tuner There is a severe hum or noise ("TUNED" or "STEREO" flashes). • Adjust the antenna. • The signal...
.... Resetting the system 1 Disconnect the power cord from 70 20,000 Hz; Repair or replace with no more SPEAKER: Active speaker system, 6 ohms continued 31 model AUDIO POWER SPECIFICATIONS POWER OUTPUT AND TOTAL HARMONIC DISTORTION: With 6-ohm loads, both channels driven, from the wall outlet. 2 Press ?/1 down and connect the power cord to rated output. A stereo FM program cannot be set again. Additional Information Tuner There is a severe hum or noise ("TUNED" or "STEREO" flashes). • Adjust the antenna. • The signal...
Operating Instructions
Page 32
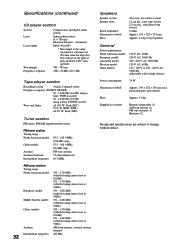
... loop antenna (1) FM wire antenna (1) Batteries (2) Design and specifications are subject to change without notice. Specifications (continued) CD player section System Laser Laser output Wavelength Frequency response Compact disc and digital audio system Semiconductor laser (λ = 780 nm) Emission duration: continuous MAX 44.6 µW* * This output is the value measured at 9 kHz) AM loop antenna, external antenna terminal 450 kHz Speakers Speaker system Speaker units Rated impedance Dimensions (w/h/d) Mass Two-way, bass reflex system 12...
... loop antenna (1) FM wire antenna (1) Batteries (2) Design and specifications are subject to change without notice. Specifications (continued) CD player section System Laser Laser output Wavelength Frequency response Compact disc and digital audio system Semiconductor laser (λ = 780 nm) Emission duration: continuous MAX 44.6 µW* * This output is the value measured at 9 kHz) AM loop antenna, external antenna terminal 450 kHz Speakers Speaker system Speaker units Rated impedance Dimensions (w/h/d) Mass Two-way, bass reflex system 12...
Operating Instructions
Page 33
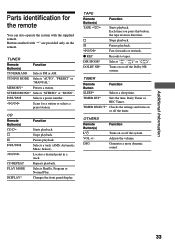
... SET* Sets the time, Daily Timer or REC Timer. Adjusts the volume. Selects a track (AMS: Automatic Music Sensor). Changes the front panel display. j/J Scans for the remote You can also operate the system with "*" are provided only on or off the timer. CD Remote Button(s) CD H s S l/L j/J CD REPEAT PLAY MODE DISPLAY* Function Starts playback. Buttons marked with the supplied remote. STEREO/MONO* Selects "STEREO" or "MONO". Each time you press this button, the tape reverses direction. Pauses playback. Turns...
... SET* Sets the time, Daily Timer or REC Timer. Adjusts the volume. Selects a track (AMS: Automatic Music Sensor). Changes the front panel display. j/J Scans for the remote You can also operate the system with "*" are provided only on or off the timer. CD Remote Button(s) CD H s S l/L j/J CD REPEAT PLAY MODE DISPLAY* Function Starts playback. Buttons marked with the supplied remote. STEREO/MONO* Selects "STEREO" or "MONO". Each time you press this button, the tape reverses direction. Pauses playback. Turns...
Operating Instructions
Page 34
... 24 R Radio stations presetting 7 tuning in 13 Recording a CD 12 a radio program 15 a tape manually 21 CDs by specifying the track order 22 timer-activated recording 26 Repeat Play 18 Resetting the system 31 S Setting the time 6 Shuffle Play 19 Sleep Timer 24 Speakers 4 34 Index A Adjusting the bass 23 the treble 23 the volume 11, 14, 17 Antennas 4, 9, 10 Automatic Source Selection 11, 14, 17 B Batteries 5 C CD player 11, 12, 18 Clock setting 6 Connecting.
... 24 R Radio stations presetting 7 tuning in 13 Recording a CD 12 a radio program 15 a tape manually 21 CDs by specifying the track order 22 timer-activated recording 26 Repeat Play 18 Resetting the system 31 S Setting the time 6 Shuffle Play 19 Sleep Timer 24 Speakers 4 34 Index A Adjusting the bass 23 the treble 23 the volume 11, 14, 17 Antennas 4, 9, 10 Automatic Source Selection 11, 14, 17 B Batteries 5 C CD player 11, 12, 18 Clock setting 6 Connecting.


