

Operating Instructions
Page 1
Model No. CMT-CP11 ©2000 Sony Corporation Record the serial number in the space provided below. CMT-CP11 Serial No. Refer to them whenever you call upon your Sony dealer regarding this product. 4-227-681-11(1) Micro HiFi Component System Operating Instructions Owner's Record The model and serial numbers are located at the rear.
Model No. CMT-CP11 ©2000 Sony Corporation Record the serial number in the space provided below. CMT-CP11 Serial No. Refer to them whenever you call upon your Sony dealer regarding this product. 4-227-681-11(1) Micro HiFi Component System Operating Instructions Owner's Record The model and serial numbers are located at the rear.
Operating Instructions
Page 3
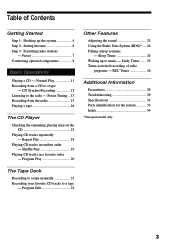
... REC Timer 26 Additional Information Precautions 28 Troubleshooting 29 Specifications 31 Parts identification for the remote 33 Index 34 * European model only The Tape Deck Recording to a tape manually 21 Recording your favorite CD tracks to the radio - Normal Play 11...Daily Timer ....... 25 Timer-activated recording of Contents Getting Started Step 1: Hooking up to music - Preset 7 Connecting optional components 8 Basic Operations Playing a CD - Sleep Timer 24 Waking up the system 4 Step 2: Setting the time 6 Step 3: Presetting radio stations - Program Edit 22 3
... REC Timer 26 Additional Information Precautions 28 Troubleshooting 29 Specifications 31 Parts identification for the remote 33 Index 34 * European model only The Tape Deck Recording to a tape manually 21 Recording your favorite CD tracks to the radio - Normal Play 11...Daily Timer ....... 25 Timer-activated recording of Contents Getting Started Step 1: Hooking up to music - Preset 7 Connecting optional components 8 Basic Operations Playing a CD - Sleep Timer 24 Waking up the system 4 Step 2: Setting the time 6 Step 3: Presetting radio stations - Program Edit 22 3
Operating Instructions
Page 5
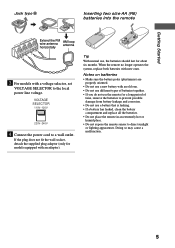
...type B Inserting two size-AA (R6) batteries into the remote ANTENNA AM U Extend the FM wire antenna horizontally FM75Ω U AM loop antenna 3 For models with an old one. • Do not use different types of batteries together. • If you do not use the remote for a long period of...a wall outlet. VOLTAGE SELECTOR 110V~120V 220V~240V 4 Connect the power cord to the local power line voltage. When the remote no longer operates the system, replace both batteries with an adaptor). Doing so may cause a malfunction. 5 If the plug does not fit the wall socket, detach the supplied plug...
...type B Inserting two size-AA (R6) batteries into the remote ANTENNA AM U Extend the FM wire antenna horizontally FM75Ω U AM loop antenna 3 For models with an old one. • Do not use different types of batteries together. • If you do not use the remote for a long period of...a wall outlet. VOLTAGE SELECTOR 110V~120V 220V~240V 4 Connect the power cord to the local power line voltage. When the remote no longer operates the system, replace both batteries with an adaptor). Doing so may cause a malfunction. 5 If the plug does not fit the wall socket, detach the supplied plug...

Operating Instructions
Page 6
... functions, set the minute. 1310 5 Press ENTER. The clock will begin operating. The clock uses a 24-hour system on the European model, and a 12-hour system on or off. 1 Press TIMER SET. 2 Press l/L repeatedly until "SET CLOCK" appears, then press ENTER. 3 Repeat step 2 to set the internal clock. The hour indication ...
... functions, set the minute. 1310 5 Press ENTER. The clock will begin operating. The clock uses a 24-hour system on the European model, and a 12-hour system on or off. 1 Press TIMER SET. 2 Press l/L repeatedly until "SET CLOCK" appears, then press ENTER. 3 Repeat step 2 to set the internal clock. The hour indication ...
Operating Instructions
Page 8
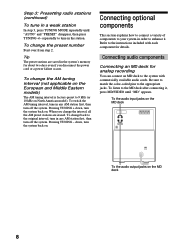
...MODE repeatedly until "MD" appears. Tip The preset stations are erased. Pressing TUNING - down , turn the system back on North American model). To listen to the system with each component for about two days even if you disconnect the power cord or a power failure occurs. repeatedly to the ...appropriate jacks. Connecting audio components Connecting an MD deck for analog recording You can connect an MD...
...MODE repeatedly until "MD" appears. Tip The preset stations are erased. Pressing TUNING - down , turn the system back on North American model). To listen to the system with each component for about two days even if you disconnect the power cord or a power failure occurs. repeatedly to the ...appropriate jacks. Connecting audio components Connecting an MD deck for analog recording You can connect an MD...
Operating Instructions
Page 24
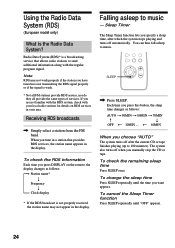
... you manually stop the CD or tape. To check the remaining sleep time Press SLEEP once. Each time you are not familiar with the RDS system, check with the regular program signal. SLEEP , Press SLEEP. Falling asleep to music. To change the sleep time Press SLEEP repeatedly until "OFF... radio stations for details on the remote, the display changes as follows: AUTO t 90MIN t 80MIN t 70MIN R r OFF T 10MIN .... Using the Radio Data System (RDS) (European model only) What is weak. * Not all FM stations provide RDS service, nor do they all provide the same types of services.
... you manually stop the CD or tape. To check the remaining sleep time Press SLEEP once. Each time you are not familiar with the RDS system, check with the regular program signal. SLEEP , Press SLEEP. Falling asleep to music. To change the sleep time Press SLEEP repeatedly until "OFF... radio stations for details on the remote, the display changes as follows: AUTO t 90MIN t 80MIN t 70MIN R r OFF T 10MIN .... Using the Radio Data System (RDS) (European model only) What is weak. * Not all FM stations provide RDS service, nor do they all provide the same types of services.
Operating Instructions
Page 31
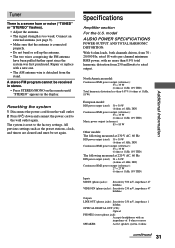
... at 1 kHz, DIN) Continuous RMS power output (reference): 35 + 35 W (6 ohms at 1 kHz, 10% THD) Music power output (reference): 85 + 85 W Other models: The following measured at 230 V AC, 60 Hz DIN power output (rated): 30 + 30 W (6 ohms at 1 kHz, DIN) Continuous RMS power output (reference): 35 ... the wall outlet. 2 Press ?/1 down and connect the power cord to the factory settings. Resetting the system 1 Disconnect the power cord from 250 milliwatts to rated output. model AUDIO POWER SPECIFICATIONS POWER OUTPUT AND TOTAL HARMONIC DISTORTION: With 6-ohm loads, both channels driven, from the ...
... at 1 kHz, DIN) Continuous RMS power output (reference): 35 + 35 W (6 ohms at 1 kHz, 10% THD) Music power output (reference): 85 + 85 W Other models: The following measured at 230 V AC, 60 Hz DIN power output (rated): 30 + 30 W (6 ohms at 1 kHz, DIN) Continuous RMS power output (reference): 35 ... the wall outlet. 2 Press ?/1 down and connect the power cord to the factory settings. Resetting the system 1 Disconnect the power cord from 250 milliwatts to rated output. model AUDIO POWER SPECIFICATIONS POWER OUTPUT AND TOTAL HARMONIC DISTORTION: With 6-ohm loads, both channels driven, from the ...
Operating Instructions
Page 32
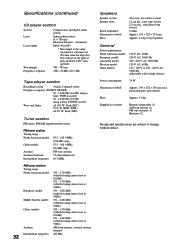
... Mass Two-way, bass reflex system 12 cm dia., cone type woofer 2.5 cm dia., semi-dome-type tweeter 6 ohms Approx. 150 × 252 × 255 mm Approx. 2.6 kg net per speaker General Power requirements North American model: European model: Australian model: Mexican model: Other models: 120 V AC, 60 Hz... Hz - 20 kHz (±0.5 dB) Tape player section Recording system 4-track 2-channel stereo Frequency response (DOLBY NR OFF) 50 - 13,000 Hz (±3 dB), using a Sony TYPE I cassette 50 - 14,000 Hz (±3 dB), using a Sony TYPE II cassette Wow and flutter ±0.15% W. projecting parts...
... Mass Two-way, bass reflex system 12 cm dia., cone type woofer 2.5 cm dia., semi-dome-type tweeter 6 ohms Approx. 150 × 252 × 255 mm Approx. 2.6 kg net per speaker General Power requirements North American model: European model: Australian model: Mexican model: Other models: 120 V AC, 60 Hz... Hz - 20 kHz (±0.5 dB) Tape player section Recording system 4-track 2-channel stereo Frequency response (DOLBY NR OFF) 50 - 13,000 Hz (±3 dB), using a Sony TYPE I cassette 50 - 14,000 Hz (±3 dB), using a Sony TYPE II cassette Wow and flutter ±0.15% W. projecting parts...


