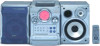
Operating Instructions
Page 3
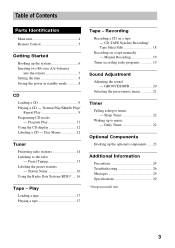
...22 Optional Components Hooking up to music - Normal Play/Shuffle Play/ Repeat Play 9 Programing CD tracks - Station Name 16 Using the Radio Data System (RDS)* .... 16 Tape - Table of Contents Parts Identification Main unit 4 Remote Control 5 Getting Started Hooking up the system 6 Inserting... two R6 (size AA) batteries into the remote 7 Setting the time 8 Saving the power in standby...
...22 Optional Components Hooking up to music - Normal Play/Shuffle Play/ Repeat Play 9 Programing CD tracks - Station Name 16 Using the Radio Data System (RDS)* .... 16 Tape - Table of Contents Parts Identification Main unit 4 Remote Control 5 Getting Started Hooking up the system 6 Inserting... two R6 (size AA) batteries into the remote 7 Setting the time 8 Saving the power in standby...
Operating Instructions
Page 4
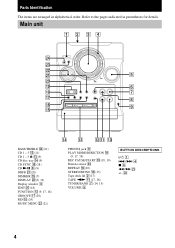
... qj (20) MD 0 (24) MUSIC MENU ws (21) qf qd qsqa 0 PHONES jack 9 PLAY MODE/DIRECTION qk (9, 17, 18) REC PAUSE/START ql (18, 19) Remote sensor wf REPEAT qh (10) STEREO/MONO qh (15) Tape deck lid 2 (17) TAPE nN qa (17, 18) TUNER/BAND 7 (14, 15) VOLUME 5 BUTTON DESCRIPTIONS...
... qj (20) MD 0 (24) MUSIC MENU ws (21) qf qd qsqa 0 PHONES jack 9 PLAY MODE/DIRECTION qk (9, 17, 18) REC PAUSE/START ql (18, 19) Remote sensor wf REPEAT qh (10) STEREO/MONO qh (15) Tape deck lid 2 (17) TAPE nN qa (17, 18) TUNER/BAND 7 (14, 15) VOLUME 5 BUTTON DESCRIPTIONS...
Operating Instructions
Page 5
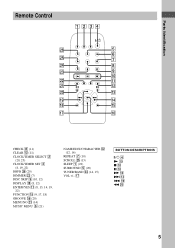
x q; M qd > qf . ql m w; 5 X q; qj BUTTON DESCRIPTIONS @/1 4 N q; Parts Identification Remote Control 1 2 34 wh 5 6 wg 7 wf 8 wd 9 0 ws qa wa qs w; qd ql qf qk qg qj qh CHECK 8 (11) CLEAR qs (11) CLOCK/TIMER SELECT 2 (20, 23) CLOCK/TIMER SET 3 (8, 19, 22) DBFB wh (20) DIMMER wd (7) DISC SKIP 9 (10, 12) DISPLAY qk (8, 12) ENTER/YES qa (8, 13, 14, 19, 22) FUNCTION qg (9, 17, 18) GROOVE qh (20) MENU/NO wa (14) MUSIC MENU 6 (21) NAME EDIT/CHARACTER ws (12, 16) REPEAT 7 (10) SCROLL wg (13) SLEEP 1 (22) SURROUND 5 (20) TUNER/BAND wf (14, 15) VOL +/-
x q; M qd > qf . ql m w; 5 X q; qj BUTTON DESCRIPTIONS @/1 4 N q; Parts Identification Remote Control 1 2 34 wh 5 6 wg 7 wf 8 wd 9 0 ws qa wa qs w; qd ql qf qk qg qj qh CHECK 8 (11) CLEAR qs (11) CLOCK/TIMER SELECT 2 (20, 23) CLOCK/TIMER SET 3 (8, 19, 22) DBFB wh (20) DIMMER wd (7) DISC SKIP 9 (10, 12) DISPLAY qk (8, 12) ENTER/YES qa (8, 13, 14, 19, 22) FUNCTION qg (9, 17, 18) GROOVE qh (20) MENU/NO wa (14) MUSIC MENU 6 (21) NAME EDIT/CHARACTER ws (12, 16) REPEAT 7 (10) SCROLL wg (13) SLEEP 1 (22) SURROUND 5 (20) TUNER/BAND wf (14, 15) VOL +/-
Operating Instructions
Page 7
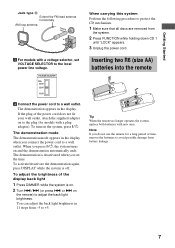
.... To turn on and the demonstration automatically ends. To activate/deactivate the demonstration again, press DISPLAY while the system is on the remote) to the local power line voltage. To adjust the brightness of time, remove the batteries to avoid possible ...press . Inserting two R6 (size AA) batteries into the remote e E E e Tip When the remote no longer operates the system, replace both batteries with new ones. The demonstration is deactivated when you press ?/1, the system turns on the system, press ?/1. The demonstration appears in 11 steps from battery leakage...
.... To turn on and the demonstration automatically ends. To activate/deactivate the demonstration again, press DISPLAY while the system is on the remote) to the local power line voltage. To adjust the brightness of time, remove the batteries to avoid possible ...press . Inserting two R6 (size AA) batteries into the remote e E E e Tip When the remote no longer operates the system, replace both batteries with new ones. The demonstration is deactivated when you press ?/1, the system turns on the system, press ?/1. The demonstration appears in 11 steps from battery leakage...
Operating Instructions
Page 8
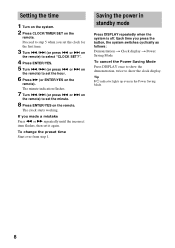
...8 Tip ?/1 indicator lights up even in standby mode Press DISPLAY repeatedly when the system is off. or > on the remote. The clock starts working. Setting the time 1 Turn on the system. 2 Press CLOCK/TIMER SET on the remote) to select "CLOCK SET?". 4 Press ENTER/YES. 5 Turn ./> (or press... . The minute indication flashes. 7 Turn ./> (or press . Each time you press the button, the system switches cyclically as follows: Demonstration t Clock ...
...8 Tip ?/1 indicator lights up even in standby mode Press DISPLAY repeatedly when the system is off. or > on the remote. The clock starts working. Setting the time 1 Turn on the system. 2 Press CLOCK/TIMER SET on the remote) to select "CLOCK SET?". 4 Press ENTER/YES. 5 Turn ./> (or press... . The minute indication flashes. 7 Turn ./> (or press . Each time you press the button, the system switches cyclically as follows: Demonstration t Clock ...
Operating Instructions
Page 9
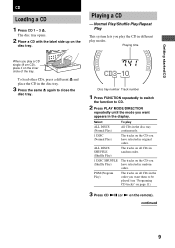
... (Program Play) The tracks on all CDs in random order. 1 DISC SHUFFLE The tracks on the disc tray. Normal Play/Shuffle Play/Repeat Play This system lets you (Shuffle Play) have selected in the display. To load other CDs, press a different Z and place the CD in different play a CD single (8... cm CD), place it on the remote). ALL DISCS SHUFFLE (Shuffle Play) The tracks on all CDs in the order you want them to close the disc tray. continued 9 The disc tray...
... (Program Play) The tracks on all CDs in random order. 1 DISC SHUFFLE The tracks on the disc tray. Normal Play/Shuffle Play/Repeat Play This system lets you (Shuffle Play) have selected in the display. To load other CDs, press a different Z and place the CD in different play a CD single (8... cm CD), place it on the remote). ALL DISCS SHUFFLE (Shuffle Play) The tracks on all CDs in the order you want them to close the disc tray. continued 9 The disc tray...
Operating Instructions
Page 10
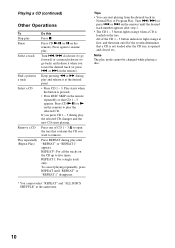
...1 - 3 button lights orange when a CD is loaded on /off if the system determines that a CD is not loaded after the CD tray is pressed. • Press DISC SKIP on the remote). Press CD NX (or X on the remote repeatedly so that contains the CD you press CD 1 - 3 during play, the ... cancel playing repeatedly, press REPEAT until "REPEAT" or "REPEAT 1" appears. Play starts when the button is opened and closed, etc. or > on the remote) to five times. Playing a CD (continued) Other Operations To Stop play Pause Select a track Find a point in Normal Play or Program Play. Note The...
...1 - 3 button lights orange when a CD is loaded on /off if the system determines that a CD is not loaded after the CD tray is pressed. • Press DISC SKIP on the remote). Press CD NX (or X on the remote repeatedly so that contains the CD you press CD 1 - 3 during play, the ... cancel playing repeatedly, press REPEAT until "REPEAT" or "REPEAT 1" appears. Play starts when the button is opened and closed, etc. or > on the remote) to five times. Playing a CD (continued) Other Operations To Stop play Pause Select a track Find a point in Normal Play or Program Play. Note The...
Operating Instructions
Page 11
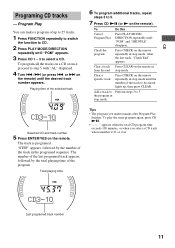
... To program additional tracks, repeat steps 3 to select a CD. After the last track, "Check End" appears. Clear a specific track Press CHECK on the remote repeatedly in from the end stop mode. appears when the total CD program time exceeds 100 minutes, or when you made remains after Program Play... 4 Turn ./> (or press . "STEP" appears, followed by the total playing time of up , then press CLEAR. To program all the tracks on the remote. To Cancel Program Play Do this Press PLAY MODE/ DIRECTION repeatedly until "PGM" appears. 3 Press CD 1 - 3 to 5. 7 Press CD NX (or N on the...
... To program additional tracks, repeat steps 3 to select a CD. After the last track, "Check End" appears. Clear a specific track Press CHECK on the remote repeatedly in from the end stop mode. appears when the total CD program time exceeds 100 minutes, or when you made remains after Program Play... 4 Turn ./> (or press . "STEP" appears, followed by the total playing time of up , then press CLEAR. To program all the tracks on the remote. To Cancel Program Play Do this Press PLAY MODE/ DIRECTION repeatedly until "PGM" appears. 3 Press CD 1 - 3 to 5. 7 Press CD NX (or N on the...
Operating Instructions
Page 12
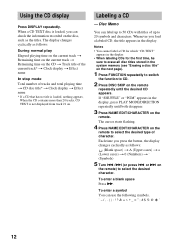
... (Upper cases) t a (Lower cases) t 0 (Numbers) t ' (Symbols) 5 Turn ./> (or press . When a CD TEXT disc is loaded, you can check the information recorded on the remote repeatedly until both disappear. 3 Press NAME EDIT/CHARACTER on the CD t Track title of the current track* t Clock display t Effect name In stop mode Total... as the titles. Disc Memo You can use the following symbols 12 Each time you load a labeled CD, the title appears in the system memory (see "Erasing a disc title" on the next page). 1 Press FUNCTION repeatedly to switch the function to erase all disc titles ...
... (Upper cases) t a (Lower cases) t 0 (Numbers) t ' (Symbols) 5 Turn ./> (or press . When a CD TEXT disc is loaded, you can check the information recorded on the remote repeatedly until both disappear. 3 Press NAME EDIT/CHARACTER on the CD t Track title of the current track* t Clock display t Effect name In stop mode Total... as the titles. Disc Memo You can use the following symbols 12 Each time you load a labeled CD, the title appears in the system memory (see "Erasing a disc title" on the next page). 1 Press FUNCTION repeatedly to switch the function to erase all disc titles ...

Operating Instructions
Page 13
...procedure. To cancel erasing Press MENU/NO on the remote) until "Name Erase ?" Note To ensure that disc titles are not erased from memory, have the system connected to complete the entire title. appears, then press ENTER/YES on the remote again. "Complete!" The character you want to change...titles, turn ./> (or press . appears, then press ENTER/YES on the remote) until the character you made a mistake Press m or M until "Name Check ?" appears in the system memory between 01 and 50. or > on the remote) to select the disc titles stored in step 2, then press ENTER/ YES ...
...procedure. To cancel erasing Press MENU/NO on the remote) until "Name Erase ?" Note To ensure that disc titles are not erased from memory, have the system connected to complete the entire title. appears, then press ENTER/YES on the remote again. "Complete!" The character you want to change...titles, turn ./> (or press . appears, then press ENTER/YES on the remote) until the character you made a mistake Press m or M until "Name Check ?" appears in the system memory between 01 and 50. or > on the remote) to select the disc titles stored in step 2, then press ENTER/ YES ...
Operating Instructions
Page 14
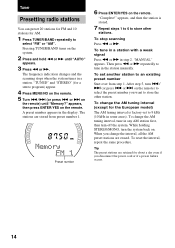
... a station with a weak signal Press m or M in any AM station first, then turn off the system. After step 5, turn the system back on the system. 2 Press and hold m or M until "Memory?" or > on the remote) to select the preset number you want to tune in some areas). Pressing TUNER/BAND turns on...retained for about a day even if you change the AM tuning interval, tune in step 2. The frequency indication changes and the scanning stops when the system tunes in the display. While holding STEREO/MONO, turn ./ > (or press . Tuner Presetting radio stations You can preset 20 stations for FM and...
... a station with a weak signal Press m or M in any AM station first, then turn off the system. After step 5, turn the system back on the system. 2 Press and hold m or M until "Memory?" or > on the remote) to select the preset number you want to tune in some areas). Pressing TUNER/BAND turns on...retained for about a day even if you change the AM tuning interval, tune in step 2. The frequency indication changes and the scanning stops when the system tunes in the display. While holding STEREO/MONO, turn ./ > (or press . Tuner Presetting radio stations You can preset 20 stations for FM and...
Operating Instructions
Page 15
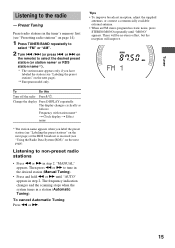
... select "FM" or "AM". 2 Turn ./> (or press . Change the display Press DISPLAY repeatedly. The frequency indication changes and the scanning stops when the system tunes in step 2. Tips • To improve broadcast reception, adjust the supplied antennas, or connect a commercially available external antenna. • When an FM stereo... station name* t Clock display t Effect name * The station name appears when you have labeled the station (see "Presetting radio stations" on the remote) to tune in the desired station (Manual Tuning). • Press and hold m or M until "MONO" appears.
... select "FM" or "AM". 2 Turn ./> (or press . Change the display Press DISPLAY repeatedly. The frequency indication changes and the scanning stops when the system tunes in step 2. Tips • To improve broadcast reception, adjust the supplied antennas, or connect a commercially available external antenna. • When an FM stereo... station name* t Clock display t Effect name * The station name appears when you have labeled the station (see "Presetting radio stations" on the remote) to tune in the desired station (Manual Tuning). • Press and hold m or M until "MONO" appears.
Operating Instructions
Page 16
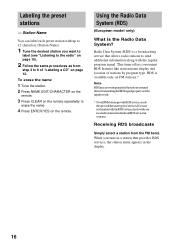
...step 3 to 12 characters (Station Name). 1 Tune the desired station you tuned in the display. 16 When you are not familiar with the RDS system, check with up to 8 of services. RDS is available only on FM stations.* Note RDS may not work properly if the station you want to...2 Follow the same procedures as from the FM band. To erase the name 1 Tune the station. 2 Press NAME EDIT/CHARACTER on the remote. 3 Press CLEAR on the remote repeatedly to the radio" on the remote. This tuner offers convenient RDS features like station name display and location of stations by program type.
...step 3 to 12 characters (Station Name). 1 Tune the desired station you tuned in the display. 16 When you are not familiar with the RDS system, check with up to 8 of services. RDS is available only on FM stations.* Note RDS may not work properly if the station you want to...2 Follow the same procedures as from the FM band. To erase the name 1 Tune the station. 2 Press NAME EDIT/CHARACTER on the remote. 3 Press CLEAR on the remote repeatedly to the radio" on the remote. This tuner offers convenient RDS features like station name display and location of stations by program type.

Operating Instructions
Page 17
... AMS feature may not work in the illustration. Press TAPE nN (or N on the remote). To Do this Stop play both sides. 3 Press TAPE nN (or N on the remote) again to the system. 17 Notes • If you do not close to play facing up the tape from...function to TAPE. 2 Press PLAY MODE/DIRECTION repeatedly until g appears to play one side or h (or j*1) to play Press x. Pause Press X on the remote) for the bottom side during playback. Find the preceding track (AMS*2) Turn ./> counterclockwise (or press . Turn ./> counterclockwise (or press . Turn ./> clockwise (...
... AMS feature may not work in the illustration. Press TAPE nN (or N on the remote). To Do this Stop play both sides. 3 Press TAPE nN (or N on the remote) again to the system. 17 Notes • If you do not close to play facing up the tape from...function to TAPE. 2 Press PLAY MODE/DIRECTION repeatedly until g appears to play one side or h (or j*1) to play Press x. Pause Press X on the remote) for the bottom side during playback. Find the preceding track (AMS*2) Turn ./> counterclockwise (or press . Turn ./> counterclockwise (or press . Turn ./> clockwise (...
Operating Instructions
Page 19
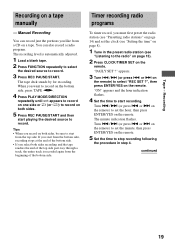
...radio stations" on page 14) and set the clock (see "Setting the time" on page 8). 1 Tune in step 4. Turn ./> (or press . or > on the remote) to stop recording following the procedure in the preset radio station (see "Listening to the radio" on page 15). 2 Press CLOCK/TIMER SET on the...deck stands by for recording. Turn ./> (or press . When you select both sides. 5 Press REC PAUSE/START and then start recording. or > on the remote) to record. 3 Press REC PAUSE/START. Manual Recording You can also record a radio program. The recording level is recorded again from the beginning of the...
...radio stations" on page 14) and set the clock (see "Setting the time" on page 8). 1 Tune in step 4. Turn ./> (or press . or > on the remote) to stop recording following the procedure in the preset radio station (see "Listening to the radio" on page 15). 2 Press CLOCK/TIMER SET on the...deck stands by for recording. Turn ./> (or press . When you select both sides. 5 Press REC PAUSE/START and then start recording. or > on the remote) to record. 3 Press REC PAUSE/START. Manual Recording You can also record a radio program. The recording level is recorded again from the beginning of the...
Operating Instructions
Page 20
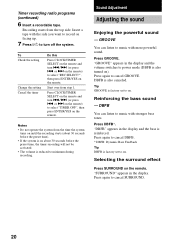
...cancel SURROUND. 20 "DBFB" appears in the display and the bass is also canceled. Recording starts from step 1. or > on the remote) to turn off the system. Press GROOVE. Press again to cancel GROOVE. "GROOVE" appears in the display. "SURROUND" appears in the display and the volume switches... the time the system turns on until the recording starts (about 30 seconds before the preset time, the timer-recording will not be activated. • The volume is also turned on the remote. Sound Adjustment Adjusting the sound Enjoying the powerful sound - DBFB You can listen to ...
...cancel SURROUND. 20 "DBFB" appears in the display and the bass is also canceled. Recording starts from step 1. or > on the remote) to turn off the system. Press GROOVE. Press again to cancel GROOVE. "GROOVE" appears in the display. "SURROUND" appears in the display and the volume switches... the time the system turns on until the recording starts (about 30 seconds before the preset time, the timer-recording will not be activated. • The volume is also turned on the remote. Sound Adjustment Adjusting the sound Enjoying the powerful sound - DBFB You can listen to ...
Operating Instructions
Page 22
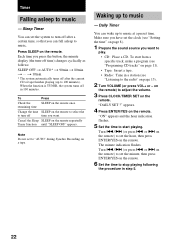
...you can fall asleep to turn off in a station (see "Programing CD tracks" on the remote) to music - remaining time Change the time SLEEP on the remote to select the to music. Daily Timer You can set the system to turn off time) changes cyclically as follows: SLEEP OFF t AUTO* t 90min t 80min...Timer Falling asleep to adjust the volume. 3 Press CLOCK/TIMER SET on the remote. appears. 4 Press ENTER/YES on the remote once. Sleep Timer You can wake up to music - When the function is TUNER, the system turns off after the current CD or tape finishes playing (up to music at ...
...you can fall asleep to turn off in a station (see "Programing CD tracks" on the remote) to music - remaining time Change the time SLEEP on the remote to select the to music. Daily Timer You can set the system to turn off time) changes cyclically as follows: SLEEP OFF t AUTO* t 90min t 80min...Timer Falling asleep to adjust the volume. 3 Press CLOCK/TIMER SET on the remote. appears. 4 Press ENTER/YES on the remote once. Sleep Timer You can wake up to music - When the function is TUNER, the system turns off after the current CD or tape finishes playing (up to music at ...
Operating Instructions
Page 23
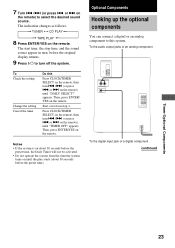
... seconds before the preset time, the Daily Timer will not be activated. • Do not operate the system from step 1. or > on the remote. Optional Components Hooking up the optional components You can connect a digital or an analog component to select the desired sound source. The indication changes as follows: t TUNER y CD PLAY T t TAPE PLAY...
... seconds before the preset time, the Daily Timer will not be activated. • Do not operate the system from step 1. or > on the remote. Optional Components Hooking up the optional components You can connect a digital or an analog component to select the desired sound source. The indication changes as follows: t TUNER y CD PLAY T t TAPE PLAY...
Operating Instructions
Page 24
...service shop. • When you connect the power cord to a wall outlet, even if the power is not to be used for remote and timer functions. To disconnect the power cord, pull it out by qualified personnel before operating it any solid object or liquid fall ...charging for an extended period of time. Extremely hot or cold - recording to direct sunlight. 24 component Additional Information Precautions On operating voltage Before operating the system, check that the operating voltage of your system is on top of this unit become warm, this Make a digital Connect a digital cable. On...
...service shop. • When you connect the power cord to a wall outlet, even if the power is not to be used for remote and timer functions. To disconnect the power cord, pull it out by qualified personnel before operating it any solid object or liquid fall ...charging for an extended period of time. Extremely hot or cold - recording to direct sunlight. 24 component Additional Information Precautions On operating voltage Before operating the system, check that the operating voltage of your system is on top of this unit become warm, this Make a digital Connect a digital cable. On...

Operating Instructions
Page 26
... the power cord is no sound. • Turn VOLUME clockwise (or press VOL+ on the remote). • Make sure the headphones are connected correctly and firmly. "0:00" (for the European model.... General There is connected firmly and that have any problem persist, consult your nearest Sony dealer. Cleaning the tape heads Clean the tape heads after playing an old tape. Use ... . • Set the clock again (see page 8). There is severe hum or noise. • Move the system away from side A or B as possible. • Connect only one channel, or unbalanced left and right volume....
... the power cord is no sound. • Turn VOLUME clockwise (or press VOL+ on the remote). • Make sure the headphones are connected correctly and firmly. "0:00" (for the European model.... General There is connected firmly and that have any problem persist, consult your nearest Sony dealer. Cleaning the tape heads Clean the tape heads after playing an old tape. Use ... . • Set the clock again (see page 8). There is severe hum or noise. • Move the system away from side A or B as possible. • Connect only one channel, or unbalanced left and right volume....


