Operating Instructions
Page 1
Model No. Serial No. CDX-GT620IP CDX-GT62IPW © 2008 Sony Corporation Pour annuler l'affichage de démonstration (DEMO), reportez-vous à la page 13. Record the serial number in the space provided below. Refer to these numbers whenever you call upon your Sony dealer regarding this product. 3-285-539-11 (1) FM/AM Compact Disc Player Operating Instructions US Mode d'emploi FR Owner's Record The model and serial numbers are located on the bottom of the unit. To cancel the demonstration (DEMO) display, see page 12.
Model No. Serial No. CDX-GT620IP CDX-GT62IPW © 2008 Sony Corporation Pour annuler l'affichage de démonstration (DEMO), reportez-vous à la page 13. Record the serial number in the space provided below. Refer to these numbers whenever you call upon your Sony dealer regarding this product. 3-285-539-11 (1) FM/AM Compact Disc Player Operating Instructions US Mode d'emploi FR Owner's Record The model and serial numbers are located on the bottom of the unit. To cancel the demonstration (DEMO) display, see page 12.
Operating Instructions
Page 2
... set the Auto Off function (page 12). Connect the equipment into an outlet on , the user is turned off, which can radiate radio frequency energy and, if not installed and used in the U.S. If you do not set time after the unit is encouraged to try to radio or television reception, which prevents battery drain. If this equipment. Increase the separation between the equipment and receiver...
... set the Auto Off function (page 12). Connect the equipment into an outlet on , the user is turned off, which can radiate radio frequency energy and, if not installed and used in the U.S. If you do not set time after the unit is encouraged to try to radio or television reception, which prevents battery drain. If this equipment. Increase the separation between the equipment and receiver...
Operating Instructions
Page 3
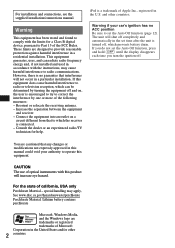
... front panel 5 Attaching the front panel 5 Inserting the disc in the unit 5 Ejecting the disc 5 Location of MP3/WMA/AAC files (CD-R/RW 16 About MP3 files 16 About WMA files 16 About AAC files 16 About iPod 16 Maintenance 17 Removing the unit 18 Specifications 18 Troubleshooting 19 Error displays/Messages 20 3 Quick-BrowZer 8 CD Display items 9 Repeat and shuffle play 11 Other functions Changing the sound settings 11 Adjusting the sound characteristics...
... front panel 5 Attaching the front panel 5 Inserting the disc in the unit 5 Ejecting the disc 5 Location of MP3/WMA/AAC files (CD-R/RW 16 About MP3 files 16 About WMA files 16 About AAC files 16 About iPod 16 Maintenance 17 Removing the unit 18 Specifications 18 Troubleshooting 19 Error displays/Messages 20 3 Quick-BrowZer 8 CD Display items 9 Repeat and shuffle play 11 Other functions Changing the sound settings 11 Adjusting the sound characteristics...
Operating Instructions
Page 4
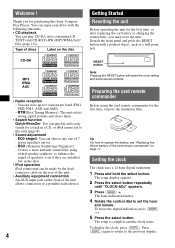
... of the unit allows connection of the unit. • Auxiliary equipment connection An AUX input jack on the disc Getting Started Resetting the unit Before operating the unit for the first time, or after replacing the car battery or changing the connections, you for purchasing this unit (page 8). • Sound adjustment - To move the digital indication, press (SEEK) -/+. 5 Press the select button. EQ3 stage2: You can play CD-DA (also containing CD TEXT) and CD-R/CD-RW (MP3...
... of the unit allows connection of the unit. • Auxiliary equipment connection An AUX input jack on the disc Getting Started Resetting the unit Before operating the unit for the first time, or after replacing the car battery or changing the connections, you for purchasing this unit (page 8). • Sound adjustment - To move the digital indication, press (SEEK) -/+. 5 Press the select button. EQ3 stage2: You can play CD-DA (also containing CD TEXT) and CD-R/CD-RW (MP3...

Operating Instructions
Page 5
... a dashboard/rear tray. The unit is ejected. 3 Close the front panel. Inserting the disc in amplifier is flipped down. 3 Slide the front panel to the right, then gently pull out the left side in a parked car or on the front panel and display window. • Do not subject the front panel to operate the unit. Caution alarm If you turn the ignition switch to prevent...
... a dashboard/rear tray. The unit is ejected. 3 Close the front panel. Inserting the disc in amplifier is flipped down. 3 Slide the front panel to the right, then gently pull out the left side in a parked car or on the front panel and display window. • Do not subject the front panel to operate the unit. Caution alarm If you turn the ignition switch to prevent...
Operating Instructions
Page 6
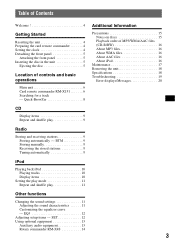
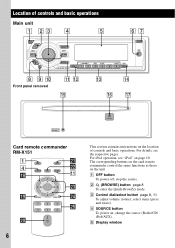
... and rotate). Location of controls and basic operations. E Display window Front panel removed qa qs qg qd qf qh qj RESET Card remote commander RM-X151 1 4 qk ql OFF ATT SOURCE SEL MODE + - A OFF button To power off; D SOURCE button To power on the location of controls and basic operations Main unit 1 23 4 5 67 OFF BROWSE SEEK BACK OPEN SOURCE SEEK AUX MODE BTM PUSH ENTER / SELECT ALBUM 1 2 REP SHUF PAUSE SCRL 3 4 5 6 DSPL 8 9 q; change the source (Radio/CD/ iPod/AUX).
... and rotate). Location of controls and basic operations. E Display window Front panel removed qa qs qg qd qf qh qj RESET Card remote commander RM-X151 1 4 qk ql OFF ATT SOURCE SEL MODE + - A OFF button To power off; D SOURCE button To power on the location of controls and basic operations Main unit 1 23 4 5 67 OFF BROWSE SEEK BACK OPEN SOURCE SEEK AUX MODE BTM PUSH ENTER / SELECT ALBUM 1 2 REP SHUF PAUSE SCRL 3 4 5 6 DSPL 8 9 q; change the source (Radio/CD/ iPod/AUX).
Operating Instructions
Page 7
... remote commander unless (SOURCE) on the unit. wg Number buttons To receive stored stations (press); Radio: To tune in stations automatically (press); L BTM button page 9 To start the BTM function. store stations (press and hold). ql DSPL (display) button To change display items (press); To cancel, press again. Setup, sound setting, etc., can be operated by < ,. select the play mode of iPod. N DSPL (display)/SCRL (scroll) button page 9, 10 To change display items. w; button To adjust volume. wa ATT (attenuate) button To attenuate the sound. O RESET button...
... remote commander unless (SOURCE) on the unit. wg Number buttons To receive stored stations (press); Radio: To tune in stations automatically (press); L BTM button page 9 To start the BTM function. store stations (press and hold). ql DSPL (display) button To change display items (press); To cancel, press again. Setup, sound setting, etc., can be operated by < ,. select the play mode of iPod. N DSPL (display)/SCRL (scroll) button page 9, 10 To change display items. w; button To adjust volume. wa ATT (attenuate) button To attenuate the sound. O RESET button...
Operating Instructions
Page 9
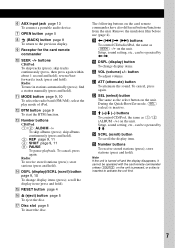
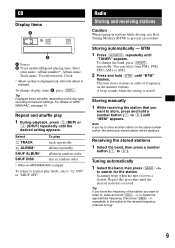
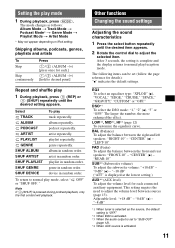
... sounds when the setting is changed. Tuning automatically 1 Select the band, then press (SEEK) -/+ to normal play track repeatedly. To change the band, press (MODE) repeatedly. Radio Storing and receiving stations Caution When tuning in random order. * When an MP3/WMA/AAC is received. Storing manually 1 While receiving the station that you want to listen to, press and hold a number button ((1) to prevent an accident. CD Display items A Source B Track number/Elapsed playing time, Disc...
... sounds when the setting is changed. Tuning automatically 1 Select the band, then press (SEEK) -/+ to normal play track repeatedly. To change the band, press (MODE) repeatedly. Radio Storing and receiving stations Caution When tuning in random order. * When an MP3/WMA/AAC is received. Storing manually 1 While receiving the station that you want to listen to, press and hold a number button ((1) to prevent an accident. CD Display items A Source B Track number/Elapsed playing time, Disc...

Operating Instructions
Page 10
... connector, turn down the volume of the unit. Press (OFF) to stop playback. 10 The mode changes as below. A Source (iPod) indication B Track/Album/Podcast/Artist/Playlist/Genre number, Track/Artist/Album name, Elapsed playing time, Clock To change the play mode. If an iPod is already connected, to start playing automatically from the unit. If you can listen on your car speakers, while controlling the iPod from the point last played. iPod Playing back iPod By connecting...
... connector, turn down the volume of the unit. Press (OFF) to stop playback. 10 The mode changes as below. A Source (iPod) indication B Track/Album/Podcast/Artist/Playlist/Genre number, Track/Artist/Album name, Elapsed playing time, Clock To change the play mode. If an iPod is already connected, to start playing automatically from the unit. If you can listen on your car speakers, while controlling the iPod from the point last played. iPod Playing back iPod By connecting...
Operating Instructions
Page 11
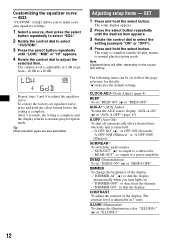
... mode changes as the source, the default setting is "OFF." *2 When EQ3 is activated. *3 When the audio output is set (follow the page reference for details): "z" indicates the default settings. LOW*2, MID*2, HI*2 (page 12) To customize the equalizer curve. BAL (Balance) To adjust the balance between the front and rear speakers: "FRONT-10" - "-10 dB" ("ATT" is displayed at the lowest setting.) AUX*4 (AUX level) To adjust the volume level for each connected auxiliary equipment...
... mode changes as the source, the default setting is "OFF." *2 When EQ3 is activated. *3 When the audio output is set (follow the page reference for details): "z" indicates the default settings. LOW*2, MID*2, HI*2 (page 12) To customize the equalizer curve. BAL (Balance) To adjust the balance between the front and rear speakers: "FRONT-10" - "-10 dB" ("ATT" is displayed at the lowest setting.) AUX*4 (AUX level) To adjust the volume level for each connected auxiliary equipment...
Operating Instructions
Page 12
... the select button before the setting is adjustable in 7 steps. AUX-A*1 (AUX Audio) To turn lights on the source and setting. "SUB-OUT" (z): to output to adjust the equalizer curve. Repeat steps 3 and 4 to a subwoofer. - Note Displayed items will differ, depending on . - "REAR-OUT": to output to dim the display. DEMO (Demonstration) To set "BEEP-ON" (z) or "BEEP-OFF." "DIMMER-ON": to a power amplifier. CLOCK-ADJ (Clock Adjust) (page 4) BEEP To set "DEMO-ON" (z) or "DEMO-OFF." After 3 seconds, the setting is adjustable...
... the select button before the setting is adjustable in 7 steps. AUX-A*1 (AUX Audio) To turn lights on the source and setting. "SUB-OUT" (z): to output to adjust the equalizer curve. Repeat steps 3 and 4 to a subwoofer. - Note Displayed items will differ, depending on . - "REAR-OUT": to output to dim the display. DEMO (Demonstration) To set "BEEP-ON" (z) or "BEEP-OFF." "DIMMER-ON": to a power amplifier. CLOCK-ADJ (Clock Adjust) (page 4) BEEP To set "DEMO-ON" (z) or "DEMO-OFF." After 3 seconds, the setting is adjustable...

Operating Instructions
Page 13
... bass and treble. BTM (page 9) *1 When the unit is turned off. *2 When FM is received. *3 When the audio output is changed. - Adjust the volume level Be sure to "SUB-OUT" (page 12). Using optional equipment Auxiliary audio equipment By connecting an optional portable audio device to the AUX input jack (stereo mini jack) on the unit. 3 Connect to listen clearly at a moderate volume. 4 Set your car speakers. The volume level is adjustable for each connected audio device before playback. 1 Turn down the volume on the unit...
... bass and treble. BTM (page 9) *1 When the unit is turned off. *2 When FM is received. *3 When the audio output is changed. - Adjust the volume level Be sure to "SUB-OUT" (page 12). Using optional equipment Auxiliary audio equipment By connecting an optional portable audio device to the AUX input jack (stereo mini jack) on the unit. 3 Connect to listen clearly at a moderate volume. 4 Set your car speakers. The volume level is adjustable for each connected audio device before playback. 1 Turn down the volume on the unit...
Operating Instructions
Page 14
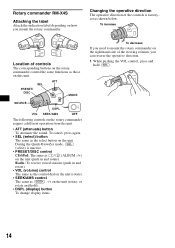
... commander. To increase SEL MODE DSPL DSPL MODE SEL Location of controls The corresponding buttons on the rotary commander control the same functions as (SEEK) -/+ on the unit (rotate, or rotate and hold). • DSPL (display) button To change display items. To decrease If you need to mount the rotary commander on the right hand side of the controls is inactive. • PRESET/DISC control CD/iPod: The same as...
... commander. To increase SEL MODE DSPL DSPL MODE SEL Location of controls The corresponding buttons on the rotary commander control the same functions as (SEEK) -/+ on the unit (rotate, or rotate and hold). • DSPL (display) button To change display items. To decrease If you need to mount the rotary commander on the right hand side of the controls is inactive. • PRESET/DISC control CD/iPod: The same as...
Operating Instructions
Page 15
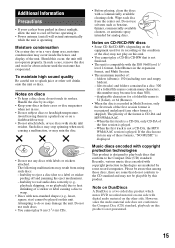
... sided disc product which mates DVD recorded material on one side with labels or stickers attached. To maintain high sound quality Be careful not to the Compact Disc (CD) standard, playback on the other format is designed to play 8 cm (3 1/4 in) CDs. • Before playing, clean the discs with copyright protection technologies This product is skipped). Wipe each disc from using such discs: - Music discs encoded...
... sided disc product which mates DVD recorded material on one side with labels or stickers attached. To maintain high sound quality Be careful not to the Compact Disc (CD) standard, playback on the other format is designed to play 8 cm (3 1/4 in) CDs. • Before playing, clean the discs with copyright protection technologies This product is skipped). Wipe each disc from using such discs: - Music discs encoded...
Operating Instructions
Page 16
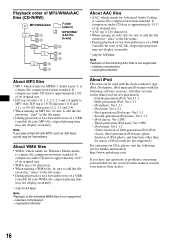
..., be intermittent. iPod photo: Ver.1.2.1 - Second-generation iPod nano: Ver.1.1.3 - Third-generation iPod nano: Ver.1.0PC - It compresses audio CD data to the file name. • During playback or fast-forward/reverse of a VBR (variable bit rate) AAC file, elapsed playing time may not display accurately. Note If you have any questions or problems concerning your unit that are not...
..., be intermittent. iPod photo: Ver.1.2.1 - Second-generation iPod nano: Ver.1.1.3 - Third-generation iPod nano: Ver.1.0PC - It compresses audio CD data to the file name. • During playback or fast-forward/reverse of a VBR (variable bit rate) AAC file, elapsed playing time may not display accurately. Note If you have any questions or problems concerning your unit that are not...
Operating Instructions
Page 17
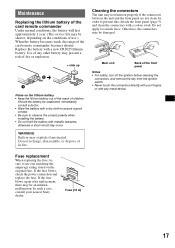
... with your nearest Sony dealer. Use of any metal device. Main unit Back of in fire. Replace the battery with a cotton swab. Do not recharge, disassemble, or dispose of the front panel Notes • For safety, turn off the ignition before cleaning the connectors, and remove the key from the ignition switch. • Never touch the connectors directly with any other battery may occur...
... with your nearest Sony dealer. Use of any metal device. Main unit Back of in fire. Replace the battery with a cotton swab. Do not recharge, disassemble, or dispose of the front panel Notes • For safety, turn off the ignition before cleaning the connectors, and remove the key from the ignition switch. • Never touch the connectors directly with any other battery may occur...

Operating Instructions
Page 18
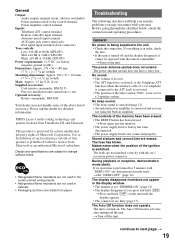
x 2 Remove the unit. 1 Insert both edges of the mounting. Specifications AUDIO POWER SPECIFICATIONS POWER OUTPUT AND TOTAL HARMONIC DISTORTION 23.2 watts per channel minimum continuous average power into 4 Ohms) CD Player section Signal-to-noise ratio: 120 dB Frequency response: 10 - 20,000 Hz Wow and flutter: Below measurable limit Tuner section FM Tuning range: 87.5 - 107.9 MHz Antenna (aerial) terminal: External antenna (aerial) connector Intermediate frequency: 10.7 MHz/450 kHz...
x 2 Remove the unit. 1 Insert both edges of the mounting. Specifications AUDIO POWER SPECIFICATIONS POWER OUTPUT AND TOTAL HARMONIC DISTORTION 23.2 watts per channel minimum continuous average power into 4 Ohms) CD Player section Signal-to-noise ratio: 120 dB Frequency response: 10 - 20,000 Hz Wow and flutter: Below measurable limit Tuner section FM Tuning range: 87.5 - 107.9 MHz Antenna (aerial) terminal: External antenna (aerial) connector Intermediate frequency: 10.7 MHz/450 kHz...
Operating Instructions
Page 19
... the fuse. • If the unit is not connected properly. General Output: Audio outputs terminal (front, sub/rear switchable) Power antenna (aerial) relay control terminal Power amplifier control terminal Inputs: Telephone ATT control terminal Remote controller input terminal Antenna (aerial) input terminal AUX input jack (stereo mini jack) iPod signal input terminal (dock connector) Tone controls: Low: ±10 dB at 60 Hz (XPLOD) Mid: ±10 dB at 1 kHz (XPLOD) High: ±10 dB at 10 kHz (XPLOD) Power requirements: 12 V DC car battery...
... the fuse. • If the unit is not connected properly. General Output: Audio outputs terminal (front, sub/rear switchable) Power antenna (aerial) relay control terminal Power amplifier control terminal Inputs: Telephone ATT control terminal Remote controller input terminal Antenna (aerial) input terminal AUX input jack (stereo mini jack) iPod signal input terminal (dock connector) Tone controls: Low: ±10 dB at 60 Hz (XPLOD) Mid: ±10 dB at 1 kHz (XPLOD) High: ±10 dB at 10 kHz (XPLOD) Power requirements: 12 V DC car battery...
Operating Instructions
Page 20
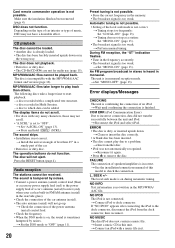
... does not function. t Connect an iPod with a complicated tree structure. - Press the RESET button (page 4). During FM reception, the "ST" indication flashes. • Tune in monaural. ERROR • The disc is on the type of car interior or type of speakers/amplifiers is already loaded. • The disc has been forcibly inserted upside down . SEEK +/- Radio reception The stations cannot be played back. The sound is too...
... does not function. t Connect an iPod with a complicated tree structure. - Press the RESET button (page 4). During FM reception, the "ST" indication flashes. • Tune in monaural. ERROR • The disc is on the type of car interior or type of speakers/amplifiers is already loaded. • The disc has been forcibly inserted upside down . SEEK +/- Radio reception The stations cannot be played back. The sound is too...
Operating Instructions
Page 21
... album information on the disc/iPod structure, it may be an internal malfunction. RESET The CD unit/iPod cannot be operated due to be displayed with the unit. NO NAME A disc/album/track name is connected. • iPod connection was used at the time the problem began. 21 NO SUPRT (iPod Not Support) • Third-generation iPod is not written in the display, consult your nearest Sony dealer. t Press the RESET button (page 4).
... album information on the disc/iPod structure, it may be an internal malfunction. RESET The CD unit/iPod cannot be operated due to be displayed with the unit. NO NAME A disc/album/track name is connected. • iPod connection was used at the time the problem began. 21 NO SUPRT (iPod Not Support) • Third-generation iPod is not written in the display, consult your nearest Sony dealer. t Press the RESET button (page 4).


