Operating Instructions
Page 1
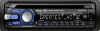
Model No. CDX-GT530UI ©2008 Sony Corporation To cancel the demonstration (DEMO) display, see page 6. Record the serial number in the space provided below. 4-109-737-11 (1) FM/AM Compact Disc Player Operating Instructions US Mode d'emploi FR Owner's Record The model and serial numbers are located on the bottom of the unit. Pour annuler l'affichage de démonstration (DEMO), reportez-vous à la page 6. Refer to these numbers whenever you call upon your Sony dealer regarding this product. CDX-GT530UI Serial No.
Model No. CDX-GT530UI ©2008 Sony Corporation To cancel the demonstration (DEMO) display, see page 6. Record the serial number in the space provided below. 4-109-737-11 (1) FM/AM Compact Disc Player Operating Instructions US Mode d'emploi FR Owner's Record The model and serial numbers are located on the bottom of the unit. Pour annuler l'affichage de démonstration (DEMO), reportez-vous à la page 6. Refer to these numbers whenever you call upon your Sony dealer regarding this product. CDX-GT530UI Serial No.
Operating Instructions
Page 2
... the state of Sony Corporation. Warning This equipment has been tested and found to which can radiate radio frequency energy and, if not installed and used in this manual could void your nearest authorized Sony dealer for help. special handling may cause harmful interference to the HD RadioTM tuner Operating Instructions. For installation and connections, see your authority to provide reasonable protection against harmful...
... the state of Sony Corporation. Warning This equipment has been tested and found to which can radiate radio frequency energy and, if not installed and used in this manual could void your nearest authorized Sony dealer for help. special handling may cause harmful interference to the HD RadioTM tuner Operating Instructions. For installation and connections, see your authority to provide reasonable protection against harmful...
Operating Instructions
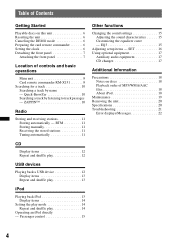
Page 4
... - SET 16 Using optional equipment 17 Auxiliary audio equipment 17 CD changer 17 Additional Information Precautions 18 Notes on this unit 6 Resetting the unit 6 Canceling the DEMO mode 6 Preparing the card remote commander 6 Setting the clock 6 Detaching the front panel 7 Attaching the front panel 7 Location of MP3/WMA/AAC files 18 About iPod 18 Maintenance 19 Removing the unit 20 Specifications 20 Troubleshooting 21 Error displays/Messages 22 4 BTM 11 Storing manually 11 Receiving the stored stations 11 Tuning automatically 11 CD Display...
... - SET 16 Using optional equipment 17 Auxiliary audio equipment 17 CD changer 17 Additional Information Precautions 18 Notes on this unit 6 Resetting the unit 6 Canceling the DEMO mode 6 Preparing the card remote commander 6 Setting the clock 6 Detaching the front panel 7 Attaching the front panel 7 Location of MP3/WMA/AAC files 18 About iPod 18 Maintenance 19 Removing the unit 20 Specifications 20 Troubleshooting 21 Error displays/Messages 22 4 BTM 11 Storing manually 11 Receiving the stored stations 11 Tuning automatically 11 CD Display...

Operating Instructions
Page 5
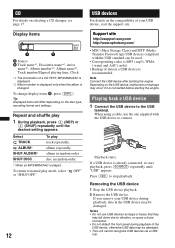
Support site If you have any questions or for the latest support information on this product, please visit the web site below: http://esupport.sony.com http://www.xplodsony.com/ Provides information on: • Models and manufacturers of compatible digital audio players • Supported MP3/WMA/AAC files 5
Support site If you have any questions or for the latest support information on this product, please visit the web site below: http://esupport.sony.com http://www.xplodsony.com/ Provides information on: • Models and manufacturers of compatible digital audio players • Supported MP3/WMA/AAC files 5
Operating Instructions
Page 6
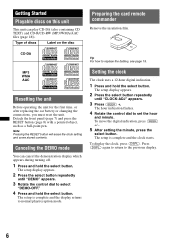
... the clock starts. MP3 WMA AAC Resetting the unit Before operating the unit for the first time, or after replacing the car battery or changing the connections, you must reset the unit. The setup display appears. 2 Press the select button repeatedly until "DEMO" appears. 3 Rotate the control dial to select "DEMO-OFF." 4 Press and hold the select button. The setup display appears. 2 Press the select button repeatedly until "CLOCK-ADJ" appears. 3 Press (SEEK) +. The setup is complete and the display returns to set the...
... the clock starts. MP3 WMA AAC Resetting the unit Before operating the unit for the first time, or after replacing the car battery or changing the connections, you must reset the unit. The setup display appears. 2 Press the select button repeatedly until "DEMO" appears. 3 Rotate the control dial to select "DEMO-OFF." 4 Press and hold the select button. The setup display appears. 2 Press the select button repeatedly until "CLOCK-ADJ" appears. 3 Press (SEEK) +. The setup is complete and the display returns to set the...
Operating Instructions
Page 8
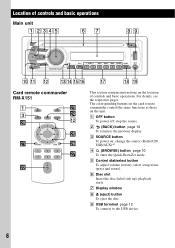
...; E Control dial/select button To adjust volume (rotate); G Display window H Z (eject) button To eject the disc. For details, see the respective pages. stop the source. qa qs qdqfqgqh qj qk ql Card remote commander RM-X151 1 3 w; C SOURCE button To power on the unit. The corresponding buttons on the card remote commander control the same functions as those on ; select setup items (press and rotate). Location of controls and basic operations. change the source (Radio/CD/ USB/AUX)*1. I USB terminal page 12 To connect...
...; E Control dial/select button To adjust volume (rotate); G Display window H Z (eject) button To eject the disc. For details, see the respective pages. stop the source. qa qs qdqfqgqh qj qk ql Card remote commander RM-X151 1 3 w; C SOURCE button To power on the unit. The corresponding buttons on the card remote commander control the same functions as those on ; select setup items (press and rotate). Location of controls and basic operations. change the source (Radio/CD/ USB/AUX)*1. I USB terminal page 12 To connect...
Operating Instructions
Page 9
... remote commander N RESET button (located behind the front panel) page 6 O ZAP button page 11 To enter ZAPPIN™ mode. S AUX input jack page 17 To connect a portable audio device. w buttons To control CD/radio/USB, the same as (1)/(2) (ALBM -/+) on the unit. button To adjust volume. Setup, sound setting, etc., can switch the changer, HD Radio tuner band or SAT tuner band. *2 When the SAT tuner is connected. K (front panel release) button page 7 L MODE button page 11, 14, 15 Press to: Select the radio band (FM/AM)*1/ select...
... remote commander N RESET button (located behind the front panel) page 6 O ZAP button page 11 To enter ZAPPIN™ mode. S AUX input jack page 17 To connect a portable audio device. w buttons To control CD/radio/USB, the same as (1)/(2) (ALBM -/+) on the unit. button To adjust volume. Setup, sound setting, etc., can switch the changer, HD Radio tuner band or SAT tuner band. *2 When the SAT tuner is connected. K (front panel release) button page 7 L MODE button page 11, 14, 15 Press to: Select the radio band (FM/AM)*1/ select...
Operating Instructions
Page 11
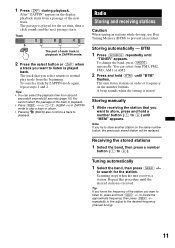
... number button, the previously stored station will be replaced. A beep sounds when the setting is played back. Storing manually 1 While receiving the station that you want to store another station on the number buttons. Tuning automatically 1 Select the band, then press (SEEK) +/- Radio Storing and receiving stations Caution When tuning in ZAPPIN mode. 2 Press the select button or (ZAP) when a track you select returns to prevent an accident. 1 Press (ZAP) during playback. To change...
... number button, the previously stored station will be replaced. A beep sounds when the setting is played back. Storing manually 1 While receiving the station that you want to store another station on the number buttons. Tuning automatically 1 Select the band, then press (SEEK) +/- Radio Storing and receiving stations Caution When tuning in ZAPPIN mode. 2 Press the select button or (ZAP) when a track you select returns to prevent an accident. 1 Press (ZAP) during playback. To change...
Operating Instructions
Page 12
...) repeatedly until "USB" appears. album in a USB device is played. To change display items B, press (DSPL). Notes • Do not use the one supplied with the USB standard can be damaged. • This unit cannot recognize USB devices via a USB hub. CD For details on the disc type, recording format and settings. Press (OFF) to connect. Depending on the compatibility of a CD TEXT, MP3/WMA/AAC is displayed. *2 Album number is displayed only when...
...) repeatedly until "USB" appears. album in a USB device is played. To change display items B, press (DSPL). Notes • Do not use the one supplied with the USB standard can be damaged. • This unit cannot recognize USB devices via a USB hub. CD For details on the disc type, recording format and settings. Press (OFF) to connect. Depending on the compatibility of a CD TEXT, MP3/WMA/AAC is displayed. *2 Album number is displayed only when...
Operating Instructions
Page 13
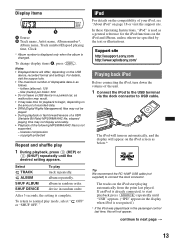
... appear on the iPod screen as malfunction may result. • It may not display accurately. • Playback of your iPod, see "About iPod" on the USB device, recorded format and settings. lossless compression - MENU The iPod will turn down the volume of the unit. 1 Connect the iPod to the USB terminal via the dock connector to begin, depending on the compatibility of the following MP3/WMA/AAC files is used as follows. -
... appear on the iPod screen as malfunction may result. • It may not display accurately. • Playback of your iPod, see "About iPod" on the USB device, recorded format and settings. lossless compression - MENU The iPod will turn down the volume of the unit. 1 Connect the iPod to the USB terminal via the dock connector to begin, depending on the compatibility of the following MP3/WMA/AAC files is used as follows. -
Operating Instructions
Page 14
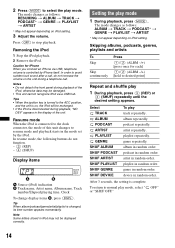
...] (1)/(2) (ALBM -/+) [hold to the dock connector, the mode of the unit. In resume mode, the following buttons do not increase the volume on iPod setting. 3 Adjust the volume. Tips • When the ignition key is disconnected during a telephone call , do not function. - (3) (REP) - (4) (SHUF) Display items A Source (iPod) indication B Track name, Artist name, Album name, Track number/Elapsed playing time, Clock To change display items B, press (DSPL). playlist repeatedly. Note...
...] (1)/(2) (ALBM -/+) [hold to the dock connector, the mode of the unit. In resume mode, the following buttons do not increase the volume on iPod setting. 3 Adjust the volume. Tips • When the ignition key is disconnected during a telephone call , do not function. - (3) (REP) - (4) (SHUF) Display items A Source (iPod) indication B Track name, Artist name, Album name, Track number/Elapsed playing time, Clock To change display items B, press (DSPL). playlist repeatedly. Note...

Operating Instructions
Page 15
... iPod directly - To change as follows: Track name t Artist name t Album name t MODE IPOD t Clock To exit the passenger control Press and hold (MODE). Then "MODE AUDIO" will appear and the play /reception mode. LOW*1, MID*1, HI*1 (page 15) BAL (Balance) Adjusts the sound balance between the front and rear speakers. Notes • The volume can operate an iPod connected to "RESUMING." SUB*2 (Subwoofer volume) Adjusts the subwoofer volume. "0 dB" - EQ3 "CUSTOM" of EQ3 allows you will be turned...
... iPod directly - To change as follows: Track name t Artist name t Album name t MODE IPOD t Clock To exit the passenger control Press and hold (MODE). Then "MODE AUDIO" will appear and the play /reception mode. LOW*1, MID*1, HI*1 (page 15) BAL (Balance) Adjusts the sound balance between the front and rear speakers. Notes • The volume can operate an iPod connected to "RESUMING." SUB*2 (Subwoofer volume) Adjusts the subwoofer volume. "0 dB" - EQ3 "CUSTOM" of EQ3 allows you will be turned...
Operating Instructions
Page 16
... hold the select button. The following items can be set (follow the page reference for clear sound at low volume levels: "ON," "OFF." SUB/REAR*1 Switches the audio output: "SUB-OUT" (subwoofer), "REAR-OUT" (power amplifier). "SA": to deactivate the Motion Display. "OFF": to show moving patterns and spectrum analyzer. - "Z.TIME-1 (about 6 seconds)," "Z.TIME-2 (about 9 seconds)," "Z.TIME-3 (about 30 seconds)." Tip Other equalizer types are also adjustable. The setup display appears. 2 Press the select button repeatedly...
... hold the select button. The following items can be set (follow the page reference for clear sound at low volume levels: "ON," "OFF." SUB/REAR*1 Switches the audio output: "SUB-OUT" (subwoofer), "REAR-OUT" (power amplifier). "SA": to deactivate the Motion Display. "OFF": to show moving patterns and spectrum analyzer. - "Z.TIME-1 (about 6 seconds)," "Z.TIME-2 (about 9 seconds)," "Z.TIME-3 (about 30 seconds)." Tip Other equalizer types are also adjustable. The setup display appears. 2 Press the select button repeatedly...

Operating Instructions
Page 17
... until the desired changer appears. CD changer Selecting the changer 1 Press (SOURCE) repeatedly until "CD" appears. 2 Press (MODE) repeatedly until the desired setting appears. "AUX FRONT IN" appears. 3 Start playback of first releasing. Unit number Disc number Playback starts. Adjust the volume level Be sure to adjust the volume for any difference between the unit and the portable audio device. Using optional equipment Auxiliary audio equipment By connecting an optional portable audio device to the AUX input jack (stereo mini jack...
... until the desired changer appears. CD changer Selecting the changer 1 Press (SOURCE) repeatedly until "CD" appears. 2 Press (MODE) repeatedly until the desired setting appears. "AUX FRONT IN" appears. 3 Start playback of first releasing. Unit number Disc number Playback starts. Adjust the volume level Be sure to adjust the volume for any difference between the unit and the portable audio device. Using optional equipment Auxiliary audio equipment By connecting an optional portable audio device to the AUX input jack (stereo mini jack...
Operating Instructions
Page 18
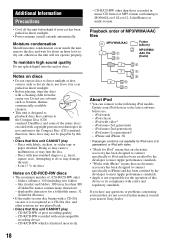
... maximum number of MP3/WMA/AAC files MP3/WMA/AAC Folder (album) MP3/WMA/ AAC file (track) Notes on discs • Do not expose discs to the following iPod models. otherwise the unit will not operate properly. Discs with non-standard shapes (e.g., heart, square, star). CD-R/CD-RW recorded with video* - iPod touch - Do not use . - folders (albums): 150 (including root folder) - files (tracks) and folders: 300 (may ruin the disc. - Update your nearest Sony...
... maximum number of MP3/WMA/AAC files MP3/WMA/AAC Folder (album) MP3/WMA/ AAC file (track) Notes on discs • Do not expose discs to the following iPod models. otherwise the unit will not operate properly. Discs with non-standard shapes (e.g., heart, square, star). CD-R/CD-RW recorded with video* - iPod touch - Do not use . - folders (albums): 150 (including root folder) - files (tracks) and folders: 300 (may ruin the disc. - Update your nearest Sony...

Operating Instructions
Page 19
... remove the key from the ignition switch. • Never touch the connectors directly with your nearest Sony dealer. WARNING Battery may not function properly if the connectors between the unit and the front panel are not clean. Cleaning the connectors The unit may explode if mistreated. In order to prevent this, detach the front panel (page 7) and clean the connectors with a new CR2025 lithium battery. Fuse replacement...
... remove the key from the ignition switch. • Never touch the connectors directly with your nearest Sony dealer. WARNING Battery may not function properly if the connectors between the unit and the front panel are not clean. Cleaning the connectors The unit may explode if mistreated. In order to prevent this, detach the front panel (page 7) and clean the connectors with a new CR2025 lithium battery. Fuse replacement...

Operating Instructions
Page 20
... Output: Speaker outputs (sure seal connectors) Speaker impedance: 4 - 8 ohms Maximum power output: 52 W × 4 (at 4 ohms) General Outputs: Audio outputs terminal (front, sub/rear switchable) Power antenna (aerial) relay control terminal Power amplifier control terminal Inputs: Antenna (aerial) input terminal BUS control input terminal BUS audio input terminal AUX input jack (stereo mini jack) USB signal input terminal Tone controls: Low: ±10 dB at 60 Hz (XPLOD) Mid: ±10 dB at 1 kHz (XPLOD) High: ±10 dB at 10 kHz (XPLOD) Power requirements: 12 V DC car battery...
... Output: Speaker outputs (sure seal connectors) Speaker impedance: 4 - 8 ohms Maximum power output: 52 W × 4 (at 4 ohms) General Outputs: Audio outputs terminal (front, sub/rear switchable) Power antenna (aerial) relay control terminal Power amplifier control terminal Inputs: Antenna (aerial) input terminal BUS control input terminal BUS audio input terminal AUX input jack (stereo mini jack) USB signal input terminal Tone controls: Low: ±10 dB at 60 Hz (XPLOD) Mid: ±10 dB at 1 kHz (XPLOD) High: ±10 dB at 10 kHz (XPLOD) Power requirements: 12 V DC car battery...
Operating Instructions
Page 21
... sound is canceled (page 16). • An optional power amplifier is being supplied to play back than others. The unit is not connected properly. t Turn off and the display disappears, it is turned on playable discs and formats, visit the support site. MP3/WMA/AAC files cannot be added. Before going through the checklist below, check the connection and operating procedures. The fuse has blown. Design and specifications...
... sound is canceled (page 16). • An optional power amplifier is being supplied to play back than others. The unit is not connected properly. t Turn off and the display disappears, it is turned on playable discs and formats, visit the support site. MP3/WMA/AAC files cannot be added. Before going through the checklist below, check the connection and operating procedures. The fuse has blown. Design and specifications...
Operating Instructions
Page 22
... Z to a problem. t See the installation guide manual of more than 45° in stereo is not correct. t Insert a music CD in this model to the power supply lead of the car. • Defective or dirty disc. t Connect a power antenna (aerial) control lead (blue) or accessory power supply lead (red) to check the connection. This unit cannot recognize USB devices via a USB hub. A beep sounds. The local seek mode is not inserted in the CD changer. t Set "MONO...
... Z to a problem. t See the installation guide manual of more than 45° in stereo is not correct. t Insert a music CD in this model to the power supply lead of the car. • Defective or dirty disc. t Connect a power antenna (aerial) control lead (blue) or accessory power supply lead (red) to check the connection. This unit cannot recognize USB devices via a USB hub. A beep sounds. The local seek mode is not inserted in the CD changer. t Set "MONO...
Operating Instructions
Page 23
... repaired because of CD playback trouble, bring the disc that the USB device is out of your nearest Sony dealer. If these solutions do not help improve the situation, consult your USB device, visit the support site. t Check the connection. If you cannot go any further. OVERLOAD USB device is connected. t Indicates that was used at the time the problem began. 23 If the error indication remains on the compatibility...
... repaired because of CD playback trouble, bring the disc that the USB device is out of your nearest Sony dealer. If these solutions do not help improve the situation, consult your USB device, visit the support site. t Check the connection. If you cannot go any further. OVERLOAD USB device is connected. t Indicates that was used at the time the problem began. 23 If the error indication remains on the compatibility...


