Operating Instructions
Page 1
CDX-GT110 © 2006 Sony Corporation CDX-GT110 Serial No. Record the serial number in the space provided below. Model No. To cancel the demonstration (DEMO) display, see page 8. Refer to these numbers whenever you call upon your Sony dealer regarding this product. Pour annuler l'affichage de démonstration (DEMO), reportez-vous à la page 8. 2-696-856-21 (1) FM/AM Compact Disc Player Operating Instructions US Mode d'emploi FR Owner's Record The model and serial numbers are located on the bottom of the unit.
CDX-GT110 © 2006 Sony Corporation CDX-GT110 Serial No. Record the serial number in the space provided below. Model No. To cancel the demonstration (DEMO) display, see page 8. Refer to these numbers whenever you call upon your Sony dealer regarding this product. Pour annuler l'affichage de démonstration (DEMO), reportez-vous à la page 8. 2-696-856-21 (1) FM/AM Compact Disc Player Operating Instructions US Mode d'emploi FR Owner's Record The model and serial numbers are located on the bottom of the unit.
Operating Instructions
Page 2
... installation/connections manual. Reorient or relocate the receiving antenna. - If you do not set the Auto Off function, press and hold (OFF) until the display disappears each time you turn the ignition off and on a circuit different from that any changes or modifications not expressly approved in a residential installation. If this equipment. Consult the dealer or an experienced radio/TV technician for a Class B digital device...
... installation/connections manual. Reorient or relocate the receiving antenna. - If you do not set the Auto Off function, press and hold (OFF) until the display disappears each time you turn the ignition off and on a circuit different from that any changes or modifications not expressly approved in a residential installation. If this equipment. Consult the dealer or an experienced radio/TV technician for a Class B digital device...
Operating Instructions
Page 3
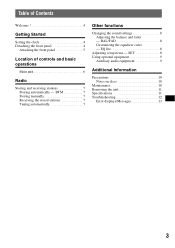
... Precautions 10 Notes on discs 10 Maintenance 10 Removing the unit 11 Specifications 11 Troubleshooting 12 Error displays/Messages 13 3 EQ lite 8 Adjusting setup items - Table of Contents Welcome 4 Getting Started Setting the clock 4 Detaching the front panel 4 Attaching the front panel 5 Location of controls and basic operations Main unit 6 Radio Storing and receiving stations 7 Storing automatically - BTM 7 Storing manually 7 Receiving the stored stations 7 Tuning automatically 7 Other functions Changing the sound settings 8 Adjusting the balance and fader -
... Precautions 10 Notes on discs 10 Maintenance 10 Removing the unit 11 Specifications 11 Troubleshooting 12 Error displays/Messages 13 3 EQ lite 8 Adjusting setup items - Table of Contents Welcome 4 Getting Started Setting the clock 4 Detaching the front panel 4 Attaching the front panel 5 Location of controls and basic operations Main unit 6 Radio Storing and receiving stations 7 Storing automatically - BTM 7 Storing manually 7 Receiving the stored stations 7 Tuning automatically 7 Other functions Changing the sound settings 8 Adjusting the balance and fader -
Operating Instructions
Page 4
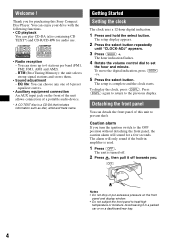
... audio use. • Radio reception - BTM (Best Tuning Memory): the unit selects strong signal stations and stores them. • Sound adjustment - The alarm will sound for a few seconds. The setup is used. 1 Press (OFF). The unit is a CD-DA that includes information such as disc, artist and track name. Getting Started Setting the clock The clock uses a 12-hour digital indication. 1 Press and hold the select button. The hour indication flashes. 4 Rotate the volume control...
... audio use. • Radio reception - BTM (Best Tuning Memory): the unit selects strong signal stations and stores them. • Sound adjustment - The alarm will sound for a few seconds. The setup is used. 1 Press (OFF). The unit is a CD-DA that includes information such as disc, artist and track name. Getting Started Setting the clock The clock uses a 12-hour digital indication. 1 Press and hold the select button. The hour indication flashes. 4 Rotate the volume control...
Operating Instructions
Page 5
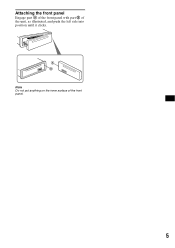
Attaching the front panel Engage part A of the front panel with part B of the front panel. 5 A B Note Do not put anything on the inner surface of the unit, as illustrated, and push the left side into position until it clicks.
Attaching the front panel Engage part A of the front panel with part B of the front panel. 5 A B Note Do not put anything on the inner surface of the unit, as illustrated, and push the left side into position until it clicks.
Operating Instructions
Page 6
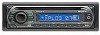
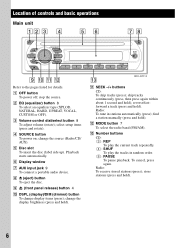
..., press again. D SOURCE button To power on; H Z (eject) button To eject the disc. qa qs Refer to the pages listed for details. B EQ (equalizer) button 8 To select an equalizer type (XPLOD, NATURAL, HARD, UPBEAT, VOCAL, CUSTOM or OFF). select setup items (press and rotate). change the source (Radio/CD/ AUX). F Display window G AUX input jack 9 To connect a portable audio device. reverse/fastforward a track (press and hold ). 6 L MODE button 7 To select the radio band (FM/AM). store stations (press and hold...
..., press again. D SOURCE button To power on; H Z (eject) button To eject the disc. qa qs Refer to the pages listed for details. B EQ (equalizer) button 8 To select an equalizer type (XPLOD, NATURAL, HARD, UPBEAT, VOCAL, CUSTOM or OFF). select setup items (press and rotate). change the source (Radio/CD/ AUX). F Display window G AUX input jack 9 To connect a portable audio device. reverse/fastforward a track (press and hold ). 6 L MODE button 7 To select the radio band (FM/AM). store stations (press and hold...
Operating Instructions
Page 7
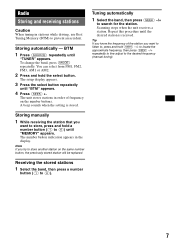
... store another station on the number buttons. The setup display appears. 3 Press the select button repeatedly until "TUNER" appears. Repeat this procedure until "MEMORY" appears. Storing automatically - The number button indication appears in order of the station you know the frequency of frequency on the same number button, the previously stored station will be replaced. Radio Storing and receiving stations Caution When tuning in stations while driving, use Best Tuning Memory (BTM) to the desired frequency (manual tuning). 7 Tip If...
... store another station on the number buttons. The setup display appears. 3 Press the select button repeatedly until "TUNER" appears. Repeat this procedure until "MEMORY" appears. Storing automatically - The number button indication appears in order of the station you know the frequency of frequency on the same number button, the previously stored station will be replaced. Radio Storing and receiving stations Caution When tuning in stations while driving, use Best Tuning Memory (BTM) to the desired frequency (manual tuning). 7 Tip If...
Operating Instructions
Page 8
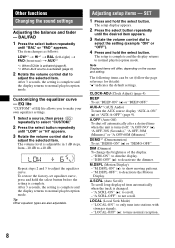
... the volume control dial to not scroll. Other functions Changing the sound settings Adjusting the balance and fader - After 3 seconds, the setting is changed. - Customizing the equalizer curve - Note Displayed items will differ, depending on the source and setting. CLOCK-ADJ (Clock Adjust) (page 4) BEEP To set equalizer curve, press and hold the select button before the setting is turned off automatically after a desired time when the unit is complete. Adjusting setup items - BAL/FAD 1 Press the select button...
... the volume control dial to not scroll. Other functions Changing the sound settings Adjusting the balance and fader - After 3 seconds, the setting is changed. - Customizing the equalizer curve - Note Displayed items will differ, depending on the source and setting. CLOCK-ADJ (Clock Adjust) (page 4) BEEP To set equalizer curve, press and hold the select button before the setting is turned off automatically after a desired time when the unit is complete. Adjusting setup items - BAL/FAD 1 Press the select button...
Operating Instructions
Page 9
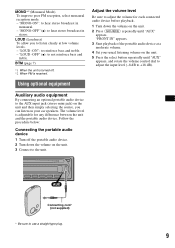
... portable audio device 1 Turn off . *2 When FM is adjustable for each connected audio device before playback. 1 Turn down the volume on the unit. 2 Press (SOURCE) repeatedly until "AUX" appears, and rotate the volume control dial to adjust the input level (-8 dB to the unit. "LOUD -ON": to not reinforce bass and treble. "FRONT IN" appears. 3 Start playback of the portable audio device at low volume levels. - Auxiliary audio equipment By connecting an optional portable audio device to the AUX input jack (stereo...
... portable audio device 1 Turn off . *2 When FM is adjustable for each connected audio device before playback. 1 Turn down the volume on the unit. 2 Press (SOURCE) repeatedly until "AUX" appears, and rotate the volume control dial to adjust the input level (-8 dB to the unit. "LOUD -ON": to not reinforce bass and treble. "FRONT IN" appears. 3 Start playback of the portable audio device at low volume levels. - Auxiliary audio equipment By connecting an optional portable audio device to the AUX input jack (stereo...
Operating Instructions
Page 10
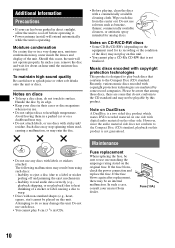
... analog discs. Music discs encoded with labels or stickers attached. Please be an internal malfunction. Note on DualDiscs A DualDisc is designed to play a CD-R/a CD-RW that is not guaranteed. • Do not use one side with copyright protection technologies are some record companies. If the fuse blows, check the power connection and replace the fuse. Handle the disc by this unit. Notes on CD-R/CD-RW discs...
... analog discs. Music discs encoded with labels or stickers attached. Please be an internal malfunction. Note on DualDiscs A DualDisc is designed to play a CD-R/a CD-RW that is not guaranteed. • Do not use one side with copyright protection technologies are some record companies. If the fuse blows, check the power connection and replace the fuse. Handle the disc by this unit. Notes on CD-R/CD-RW discs...
Operating Instructions
Page 11
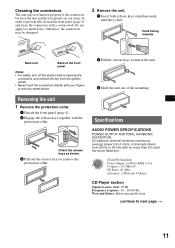
..., detach the front panel (page 4) and clean the connectors with no more than 5% total harmonic distortion. Hook facing inwards. Specifications AUDIO POWER SPECIFICATIONS POWER OUTPUT AND TOTAL HARMONIC DISTORTION 22 watts per channel minimum continuous average power into 4 Ohms) CD Player section Signal-to-noise ratio: 95 dB Frequency response: 10 - 20,000 Hz Wow and flutter: Below measurable limit continue to remove the protection collar. In...
..., detach the front panel (page 4) and clean the connectors with no more than 5% total harmonic distortion. Hook facing inwards. Specifications AUDIO POWER SPECIFICATIONS POWER OUTPUT AND TOTAL HARMONIC DISTORTION 22 watts per channel minimum continuous average power into 4 Ohms) CD Player section Signal-to-noise ratio: 95 dB Frequency response: 10 - 20,000 Hz Wow and flutter: Below measurable limit continue to remove the protection collar. In...
Operating Instructions
Page 12
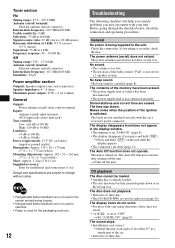
... operating procedures. If everything is turned on the unit until the display appears. • The connectors are not matched correctly with your unit. t Set "A.SCRL-ON" (page 8). The unit is in ) (w/h/d) Mass: Approx. 1.2 kg (2 lb 11 oz) Supplied accessory: Parts for audio use (page 10). Stored stations and correct time are not for installation and connections (1 set to the unit. t Install the unit at 10 kHz Power requirements: 12 V DC car battery...
... operating procedures. If everything is turned on the unit until the display appears. • The connectors are not matched correctly with your unit. t Set "A.SCRL-ON" (page 8). The unit is in ) (w/h/d) Mass: Approx. 1.2 kg (2 lb 11 oz) Supplied accessory: Parts for audio use (page 10). Stored stations and correct time are not for installation and connections (1 set to the unit. t Install the unit at 10 kHz Power requirements: 12 V DC car battery...
Operating Instructions
Page 13
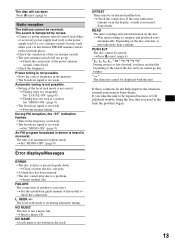
...; The disc cannot play due to check the connection. FAILURE The connection of the power antenna (aerial) control lead. • Check the frequency. t See the installation guide manual of the car antenna (aerial). • The auto antenna (aerial) will not eject. The local seek mode is not written in the display, consult your nearest Sony dealer. NO NAME A track name is on the disc. t Check the connection. If the error indication remains...
...; The disc cannot play due to check the connection. FAILURE The connection of the power antenna (aerial) control lead. • Check the frequency. t See the installation guide manual of the car antenna (aerial). • The auto antenna (aerial) will not eject. The local seek mode is not written in the display, consult your nearest Sony dealer. NO NAME A track name is on the disc. t Check the connection. If the error indication remains...
Operating Instructions
Page 28
If you have any questions/problems regarding this product, try the following: 1 Read Troubleshooting in China only); Call 1-800-222-7669 URL http://www.SONY.com http://www.sony.net/ Sony Corporation Printed in these Operating Instructions. 2 Please contact (U.S.A.
If you have any questions/problems regarding this product, try the following: 1 Read Troubleshooting in China only); Call 1-800-222-7669 URL http://www.SONY.com http://www.sony.net/ Sony Corporation Printed in these Operating Instructions. 2 Please contact (U.S.A.


