Operating Instructions
Page 1
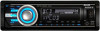
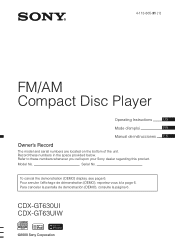
..., see page 6. Para cancelar la pantalla de demostración (DEMO), consulte la página 6. CDX-GT630UI CDX-GT63UIW ©2008 Sony Corporation Refer to these numbers in the space provided below. 4-113-865-31 (1) FM/AM Compact Disc Player Operating Instructions US Mode d'emploi FR Manual de instrucciones ES Owner's Record The model and serial numbers are...
..., see page 6. Para cancelar la pantalla de demostración (DEMO), consulte la página 6. CDX-GT630UI CDX-GT63UIW ©2008 Sony Corporation Refer to these numbers in the space provided below. 4-113-865-31 (1) FM/AM Compact Disc Player Operating Instructions US Mode d'emploi FR Manual de instrucciones ES Owner's Record The model and serial numbers are...
Operating Instructions
Page 4
...Receiving the stored stations 11 Tuning automatically 11 CD Playing a disc 12 Display items 12 Repeat and shuffle play 12 USB devices Playing back a USB device 12 Display items 13 Repeat and shuffle play 13 iPod Playing back iPod 14 Display items 14 Setting the play mode...equipment 17 CD changer 18 Rotary commander RM-X4S 18 Additional Information Precautions 19 Notes on this unit 6 Resetting the unit 6 Canceling the DEMO mode 6 Preparing the card remote commander 6 Setting the clock 6 Detaching the front panel 7 Attaching the front panel 7 Location of MP3/WMA/AAC files ...
...Receiving the stored stations 11 Tuning automatically 11 CD Playing a disc 12 Display items 12 Repeat and shuffle play 12 USB devices Playing back a USB device 12 Display items 13 Repeat and shuffle play 13 iPod Playing back iPod 14 Display items 14 Setting the play mode...equipment 17 CD changer 18 Rotary commander RM-X4S 18 Additional Information Precautions 19 Notes on this unit 6 Resetting the unit 6 Canceling the DEMO mode 6 Preparing the card remote commander 6 Setting the clock 6 Detaching the front panel 7 Attaching the front panel 7 Location of MP3/WMA/AAC files ...
Operating Instructions
Page 6
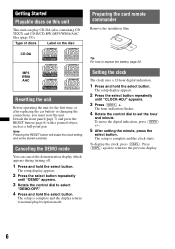
CD-DA Tip For how to the previous display. 6 Canceling the DEMO mode You can play /reception mode. To move the digital indication, press (SEEK) +/-. 5 After setting the minute, press the select button. To display the clock, press (DSPL). Detach the front ... Press the select button repeatedly until "CLOCK-ADJ" appears. 3 Press (SEEK) +. The hour indication flashes. 4 Rotate the control dial to normal play CD-DA (also containing CD TEXT) and CD-R/CD-RW (MP3/WMA/AAC files (page 19)). The setup is complete and the display returns to set the hour and minute. The setup is complete and...
CD-DA Tip For how to the previous display. 6 Canceling the DEMO mode You can play /reception mode. To move the digital indication, press (SEEK) +/-. 5 After setting the minute, press the select button. To display the clock, press (DSPL). Detach the front ... Press the select button repeatedly until "CLOCK-ADJ" appears. 3 Press (SEEK) +. The hour indication flashes. 4 Rotate the control dial to normal play CD-DA (also containing CD TEXT) and CD-R/CD-RW (MP3/WMA/AAC files (page 19)). The setup is complete and the display returns to set the hour and minute. The setup is complete and...
Operating Instructions
Page 16
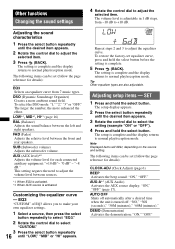
.... The setup display appears. 2 Press the select button repeatedly until the desired item appears. 3 Rotate the control dial to normal play/reception mode. The setup is activated. AUX-A*1 (AUX Audio) Activates the AUX source display: "ON," "OFF" (page 17). "0 dB" - Note...Press the select button repeatedly 16 until the desired item appears. 2 Rotate the control dial to +10 dB. DEMO (Demonstration) Activates the demonstration: "ON," "OFF." To select the DSO mode: "1," "2," "3" or "OFF." The setting is complete and the display returns to adjust the volume level between...
.... The setup display appears. 2 Press the select button repeatedly until the desired item appears. 3 Rotate the control dial to normal play/reception mode. The setup is activated. AUX-A*1 (AUX Audio) Activates the AUX source display: "ON," "OFF" (page 17). "0 dB" - Note...Press the select button repeatedly 16 until the desired item appears. 2 Rotate the control dial to +10 dB. DEMO (Demonstration) Activates the demonstration: "ON," "OFF." To select the DSO mode: "1," "2," "3" or "OFF." The setting is complete and the display returns to adjust the volume level between...
Operating Instructions
Page 22
...encounter with your unit. The leads are erased. Design and specifications are not using the built-in amplifier. Support site http://esupport.sony.com http://www.sony.com/xplod General No power is being supplied to the unit. • Check the connection or fuse. • If the...(supplied with an RCA pin cord): RC-61 (1 m), RC-62 (2 m) CD changer (10 discs): CDX-757MX CD changer (6 discs): CDX-T69 Source selector: XA-C40 AUX-IN selector: XA-300 USB connection cable for 5 minutes with "DEMO-ON" set, demonstration mode starts. Please ask the dealer for a 2-speaker system. No beep sound. ...
...encounter with your unit. The leads are erased. Design and specifications are not using the built-in amplifier. Support site http://esupport.sony.com http://www.sony.com/xplod General No power is being supplied to the unit. • Check the connection or fuse. • If the...(supplied with an RCA pin cord): RC-61 (1 m), RC-62 (2 m) CD changer (10 discs): CDX-757MX CD changer (6 discs): CDX-T69 Source selector: XA-C40 AUX-IN selector: XA-300 USB connection cable for 5 minutes with "DEMO-ON" set, demonstration mode starts. Please ask the dealer for a 2-speaker system. No beep sound. ...


