
Limited Warranty (U.S. Only)
Page 1
... for the time periods and as fuses or batteries). Instructions: To obtain warranty service, you may have other materials you must deliver the product, freight prepaid, in Japan For specific instructions on your exclusive remedies. Printed in either its option, repair or replace with the Product. Only) Sony Electronics Inc. ("Sony") warrants this product against defects in any repair, replacement part or replacement product for...
... for the time periods and as fuses or batteries). Instructions: To obtain warranty service, you may have other materials you must deliver the product, freight prepaid, in Japan For specific instructions on your exclusive remedies. Printed in either its option, repair or replace with the Product. Only) Sony Electronics Inc. ("Sony") warrants this product against defects in any repair, replacement part or replacement product for...
Instruction Manual
Page 1
Record the serial number in the space provided below. CDX-GT610UI Serial No. To cancel the demonstration (DEMO) display, see page 12. CDX-GT610UI © 2007 Sony Corporation Pour annuler l'affichage de démonstration (DEMO), reportez-vous à la page 13. Model No. Refer to these numbers whenever you call upon your Sony dealer regarding this product. 3-096-839-21 (1) FM/AM Compact Disc Player Operating Instructions US Mode d'emploi FR Owner's Record The model and serial numbers are located on the bottom of the unit.
Record the serial number in the space provided below. CDX-GT610UI Serial No. To cancel the demonstration (DEMO) display, see page 12. CDX-GT610UI © 2007 Sony Corporation Pour annuler l'affichage de démonstration (DEMO), reportez-vous à la page 13. Model No. Refer to these numbers whenever you call upon your Sony dealer regarding this product. 3-096-839-21 (1) FM/AM Compact Disc Player Operating Instructions US Mode d'emploi FR Owner's Record The model and serial numbers are located on the bottom of the unit.
Instruction Manual
Page 2
... set the Auto Off function, press and hold (OFF) until the display disappears each time you do not set the Auto Off function (page 12). Increase the separation between the equipment and receiver. - Connect the equipment into an outlet on the satellite radio tuner module. Consult the dealer or an experienced radio/TV technician for a Class B digital device, pursuant to which the receiver is connected. - If you turn...
... set the Auto Off function, press and hold (OFF) until the display disappears each time you do not set the Auto Off function (page 12). Increase the separation between the equipment and receiver. - Connect the equipment into an outlet on the satellite radio tuner module. Consult the dealer or an experienced radio/TV technician for a Class B digital device, pursuant to which the receiver is connected. - If you turn...
Instruction Manual
Page 3
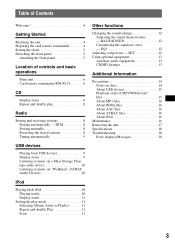
... manually 8 Receiving the stored stations 8 Tuning automatically 9 USB devices Playing back USB devices 9 Display items 9 Listening to music on a Mass Storage Class type audio device 10 Listening to music on discs 14 About USB devices 15 Playback order of controls and basic operations Main unit 6 Card remote commander RM-X151 6 CD Display items 8 Repeat and shuffle play mode 11 Selecting Album, Artist or Playlist 11 Repeat and shuffle Play 11 Scan 11 Other functions Changing the sound settings 12 Adjusting the sound characteristics...
... manually 8 Receiving the stored stations 8 Tuning automatically 9 USB devices Playing back USB devices 9 Display items 9 Listening to music on a Mass Storage Class type audio device 10 Listening to music on discs 14 About USB devices 15 Playback order of controls and basic operations Main unit 6 Card remote commander RM-X151 6 CD Display items 8 Repeat and shuffle play mode 11 Selecting Album, Artist or Playlist 11 Repeat and shuffle Play 11 Scan 11 Other functions Changing the sound settings 12 Adjusting the sound characteristics...

Instruction Manual
Page 4
... after replacing the car battery or changing the connections, you for the first time, remove the insulation film. 4 iPod: iPod connection can be connected to About USB devices (page 15) or the Sony support website (page 21). - Thank you must reset the unit. Detach the front panel and press the RESET button with the following functions. • CD playback You can be made by the dock connector cable on a usable devices, please refer to the SONY BUS...
... after replacing the car battery or changing the connections, you for the first time, remove the insulation film. 4 iPod: iPod connection can be connected to About USB devices (page 15) or the Sony support website (page 21). - Thank you must reset the unit. Detach the front panel and press the RESET button with the following functions. • CD playback You can be made by the dock connector cable on a usable devices, please refer to the SONY BUS...
Instruction Manual
Page 5
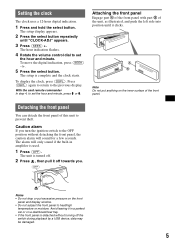
... can detach the front panel of the front panel. The alarm will sound for a few seconds. The hour indication flashes. 4 Rotate the volume control dial to the OFF position without turning off towards you turn the ignition switch to set the hour and minute, press M or m. Attaching the front panel Engage part A of the front panel with part B of the unit, as illustrated, and push...
... can detach the front panel of the front panel. The alarm will sound for a few seconds. The hour indication flashes. 4 Rotate the volume control dial to the OFF position without turning off towards you turn the ignition switch to set the hour and minute, press M or m. Attaching the front panel Engage part A of the front panel with part B of the unit, as illustrated, and push...
Instruction Manual
Page 6
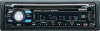
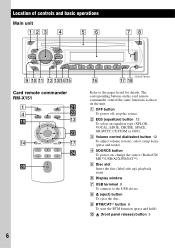
... qf OFF ATT SOURCE SEL MODE + - The corresponding buttons on the card remote commander control the same functions as those on ; F Display window G USB terminal 9 To connect to the pages listed for details. Refer to the USB device. B EQ3 (equalizer) button 12 To select an equalizer type (XPLOD, VOCAL, EDGE, CRUISE, SPACE, GRAVITY, CUSTOM or OFF). select setup items (press and rotate). H Z (eject) button To eject the disc. J (front panel release) button 5 6 change the source (Radio/CD/ MD*1/USB/AUX/PD...
... qf OFF ATT SOURCE SEL MODE + - The corresponding buttons on the card remote commander control the same functions as those on ; F Display window G USB terminal 9 To connect to the pages listed for details. Refer to the USB device. B EQ3 (equalizer) button 12 To select an equalizer type (XPLOD, VOCAL, EDGE, CRUISE, SPACE, GRAVITY, CUSTOM or OFF). select setup items (press and rotate). H Z (eject) button To eject the disc. J (front panel release) button 5 6 change the source (Radio/CD/ MD*1/USB/AUX/PD...
Instruction Manual
Page 7
...); O RESET button (located behind the front panel) 4 P Number buttons CD/MD*1/USB*3/PD*4: (1)/(2): GP*7/ALBM*8 -/+ To skip groups/albums (press); Radio: To tune in stations automatically (press); select the play mode*4*6. N DSPL (display)/DIM (dimmer) button 8, 9, 11 To change the display brightness (press and hold ); change display items (press); Tip For details on how to replace the battery, see page 11, 13. *10When playing back on the unit. R AUX input jack 13 To connect a portable audio device. ws SEL (select) button The...
...); O RESET button (located behind the front panel) 4 P Number buttons CD/MD*1/USB*3/PD*4: (1)/(2): GP*7/ALBM*8 -/+ To skip groups/albums (press); Radio: To tune in stations automatically (press); select the play mode*4*6. N DSPL (display)/DIM (dimmer) button 8, 9, 11 To change the display brightness (press and hold ); change display items (press); Tip For details on how to replace the battery, see page 11, 13. *10When playing back on the unit. R AUX input jack 13 To connect a portable audio device. ws SEL (select) button The...

Instruction Manual
Page 8
... (6)). 8 Radio Storing and receiving stations Caution When tuning in random order. You can select from FM1, FM2, FM3, AM1 or AM2. 2 Press and hold the select button. The unit stores stations in random order. *1 When an MP3/WMA/AAC is played. *2 When an ATRAC CD is changed. The setup display appears. 2 Press the select button repeatedly until "TUNER" appears. Receiving the stored stations 1 Select the band, then press a number button ((1) to normal play mode, select...
... (6)). 8 Radio Storing and receiving stations Caution When tuning in random order. You can select from FM1, FM2, FM3, AM1 or AM2. 2 Press and hold the select button. The unit stores stations in random order. *1 When an MP3/WMA/AAC is played. *2 When an ATRAC CD is changed. The setup display appears. 2 Press the select button repeatedly until "TUNER" appears. Receiving the stored stations 1 Select the band, then press a number button ((1) to normal play mode, select...

Instruction Manual
Page 9
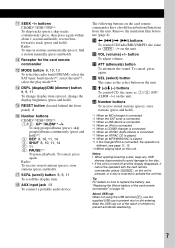
... playing time, Text information, Clock To change display items C, press (DSPL); scroll display items C, press (SCRL) or set "A.SCRL-ON" (page 12). For details on MP3/WMA/AAC, see page 16. ATRAC CD, see page 15; If a USB device is already connected, press (SOURCE) repeatedly until the desired station is received. Repeat this procedure until "USB" appears, to stop playback first. Scanning stops when the unit receives a station. Tuning...
... playing time, Text information, Clock To change display items C, press (DSPL); scroll display items C, press (SCRL) or set "A.SCRL-ON" (page 12). For details on MP3/WMA/AAC, see page 16. ATRAC CD, see page 15; If a USB device is already connected, press (SOURCE) repeatedly until the desired station is received. Repeat this procedure until "USB" appears, to stop playback first. Scanning stops when the unit receives a station. Tuning...
Instruction Manual
Page 10
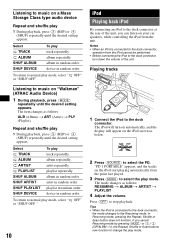
... iPod is connected to the dock connector, operation from the iPod cannot be performed. • Before connecting the iPod to the dock connector, turn on automatically, and the display will turn down the volume of the unit, you cancel Resuming mode by pressing (MODE) or (1)/ (2) (GP/ALBM -/+), the Repeat, Shuffle or Scan buttons now function to change the play 1 During playback, press (3) (REP) or (4) (SHUF) repeatedly until the desired setting...
... iPod is connected to the dock connector, operation from the iPod cannot be performed. • Before connecting the iPod to the dock connector, turn on automatically, and the display will turn down the volume of the unit, you cancel Resuming mode by pressing (MODE) or (1)/ (2) (GP/ALBM -/+), the Repeat, Shuffle or Scan buttons now function to change the play 1 During playback, press (3) (REP) or (4) (SHUF) repeatedly until the desired setting...
Instruction Manual
Page 12
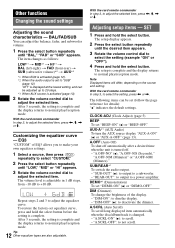
... setting, and can adjust the balance, fader, and subwoofer volume. 1 Press the select button repeatedly until "BAL," "FAD" or "SUB" appears. After 3 seconds, the setting is set to adjust the selected item. The item changes as follows: LOW*1 t MID*1 t HI*1 t BAL (left-right) t FAD (front-rear) t SUB (subwoofer volume)*2 t AUX*3 *1 When EQ3 is activated (page 12). *2 When the audio output is complete and the display returns to adjust the selected item, press Other functions Changing the sound settings Adjusting...
... setting, and can adjust the balance, fader, and subwoofer volume. 1 Press the select button repeatedly until "BAL," "FAD" or "SUB" appears. After 3 seconds, the setting is set to adjust the selected item. The item changes as follows: LOW*1 t MID*1 t HI*1 t BAL (left-right) t FAD (front-rear) t SUB (subwoofer volume)*2 t AUX*3 *1 When EQ3 is activated (page 12). *2 When the audio output is complete and the display returns to adjust the selected item, press Other functions Changing the sound settings Adjusting...

Instruction Manual
Page 13
BTM (page 8) *1 When the unit is turned off frequency: "LPF OFF" (z), "LPF125Hz" or "LPF 78Hz." AUX AUX Adjust the volume level Be sure to hear stereo broadcast in stereo. continue to next page t Connecting cord* (not supplied) * Be sure to only tune into stations with stronger signals. - "MONO-ON" : to adjust the volume for a moment). Using optional equipment Auxiliary audio equipment By connecting an optional portable audio device to the unit. Unit number Disc number Playback starts. To...
BTM (page 8) *1 When the unit is turned off frequency: "LPF OFF" (z), "LPF125Hz" or "LPF 78Hz." AUX AUX Adjust the volume level Be sure to hear stereo broadcast in stereo. continue to next page t Connecting cord* (not supplied) * Be sure to only tune into stations with stronger signals. - "MONO-ON" : to adjust the volume for a moment). Using optional equipment Auxiliary audio equipment By connecting an optional portable audio device to the unit. Unit number Disc number Playback starts. To...

Instruction Manual
Page 14
... eject a disc (due to splash juice or other soft drinks onto the unit or discs. Should this unit. In such a case, remove the disc and wait for about an hour until the desired setting appears. To maintain high sound quality Be careful not to a label or sticker peeling off before operating it. • Power antenna (aerial) will not operate properly. Attempting to normal play...
... eject a disc (due to splash juice or other soft drinks onto the unit or discs. Should this unit. In such a case, remove the disc and wait for about an hour until the desired setting appears. To maintain high sound quality Be careful not to a label or sticker peeling off before operating it. • Power antenna (aerial) will not operate properly. Attempting to normal play...

Instruction Manual
Page 15
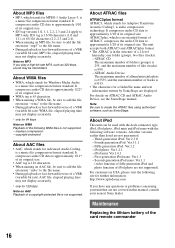
Notes on CD-R/CD-RW discs • Some CD-Rs/CD-RWs (depending on the equipment used . displayable characters for analog discs. The priority of the format is played. Recently, various music discs encoded with copyright protection technologies are marketed by this product. Mass Storage Class: - Playback order of your USB device, visit the Sony support website (page 21). • Corresponding codecs differ depending on this number may...
Notes on CD-R/CD-RW discs • Some CD-Rs/CD-RWs (depending on the equipment used . displayable characters for analog discs. The priority of the format is played. Recently, various music discs encoded with copyright protection technologies are marketed by this product. Mass Storage Class: - Playback order of your USB device, visit the Sony support website (page 21). • Corresponding codecs differ depending on this number may...
Instruction Manual
Page 16
... Replacing the lithium battery of its original size. It compresses audio CD data to the file name. • During playback or fast-forward/reverse of a VBR (variable bit rate) WMA file, elapsed playing time may not display accurately. * only for further information: http://www.xplodsony.com If you play a high-bit-rate MP3, such as SonicStage. About iPod This unit...
... Replacing the lithium battery of its original size. It compresses audio CD data to the file name. • During playback or fast-forward/reverse of a VBR (variable bit rate) WMA file, elapsed playing time may not display accurately. * only for further information: http://www.xplodsony.com If you play a high-bit-rate MP3, such as SonicStage. About iPod This unit...

Instruction Manual
Page 17
... front panel 17 Fuse replacement When replacing the fuse, be sure to use .) When the battery becomes weak, the range of the card remote commander becomes shorter. Notes • For safety, turn off the ignition before cleaning the connectors, and remove the key from the ignition switch. • Never touch the connectors directly with your nearest Sony dealer. If the fuse blows, check the power connection and replace the fuse...
... front panel 17 Fuse replacement When replacing the fuse, be sure to use .) When the battery becomes weak, the range of the card remote commander becomes shorter. Notes • For safety, turn off the ignition before cleaning the connectors, and remove the key from the ignition switch. • Never touch the connectors directly with your nearest Sony dealer. If the fuse blows, check the power connection and replace the fuse...
Instruction Manual
Page 18
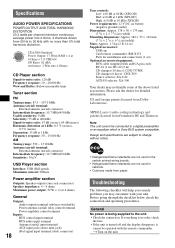
... seal connectors) Speaker impedance: 4 - 8 ohms Maximum power output: 52 W × 4 (at 4 ohms) General Output: Audio outputs terminal (sub/rear switchable) Power antenna (aerial) relay control terminal Power amplifier control terminal Inputs: BUS control input terminal BUS audio input terminal Antenna (aerial) input terminal AUX input jack (stereo mini jack) iPod signal input terminal (dock connector) 18 Tone controls: Low: ±10 dB at 60 Hz (XPLOD) Mid: ±10 dB at 1 kHz (XPLOD) High: ±10 dB at 10 kHz (XPLOD) Power requirements: 12 V DC car battery...
... seal connectors) Speaker impedance: 4 - 8 ohms Maximum power output: 52 W × 4 (at 4 ohms) General Output: Audio outputs terminal (sub/rear switchable) Power antenna (aerial) relay control terminal Power amplifier control terminal Inputs: BUS control input terminal BUS audio input terminal Antenna (aerial) input terminal AUX input jack (stereo mini jack) iPod signal input terminal (dock connector) 18 Tone controls: Low: ±10 dB at 60 Hz (XPLOD) Mid: ±10 dB at 1 kHz (XPLOD) High: ±10 dB at 10 kHz (XPLOD) Power requirements: 12 V DC car battery...
Instruction Manual
Page 19
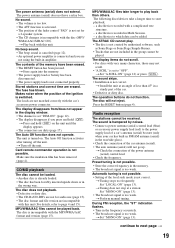
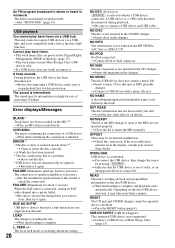
... be received. a disc/device to play . • The disc is activated. • The position of the power antenna (aerial) control lead. • Check the frequency. t Install the unit at a station: Set "MONO-ON" (page 13). • The broadcast signal is switched. Press the RESET button (page 4). The sound is not correct. t Tuning stops too frequently: Set "LOCAL-ON" (page 13). During FM reception, the "ST" indication flashes. • Tune in amplifier. The power antenna (aerial...
... be received. a disc/device to play . • The disc is activated. • The position of the power antenna (aerial) control lead. • Check the frequency. t Install the unit at a station: Set "MONO-ON" (page 13). • The broadcast signal is switched. Press the RESET button (page 4). The sound is not correct. t Tuning stops too frequently: Set "LOCAL-ON" (page 13). During FM reception, the "ST" indication flashes. • Tune in amplifier. The power antenna (aerial...
Instruction Manual
Page 20
... tuning. 20 NO DEV (No Device) (SOURCE) is on the disc/USB device structure, it . t Be sure to dock connector. t Insert discs in the changer. NO IPOD No iPod connected. t Connect iPod to connect a USB device and USB cable. t Insert the magazine in the changer. NO MUSIC The disc/USB device does not contain a music file. t Insert a music CD in the display, consult your nearest Sony dealer. t Connect a USB device with a music file in it on the MD.*2 t Play an MD with a device that the USB device...
... tuning. 20 NO DEV (No Device) (SOURCE) is on the disc/USB device structure, it . t Be sure to dock connector. t Insert discs in the changer. NO IPOD No iPod connected. t Connect iPod to connect a USB device and USB cable. t Insert the magazine in the changer. NO MUSIC The disc/USB device does not contain a music file. t Insert a music CD in the display, consult your nearest Sony dealer. t Connect a USB device with a music file in it on the MD.*2 t Play an MD with a device that the USB device...


