
Limited Warranty (U.S. Only)
Page 1
... consumables (such as set forth below is longer. Some states do so for the time periods and as fuses or batteries). 3-272-643-01 ® Car Audio LIMITED WARRANTY (U.S. Only) Sony Electronics Inc. ("Sony") warrants this product against defects in the Product; If Sony elects to replace the product after this Limited Warranty, "refurbished" means a product or part that such data...
... consumables (such as set forth below is longer. Some states do so for the time periods and as fuses or batteries). 3-272-643-01 ® Car Audio LIMITED WARRANTY (U.S. Only) Sony Electronics Inc. ("Sony") warrants this product against defects in the Product; If Sony elects to replace the product after this Limited Warranty, "refurbished" means a product or part that such data...
Operating Instructions
Page 1
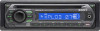
Refer to these numbers whenever you call upon your Sony dealer regarding this product. 2-696-857-11 (2) FM/AM Compact Disc Player Operating Instructions US Manual de instrucciones ES Owner's Record The model and serial numbers are located on the bottom of the unit. CDX-GT21W Serial No. Model No. Record the serial number in the space provided below. To cancel the demonstration (DEMO) display, see page 8. Para cancelar la pantalla de demostración (DEMO), consulte la página 9. CDX-GT21W © 2006 Sony Corporation
Refer to these numbers whenever you call upon your Sony dealer regarding this product. 2-696-857-11 (2) FM/AM Compact Disc Player Operating Instructions US Manual de instrucciones ES Owner's Record The model and serial numbers are located on the bottom of the unit. CDX-GT21W Serial No. Model No. Record the serial number in the space provided below. To cancel the demonstration (DEMO) display, see page 8. Para cancelar la pantalla de demostración (DEMO), consulte la página 9. CDX-GT21W © 2006 Sony Corporation
Operating Instructions
Page 2
... display disappears each time you do not set time after the unit is no ACC position Be sure to which can radiate radio frequency energy and, if not installed and used in accordance with the instructions, may cause harmful interference to correct the interference by turning the equipment off , which prevents battery drain. For installation and connections, see the supplied installation/connections manual. Reorient or relocate the receiving antenna...
... display disappears each time you do not set time after the unit is no ACC position Be sure to which can radiate radio frequency energy and, if not installed and used in accordance with the instructions, may cause harmful interference to correct the interference by turning the equipment off , which prevents battery drain. For installation and connections, see the supplied installation/connections manual. Reorient or relocate the receiving antenna...
Operating Instructions
Page 3
... 11 Removing the unit 11 Specifications 12 Troubleshooting 13 Error displays/Messages 14 3 BTM 7 Storing manually 7 Receiving the stored stations 7 Tuning automatically 7 Other functions Changing the sound settings 8 Adjusting the balance and fader - Table of Contents Welcome 4 Getting Started Setting the clock 4 Detaching the front panel 4 Attaching the front panel 5 Location of controls and basic operations Main unit 6 CD Display items 7 Repeat and shuffle play 7 Radio Storing and receiving stations 7 Storing automatically - BAL/FAD 8 Customizing the equalizer curve...
... 11 Removing the unit 11 Specifications 12 Troubleshooting 13 Error displays/Messages 14 3 BTM 7 Storing manually 7 Receiving the stored stations 7 Tuning automatically 7 Other functions Changing the sound settings 8 Adjusting the balance and fader - Table of Contents Welcome 4 Getting Started Setting the clock 4 Detaching the front panel 4 Attaching the front panel 5 Location of controls and basic operations Main unit 6 CD Display items 7 Repeat and shuffle play 7 Radio Storing and receiving stations 7 Storing automatically - BAL/FAD 8 Customizing the equalizer curve...
Operating Instructions
Page 4
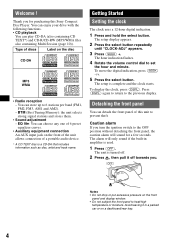
... the select button. To display the clock, press (DSPL). The alarm will sound for purchasing this unit to 6 stations per band (FM1, FM2, FM3, AM1 and AM2). - Avoid leaving it off . 2 Press , then pull it in amplifier is complete and the clock starts. Detaching the front panel You can choose any one of 6 preset equalizer curves. • Auxiliary equipment connection An AUX input jack on a dashboard/rear...
... the select button. To display the clock, press (DSPL). The alarm will sound for purchasing this unit to 6 stations per band (FM1, FM2, FM3, AM1 and AM2). - Avoid leaving it off . 2 Press , then pull it in amplifier is complete and the clock starts. Detaching the front panel You can choose any one of 6 preset equalizer curves. • Auxiliary equipment connection An AUX input jack on a dashboard/rear...
Operating Instructions
Page 5
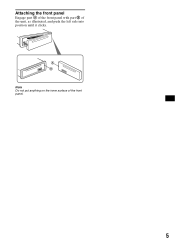
A B Note Do not put anything on the inner surface of the unit, as illustrated, and push the left side into position until it clicks. Attaching the front panel Engage part A of the front panel with part B of the front panel. 5
A B Note Do not put anything on the inner surface of the unit, as illustrated, and push the left side into position until it clicks. Attaching the front panel Engage part A of the front panel with part B of the front panel. 5
Operating Instructions
Page 6
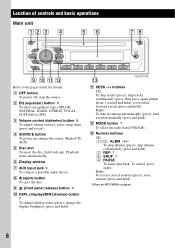
... ). Location of controls and basic operations Main unit 12 3 4 56 78 OFF EQ SEEK DIM DSPL PUSH SELECT SOURCE AUX SEEK MODE ALBM 1 2 REP SHUF 3 4 5 PAUSE 6 9 q; B EQ (equalizer) button 8 To select an equalizer type (XPLOD, NATURAL, HARD, UPBEAT, VOCAL, CUSTOM or OFF). change display items (press); change the display brightness (press and hold ); L MODE button 7 To select the radio band (FM/AM). M Number buttons CD: (1)/(2): ALBM -/+* To skip albums (press); D SOURCE button To power on; H Z (eject) button To eject the disc...
... ). Location of controls and basic operations Main unit 12 3 4 56 78 OFF EQ SEEK DIM DSPL PUSH SELECT SOURCE AUX SEEK MODE ALBM 1 2 REP SHUF 3 4 5 PAUSE 6 9 q; B EQ (equalizer) button 8 To select an equalizer type (XPLOD, NATURAL, HARD, UPBEAT, VOCAL, CUSTOM or OFF). change display items (press); change the display brightness (press and hold ); L MODE button 7 To select the radio band (FM/AM). M Number buttons CD: (1)/(2): ALBM -/+* To skip albums (press); D SOURCE button To power on; H Z (eject) button To eject the disc...
Operating Instructions
Page 7
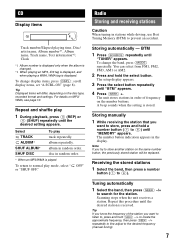
... (6)). The setup display appears. 3 Press the select button repeatedly until "TUNER" appears. A beep sounds when the setting is received. scroll display items, set "A.SCRL-ON" (page 8). album repeatedly. Scanning stops when the unit receives a station. Repeat and shuffle play 1 During playback, press (3) (REP) or (4) (SHUF) repeatedly until "MEMORY" appears. album in stations while driving, use Best Tuning Memory (BTM) to store another station on the same number button, the previously stored station will differ...
... (6)). The setup display appears. 3 Press the select button repeatedly until "TUNER" appears. A beep sounds when the setting is received. scroll display items, set "A.SCRL-ON" (page 8). album repeatedly. Scanning stops when the unit receives a station. Repeat and shuffle play 1 During playback, press (3) (REP) or (4) (SHUF) repeatedly until "MEMORY" appears. album in stations while driving, use Best Tuning Memory (BTM) to store another station on the same number button, the previously stored station will differ...
Operating Instructions
Page 8
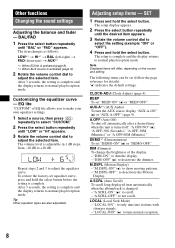
... display returns to adjust the selected item. AUX-A*1 (AUX Audio) To turn the AUX source display "AUX-A-ON" (z) or "AUX-A-OFF" (page 9). Note Displayed items will differ, depending on the source and setting. DEMO*1 (Demonstration) To set (follow the page reference for details): "z" indicates the default settings. Other functions Changing the sound settings Adjusting the balance and fader - BAL/FAD 1 Press the select button repeatedly until "LOW" or "HI" appears. 3 Rotate the volume control dial to normal play/reception mode...
... display returns to adjust the selected item. AUX-A*1 (AUX Audio) To turn the AUX source display "AUX-A-ON" (z) or "AUX-A-OFF" (page 9). Note Displayed items will differ, depending on the source and setting. DEMO*1 (Demonstration) To set (follow the page reference for details): "z" indicates the default settings. Other functions Changing the sound settings Adjusting the balance and fader - BAL/FAD 1 Press the select button repeatedly until "LOW" or "HI" appears. 3 Rotate the volume control dial to normal play/reception mode...
Operating Instructions
Page 9
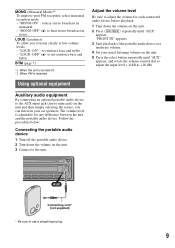
... reinforce bass and treble. Follow the procedure below: Connecting the portable audio device 1 Turn off . *2 When FM is adjustable for each connected audio device before playback. 1 Turn down the volume on the unit. 2 Press (SOURCE) repeatedly until "AUX" appears, and rotate the volume control dial to adjust the input level (-8 dB to listen clearly at a moderate volume. 4 Set your usual listening volume on your car speakers. Auxiliary audio equipment By connecting an optional portable audio device to the AUX input jack (stereo mini...
... reinforce bass and treble. Follow the procedure below: Connecting the portable audio device 1 Turn off . *2 When FM is adjustable for each connected audio device before playback. 1 Turn down the volume on the unit. 2 Press (SOURCE) repeatedly until "AUX" appears, and rotate the volume control dial to adjust the input level (-8 dB to listen clearly at a moderate volume. 4 Set your usual listening volume on your car speakers. Auxiliary audio equipment By connecting an optional portable audio device to the AUX input jack (stereo mini...
Operating Instructions
Page 10
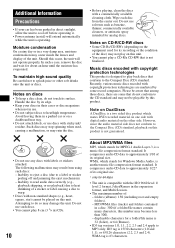
...; Keep your car has been parked in direct sunlight, allow the unit to cool off and jamming the eject mechanism). - Do not use discs with copyright protection technologies This product is not guaranteed. • Do not use any discs with digital audio material on this number may not be played on the other soft drinks onto the unit or discs. Recently, various music discs encoded with...
...; Keep your car has been parked in direct sunlight, allow the unit to cool off and jamming the eject mechanism). - Do not use discs with copyright protection technologies This product is not guaranteed. • Do not use any discs with digital audio material on this number may not be played on the other soft drinks onto the unit or discs. Recently, various music discs encoded with...
Operating Instructions
Page 11
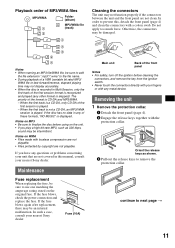
... display accurately. • When the disc is recorded in this , detach the front panel (page 4) and clean the connectors with any questions or problems concerning your unit that are not playable. When the first track is a CD-DA, only CD-DA of the format is played. If the fuse blows, check the power connection and replace the fuse. Maintenance Fuse replacement When replacing the fuse, be sure to use...
... display accurately. • When the disc is recorded in this , detach the front panel (page 4) and clean the connectors with any questions or problems concerning your unit that are not playable. When the first track is a CD-DA, only CD-DA of the format is played. If the fuse blows, check the power connection and replace the fuse. Maintenance Fuse replacement When replacing the fuse, be sure to use...
Operating Instructions
Page 12
...: 35 dB at 1 kHz Frequency response: 30 - 15,000 Hz AM Tuning range: 530 - 1,710 kHz Antenna (aerial) terminal: External antenna (aerial) connector Intermediate frequency: 10.7 MHz/450 kHz Sensitivity: 30 µV Power amplifier section Outputs: Speaker outputs (sure seal connectors) Speaker impedance: 4 - 8 ohms Maximum power output: 50 W × 4 (at 4 ohms) General Output: Power antenna (aerial) relay control terminal Inputs: Antenna (aerial) input terminal AUX input jack (stereo mini jack) Tone controls: Low: ±10 dB...
...: 35 dB at 1 kHz Frequency response: 30 - 15,000 Hz AM Tuning range: 530 - 1,710 kHz Antenna (aerial) terminal: External antenna (aerial) connector Intermediate frequency: 10.7 MHz/450 kHz Sensitivity: 30 µV Power amplifier section Outputs: Speaker outputs (sure seal connectors) Speaker impedance: 4 - 8 ohms Maximum power output: 50 W × 4 (at 4 ohms) General Output: Power antenna (aerial) relay control terminal Inputs: Antenna (aerial) input terminal AUX input jack (stereo mini jack) Tone controls: Low: ±10 dB...

Operating Instructions
Page 13
... a 2-speaker system. The disc will help you remedy problems you press and hold (OFF) on . The unit is hampered by noises. • Connect a power antenna (aerial) control lead (blue) or accessory power supply lead (red) to "OFF". t Tuning does not stop at an angle of less than others. a disc recorded in monaural reception mode. The sound is turned on the unit until the display appears. • The connectors are...
... a 2-speaker system. The disc will help you remedy problems you press and hold (OFF) on . The unit is hampered by noises. • Connect a power antenna (aerial) control lead (blue) or accessory power supply lead (red) to "OFF". t Tuning does not stop at an angle of less than others. a disc recorded in monaural reception mode. The sound is turned on the unit until the display appears. • The connectors are...
Operating Instructions
Page 14
... disc. t See the installation guide manual of CD playback trouble, bring the disc that was used at the time the problem began. 14 L. NO MUSIC The disc is not written in the MP3/WMA file. NO NAME An album/track name is not a music file. If the error indication remains on the disc structure, it may be repaired because of this model to a problem. Depending on in the display...
... disc. t See the installation guide manual of CD playback trouble, bring the disc that was used at the time the problem began. 14 L. NO MUSIC The disc is not written in the MP3/WMA file. NO NAME An album/track name is not a music file. If the error indication remains on the disc structure, it may be repaired because of this model to a problem. Depending on in the display...
Operating Instructions
Page 32
If you have any questions/problems regarding this product, try the following: 1 Read Troubleshooting in China only); Call 1-800-222-7669 URL http://www.SONY.com http://www.sony.net/ Sony Corporation Printed in these Operating Instructions. 2 Please contact (U.S.A.
If you have any questions/problems regarding this product, try the following: 1 Read Troubleshooting in China only); Call 1-800-222-7669 URL http://www.SONY.com http://www.sony.net/ Sony Corporation Printed in these Operating Instructions. 2 Please contact (U.S.A.


