Operating Instructions
Page 1
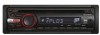
... (DEMO) display, see page 9. Record these numbers whenever you call upon your Sony dealer regarding this product. Pour annuler l'affichage de démonstration (DEMO), reportez-vous à la page 10. 4-000-121-12 (1) FM/AM Compact Disc Player Operating Instructions US Mode d'emploi FR Manual de instrucciones ES Owner's Record The model and serial numbers are located on the bottom of the unit. CDX-GT330 CDX-GT33W CDX-GT230 CDX-GT130 ©...
... (DEMO) display, see page 9. Record these numbers whenever you call upon your Sony dealer regarding this product. Pour annuler l'affichage de démonstration (DEMO), reportez-vous à la page 10. 4-000-121-12 (1) FM/AM Compact Disc Player Operating Instructions US Mode d'emploi FR Manual de instrucciones ES Owner's Record The model and serial numbers are located on the bottom of the unit. CDX-GT330 CDX-GT33W CDX-GT230 CDX-GT130 ©...
Operating Instructions
Page 2
... Sony dealer for help. Please see the supplied installation/connections manual. These limits are cautioned that to the HD RadioTM tuner Operating Instructions. However, there is encouraged to try to Part 15 of the following measures: - CDX-GT330/GT33W/GT230 only For the state of iBiquity Digital Corp. For HD RadioTM tuner operation, please refer to which prevents battery drain. This equipment generates, uses...
... Sony dealer for help. Please see the supplied installation/connections manual. These limits are cautioned that to the HD RadioTM tuner Operating Instructions. However, there is encouraged to try to Part 15 of the following measures: - CDX-GT330/GT33W/GT230 only For the state of iBiquity Digital Corp. For HD RadioTM tuner operation, please refer to which prevents battery drain. This equipment generates, uses...
Operating Instructions
Page 3
... Specifications 14 Troubleshooting 15 Error displays/Messages 16 3 SET 9 Using optional equipment 10 Auxiliary audio equipment 10 CD changer (CDX-GT330/GT33W only 11 Additional Information Precautions 11 Notes on discs 11 Playback order of controls and basic operations Main unit 6 Card remote commander RM-X151 (CDX-GT330/GT33W/GT230 only 6 CD Display items 8 Repeat and shuffle play 8 Radio Storing and receiving stations 8 Storing automatically - BTM 8 Storing manually 8 Receiving the stored stations 8 Tuning automatically 8 Other functions Changing...
... Specifications 14 Troubleshooting 15 Error displays/Messages 16 3 SET 9 Using optional equipment 10 Auxiliary audio equipment 10 CD changer (CDX-GT330/GT33W only 11 Additional Information Precautions 11 Notes on discs 11 Playback order of controls and basic operations Main unit 6 Card remote commander RM-X151 (CDX-GT330/GT33W/GT230 only 6 CD Display items 8 Repeat and shuffle play 8 Radio Storing and receiving stations 8 Storing automatically - BTM 8 Storing manually 8 Receiving the stored stations 8 Tuning automatically 8 Other functions Changing...
Operating Instructions
Page 4
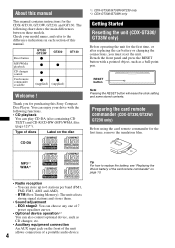
... signal stations and stores them. • Sound adjustment - About this manual This manual contains instructions for the first time, or after replacing the car battery or changing the connections, you for the first time, remove the insulation film. Check your drive with a pointed object, such as CD changer, etc. • Auxiliary equipment connection An AUX input jack on the front of the unit allows connection of this manual. Reset button MP3/WMA playback CD changer control Card remote...
... signal stations and stores them. • Sound adjustment - About this manual This manual contains instructions for the first time, or after replacing the car battery or changing the connections, you for the first time, remove the insulation film. Check your drive with a pointed object, such as CD changer, etc. • Auxiliary equipment connection An AUX input jack on the front of the unit allows connection of this manual. Reset button MP3/WMA playback CD changer control Card remote...
Operating Instructions
Page 5
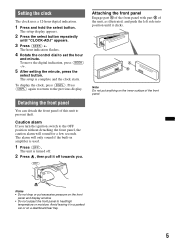
... select button. Notes • Do not drop or put anything on a dashboard/rear tray. 5 The alarm will sound for a few seconds. Detaching the front panel You can detach the front panel of the front panel. Setting the clock The clock uses a 12-hour digital indication. 1 Press and hold the select button. Caution alarm If you . The setup display appears. 2 Press the select button repeatedly until it in amplifier...
... select button. Notes • Do not drop or put anything on a dashboard/rear tray. 5 The alarm will sound for a few seconds. Detaching the front panel You can detach the front panel of the front panel. Setting the clock The clock uses a 12-hour digital indication. 1 Press and hold the select button. Caution alarm If you . The setup display appears. 2 Press the select button repeatedly until it in amplifier...
Operating Instructions
Page 6
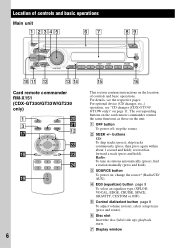
... contains instructions on ; For optional device (CD changer, etc.,) operation, see the respective pages. Radio: To tune in stations automatically (press); C SOURCE button To power on the location of controls and basic operations Main unit 1 2345 67 89 OFF SOURCE SEEK DSPL EQ3 SEEK MODE PUSH SELECT AF TA TP REG DISC ALBM ARTIST TRACK SHUF ZAP DM+ LOUD AUX BTM 1 REP SHUF PAUSE 2 3 4 5 6 q; buttons CD: To skip tracks (press); select setup...
... contains instructions on ; For optional device (CD changer, etc.,) operation, see the respective pages. Radio: To tune in stations automatically (press); C SOURCE button To power on the location of controls and basic operations Main unit 1 2345 67 89 OFF SOURCE SEEK DSPL EQ3 SEEK MODE PUSH SELECT AF TA TP REG DISC ALBM ARTIST TRACK SHUF ZAP DM+ LOUD AUX BTM 1 REP SHUF PAUSE 2 3 4 5 6 q; buttons CD: To skip tracks (press); select setup...
Operating Instructions
Page 7
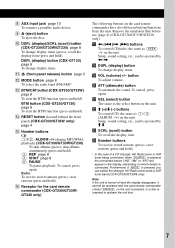
... ). Radio: To receive stored stations (press); Remove the insulation film before use (page 4) (CDX-GT330/GT33W/GT230 only). Setup, sound setting, etc., can be operated by M m. qk DSPL (display) button To change display items (press); To cancel, press again. ws M (+)/m (-) buttons To control CD, the same as (1)/(2) (ALBUM -/+) on which device is connected. when (SOURCE) is inserted to activate the unit first. 7 DSPL (display) button (CDX-GT130) page 8 To change display items. K (front panel release) button page 5 L MODE button page 8 To select...
... ). Radio: To receive stored stations (press); Remove the insulation film before use (page 4) (CDX-GT330/GT33W/GT230 only). Setup, sound setting, etc., can be operated by M m. qk DSPL (display) button To change display items (press); To cancel, press again. ws M (+)/m (-) buttons To control CD, the same as (1)/(2) (ALBUM -/+) on which device is connected. when (SOURCE) is inserted to activate the unit first. 7 DSPL (display) button (CDX-GT130) page 8 To change display items. K (front panel release) button page 5 L MODE button page 8 To select...
Operating Instructions
Page 8
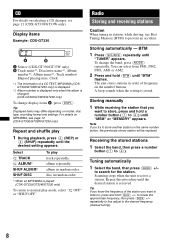
... the desired frequency (manual tuning). 8 repeatedly to fine adjust to search for the station. CD For details on model, disc type, recording format and settings. disc in stations while driving, use Best Tuning Memory (BTM) to store another station on the same number button, the previously stored station will be replaced. Tip Displayed items may differ depending on selecting a CD changer, see page 12. (CDX-GT330/GT33W/GT230 only) Repeat and shuffle play 1 During...
... the desired frequency (manual tuning). 8 repeatedly to fine adjust to search for the station. CD For details on model, disc type, recording format and settings. disc in stations while driving, use Best Tuning Memory (BTM) to store another station on the same number button, the previously stored station will be replaced. Tip Displayed items may differ depending on selecting a CD changer, see page 12. (CDX-GT330/GT33W/GT230 only) Repeat and shuffle play 1 During...
Operating Instructions
Page 9
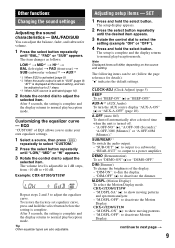
... the factory-set to normal play /reception mode. SET 1 Press and hold the select button before the setting is complete and the display returns to "SUB" (page 9). SUB/REAR*1 To switch the audio output. - M.DSPL (Motion Display) To select the Motion Display mode. "M.DSPL-OFF": to deactivate the dimmer. EQ3 "CUSTOM" of the display. - The volume level is set equalizer curve, press and hold the select button. After 5 seconds, the setting is complete. Adjusting setup items - The setup display appears. 2 Press the select button...
... the factory-set to normal play /reception mode. SET 1 Press and hold the select button before the setting is complete and the display returns to "SUB" (page 9). SUB/REAR*1 To switch the audio output. - M.DSPL (Motion Display) To select the Motion Display mode. "M.DSPL-OFF": to deactivate the dimmer. EQ3 "CUSTOM" of the display. - The volume level is set equalizer curve, press and hold the select button. After 5 seconds, the setting is complete. Adjusting setup items - The setup display appears. 2 Press the select button...
Operating Instructions
Page 10
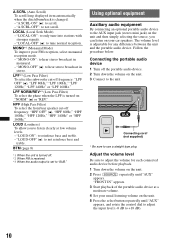
A.SCRL (Auto Scroll) To scroll long displayed item automatically when the disc/album/track is adjustable for each connected audio device before playback. 1 Turn down the volume on the unit. 2 Press (SOURCE) repeatedly until "AUX" appears, and rotate the control dial to adjust the input level (-8 dB to "SUB." MONO*2 (Monaural Mode) To improve poor FM reception, select monaural reception mode. - "LOUD-OFF" (z): to the AUX input jack (stereo mini jack) on the unit and...
A.SCRL (Auto Scroll) To scroll long displayed item automatically when the disc/album/track is adjustable for each connected audio device before playback. 1 Turn down the volume on the unit. 2 Press (SOURCE) repeatedly until "AUX" appears, and rotate the control dial to adjust the input level (-8 dB to "SUB." MONO*2 (Monaural Mode) To improve poor FM reception, select monaural reception mode. - "LOUD-OFF" (z): to the AUX input jack (stereo mini jack) on the unit and...
Operating Instructions
Page 11
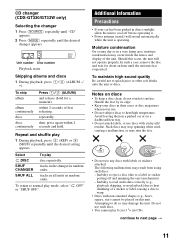
... unit. tracks in the changer in a parked car or on this occur, the unit will extend automatically while the unit is operating. Skipping albums and discs 1 During playback, press (1)/(2) (ALBUM -/ +). Unit number Disc number Playback starts. CD changer (CDX-GT330/GT33W only) Selecting the changer 1 Press (SOURCE) repeatedly until "CD" appears. 2 Press (MODE) repeatedly until the desired setting appears. Should this unit. Inability to eject a disc (due to normal play 8 cm (3 1/4 in use...
... unit. tracks in the changer in a parked car or on this occur, the unit will extend automatically while the unit is operating. Skipping albums and discs 1 During playback, press (1)/(2) (ALBUM -/ +). Unit number Disc number Playback starts. CD changer (CDX-GT330/GT33W only) Selecting the changer 1 Press (SOURCE) repeatedly until "CD" appears. 2 Press (MODE) repeatedly until the desired setting appears. Should this unit. Inability to eject a disc (due to normal play 8 cm (3 1/4 in use...
Operating Instructions
Page 12
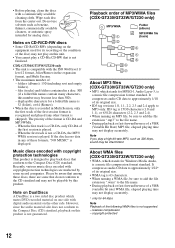
... unit is compatible with copyright protection technologies are some record companies. folders (albums): 150 (including root and empty folders). - Recently, various music discs encoded with the ISO 9660 level 1/ level 2 format, Joliet/Romeo in Multi Session, only the first track of a VBR (Variable Bit Rate) MP3 file, elapsed playing time may not play on the equipment used for Windows Media Audio, is a music...
... unit is compatible with copyright protection technologies are some record companies. folders (albums): 150 (including root and empty folders). - Recently, various music discs encoded with the ISO 9660 level 1/ level 2 format, Joliet/Romeo in Multi Session, only the first track of a VBR (Variable Bit Rate) MP3 file, elapsed playing time may not play on the equipment used for Windows Media Audio, is a music...
Operating Instructions
Page 13
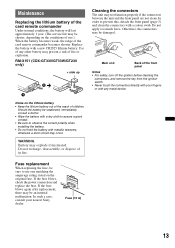
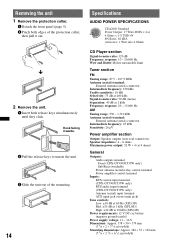
... unit Back of the front panel Notes • For safety, turn off the ignition before cleaning the connectors, and remove the key from the ignition switch. • Never touch the connectors directly with metallic tweezers, otherwise a short-circuit may occur. Fuse (10 A) 13 Maintenance Replacing the lithium battery of the card remote commander Under normal conditions, the battery will last approximately 1 year. (The service...
... unit Back of the front panel Notes • For safety, turn off the ignition before cleaning the connectors, and remove the key from the ignition switch. • Never touch the connectors directly with metallic tweezers, otherwise a short-circuit may occur. Fuse (10 A) 13 Maintenance Replacing the lithium battery of the card remote commander Under normal conditions, the battery will last approximately 1 year. (The service...
Operating Instructions
Page 14
... Intermediate frequency: 25 kHz Sensitivity: 26 µV Power amplifier section Output: Speaker outputs (sure seal connectors) Speaker impedance: 4 - 8 ohms Maximum power output: 52 W × 4 (at 4 ohms) General Outputs: Audio outputs terminal Front (CDX-GT330/GT33W only) Sub/Rear switchable Power antenna (aerial) relay control terminal Power amplifier control terminal Inputs: BUS control input terminal (CDX-GT330/GT33W only) BUS audio input terminal (CDX-GT330/GT33W only) Antenna (aerial) input terminal AUX input jack (stereo mini jack) Tone controls: Low: ±10 dB at 60 Hz (XPLOD) Mid...
... Intermediate frequency: 25 kHz Sensitivity: 26 µV Power amplifier section Output: Speaker outputs (sure seal connectors) Speaker impedance: 4 - 8 ohms Maximum power output: 52 W × 4 (at 4 ohms) General Outputs: Audio outputs terminal Front (CDX-GT330/GT33W only) Sub/Rear switchable Power antenna (aerial) relay control terminal Power amplifier control terminal Inputs: BUS control input terminal (CDX-GT330/GT33W only) BUS audio input terminal (CDX-GT330/GT33W only) Antenna (aerial) input terminal AUX input jack (stereo mini jack) Tone controls: Low: ±10 dB at 60 Hz (XPLOD) Mid...
Operating Instructions
Page 15
...) Supplied accessories: Card remote commander: RM-X151 (CDX-GT330/GT33W/GT230 only) Parts for installation and connections (1 set) Optional accessories/equipment: for CDX-GT330/GT33W BUS cable (supplied with your unit. General No power is turned on the unit until the display appears. • The connectors are erased. No sound. • The volume is too low. • The ATT function is activated. • The position of the memory have a relay box...
...) Supplied accessories: Card remote commander: RM-X151 (CDX-GT330/GT33W/GT230 only) Parts for installation and connections (1 set) Optional accessories/equipment: for CDX-GT330/GT33W BUS cable (supplied with your unit. General No power is turned on the unit until the display appears. • The connectors are erased. No sound. • The volume is too low. • The ATT function is activated. • The position of the memory have a relay box...
Operating Instructions
Page 16
... installation/connections manual of less than others.*1 The following discs take longer to play due to a problem. The local seek mode is not inserted in the CD changer. NO MAG (CDX-GT330/GT33W only) The disc magazine is on during automatic tuning. NO MUSIC The disc does not contain a music file. Press the RESET button (page 4).*2 Press Z (eject) (page 7).*3 Radio reception The stations cannot be loaded. • Another disc is connected...
... installation/connections manual of less than others.*1 The following discs take longer to play due to a problem. The local seek mode is not inserted in the CD changer. NO MAG (CDX-GT330/GT33W only) The disc magazine is on during automatic tuning. NO MUSIC The disc does not contain a music file. Press the RESET button (page 4).*2 Press Z (eject) (page 7).*3 Radio reception The stations cannot be loaded. • Another disc is connected...
Operating Instructions
Page 17
t Press Z (eject) (page 7). RESET (CDX-GT330/GT33W only) The CD unit and CD changer cannot be displayed with the unit. *1 If an error occurs during playback of a CD, the disc number of the CD does not appear in the display. *2 The disc number of the disc causing the error appears in the display, consult your nearest Sony dealer. t Press the RESET button (page 4). "" The character cannot be operated due to be...
t Press Z (eject) (page 7). RESET (CDX-GT330/GT33W only) The CD unit and CD changer cannot be displayed with the unit. *1 If an error occurs during playback of a CD, the disc number of the CD does not appear in the display. *2 The disc number of the disc causing the error appears in the display, consult your nearest Sony dealer. t Press the RESET button (page 4). "" The character cannot be operated due to be...

Operating Instructions
Page 56
only); Call 1-800-222-7669 URL http://www.SONY.com http://www.sony.net/ Sony Corporation Printed in these Operating Instructions. 2 Reset the unit. (Only for models with a RESET button.) Note: Stored data may be erased. 3 Please contact (U.S.A. If you have any questions/problems regarding this product, try the following: 1 Read Troubleshooting in China
only); Call 1-800-222-7669 URL http://www.SONY.com http://www.sony.net/ Sony Corporation Printed in these Operating Instructions. 2 Reset the unit. (Only for models with a RESET button.) Note: Stored data may be erased. 3 Please contact (U.S.A. If you have any questions/problems regarding this product, try the following: 1 Read Troubleshooting in China


