Operating Instructions
Page 2
... equipment has been tested and found to comply with the limits for help. However, there is connected. - Consult the dealer or an experienced radio/TV technician for a Class B digital device, pursuant to which prevents battery drain. CAUTION The use of the FCC Rules. These limits are ... between the equipment and receiver. - If you turn the ignition off , which the receiver is no ACC position Be sure to radio communications. Warning if your authority to operate this product will shut off completely and automatically in accordance with this equipment. If this manual...
... equipment has been tested and found to comply with the limits for help. However, there is connected. - Consult the dealer or an experienced radio/TV technician for a Class B digital device, pursuant to which prevents battery drain. CAUTION The use of the FCC Rules. These limits are ... between the equipment and receiver. - If you turn the ignition off , which the receiver is no ACC position Be sure to radio communications. Warning if your authority to operate this product will shut off completely and automatically in accordance with this equipment. If this manual...
Operating Instructions
Page 3
... 3 Table of Contents Welcome 4 Getting Started Setting the clock 4 Detaching the front panel 4 Attaching the front panel 5 Location of controls and basic operations Main unit 6 Radio Storing and receiving stations 7 Storing automatically - EQ lite 8 Adjusting setup items - BTM 7 Storing manually 7 Receiving the stored stations 7 Tuning automatically 7 Other functions Changing the sound...
... 3 Table of Contents Welcome 4 Getting Started Setting the clock 4 Detaching the front panel 4 Attaching the front panel 5 Location of controls and basic operations Main unit 6 Radio Storing and receiving stations 7 Storing automatically - EQ lite 8 Adjusting setup items - BTM 7 Storing manually 7 Receiving the stored stations 7 Tuning automatically 7 Other functions Changing the sound...
Operating Instructions
Page 4
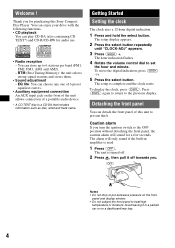
...and AM2). - The setup is turned off towards you. The alarm will sound for audio use. • Radio reception - EQ lite: You can detach the front panel of a portable audio device. * A CD TEXT disc is used. 1 Press (OFF). To display the clock, press (DSPL). Detaching the front panel ...You can choose any one of 6 preset equalizer curves. • Auxiliary equipment connection An AUX input jack on the front of the unit allows connection of this Sony Compact Disc Player. Notes &#...
...and AM2). - The setup is turned off towards you. The alarm will sound for audio use. • Radio reception - EQ lite: You can detach the front panel of a portable audio device. * A CD TEXT disc is used. 1 Press (OFF). To display the clock, press (DSPL). Detaching the front panel ...You can choose any one of 6 preset equalizer curves. • Auxiliary equipment connection An AUX input jack on the front of the unit allows connection of this Sony Compact Disc Player. Notes &#...
Operating Instructions
Page 6
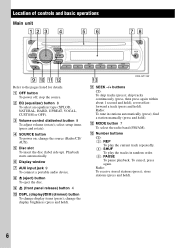
...) button 4 J DSPL (display)/DIM (dimmer) button To change the source (Radio/CD/ AUX). change the display brightness (press and hold ). L MODE button 7 To select the radio band (FM/AM). To cancel, press again. Radio: To receive stored stations (press); F Display window G AUX input jack 9 ...button To power off; C Volume control dial/select button 8 To adjust volume (rotate); D SOURCE button To power on; qd CDX-GT11W K SEEK -/+ buttons CD: To skip tracks (press); skip tracks continuously (press, then press again within about 1 second and hold ). 6 reverse/fastforward a ...
...) button 4 J DSPL (display)/DIM (dimmer) button To change the source (Radio/CD/ AUX). change the display brightness (press and hold ). L MODE button 7 To select the radio band (FM/AM). To cancel, press again. Radio: To receive stored stations (press); F Display window G AUX input jack 9 ...button To power off; C Volume control dial/select button 8 To adjust volume (rotate); D SOURCE button To power on; qd CDX-GT11W K SEEK -/+ buttons CD: To skip tracks (press); skip tracks continuously (press, then press again within about 1 second and hold ). 6 reverse/fastforward a ...
Operating Instructions
Page 7
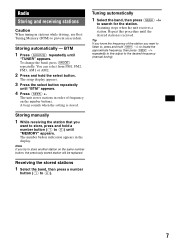
... of the station you want to listen to, press and hold the select button. Storing automatically - Tuning automatically 1 Select the band, then press (SEEK) -/+ to (6)). Radio Storing and receiving stations Caution When tuning in stations while driving, use Best Tuning Memory (BTM) to the desired frequency (manual tuning). 7 Repeat this procedure...
... of the station you want to listen to, press and hold the select button. Storing automatically - Tuning automatically 1 Select the band, then press (SEEK) -/+ to (6)). Radio Storing and receiving stations Caution When tuning in stations while driving, use Best Tuning Memory (BTM) to the desired frequency (manual tuning). 7 Repeat this procedure...
Operating Instructions
Page 13
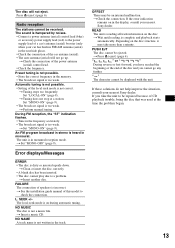
Radio reception The stations cannot be displayed with the unit. t Check the ...station: Set "MONO-ON" (page 9). • The broadcast signal is on the disc structure, it may be ejected. t Insert a music CD. t Tuning stops too frequently: Set "LOCAL-ON" (page 8). t Set "MONO-ON" (page 9). t Clean or insert the disc correctly.... inserted. • The disc cannot play due to be repaired because of a car's antenna (aerial) booster (only when your nearest Sony dealer. SEEK +/- t Check the connection. t Wait until reading is dirty or inserted upside down. PUSH EJT The disc cannot be ...
Radio reception The stations cannot be displayed with the unit. t Check the ...station: Set "MONO-ON" (page 9). • The broadcast signal is on the disc structure, it may be ejected. t Insert a music CD. t Tuning stops too frequently: Set "LOCAL-ON" (page 8). t Set "MONO-ON" (page 9). t Clean or insert the disc correctly.... inserted. • The disc cannot play due to be repaired because of a car's antenna (aerial) booster (only when your nearest Sony dealer. SEEK +/- t Check the connection. t Wait until reading is dirty or inserted upside down. PUSH EJT The disc cannot be ...


