Operating Instructions
Page 5
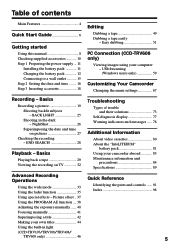
Easy dubbing 51 PC Connection (CCD-TRV608 only) Viewing images using your own titles 44 Using the built-in the dark - USB Streaming (Windows users only 59 Customizing Your Camcorder Changing the menu settings 67 Recording - END SEARCH 28 Playback - Basics Playing back a tape 29 Viewing the recording on pictures 27 ... 38 Adjusting the exposure manually ...... 40 Focusing manually 41 Superimposing a title 42 Making your computer - BACK LIGHT 25 Shooting in light (CCD-TRV107/TRV308/TRV408/ TRV608 only 46 5 Basics Recording a picture 19 Shooting backlit subjects -
Easy dubbing 51 PC Connection (CCD-TRV608 only) Viewing images using your own titles 44 Using the built-in the dark - USB Streaming (Windows users only 59 Customizing Your Camcorder Changing the menu settings 67 Recording - END SEARCH 28 Playback - Basics Playing back a tape 29 Viewing the recording on pictures 27 ... 38 Adjusting the exposure manually ...... 40 Focusing manually 41 Superimposing a title 42 Making your computer - BACK LIGHT 25 Shooting in light (CCD-TRV107/TRV308/TRV408/ TRV608 only 46 5 Basics Recording a picture 19 Shooting backlit subjects -
Operating Instructions
Page 6
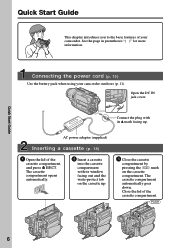
... compartment. The cassette compartment opens automatically. Quick Start Guide 6 Connecting the power cord (p. 15) Use the battery pack when using your camcorder. Open the DC IN jack cover. Connect the plug with its v mark facing up . 3 Close the cassette compartment by pressing the...up . EJECT 2 Insert a cassette into the cassette compartment with its window facing out and the write-protect tab on the cassette compartment. Quick Start Guide This chapter introduces you to the basic features of your camcorder outdoors (p. 11). See the page in parentheses "( )" for more ...
... compartment. The cassette compartment opens automatically. Quick Start Guide 6 Connecting the power cord (p. 15) Use the battery pack when using your camcorder. Open the DC IN jack cover. Connect the plug with its v mark facing up . 3 Close the cassette compartment by pressing the...up . EJECT 2 Insert a cassette into the cassette compartment with its window facing out and the write-protect tab on the cassette compartment. Quick Start Guide This chapter introduces you to the basic features of your camcorder outdoors (p. 11). See the page in parentheses "( )" for more ...

Operating Instructions
Page 9
...dusk [d]. [a] [b] [c] [d] 9 Exposing the LCD screen, the finder or the lens to malfunction. Doing so might cause your camcorder to direct sunlight for effective use. Precautions on camcorder care Lens and LCD screen/finder (on TV color systems TV color systems... differ from rain and sea water. Getting started Using this malfunction cannot be some tiny black points and/or bright points (white, red, blue or green in the sun or under direct sunlight [b]. •Be careful when placing the camera near a window...
...dusk [d]. [a] [b] [c] [d] 9 Exposing the LCD screen, the finder or the lens to malfunction. Doing so might cause your camcorder to direct sunlight for effective use. Precautions on camcorder care Lens and LCD screen/finder (on TV color systems TV color systems... differ from rain and sea water. Getting started Using this malfunction cannot be some tiny black points and/or bright points (white, red, blue or green in the sun or under direct sunlight [b]. •Be careful when placing the camera near a window...
Operating Instructions
Page 12
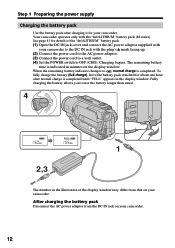
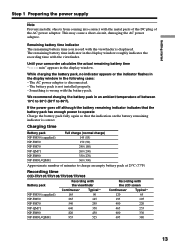
...number in the illustration of the "InfoLITHIUM" battery pack. (1) Open the DC IN jack cover and connect the AC power adaptor supplied with your camcorder. Step 1 Preparing the power supply Charging the battery pack Use the battery pack after charging it for about one hour after normal charge is ... AC power adaptor from that on the display window. The remaining battery time is completed. Fully charging the battery allows you to , normal charge is indicated in minutes on your camcorder. 12 See page 81 for details of the display window may differ from the DC IN jack on ...
...number in the illustration of the "InfoLITHIUM" battery pack. (1) Open the DC IN jack cover and connect the AC power adaptor supplied with your camcorder. Step 1 Preparing the power supply Charging the battery pack Use the battery pack after charging it for about one hour after normal charge is ... AC power adaptor from that on the display window. The remaining battery time is completed. Fully charging the battery allows you to , normal charge is indicated in minutes on your camcorder. 12 See page 81 for details of the display window may differ from the DC IN jack on ...
Operating Instructions
Page 13
... camcorder calculates...window roughly indicates the recording time with the viewfinder. min" appears in an ambient temperature of the AC power adaptor. If the power goes off although the battery remaining indicator indicates that the battery pack has enough power to charge an empty battery pack at 25°C (77°F) Recording time CCD...-TRV107/TRV108/TRV308/TRV408 Battery pack Recording with the viewfinder Continuous* Typical** NP-FM30 (supplied) 165 90 NP-FM50 265 145 NP-FM70 540 295 NP-QM71 640 350 NP-FM90 820 450 NP-FM91/QM91 955 525 Recording with the LCD...
... camcorder calculates...window roughly indicates the recording time with the viewfinder. min" appears in an ambient temperature of the AC power adaptor. If the power goes off although the battery remaining indicator indicates that the battery pack has enough power to charge an empty battery pack at 25°C (77°F) Recording time CCD...-TRV107/TRV108/TRV308/TRV408 Battery pack Recording with the viewfinder Continuous* Typical** NP-FM30 (supplied) 165 90 NP-FM50 265 145 NP-FM70 540 295 NP-QM71 640 350 NP-FM90 820 450 NP-FM91/QM91 955 525 Recording with the LCD...
Operating Instructions
Page 18
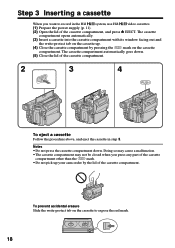
... compartment. The cassette compartment opens automatically. (3) Insert a cassette into the cassette compartment with its window facing out and the write-protect tab on the cassette up your camcorder by pressing the mark on the cassette to record in step 3. Notes •Do not press... the cassette compartment down . (5) Close the lid of the cassette compartment. 2 3 4 EJECT To eject a cassette Follow the procedure above, and eject the cassette in the Hi8 system, use Hi8 ...
... compartment. The cassette compartment opens automatically. (3) Insert a cassette into the cassette compartment with its window facing out and the write-protect tab on the cassette up your camcorder by pressing the mark on the cassette to record in step 3. Notes •Do not press... the cassette compartment down . (5) Close the lid of the cassette compartment. 2 3 4 EJECT To eject a cassette Follow the procedure above, and eject the cassette in the Hi8 system, use Hi8 ...
Operating Instructions
Page 38
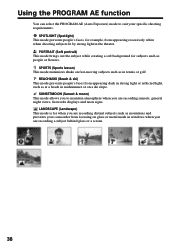
... reflected light, such as mountains and prevents your specific shooting requirements. SUNSETMOON (Sunset & moon) This mode allows you to suit your camcorder from focusing on glass or metal mesh in windows when you are recording sunsets, general night views, fireworks displays and neon signs. BEACH&SKI (Beach & ski) This mode prevents people...
... reflected light, such as mountains and prevents your specific shooting requirements. SUNSETMOON (Sunset & moon) This mode allows you to suit your camcorder from focusing on glass or metal mesh in windows when you are recording sunsets, general night views, fireworks displays and neon signs. BEACH&SKI (Beach & ski) This mode prevents people...
Operating Instructions
Page 46
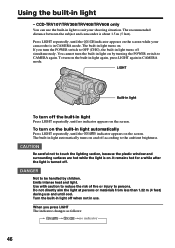
CCD-TRV107/TRV308/TRV408/TRV608 only You can use the built-in CAMERA mode. To turn on the built-in.... CAUTION Be careful not to persons. Emits intense heat and light. The recommended distance between the subject and camcorder is turned off the built-in light automatically Press LIGHT repeatedly, until the indicator appears on the built-in light... with caution to reduce the risk of fire or injury to touch the lighting section, because the plastic window and surrounding surfaces are hot while the light is in light on the screen while your shooting situation. ...
CCD-TRV107/TRV308/TRV408/TRV608 only You can use the built-in CAMERA mode. To turn on the built-in.... CAUTION Be careful not to persons. Emits intense heat and light. The recommended distance between the subject and camcorder is turned off the built-in light automatically Press LIGHT repeatedly, until the indicator appears on the built-in light... with caution to reduce the risk of fire or injury to touch the lighting section, because the plastic window and surrounding surfaces are hot while the light is in light on the screen while your shooting situation. ...
Operating Instructions
Page 59
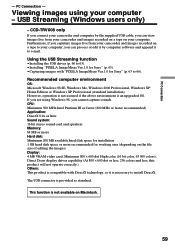
... Ver.1.0 for Sony" (p. 63). •Capturing images with DirectX technology, so it by the supplied USB cable, you cannot capture sounds. CCD-TRV608 only If you are using your camcorder and computer by... computer software and append it to your computer, you can view images live from your camcorder and images recorded on a tape to e-mail. Furthermore, if you caputure images live from your computer. Recommended computer environment OS: Microsoft Windows 98 SE, Windows Me, Windows 2000 Professional, Windows...
... Ver.1.0 for Sony" (p. 63). •Capturing images with DirectX technology, so it by the supplied USB cable, you cannot capture sounds. CCD-TRV608 only If you are using your camcorder and computer by... computer software and append it to your computer, you can view images live from your camcorder and images recorded on a tape to e-mail. Furthermore, if you caputure images live from your computer. Recommended computer environment OS: Microsoft Windows 98 SE, Windows Me, Windows 2000 Professional, Windows...
Operating Instructions
Page 60
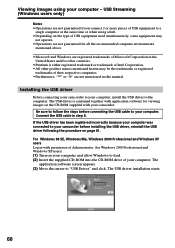
... the same time or when using your camcorder. Connect the USB cable in with your computer - The USB driver is either registered trademark or trademark of Intel Corporation. • All other countries. • Pentium is contained together with application software for Windows 2000 Professional and Windows XP users) (1) Turn on page 61. The...
... the same time or when using your camcorder. Connect the USB cable in with your computer - The USB driver is either registered trademark or trademark of Intel Corporation. • All other countries. • Pentium is contained together with application software for Windows 2000 Professional and Windows XP users) (1) Turn on page 61. The...
Operating Instructions
Page 61
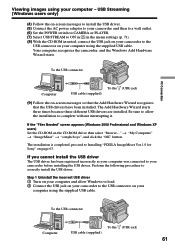
...Ver.1.0 for Sony" on your computer using the supplied USB cable. To the USB connector To the (USB) jack Computer USB cable (supplied) 61 USB Streaming (Windows users only) (4) Follow the on-screen messages to install the USB driver. (5) Connect the AC power adaptor to your camcorder and then ...the (USB) jack USB cable (supplied) (9) Follow the on the CD-ROM driver then select "Browse...." Be sure to allow Windows to load. 2 Connect the USB jack on your camcorder to the USB connector on your computer and allow the installation to your computer - t "My Computer" t "ImageMixer" t "...
...Ver.1.0 for Sony" on your computer using the supplied USB cable. To the USB connector To the (USB) jack Computer USB cable (supplied) 61 USB Streaming (Windows users only) (4) Follow the on-screen messages to install the USB driver. (5) Connect the AC power adaptor to your camcorder and then ...the (USB) jack USB cable (supplied) (9) Follow the on the CD-ROM driver then select "Browse...." Be sure to allow Windows to load. 2 Connect the USB jack on your camcorder to the USB connector on your computer and allow the installation to your computer - t "My Computer" t "ImageMixer" t "...
Operating Instructions
Page 62
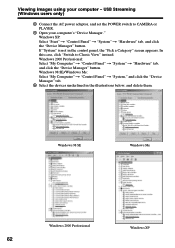
... "Start" t "Control Panel" t "System" t "Hardware" tab, and click the "Device Manager" button. Windows 98 SE/Windows Me: Select "My Computer" t "Control Panel" t "System," and click the "Device Manager" tab. 5 Select the devices underlined in the control panel, the ...to CAMERA or PLAYER. 4 Open your computer - If "System" is not in the illustrations below, and delete them. Windows 98 SE Windows Me Windows 2000 Professional 62 Windows XP USB Streaming (Windows users only) 3 Connect the AC power adaptor, and set the POWER switch to Classic View" instead. Viewing images using ...
... "Start" t "Control Panel" t "System" t "Hardware" tab, and click the "Device Manager" button. Windows 98 SE/Windows Me: Select "My Computer" t "Control Panel" t "System," and click the "Device Manager" tab. 5 Select the devices underlined in the control panel, the ...to CAMERA or PLAYER. 4 Open your computer - If "System" is not in the illustrations below, and delete them. Windows 98 SE Windows Me Windows 2000 Professional 62 Windows XP USB Streaming (Windows users only) 3 Connect the AC power adaptor, and set the POWER switch to Classic View" instead. Viewing images using ...
Operating Instructions
Page 63
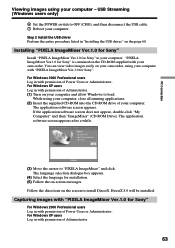
Installing "PIXELA ImageMixer Ver.1.0 for Sony" Install "PIXELA ImageMixer Ver.1.0 for Sony" to your computer and allow Windows to OFF (CHG), and then disconnect the USB cable. 7 Reboot your camcorder. For Windows XP users Log in with permission of Administrator. (1) Turn on ..." on -screen messages. The application software screen appears. Follow the directions on your camcorder, using your computer - Capturing images with "PIXELA ImageMixer Ver.1.0 for Sony" For Windows 2000 Professional users Log in with permission of your computer. The application software screen appears...
Installing "PIXELA ImageMixer Ver.1.0 for Sony" Install "PIXELA ImageMixer Ver.1.0 for Sony" to your computer and allow Windows to OFF (CHG), and then disconnect the USB cable. 7 Reboot your camcorder. For Windows XP users Log in with permission of Administrator. (1) Turn on ..." on -screen messages. The application software screen appears. Follow the directions on your camcorder, using your computer - Capturing images with "PIXELA ImageMixer Ver.1.0 for Sony" For Windows 2000 Professional users Log in with permission of your computer. The application software screen appears...

Operating Instructions
Page 64
... (1) Turn on your computer and allow Windows to load. (2) Connect one end of Start-up screen. (8) Select . To the USB connector Computer To the (USB) jack USB cable (supplied) (3) Connect the AC power adaptor and insert a cassette to your camcorder. (4) Set the POWER switch to PLAYER...cable to the USB jack on the camcorder and the other end to ON in in the menu settings (p. 71). (6) Select "Start" t "Program" t "Pixela" t "ImageMixer" t "PIXELA ImageMixer Ver.1.0 for Sony" on your computer - Preview window (9) Start playing back a tape on Windows. (7) Click the input mode button...
... (1) Turn on your computer and allow Windows to load. (2) Connect one end of Start-up screen. (8) Select . To the USB connector Computer To the (USB) jack USB cable (supplied) (3) Connect the AC power adaptor and insert a cassette to your camcorder. (4) Set the POWER switch to PLAYER...cable to the USB jack on the camcorder and the other end to ON in in the menu settings (p. 71). (6) Select "Start" t "Program" t "Pixela" t "ImageMixer" t "PIXELA ImageMixer Ver.1.0 for Sony" on your computer - Preview window (9) Start playing back a tape on Windows. (7) Click the input mode button...
Operating Instructions
Page 65
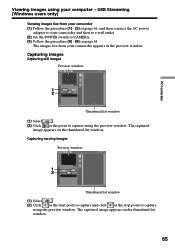
... the procedure (1) - (2) on page 64. Capturing images Capturing still images Preview window 1 2 Thumbnail list window (1) Select . (2) Click at the stop point to capture using the preview window. The captured image appears on the thumbnail list window. 65 The images live from your camcorder and then to a wall outlet. (2) Set the POWER switch to CAMERA. (3) Follow...
... the procedure (1) - (2) on page 64. Capturing images Capturing still images Preview window 1 2 Thumbnail list window (1) Select . (2) Click at the stop point to capture using the preview window. The captured image appears on the thumbnail list window. 65 The images live from your camcorder and then to a wall outlet. (2) Set the POWER switch to CAMERA. (3) Follow...
Operating Instructions
Page 66
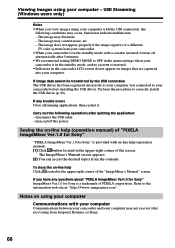
...If any questions about "PIXELA ImageMixer Ver1.0 for Sony" ImageMixer Ver.1.0 for Sony" is in the standby mode with on -line help (operation manual) of "PIXELA ImageMixer Ver.1.0 for Sony" "PIXELA ImageMixer Ver.1.0 for Sony is inserted. •Indicators in the upper right... Click located in the camcorder LCD screen do not indicate malfunction: - Viewing images using your computer with your computer Communications between your camcorder and your computer may not recover after quitting the application: - The image may fluctuate. - USB Streaming (Windows users only) Notes •...
...If any questions about "PIXELA ImageMixer Ver1.0 for Sony" ImageMixer Ver.1.0 for Sony" is in the standby mode with on -line help (operation manual) of "PIXELA ImageMixer Ver.1.0 for Sony" "PIXELA ImageMixer Ver.1.0 for Sony is inserted. •Indicators in the upper right... Click located in the camcorder LCD screen do not indicate malfunction: - Viewing images using your computer with your computer Communications between your camcorder and your computer may not recover after quitting the application: - The image may fluctuate. - USB Streaming (Windows users only) Notes •...
Operating Instructions
Page 76
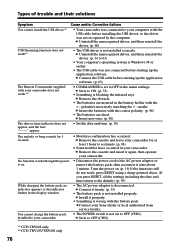
...8226; Some troubles have occurred in the display window. You cannot charge the battery pack installed to your camcorder. • Disconnect the power cord of ...so the driver was not recognized by the computer. c Contact your Sony dealer or local authorized Sony service facility. • The POWER switch is disconnected. c Insert ...camcorder for 5 seconds. Types of the AC power adaptor or remove the battery pack, then reconnect it after about 1 minute. c Install it properly. • Something is not installed correctly. c Connect it to OFF (CHG). *1) CCD-TRV608 only *2) CCD...
...8226; Some troubles have occurred in the display window. You cannot charge the battery pack installed to your camcorder. • Disconnect the power cord of ...so the driver was not recognized by the computer. c Contact your Sony dealer or local authorized Sony service facility. • The POWER switch is disconnected. c Insert ...camcorder for 5 seconds. Types of the AC power adaptor or remove the battery pack, then reconnect it after about 1 minute. c Install it properly. • Something is not installed correctly. c Connect it to OFF (CHG). *1) CCD-TRV608 only *2) CCD...
Operating Instructions
Page 77
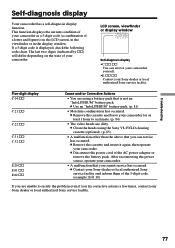
... times, contact your Sony dealer or local authorized Sony service facility and inform them of the 5-digit code. (example: E:61:10) If you are dirty. c Remove the cassette and insert it again, then operate your camcorder. • A malfunction that is displayed, check the following code chart. LCD screen, viewfinder or display window C:21:00 Self...
... times, contact your Sony dealer or local authorized Sony service facility and inform them of the 5-digit code. (example: E:61:10) If you are dirty. c Remove the cassette and insert it again, then operate your camcorder. • A malfunction that is displayed, check the following code chart. LCD screen, viewfinder or display window C:21:00 Self...
Operating Instructions
Page 78
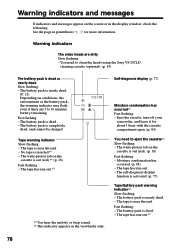
..."( )" for about 1 hour with the cassette compartment open. (p. 84) You need to clean the heads using the Sony V8-25CLD cleaning cassette (optional). (p. 85) The battery pack is out (red).*1) (p. 18) Fast flashing: - The...Warning indicators The video heads are 5 to eject the cassette*1) Slow flashing: - Eject the cassette, turn off your camcorder, and leave it for more information. The tape has run out. - No tape is dead. - The write-protect... appear on the screen or in the display window, check the following: See the page in the viewfinder only. The tape is near the end. -...
..."( )" for about 1 hour with the cassette compartment open. (p. 84) You need to clean the heads using the Sony V8-25CLD cleaning cassette (optional). (p. 85) The battery pack is out (red).*1) (p. 18) Fast flashing: - The...Warning indicators The video heads are 5 to eject the cassette*1) Slow flashing: - Eject the cassette, turn off your camcorder, and leave it for more information. The tape has run out. - No tape is dead. - The write-protect... appear on the screen or in the display window, check the following: See the page in the viewfinder only. The tape is near the end. -...

Operating Instructions
Page 81
...Charging the battery pack •Be sure to charge the battery pack before you start using the LCD panel or frequently operating playback, fast forward or rewind wears out the battery pack faster. The ...the indication on the remaining battery time indicator is completed, either disconnect the cable from your camcorder and store it is not used for two or three times the expected recording time, and ...is a lithium-ion battery pack that the battery pack can be restored if it in the display window. So, the time that has functions for a long time or left in a fully charged state,...
...Charging the battery pack •Be sure to charge the battery pack before you start using the LCD panel or frequently operating playback, fast forward or rewind wears out the battery pack faster. The ...the indication on the remaining battery time indicator is completed, either disconnect the cable from your camcorder and store it is not used for two or three times the expected recording time, and ...is a lithium-ion battery pack that the battery pack can be restored if it in the display window. So, the time that has functions for a long time or left in a fully charged state,...


