Operating Instructions
Page 3
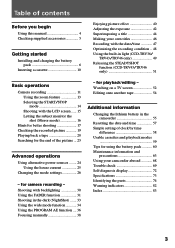
... function (CCD-TRV43/TRV46 only 51 Basic operations Camera recording 11 Using the zoom feature 13 Selecting the START/STOP mode 14 Shooting with backlighting 30 Using the FADER function 31 Shooting in the camcorder 55 Resetting the date and time 57 Simple setting of clock by time difference 58 Usable cassettes and playback...
... function (CCD-TRV43/TRV46 only 51 Basic operations Camera recording 11 Using the zoom feature 13 Selecting the START/STOP mode 14 Shooting with backlighting 30 Using the FADER function 31 Shooting in the camcorder 55 Resetting the date and time 57 Simple setting of clock by time difference 58 Usable cassettes and playback...
Operating Instructions
Page 10
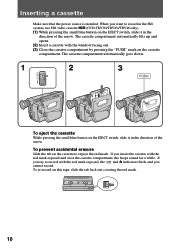
... the red mark exposed and close the cassette compartment, the beeps sound for a while. If you insert the cassette with the window facing out. (3) Close the cassette compartment by pressing the "PUSH" mark on the cassette to record in the Hi8 system, use Hi8 video cassette H (CCD-TRV36/TRV43/TRV46 only). (1) While pressing the small blue button on the...
... the red mark exposed and close the cassette compartment, the beeps sound for a while. If you insert the cassette with the window facing out. (3) Close the cassette compartment by pressing the "PUSH" mark on the cassette to record in the Hi8 system, use Hi8 video cassette H (CCD-TRV36/TRV43/TRV46 only). (1) While pressing the small blue button on the...
Operating Instructions
Page 11
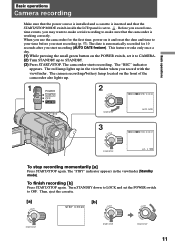
... the viewfinder when you start recording (AUTO DATE feature). Basic operations STA Basic operations Camera recording Make sure that the power source is installed and a cassette is inserted and that the camcorder is working correctly. Before you record onetime events, you start recording (p. 57). To finish recording [b] Press START/STOP again.
... the viewfinder when you start recording (AUTO DATE feature). Basic operations STA Basic operations Camera recording Make sure that the power source is installed and a cassette is inserted and that the camcorder is working correctly. Before you record onetime events, you start recording (p. 57). To finish recording [b] Press START/STOP again.
Operating Instructions
Page 12
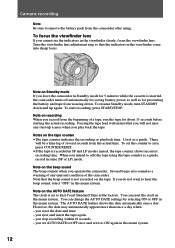
... the date may automatically appear more than once a day when: - To focus the viewfinder lens If you leave the camcorder in Standby mode for 5 minutes while the cassette is inserted, the camcorder turns off automatically for saving battery power as well as for about 15 seconds before starting the actual recording. Note.... - To start -up again. You can change the AUTO DATE settings by selecting ON or OFF in the menu system. you operate the camcorder. Notes on the beep sound The beep sounds when you reset the date and time. - Note on the AUTO DATE feature The clock is ...
... the date may automatically appear more than once a day when: - To focus the viewfinder lens If you leave the camcorder in Standby mode for 5 minutes while the cassette is inserted, the camcorder turns off automatically for saving battery power as well as for about 15 seconds before starting the actual recording. Note.... - To start -up again. You can change the AUTO DATE settings by selecting ON or OFF in the menu system. you operate the camcorder. Notes on the beep sound The beep sounds when you reset the date and time. - Note on the AUTO DATE feature The clock is ...
Operating Instructions
Page 19
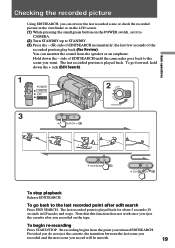
...START/STOP. Re-recording begins from the speaker or an earphone. To go forward, hold down the - the last few seconds of EDITSEARCH until the camcorder goes back to STANDBY. (3) Press the - (Œ) side of EDITSEARCH momentarily; The last recorded point is played back. Provided you do not eject ...last scene you recorded and the next scene you record will be smooth. 19 Note that this function does not work once you eject the cassette after edit search Press END SEARCH. You can review the last recorded scene or check the recorded picture in LP mode) and stops. Basic...
...START/STOP. Re-recording begins from the speaker or an earphone. To go forward, hold down the - the last few seconds of EDITSEARCH until the camcorder goes back to STANDBY. (3) Press the - (Œ) side of EDITSEARCH momentarily; The last recorded point is played back. Provided you do not eject ...last scene you recorded and the next scene you record will be smooth. 19 Note that this function does not work once you eject the cassette after edit search Press END SEARCH. You can review the last recorded scene or check the recorded picture in LP mode) and stops. Basic...
Operating Instructions
Page 23
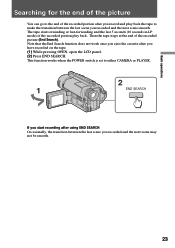
... 5 seconds (10 seconds in LP mode) of the recorded picture (End Search). Note that the End Search function does not work once you eject the cassette after you recorded and the next scene may not be smooth. 23 This function works when the POWER switch is set to either CAMERA or...
... 5 seconds (10 seconds in LP mode) of the recorded picture (End Search). Note that the End Search function does not work once you eject the cassette after you recorded and the next scene may not be smooth. 23 This function works when the POWER switch is set to either CAMERA or...
Operating Instructions
Page 27
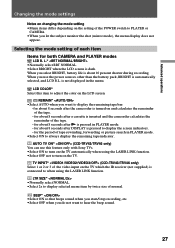
...LASER LINK function. •Select OFF not to always display the remaining tape indicator. for about 8 seconds after a cassette is inserted and the camcorder calculates the remainder of the tape. - TV INPUT* (CCD-TRV43/TRV46 only) Select 1 or 2 or 3 of the video input on the TV which the IR receiver (not ...of the POWER switch to display the remaining tape bar: -for about 8 seconds after the camcorder is turned on and calculates the remainder of the tape. - LCD COLOR* Select this feature only with Sony TVs. •Select ON to turn on the TV. Selecting the mode setting of each...
...LASER LINK function. •Select OFF not to always display the remaining tape indicator. for about 8 seconds after a cassette is inserted and the camcorder calculates the remainder of the tape. - TV INPUT* (CCD-TRV43/TRV46 only) Select 1 or 2 or 3 of the video input on the TV which the IR receiver (not ...of the POWER switch to display the remaining tape bar: -for about 8 seconds after the camcorder is turned on and calculates the remainder of the tape. - LCD COLOR* Select this feature only with Sony TVs. •Select ON to turn on the TV. Selecting the mode setting of each...
Operating Instructions
Page 29
... will begin. The EDIT setting works only during the demonstration, the demonstration stops. Notes on the LCD screen and you turn off the camcorder once, DEMO MODE automatically returns to deactivate the demonstration mode. Select ON of DEMO MODE in the viewfinder or on DEMO MODE •DEMO... MODE is in place. 29 DEMO MODE automatically returns to STBY. •When NIGHTSHOT is inserted in the camcorder. •If you insert a cassette during playback * These settings are retained even when the battery pack is removed, as long as usual. To look at the ...
... will begin. The EDIT setting works only during the demonstration, the demonstration stops. Notes on the LCD screen and you turn off the camcorder once, DEMO MODE automatically returns to deactivate the demonstration mode. Select ON of DEMO MODE in the viewfinder or on DEMO MODE •DEMO... MODE is in place. 29 DEMO MODE automatically returns to STBY. •When NIGHTSHOT is inserted in the camcorder. •If you insert a cassette during playback * These settings are retained even when the battery pack is removed, as long as usual. To look at the ...

Operating Instructions
Page 46
... the desired character, then press the dial. (6) Repeat steps 4 and 5 until you begin. We recommend to set the POWER switch to PLAYER or eject the cassette before you finish the title. (7) For finishing the titling work, turn the control dial to select SET, then press the dial. 1 TITLE 2 TITLE SET CUSTOM1... TITLE SET S [TITLE] : END [TITLE] : END [TITLE] : END 46 Making your own titles You can have up to two titles and store them in the camcorder.
... the desired character, then press the dial. (6) Repeat steps 4 and 5 until you begin. We recommend to set the POWER switch to PLAYER or eject the cassette before you finish the title. (7) For finishing the titling work, turn the control dial to select SET, then press the dial. 1 TITLE 2 TITLE SET CUSTOM1... TITLE SET S [TITLE] : END [TITLE] : END [TITLE] : END 46 Making your own titles You can have up to two titles and store them in the camcorder.

Operating Instructions
Page 47
.... Advanced operations Recording with the date and/or time Press DATE and/or TIME again. The last character is set to enter characters while a cassette is in the camcorder The power goes off automatically. Making your own titles To edit a title you have entered remain. The recording continues. 47 DATE TIME JUL...
.... Advanced operations Recording with the date and/or time Press DATE and/or TIME again. The last character is set to enter characters while a cassette is in the camcorder The power goes off automatically. Making your own titles To edit a title you have entered remain. The recording continues. 47 DATE TIME JUL...
Operating Instructions
Page 48
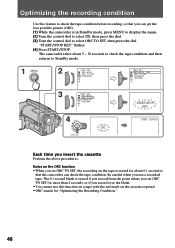
Be careful when you insert the cassette Perform the above procedures. The camcorder takes about 5 - 10 seconds to check the tape condition and then returns to Standby mode. 1 MENU 2 TAPE SET REC MODE ORC TO SET REMAIN TAPE ... ORC function •When you can check the tape condition. Optimizing the recording condition Use this function on a tape with the red mark on the cassette exposed. •ORC stands for "Optimizing the Recording Condition." 48 The 0.1 second blank is erased if you record from the point where you set ORC...
Be careful when you insert the cassette Perform the above procedures. The camcorder takes about 5 - 10 seconds to check the tape condition and then returns to Standby mode. 1 MENU 2 TAPE SET REC MODE ORC TO SET REMAIN TAPE ... ORC function •When you can check the tape condition. Optimizing the recording condition Use this function on a tape with the red mark on the cassette exposed. •ORC stands for "Optimizing the Recording Condition." 48 The 0.1 second blank is erased if you record from the point where you set ORC...
Operating Instructions
Page 49
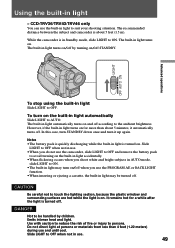
...Slide LIGHT to suit your shooting situation. CCD-TRV36/TRV43/TRV46 only You can use the built-in light to OFF when not in use the PROGRAM AE or BACK LIGHT function. •When inserting or ejecting a cassette, the built-in light is turned on . While the camcorder is on /off when you use...LIGHT to ON. Use with caution to reduce the risk of fire or injury to the ambient brightness. The recommended distance between the subject and camcorder is turned off STANDBY. The built-in light automatically turns on the built-in light accidentally. •When flickering occurs when you do not ...
...Slide LIGHT to suit your shooting situation. CCD-TRV36/TRV43/TRV46 only You can use the built-in light to OFF when not in use the PROGRAM AE or BACK LIGHT function. •When inserting or ejecting a cassette, the built-in light is turned on . While the camcorder is on /off when you use...LIGHT to ON. Use with caution to reduce the risk of fire or injury to the ambient brightness. The recommended distance between the subject and camcorder is turned off STANDBY. The built-in light automatically turns on the built-in light accidentally. •When flickering occurs when you do not ...
Operating Instructions
Page 59
... use a standard 8 mm video recorder/player to use either Hi8 or standard 8 mm video cassette for recording. CCD-TRV36/TRV43/TRV46 only This Hi8 system is played back on a conventional 8 camcorder is an extension of an 8 camcorder. A video tape recorded by this "XR" camcorder is played back on a conventional 8 camcorder or when a video tape recorded on this camera. You...
... use a standard 8 mm video recorder/player to use either Hi8 or standard 8 mm video cassette for recording. CCD-TRV36/TRV43/TRV46 only This Hi8 system is played back on a conventional 8 camcorder is an extension of an 8 camcorder. A video tape recorded by this "XR" camcorder is played back on a conventional 8 camcorder or when a video tape recorded on this camera. You...

Operating Instructions
Page 63
...prevent possible damage under these circumstances, the camcorder is moisture inside it has reached the temperature surrounding it about 1 hour. Open the cassette compartment, turn off the camcorder, and leave also the cassette about 1 hour. Turn off the camcorder, and leave it (after about 1 hour.... How to prevent moisture condensation When bringing the camcorder from a cold place to a warm place...
...prevent possible damage under these circumstances, the camcorder is moisture inside it has reached the temperature surrounding it about 1 hour. Open the cassette compartment, turn off the camcorder, and leave also the cassette about 1 hour. Turn off the camcorder, and leave it (after about 1 hour.... How to prevent moisture condensation When bringing the camcorder from a cold place to a warm place...

Operating Instructions
Page 64
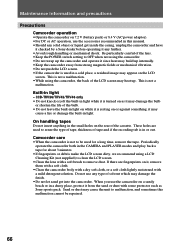
...It may be dirty. [a] [b] [a] Slightly dirty [b] Very dirty If this happens, clean the video heads with the Sony V8-25CLD/V8-25CLDR cleaning cassette (not supplied). Maintenance information and precautions Video head cleaning To ensure normal recording and clear pictures, clean the video heads. ...Note If the Sony V8-25CLD/V8-25CLDR cleaning cassette is still "noisy," repeat the cleaning. (Do not repeat cleaning more than 5 times in your area, consult your nearest Sony dealer. 64 When the v˚ indicator and " CLEANING CASSETTE" message appear one session.) Caution...
...It may be dirty. [a] [b] [a] Slightly dirty [b] Very dirty If this happens, clean the video heads with the Sony V8-25CLD/V8-25CLDR cleaning cassette (not supplied). Maintenance information and precautions Video head cleaning To ensure normal recording and clear pictures, clean the video heads. ...Note If the Sony V8-25CLD/V8-25CLDR cleaning cassette is still "noisy," repeat the cleaning. (Do not repeat cleaning more than 5 times in your area, consult your nearest Sony dealer. 64 When the v˚ indicator and " CLEANING CASSETTE" message appear one session.) Caution...
Operating Instructions
Page 66
.... Sand or dust may cause a fire or damage the built-in light on while it since heat may build up . Be particularly careful of the cassette. This is not a malfunction. •While using a LCD Cleaning Kit (not supplied) to malfunction, and sometimes this manual. •Should any further...;When the camcorder is turned on or against something; CCD-TRV36/TRV43/TRV46 only • Do not knock or jolt the built-in a cold place, a residual image may damage the finish. •Do not let sand get inside the casing, unplug the camcorder and have it checked by a Sony dealer before ...
.... Sand or dust may cause a fire or damage the built-in light on while it since heat may build up . Be particularly careful of the cassette. This is not a malfunction. •While using a LCD Cleaning Kit (not supplied) to malfunction, and sometimes this manual. •Should any further...;When the camcorder is turned on or against something; CCD-TRV36/TRV43/TRV46 only • Do not knock or jolt the built-in a cold place, a residual image may damage the finish. •Do not let sand get inside the casing, unplug the camcorder and have it checked by a Sony dealer before ...

Operating Instructions
Page 69
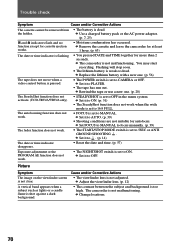
Camcorder Power Symptom The power is not on the cassette is out (red). Operation Symptom START/STOP does not operate. Cause and/or Corrective Actions • The battery pack is quickly discharged. m Set it to ... . (p. 14) (to a wall outlet. (p. 25) • While being operated in CAMERA mode, the camcorder has been in Standby mode for more than 5 minutes. Should the difficulty persist, disconnect the power source and contact your Sony dealer or local authorized Sony service facility. m Use another battery pack. (p. 61) •The AC power adaptor is...
Camcorder Power Symptom The power is not on the cassette is out (red). Operation Symptom START/STOP does not operate. Cause and/or Corrective Actions • The battery pack is quickly discharged. m Set it to ... . (p. 14) (to a wall outlet. (p. 25) • While being operated in CAMERA mode, the camcorder has been in Standby mode for more than 5 minutes. Should the difficulty persist, disconnect the power source and contact your Sony dealer or local authorized Sony service facility. m Use another battery pack. (p. 61) •The AC power adaptor is...
Operating Instructions
Page 70
.... Picture Symptom The image on the viewfinder screen is not malfunctioning. The camcorder is not clear. m Replace the lithium battery with a new one . (p. 20) The SteadyShot function does not activate. (CCD-TRV43/TRV46 only) • STEADYSHOT is set to CAMERA or OFF. m Rewind...indicators flash and no function except for at least 1 hour. (p. 63) The date or time indicator is dead. m Remove the cassette and leave the camcorder for cassette ejection works. • Moisture condensation has occurred. m Set it to 5SEC or ANTI GROUND SHOOTING . A vertical band appears when ...
.... Picture Symptom The image on the viewfinder screen is not malfunctioning. The camcorder is not clear. m Replace the lithium battery with a new one . (p. 20) The SteadyShot function does not activate. (CCD-TRV43/TRV46 only) • STEADYSHOT is set to CAMERA or OFF. m Rewind...indicators flash and no function except for at least 1 hour. (p. 63) The date or time indicator is dead. m Remove the cassette and leave the camcorder for cassette ejection works. • Moisture condensation has occurred. m Set it to 5SEC or ANTI GROUND SHOOTING . A vertical band appears when ...

Operating Instructions
Page 71
...Symptom Cause and/or Corrective Actions A vertical band appears when shooting a very bright subject. • The camcorder is open. m Clean the heads using the Sony V8-25CLD/V8-25CLDR cleaning cassette (not supplied). (p. 64) The picture does not appear in the menu system. There is set to ...dark place. (p. 33) Others Symptom The supplied Remote Commander does not work. (CCD-TRV36/ TRV43/TRV46 only) The beep sounds for at least 1 hour. (p. 63) • Some troubles occured in the menu system. m Remove the cassette and insert it to OFF. (p. 33) Picture appears too bright, and the...
...Symptom Cause and/or Corrective Actions A vertical band appears when shooting a very bright subject. • The camcorder is open. m Clean the heads using the Sony V8-25CLD/V8-25CLDR cleaning cassette (not supplied). (p. 64) The picture does not appear in the menu system. There is set to ...dark place. (p. 33) Others Symptom The supplied Remote Commander does not work. (CCD-TRV36/ TRV43/TRV46 only) The beep sounds for at least 1 hour. (p. 63) • Some troubles occured in the menu system. m Remove the cassette and insert it to OFF. (p. 33) Picture appears too bright, and the...
Operating Instructions
Page 72
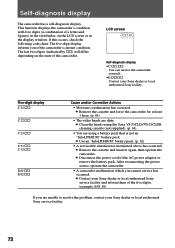
... Self-diagnosis display •C:ππ:ππ You can service the camcorder yourself. •E:ππ:ππ Contact your Sony dealer or local authorized Sony service facility. 72 m Remove the cassette and leave the camcorder for at least 1 hour. (p. 63) • The video heads ... 64) • You are dirty. The five-digit display informs you of the camcorder. m Remove the cassette and insert it again, then operate the camcorder. m Contact your Sony dealer or local authorized Sony service facility and inform them of the five digits. (example: E:61:10) If ...
... Self-diagnosis display •C:ππ:ππ You can service the camcorder yourself. •E:ππ:ππ Contact your Sony dealer or local authorized Sony service facility. 72 m Remove the cassette and leave the camcorder for at least 1 hour. (p. 63) • The video heads ... 64) • You are dirty. The five-digit display informs you of the camcorder. m Remove the cassette and insert it again, then operate the camcorder. m Contact your Sony dealer or local authorized Sony service facility and inform them of the five digits. (example: E:61:10) If ...


