Operating Instructions
Page 2
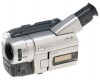
... "dangerous voltage" within the product's enclosure that you call 1-800-222-SONY (United States only) For the Sony Factory Service Center nearest you can enjoy for years to operate this Sony Handycam VisionTM camcorder. Never expose the battery pack to Part 15 of important operating and maintenance... is no guarantee that to which can return your Handycam Vision, you can radiate radio frequency energy and, if not installed and used in the literature accompanying the appliance. Consult the dealer or an experienced radio/TV technician for a Class B digital device, pursuant ...
... "dangerous voltage" within the product's enclosure that you call 1-800-222-SONY (United States only) For the Sony Factory Service Center nearest you can enjoy for years to operate this Sony Handycam VisionTM camcorder. Never expose the battery pack to Part 15 of important operating and maintenance... is no guarantee that to which can return your Handycam Vision, you can radiate radio frequency energy and, if not installed and used in the literature accompanying the appliance. Consult the dealer or an experienced radio/TV technician for a Class B digital device, pursuant ...
Operating Instructions
Page 3
... (NightShot 21 Superimposing the date and time on a tape - Picture effect 37 Using special effects - Digital effect (CCD-TRV87 only 38 Using the PROGRAM AE function .... 41 Adjusting the exposure manually ...... 43 Focusing manually 44 Superimposing a title 45 Making your camcorder abroad 72 Maintenance information and precautions 73 Advanced Recording Specifications 77 Operations Recording...
... (NightShot 21 Superimposing the date and time on a tape - Picture effect 37 Using special effects - Digital effect (CCD-TRV87 only 38 Using the PROGRAM AE function .... 41 Adjusting the exposure manually ...... 43 Focusing manually 44 Superimposing a title 45 Making your camcorder abroad 72 Maintenance information and precautions 73 Advanced Recording Specifications 77 Operations Recording...
Operating Instructions
Page 4
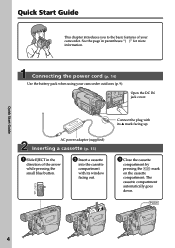
... (p. 9). EJECT AC power adaptor (supplied) Inserting a cassette (p. 15) 1 Slide EJECT in parentheses "( )" for more information. Connecting the power cord (p. 14) Use the battery pack when using your camcorder. Quick Start Guide This chapter introduces you to the basic features of the arrow while pressing the small blue button. 2 Insert a cassette into the cassette...
... (p. 9). EJECT AC power adaptor (supplied) Inserting a cassette (p. 15) 1 Slide EJECT in parentheses "( )" for more information. Connecting the power cord (p. 14) Use the battery pack when using your camcorder. Quick Start Guide This chapter introduces you to the basic features of the arrow while pressing the small blue button. 2 Insert a cassette into the cassette...
Operating Instructions
Page 5
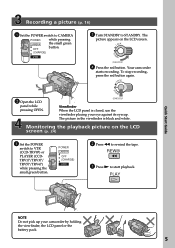
...against its eyecup. NDBY START/STOP Viewfinder When the LCD panel is black and white. The picture in the viewfinder is closed, use the viewfinder placing your camcorder by holding the viewfinder, the LCD panel or the battery pack. 5 LOCK STA 2 Open the LCD panel while pressing OPEN.... REW 3 Press N to VTR (CCD-TRV87) or PLAYER (CCDTRV17/TRV37/ TRV57/TRV67) while pressing the small green button. The picture appears on the LCD ...
...against its eyecup. NDBY START/STOP Viewfinder When the LCD panel is black and white. The picture in the viewfinder is closed, use the viewfinder placing your camcorder by holding the viewfinder, the LCD panel or the battery pack. 5 LOCK STA 2 Open the LCD panel while pressing OPEN.... REW 3 Press N to VTR (CCD-TRV87) or PLAYER (CCDTRV17/TRV37/ TRV57/TRV67) while pressing the small green button. The picture appears on the LCD ...
Operating Instructions
Page 6
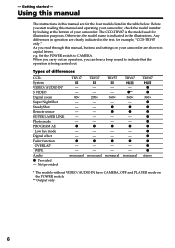
... this manual, buttons and settings on the POWER switch. ** Output only 6 z - - z - - Using this manual The instructions in this manual and operating your camcorder. Any differences in operation are for illustration purposes. monaural - - 200 z - - Set the POWER switch ...mode Digital effect Fader function OVERLAP WIPE Audio z Provided - The CCD-TRV87 is indicated in the table below. z z - - Not provided TRV17 TRV37 TRV57 TRV67 - - 80 z - - Otherwise, the model name is the model used for the four models listed in the illustrations. monaural - - 360...
... this manual, buttons and settings on the POWER switch. ** Output only 6 z - - z - - Using this manual The instructions in this manual and operating your camcorder. Any differences in operation are for illustration purposes. monaural - - 200 z - - Set the POWER switch ...mode Digital effect Fader function OVERLAP WIPE Audio z Provided - The CCD-TRV87 is indicated in the table below. z z - - Not provided TRV17 TRV37 TRV57 TRV67 - - 80 z - - Otherwise, the model name is the model used for the four models listed in the illustrations. monaural - - 360...
Operating Instructions
Page 7
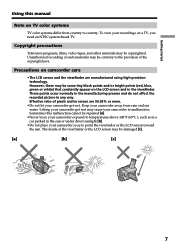
...•Do not let your camcorder away from country to the provision of the viewfinder or the LCD screen may be damaged [c]. [a] [b] [c] 7 Copyright precautions Television programs, films, video tapes, and other materials may be copyrighted. Getting started Using this malfunction cannot be contrary to...the viewfinder. The inside of the copyright laws. Unauthorized recording of pixels and/or screen are manufactured using high-precision technology. To view your camcorder to point the viewfinder or the LCD screen toward the sun. Effective ratio of such materials may ...
...•Do not let your camcorder away from country to the provision of the viewfinder or the LCD screen may be damaged [c]. [a] [b] [c] 7 Copyright precautions Television programs, films, video tapes, and other materials may be copyrighted. Getting started Using this malfunction cannot be contrary to...the viewfinder. The inside of the copyright laws. Unauthorized recording of pixels and/or screen are manufactured using high-precision technology. To view your camcorder to point the viewfinder or the LCD screen toward the sun. Effective ratio of such materials may ...
Operating Instructions
Page 9
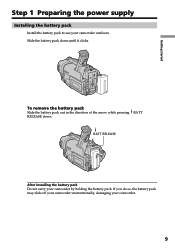
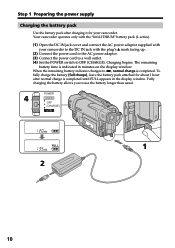
Slide the battery pack down . BATT RELEASE After installing the battery pack Do not carry your camcorder outdoors. Getting started Step 1 Preparing the power supply Installing the battery pack Install the battery pack to use your camcorder by holding the battery pack. If you do so, the battery pack may slide off your camcorder unintentionally, damaging your camcorder. 9 To remove the battery pack Slide the battery pack out in the direction of the arrow while pressing BATT RELEASE down until it clicks.
Slide the battery pack down . BATT RELEASE After installing the battery pack Do not carry your camcorder outdoors. Getting started Step 1 Preparing the power supply Installing the battery pack Install the battery pack to use your camcorder by holding the battery pack. If you do so, the battery pack may slide off your camcorder unintentionally, damaging your camcorder. 9 To remove the battery pack Slide the battery pack out in the direction of the arrow while pressing BATT RELEASE down until it clicks.
Operating Instructions
Page 10
...jack cover and connect the AC power adaptor supplied with your camcorder. When the remaining battery indicator changes to u, normal charge is indicated in the display window. Step 1 Preparing the power supply Charging the battery pack Use the battery pack after normal charge is completed until FULL appears...about 1 hour after charging it for your camcorder to the DC IN jack with the plug's v mark facing up. (2) Connect the power cord to the AC power adaptor. (3) Connect the power cord to a wall outlet. (4) Set the POWER switch to use the battery longer than usual. Charging begins....
...jack cover and connect the AC power adaptor supplied with your camcorder. When the remaining battery indicator changes to u, normal charge is indicated in the display window. Step 1 Preparing the power supply Charging the battery pack Use the battery pack after normal charge is completed until FULL appears...about 1 hour after charging it for your camcorder to the DC IN jack with the plug's v mark facing up. (2) Connect the power cord to the AC power adaptor. (3) Connect the power cord to a wall outlet. (4) Set the POWER switch to use the battery longer than usual. Charging begins....
Operating Instructions
Page 11
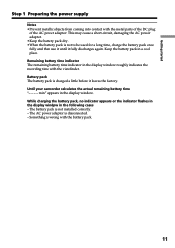
... indicator appears or the indicator flashes in the display windpw in a cool place. Something is charged a little before it fully discharges again. Until your camcorder calculates the actual remaining battery time "- - - - The AC power adaptor is not installed correctly. - The battery pack is disconnected. - Remaining ... adaptor. •Keep the battery pack dry. •When the battery pack is not to be used for a long time, charge the battery pack once fully and then use it until it leaves the factory. min" appears in the display window roughly indicates the recording time...
... indicator appears or the indicator flashes in the display windpw in a cool place. Something is charged a little before it fully discharges again. Until your camcorder calculates the actual remaining battery time "- - - - The AC power adaptor is not installed correctly. - The battery pack is disconnected. - Remaining ... adaptor. •Keep the battery pack dry. •When the battery pack is not to be used for a long time, charge the battery pack once fully and then use it until it leaves the factory. min" appears in the display window roughly indicates the recording time...
Operating Instructions
Page 12
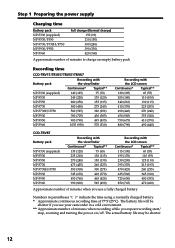
... 210 (150) 300 (240) 390 (330) 420 (360) Approximate number of minutes to charge an empty battery pack Recording time CCD-TRV17/TRV37/TRV57/TRV67 Battery pack Recording with the viewfinder Continuous* Typical** NP-F330 (supplied) NP-F530 NP-F550 NP-F730 NP-F730H/F750...number of minutes when recording while you use a fully charged battery Numbers in parentheses "( )" indicate the time using a normally charged battery. * Approximate continuous recording time at 77°F (25°C). The actual battery life may be shorter if you use your camcorder in a cold environment. ** Approximate ...
... 210 (150) 300 (240) 390 (330) 420 (360) Approximate number of minutes to charge an empty battery pack Recording time CCD-TRV17/TRV37/TRV57/TRV67 Battery pack Recording with the viewfinder Continuous* Typical** NP-F330 (supplied) NP-F530 NP-F550 NP-F730 NP-F730H/F750...number of minutes when recording while you use a fully charged battery Numbers in parentheses "( )" indicate the time using a normally charged battery. * Approximate continuous recording time at 77°F (25°C). The actual battery life may be shorter if you use your camcorder in a cold environment. ** Approximate ...
Operating Instructions
Page 13
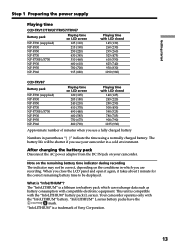
...have the mark. Getting started Step 1 Preparing the power supply Playing time CCD-TRV17/TRV37/TRV57/TRV67 Battery pack NP-F330 (supplied) NP-F530 NP-F550 NP-... (250) 500 (450) 580 (525) 780 (705) 900 (790) 1035 (930) Approximate number of Sony Corporation. 13 The battery life will be displayed. After charging the battery pack Disconnect the AC power adaptor from ... consumption with the "InfoLITHIUM" battery pack (L series). What is a trademark of minutes when you use your camcorder. Your camcorder operates only with LCD closed 145 (130) 260 (230) 295 (260) 525 (475) 610 (550)...
...have the mark. Getting started Step 1 Preparing the power supply Playing time CCD-TRV17/TRV37/TRV57/TRV67 Battery pack NP-F330 (supplied) NP-F530 NP-F550 NP-... (250) 500 (450) 580 (525) 780 (705) 900 (790) 1035 (930) Approximate number of Sony Corporation. 13 The battery life will be displayed. After charging the battery pack Disconnect the AC power adaptor from ... consumption with the "InfoLITHIUM" battery pack (L series). What is a trademark of minutes when you use your camcorder. Your camcorder operates only with LCD closed 145 (130) 260 (230) 295 (260) 525 (475) 610 (550)...

Operating Instructions
Page 14
...is connected to the wall outlet, even if the set itself has been turned off. This means that you use your camcorder. • The DC IN jack has "source priority". Using a car battery Use Sony DC Adaptor/Charger (not supplied). 14 Notes • The AC power adaptor can supply power even if ...the battery pack is attached to your camcorder for a long time, we recommend that the battery pack cannot supply any power if...
...is connected to the wall outlet, even if the set itself has been turned off. This means that you use your camcorder. • The DC IN jack has "source priority". Using a car battery Use Sony DC Adaptor/Charger (not supplied). 14 Notes • The AC power adaptor can supply power even if ...the battery pack is attached to your camcorder for a long time, we recommend that the battery pack cannot supply any power if...
Operating Instructions
Page 15
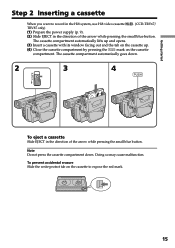
... facing out and the tab on the cassette up. (4) Close the cassette compartment by pressing the mark on the cassette to record in the Hi8 system, use Hi8 video cassette . (CCD-TRV67/ TRV87 only) (1) Prepare the power supply (p. 9). (2) Slide EJECT in the direction of the arrow while pressing the small blue button. To prevent...
... facing out and the tab on the cassette up. (4) Close the cassette compartment by pressing the mark on the cassette to record in the Hi8 system, use Hi8 video cassette . (CCD-TRV67/ TRV87 only) (1) Prepare the power supply (p. 9). (2) Slide EJECT in the direction of the arrow while pressing the small blue button. To prevent...

Operating Instructions
Page 17
...•The STBY indicator appears as Xz and REC as z. When you leave your camcorder do not work. Some of the two buttons on the LCD screen (Mirror mode). Basics Recording a picture If you use the viewfinder. Picture in the viewfinder and on LCD BRIGHT. Indicators in the mirror mode... closing the LCD panel, set the counter to the lens side. This is inserted Your camcorder automatically turns off . Recording - To resume the standby mode, turn the LCD panel over so that you use the LCD screen outdoors in the standby mode for 5 minutes while the cassette is to ...
...•The STBY indicator appears as Xz and REC as z. When you leave your camcorder do not work. Some of the two buttons on the LCD screen (Mirror mode). Basics Recording a picture If you use the viewfinder. Picture in the viewfinder and on LCD BRIGHT. Indicators in the mirror mode... closing the LCD panel, set the counter to the lens side. This is inserted Your camcorder automatically turns off . Recording - To resume the standby mode, turn the LCD panel over so that you use the LCD screen outdoors in the standby mode for 5 minutes while the cassette is to ...
Operating Instructions
Page 18
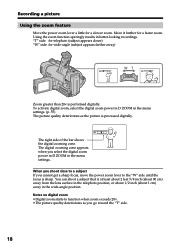
... to function when zoom exceeds 20×. •The picture quality deteriorates as the picture is sharp. Recording a picture Using the zoom feature Move the power zoom lever a little for a slower zoom. Using the zoom function sparingly results in the menu settings. Notes on digital zoom •Digital zoom starts to the...
... to function when zoom exceeds 20×. •The picture quality deteriorates as the picture is sharp. Recording a picture Using the zoom feature Move the power zoom lever a little for a slower zoom. Using the zoom function sparingly results in the menu settings. Notes on digital zoom •Digital zoom starts to the...
Operating Instructions
Page 20
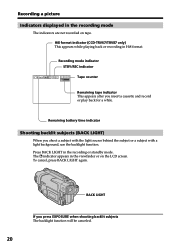
Press BACK LIGHT in Hi8 format. Hi8 format indicator (CCD-TRV67/TRV87 only) This appears while playing back or recording in the recording or standby mode. The . BACK LIGHT If you insert a cassette and record .... Remaining battery time indicator Shooting backlit subjects (BACK LIGHT) When you shoot a subject with the light source behind the subject or a subject with a light background, use the backlight function.
Press BACK LIGHT in Hi8 format. Hi8 format indicator (CCD-TRV67/TRV87 only) This appears while playing back or recording in the recording or standby mode. The . BACK LIGHT If you insert a cassette and record .... Remaining battery time indicator Shooting backlit subjects (BACK LIGHT) When you shoot a subject with the light source behind the subject or a subject with a light background, use the backlight function.

Operating Instructions
Page 21
... "NIGHTSHOT" indicators flash on . Basics NIGHTSHOT OFF ON SUPER NIGHTSHOT NightShot Light emitter Using the Super NightShot mode - Exposure - While your camcorder to malfunction. •When you keep NIGHTSHOT set N.S.LIGHT to ON in a dark... place. indicator appears on the LCD screen or in the viewfinder. (2) Press SUPER NIGHTSHOT. and "SUPER NIGHTSHOT" indicators flash on the LCD screen or in the viewfinder. Notes •Do not use the following functions: - Digital effect* (CCD...
... "NIGHTSHOT" indicators flash on . Basics NIGHTSHOT OFF ON SUPER NIGHTSHOT NightShot Light emitter Using the Super NightShot mode - Exposure - While your camcorder to malfunction. •When you keep NIGHTSHOT set N.S.LIGHT to ON in a dark... place. indicator appears on the LCD screen or in the viewfinder. (2) Press SUPER NIGHTSHOT. and "SUPER NIGHTSHOT" indicators flash on the LCD screen or in the viewfinder. Notes •Do not use the following functions: - Digital effect* (CCD...

Operating Instructions
Page 22
Recording a picture The SUPER NIGHTSHOT button does not work (CCD-TRV87 only): - while the digital effect function is set to OFF NightShot Light NightShot Light rays are infrared and so are invisible. The shooting distance ... be twice or more in the menu settings (p. 55). The maximum shooting distance using the NightShot Light is set or in use - Superimposing the date and time on pictures You can reset the clock in the Super NightShot mode (CCD-TRV87 only). Press DATE to East Coast Standard Time. when NIGHTSHOT is in...
Recording a picture The SUPER NIGHTSHOT button does not work (CCD-TRV87 only): - while the digital effect function is set to OFF NightShot Light NightShot Light rays are infrared and so are invisible. The shooting distance ... be twice or more in the menu settings (p. 55). The maximum shooting distance using the NightShot Light is set or in use - Superimposing the date and time on pictures You can reset the clock in the Super NightShot mode (CCD-TRV87 only). Press DATE to East Coast Standard Time. when NIGHTSHOT is in...
Operating Instructions
Page 23
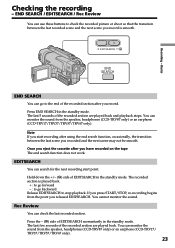
...SEARCH / EDITSEARCH / Rec Review You can monitor the sound from the speaker, headphones (CCD-TRV87 only) or an earphone (CCD-TRV17/ TRV37/TRV57/TRV67 only). 23 Press END SEARCH in the standby mode. You can use these buttons to the end of the recorded section are played back and playback stops.... Once you eject the cassette after using the end search function, occasionally, the ...
...SEARCH / EDITSEARCH / Rec Review You can monitor the sound from the speaker, headphones (CCD-TRV87 only) or an earphone (CCD-TRV17/ TRV37/TRV57/TRV67 only). 23 Press END SEARCH in the standby mode. You can use these buttons to the end of the recorded section are played back and playback stops.... Once you eject the cassette after using the end search function, occasionally, the ...
Operating Instructions
Page 24
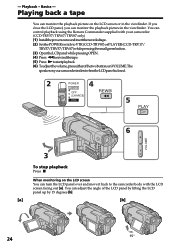
... the LCD screen You can control playback using the Remote Commander supplied with the LCD screen facing out [a]. Playback - You can turn the LCD panel over and move it back to the camcorder body with your camcorder. (CCD-TRV57/TRV67/TRV87 only) (1) Installthepowersourceandinserttherecordedtape. (2) SetthePOWERswitchtoVTR(CCD-TRV87)orPLAYER(CCD-TRV17/ TRV37/TRV57/TRV67) while pressing the small green...
... the LCD screen You can control playback using the Remote Commander supplied with the LCD screen facing out [a]. Playback - You can turn the LCD panel over and move it back to the camcorder body with your camcorder. (CCD-TRV57/TRV67/TRV87 only) (1) Installthepowersourceandinserttherecordedtape. (2) SetthePOWERswitchtoVTR(CCD-TRV87)orPLAYER(CCD-TRV17/ TRV37/TRV57/TRV67) while pressing the small green...


