Operating Instructions
Page 2
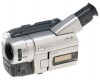
... can return your unwanted lithium ion batteries to your authority to the presence of electric shock to radio communications. If this Sony Handycam VisionTM camcorder. Connect the equipment into an outlet on a circuit different from that to which can enjoy for years to provide reasonable ... home video that any changes or modifications not expressly approved in a particular installation. These limits are cautioned that you call 416-499-SONY (Canada only) Caution: Do not handle damaged or leaking lithium ion battery. However, there is intended to alert the user to...
... can return your unwanted lithium ion batteries to your authority to the presence of electric shock to radio communications. If this Sony Handycam VisionTM camcorder. Connect the equipment into an outlet on a circuit different from that to which can enjoy for years to provide reasonable ... home video that any changes or modifications not expressly approved in a particular installation. These limits are cautioned that you call 416-499-SONY (Canada only) Caution: Do not handle damaged or leaking lithium ion battery. However, there is intended to alert the user to...
Operating Instructions
Page 3
...49 3 Basics Recording a picture 16 Shooting backlit subjects (BACK LIGHT 20 Shooting in your camcorder 65 Troubleshooting 67 Self-diagnosis display 70 Playback - Digital effect (CCD-TRV87 only 38 Using the PROGRAM AE function .... 41 Adjusting the exposure manually ...... 43 ...manually 44 Superimposing a title 45 Making your camcorder abroad 72 Maintenance information and precautions 73 Advanced Recording Specifications 77 Operations Recording a still image on pictures 22 Checking the recording - Tape Photo recording (CCD-TRV87 only 30 Using the wide mode ...
...49 3 Basics Recording a picture 16 Shooting backlit subjects (BACK LIGHT 20 Shooting in your camcorder 65 Troubleshooting 67 Self-diagnosis display 70 Playback - Digital effect (CCD-TRV87 only 38 Using the PROGRAM AE function .... 41 Adjusting the exposure manually ...... 43 ...manually 44 Superimposing a title 45 Making your camcorder abroad 72 Maintenance information and precautions 73 Advanced Recording Specifications 77 Operations Recording a still image on pictures 22 Checking the recording - Tape Photo recording (CCD-TRV87 only 30 Using the wide mode ...
Operating Instructions
Page 4
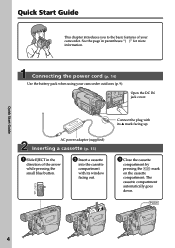
... out. 3 Close the cassette compartment by pressing the mark on the cassette compartment. Connecting the power cord (p. 14) Use the battery pack when using your camcorder. See the page in the direction of your...
... out. 3 Close the cassette compartment by pressing the mark on the cassette compartment. Connecting the power cord (p. 14) Use the battery pack when using your camcorder. See the page in the direction of your...
Operating Instructions
Page 5
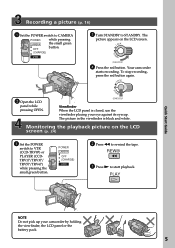
... recording. The picture in the viewfinder is closed, use the viewfinder placing your camcorder by holding the viewfinder, the LCD panel or the battery pack. 5 The picture appears on the LCD screen (p. 24) 1 Set the POWER switch to STANDBY. ... (p. 16) 1 Set the POWER switch to CAMERA POWER while pressing CAMERA OFF the small green button. (CHARGE) VTR STA 3 Turn STANDBY to VTR (CCD-TRV87) or PLAYER (CCDTRV17/TRV37/ TRV57/TRV67) while pressing the small green button. LOCK NDBY START/STOP 4 Press the red button. LOCK STA 2 Open the LCD panel while...
... recording. The picture in the viewfinder is closed, use the viewfinder placing your camcorder by holding the viewfinder, the LCD panel or the battery pack. 5 The picture appears on the LCD screen (p. 24) 1 Set the POWER switch to STANDBY. ... (p. 16) 1 Set the POWER switch to CAMERA POWER while pressing CAMERA OFF the small green button. (CHARGE) VTR STA 3 Turn STANDBY to VTR (CCD-TRV87) or PLAYER (CCDTRV17/TRV37/ TRV57/TRV67) while pressing the small green button. LOCK NDBY START/STOP 4 Press the red button. LOCK STA 2 Open the LCD panel while...
Operating Instructions
Page 6
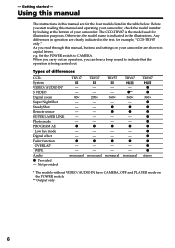
...CCD-TRV87 only." Set the POWER switch to indicate that the operation is indicated in the illustrations. monaural - - 360× - z z - - - As you read through this manual, buttons and settings on the POWER switch. ** Output only 6 e.g. Types of your camcorder ... CAMERA. Otherwise, the model name is being carried out. Any differences in operation are for the four models listed in capital letters. Not provided TRV17 TRV37 TRV57 TRV67 - - 80 z - - z - - monaural - - 200 z - - z - - z z - - z - - monaural - z** 360× - monaural TRV87 z z 360× z z z z ...
...CCD-TRV87 only." Set the POWER switch to indicate that the operation is indicated in the illustrations. monaural - - 360× - z z - - - As you read through this manual, buttons and settings on the POWER switch. ** Output only 6 e.g. Types of your camcorder ... CAMERA. Otherwise, the model name is being carried out. Any differences in operation are for the four models listed in capital letters. Not provided TRV17 TRV37 TRV57 TRV67 - - 80 z - - z - - monaural - - 200 z - - z - - z z - - z - - monaural - z** 360× - monaural TRV87 z z 360× z z z z ...
Operating Instructions
Page 7
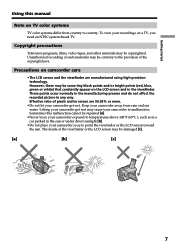
...to country. Sometimes this manual Note on the LCD screen and in the sun or under direct sunlight [b]. •Do not place your camcorder so as in a car parked in the viewfinder. Effective ratio of the viewfinder or the LCD screen may be copyrighted. Getting started Using... this malfunction cannot be repaired [a]. •Never leave your camcorder exposed to temperatures above 140°F (60°C ), such as to point the viewfinder or the LCD screen toward the sun. These points...
...to country. Sometimes this manual Note on the LCD screen and in the sun or under direct sunlight [b]. •Do not place your camcorder so as in a car parked in the viewfinder. Effective ratio of the viewfinder or the LCD screen may be copyrighted. Getting started Using... this malfunction cannot be repaired [a]. •Never leave your camcorder exposed to temperatures above 140°F (60°C ), such as to point the viewfinder or the LCD screen toward the sun. These points...
Operating Instructions
Page 8
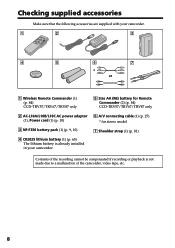
... tape, etc. 8 Checking supplied accessories Make sure that the following accessories are supplied with your camcorder. 1 2 3 4 5 6 7 * or 1 Wireless Remote Commander (1) (p. 84) CCD-TRV57/TRV67/TRV87 only 5 Size AA (R6) battery for Remote Commander (2) (p. 84) CCD-TRV57/TRV67/TRV87 only 2 AC-L10A/L10B/L10C AC power adaptor 6 A/V connecting cable (1) (p. 27) (1), Power cord (1) (p. 10) * for... (1) (p. 65) The lithium battery is not made due to a malfunction of the recording cannot be compensated if recording or playback is already installed in your camcorder.
... tape, etc. 8 Checking supplied accessories Make sure that the following accessories are supplied with your camcorder. 1 2 3 4 5 6 7 * or 1 Wireless Remote Commander (1) (p. 84) CCD-TRV57/TRV67/TRV87 only 5 Size AA (R6) battery for Remote Commander (2) (p. 84) CCD-TRV57/TRV67/TRV87 only 2 AC-L10A/L10B/L10C AC power adaptor 6 A/V connecting cable (1) (p. 27) (1), Power cord (1) (p. 10) * for... (1) (p. 65) The lithium battery is not made due to a malfunction of the recording cannot be compensated if recording or playback is already installed in your camcorder.
Operating Instructions
Page 9
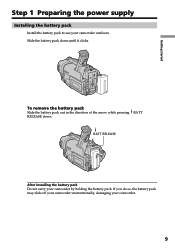
BATT RELEASE After installing the battery pack Do not carry your camcorder. 9 If you do so, the battery pack may slide off your camcorder unintentionally, damaging your camcorder by holding the battery pack. To remove the battery pack Slide the battery pack out in the direction of the arrow while pressing BATT RELEASE down until it clicks. Slide the battery pack down . Getting started Step 1 Preparing the power supply Installing the battery pack Install the battery pack to use your camcorder outdoors.
BATT RELEASE After installing the battery pack Do not carry your camcorder. 9 If you do so, the battery pack may slide off your camcorder unintentionally, damaging your camcorder by holding the battery pack. To remove the battery pack Slide the battery pack out in the direction of the arrow while pressing BATT RELEASE down until it clicks. Slide the battery pack down . Getting started Step 1 Preparing the power supply Installing the battery pack Install the battery pack to use your camcorder outdoors.
Operating Instructions
Page 10
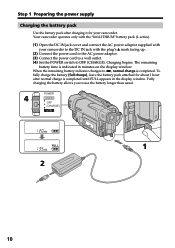
...battery pack after charging it for about 1 hour after normal charge is completed until FULL appears in minutes on the display window. Your camcorder operates only with the "InfoLITHIUM" battery pack (L series). (1) Open the DC IN jack cover and connect the AC power adaptor supplied with ...your camcorder. The remaining battery time is completed. When the remaining battery indicator changes to use the battery longer than usual. POWER 4 CAMERA OFF (CHARGE) VTR ...
...battery pack after charging it for about 1 hour after normal charge is completed until FULL appears in minutes on the display window. Your camcorder operates only with the "InfoLITHIUM" battery pack (L series). (1) Open the DC IN jack cover and connect the AC power adaptor supplied with ...your camcorder. The remaining battery time is completed. When the remaining battery indicator changes to use the battery longer than usual. POWER 4 CAMERA OFF (CHARGE) VTR ...
Operating Instructions
Page 11
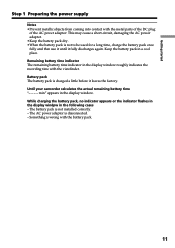
... is not to be used for a long time, charge the battery pack once fully and then use it until it leaves the factory. Until your camcorder calculates the actual remaining battery time "- - - - Something is wrong with the viewfinder. This may cause a short-circuit, damaging the AC power adaptor. •Keep the...
... is not to be used for a long time, charge the battery pack once fully and then use it until it leaves the factory. Until your camcorder calculates the actual remaining battery time "- - - - Something is wrong with the viewfinder. This may cause a short-circuit, damaging the AC power adaptor. •Keep the...
Operating Instructions
Page 12
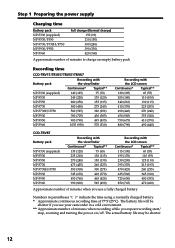
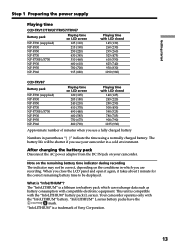
... charge) 150 (90) 210 (150) 300 (240) 390 (330) 420 (360) Approximate number of minutes to charge an empty battery pack Recording time CCD-TRV17/TRV37/TRV57/TRV67 Battery pack Recording with the viewfinder Continuous* Typical** NP-F330 (supplied) NP-F530 NP-F550 NP-F730 NP-F730H/F750 NP-F930 NP...) 260 (235) 625 (560) 345 (310) 725 (650) 400 (355) 850 (765) 470 (420) Approximate number of minutes when recording while you use your camcorder in parentheses "( )" indicate the time using a normally charged battery. * Approximate continuous recording time at 77°F (25°C).
... charge) 150 (90) 210 (150) 300 (240) 390 (330) 420 (360) Approximate number of minutes to charge an empty battery pack Recording time CCD-TRV17/TRV37/TRV57/TRV67 Battery pack Recording with the viewfinder Continuous* Typical** NP-F330 (supplied) NP-F530 NP-F550 NP-F730 NP-F730H/F750 NP-F930 NP...) 260 (235) 625 (560) 345 (310) 725 (650) 400 (355) 850 (765) 470 (420) Approximate number of minutes when recording while you use your camcorder in parentheses "( )" indicate the time using a normally charged battery. * Approximate continuous recording time at 77°F (25°C).
Operating Instructions
Page 13
...Your camcorder operates only with compatible electronic equipment. This unit is a trademark of minutes when you are recording. "InfoLITHIUM" L series battery packs have the mark. "InfoLITHIUM" is compatible with the "InfoLITHIUM" battery pack (L series). Getting started Step 1 Preparing the power supply Playing time CCD-TRV17/TRV37/...) 245 (220) 280 (250) 500 (450) 580 (525) 780 (705) 900 (790) 1035 (930) Approximate number of Sony Corporation. 13 After charging the battery pack Disconnect the AC power adaptor from the DC IN jack on the conditions in which can exchange data...
...Your camcorder operates only with compatible electronic equipment. This unit is a trademark of minutes when you are recording. "InfoLITHIUM" L series battery packs have the mark. "InfoLITHIUM" is compatible with the "InfoLITHIUM" battery pack (L series). Getting started Step 1 Preparing the power supply Playing time CCD-TRV17/TRV37/...) 245 (220) 280 (250) 500 (450) 580 (525) 780 (705) 900 (790) 1035 (930) Approximate number of Sony Corporation. 13 After charging the battery pack Disconnect the AC power adaptor from the DC IN jack on the conditions in which can exchange data...

Operating Instructions
Page 14
Using a car battery Use Sony DC Adaptor/Charger (not supplied). 14 Step 1 Preparing the power supply Connecting to a wall... plugged into a wall outlet. Notes • The AC power adaptor can supply power even if the battery pack is attached to your camcorder with the plug's v mark facing up. (2) Connect the power cord to the AC power adaptor. (3) Connect the power cord to ...adaptor to the wall outlet, even if the set itself has been turned off. This means that you use your camcorder for a long time, we recommend that the battery pack cannot supply any power if the power cord is connected ...
Using a car battery Use Sony DC Adaptor/Charger (not supplied). 14 Step 1 Preparing the power supply Connecting to a wall... plugged into a wall outlet. Notes • The AC power adaptor can supply power even if the battery pack is attached to your camcorder with the plug's v mark facing up. (2) Connect the power cord to the AC power adaptor. (3) Connect the power cord to ...adaptor to the wall outlet, even if the set itself has been turned off. This means that you use your camcorder for a long time, we recommend that the battery pack cannot supply any power if the power cord is connected ...
Operating Instructions
Page 16
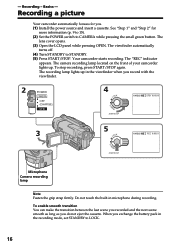
...the built-in the viewfinder when you do not eject the cassette. The camera recording lamp located on the front of your camcorder lights up in microphone during recording. Basics - Recording a picture Your camcorder automatically focuses for more information (p. 9 to 15). (2) Set the POWER switch to STANDBY. (5) Press START/STOP. Your... camcorder starts recording. To enable smooth transition You can make the transition between the last scene you recorded and the next scene smooth as ...
...the built-in the viewfinder when you do not eject the cassette. The camera recording lamp located on the front of your camcorder lights up in microphone during recording. Basics - Recording a picture Your camcorder automatically focuses for more information (p. 9 to 15). (2) Set the POWER switch to STANDBY. (5) Press START/STOP. Your... camcorder starts recording. To enable smooth transition You can make the transition between the last scene you recorded and the next scene smooth as ...

Operating Instructions
Page 17
...To adjust the brightness of the LCD screen, press either of the other way, the indicator appears in the mirror mode The picture on your camcorder in direct sunlight The LCD screen may be difficult to 0:00:00 Press COUNTER RESET (p. 82). to brighten 180° LCD BRIGHT to ... panel over so that you use the viewfinder. After recording (1) Turn STANDBY down and up again. If this happens, we recommend that it into the camcorder body. This is working. Basics Recording a picture If you turn STANDBY down to LOCK. (2) Close the LCD panel. (3) Eject the cassette. (4) Set the...
...To adjust the brightness of the LCD screen, press either of the other way, the indicator appears in the mirror mode The picture on your camcorder in direct sunlight The LCD screen may be difficult to 0:00:00 Press COUNTER RESET (p. 82). to brighten 180° LCD BRIGHT to ... panel over so that you use the viewfinder. After recording (1) Turn STANDBY down and up again. If this happens, we recommend that it into the camcorder body. This is working. Basics Recording a picture If you turn STANDBY down to LOCK. (2) Close the LCD panel. (3) Eject the cassette. (4) Set the...

Operating Instructions
Page 21
... "SUPER NIGHTSHOT" indicators flash on the LCD screen or in the viewfinder. This may cause your camcorder is difficult with the NightShot Light on the LCD screen or in bright places (ex. Fader* (CCD-TRV87 only) - CCD-TRV87 only The Super NightShot mode makes subjects more than four times brighter than those recorded...
... "SUPER NIGHTSHOT" indicators flash on the LCD screen or in the viewfinder. This may cause your camcorder is difficult with the NightShot Light on the LCD screen or in bright places (ex. Fader* (CCD-TRV87 only) - CCD-TRV87 only The Super NightShot mode makes subjects more than four times brighter than those recorded...
Operating Instructions
Page 24
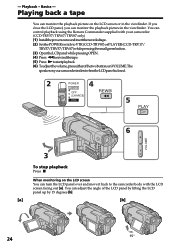
... LCD screen You can turn the LCD panel over and move it back to the camcorder body with your camcorder. (CCD-TRV57/TRV67/TRV87 only) (1) Installthepowersourceandinserttherecordedtape. (2) SetthePOWERswitchtoVTR(CCD-TRV87)orPLAYER(CCD-TRV17/ TRV37/TRV57/TRV67) while pressing the small green button. (3) OpentheLCDpanelwhilepressingOPEN. (4) Press mtorewindthetape. ...Commander supplied with the LCD screen facing out [a]. You can monitor the playback picture on your camcorder is silent when the LCD panel is closed. 2 POWER 4 CAMERA OFF REW (CHARGE) VTR 5 PLAY 6 VOLUME ...
... LCD screen You can turn the LCD panel over and move it back to the camcorder body with your camcorder. (CCD-TRV57/TRV67/TRV87 only) (1) Installthepowersourceandinserttherecordedtape. (2) SetthePOWERswitchtoVTR(CCD-TRV87)orPLAYER(CCD-TRV17/ TRV37/TRV57/TRV67) while pressing the small green button. (3) OpentheLCDpanelwhilepressingOPEN. (4) Press mtorewindthetape. ...Commander supplied with the LCD screen facing out [a]. You can monitor the playback picture on your camcorder is silent when the LCD panel is closed. 2 POWER 4 CAMERA OFF REW (CHARGE) VTR 5 PLAY 6 VOLUME ...
Operating Instructions
Page 25
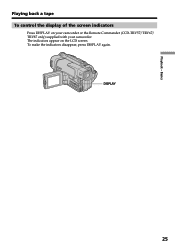
DISPLAY 25 Playback - Basics Playing back a tape To control the display of the screen indicators Press DISPLAY on the LCD screen. The indicators appear on your camcorder or the Remote Commander (CCD-TRV57/TRV67/ TRV87 only) supplied with your camcorder. To make the indicators disappear, press DISPLAY again.
DISPLAY 25 Playback - Basics Playing back a tape To control the display of the screen indicators Press DISPLAY on the LCD screen. The indicators appear on your camcorder or the Remote Commander (CCD-TRV57/TRV67/ TRV87 only) supplied with your camcorder. To make the indicators disappear, press DISPLAY again.
Operating Instructions
Page 26
.... In the various playback modes Sound is muted. To resume playback, press N. The tapes recorded in the Hi8 format (CCD-TRV17/TRV37/TRV57 only) You can play back a tape recorded in the Hi8 video system on your camcorder. 26 To rewind the tape Press min the stop mode. To view a still picture (playback pause) Press...
.... In the various playback modes Sound is muted. To resume playback, press N. The tapes recorded in the Hi8 format (CCD-TRV17/TRV37/TRV57 only) You can play back a tape recorded in the Hi8 video system on your camcorder. 26 To rewind the tape Press min the stop mode. To view a still picture (playback pause) Press...
Operating Instructions
Page 27
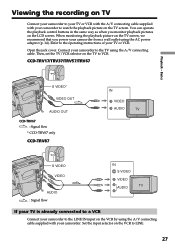
... to a VCR Connect your camcorder to the LINE IN input on the VCR by using the A/V connecting cable supplied with your camcorder to the TV using the A/V connecting cable. Connect your camcorder to watch the playback picture on the TV screen. CCD-TRV17/TRV37/TRV57/TRV67 Playback - Viewing ...the recording on TV Connect your camcorder to your TV or VCR with the A/V ...
... to a VCR Connect your camcorder to the LINE IN input on the VCR by using the A/V connecting cable supplied with your camcorder to the TV using the A/V connecting cable. Connect your camcorder to watch the playback picture on the TV screen. CCD-TRV17/TRV37/TRV57/TRV67 Playback - Viewing ...the recording on TV Connect your camcorder to your TV or VCR with the A/V ...


