Operating Instructions
Page 10
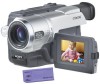
...) battery for Remote Commander (CCD-TRV107/TRV408 only) (2) (p. 96) 5 A/V connecting cable (1) (p. 32) 6 Shoulder strap (1) (p. 91) 7 Lens cap (1) (p. 19, 95) 8 USB Cable (CCD-TRV608 only) (1) (p. 59) 9 CD-ROM (SPVD-008 USB Driver) (CCD-TRV608 only) (1) (p. 60) Contents of the recording cannot be compensated if recording or playback is not made due to a malfunction of the camcorder, storage media, etc...
...) battery for Remote Commander (CCD-TRV107/TRV408 only) (2) (p. 96) 5 A/V connecting cable (1) (p. 32) 6 Shoulder strap (1) (p. 91) 7 Lens cap (1) (p. 19, 95) 8 USB Cable (CCD-TRV608 only) (1) (p. 59) 9 CD-ROM (SPVD-008 USB Driver) (CCD-TRV608 only) (1) (p. 60) Contents of the recording cannot be compensated if recording or playback is not made due to a malfunction of the camcorder, storage media, etc...
Operating Instructions
Page 59
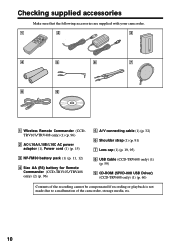
CCD-TRV608 only If you connect your computer - Recommended computer environment OS: Microsoft Windows 98 SE, Windows Me, Windows 2000 Professional, Windows XP Home Edition or ... 1 GB hard disk space or more recommended for Sony" (p. 63 to install DirectX. Viewing images using Windows 98, you can process or edit it is compatible with DirectX technology, so it by the supplied USB cable, you cannot capture sounds. If you are using your camcorder and computer by computer software and append it...
CCD-TRV608 only If you connect your computer - Recommended computer environment OS: Microsoft Windows 98 SE, Windows Me, Windows 2000 Professional, Windows XP Home Edition or ... 1 GB hard disk space or more recommended for Sony" (p. 63 to install DirectX. Viewing images using Windows 98, you can process or edit it is compatible with DirectX technology, so it by the supplied USB cable, you cannot capture sounds. If you are using your camcorder and computer by computer software and append it...
Operating Instructions
Page 60
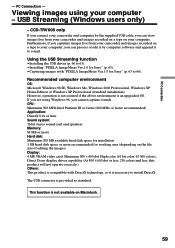
... herein may be the trademarks or registered trademarks of your computer. If the USB driver has been registered incorrectly because your computer was connected to your camcorder before connecting the USB cable to your computer. Connect the USB cable in this manual. The USB driver installation starts. 60 The application software screen appears. (3) Move the cursor to...
... herein may be the trademarks or registered trademarks of your computer. If the USB driver has been registered incorrectly because your computer was connected to your camcorder before connecting the USB cable to your computer. Connect the USB cable in this manual. The USB driver installation starts. 60 The application software screen appears. (3) Move the cursor to...
Operating Instructions
Page 61
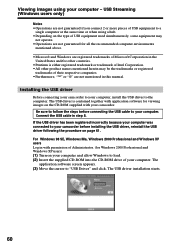
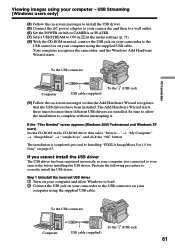
... CD-ROM inserted, connect the USB jack on your computer using the supplied USB cable. Your computer recognises the camcorder, and the Windows Add Hardware Wizard starts. Step 1 Uninstall the incorrect USB driver 1 Turn on your computer and allow the installation to Installing "PIXELA ImageMixer Ver.1.0 for Sony" on your camcorder to the USB connector on page 63.
... CD-ROM inserted, connect the USB jack on your computer using the supplied USB cable. Your computer recognises the camcorder, and the Windows Add Hardware Wizard starts. Step 1 Uninstall the incorrect USB driver 1 Turn on your computer and allow the installation to Installing "PIXELA ImageMixer Ver.1.0 for Sony" on your camcorder to the USB connector on page 63.
Operating Instructions
Page 63
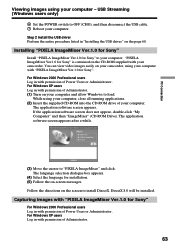
... "PIXELA ImageMixer Ver.1.0 for Sony" to load. Installing "PIXELA ImageMixer Ver.1.0 for Sony" Install "PIXELA ImageMixer Ver.1.0 for Sony". "PIXELA ImageMixer Ver.1.0 for Sony" is contained on -screen messages. The application software screen appears after a while. (3) Move the cursor to OFF (CHG), and then disconnect the USB cable. 7 Reboot your computer....can view video images easily on the screen to install DirectX. The application software screen appears. Follow the directions on your camcorder, using your camcorder. Capturing images with permission of Administrator. 63
... "PIXELA ImageMixer Ver.1.0 for Sony" to load. Installing "PIXELA ImageMixer Ver.1.0 for Sony" Install "PIXELA ImageMixer Ver.1.0 for Sony". "PIXELA ImageMixer Ver.1.0 for Sony" is contained on -screen messages. The application software screen appears after a while. (3) Move the cursor to OFF (CHG), and then disconnect the USB cable. 7 Reboot your computer....can view video images easily on the screen to install DirectX. The application software screen appears. Follow the directions on your camcorder, using your camcorder. Capturing images with permission of Administrator. 63

Operating Instructions
Page 64
... on a tape appears in the menu settings (p. 71). (6) Select "Start" t "Program" t "Pixela" t "ImageMixer" t "PIXELA ImageMixer Ver.1.0 for Sony" on your computer - The images recorded on your computer using your camcorder. Viewing images using the supplied USB cable. USB Streaming (Windows users only) Viewing images Viewing images recorded on a tape (1) Turn on your computer and allow...
... on a tape appears in the menu settings (p. 71). (6) Select "Start" t "Program" t "Pixela" t "ImageMixer" t "PIXELA ImageMixer Ver.1.0 for Sony" on your computer - The images recorded on your computer using your camcorder. Viewing images using the supplied USB cable. USB Streaming (Windows users only) Viewing images Viewing images recorded on a tape (1) Turn on your computer and allow...
Operating Instructions
Page 66
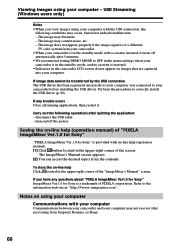
... Seeing the on -line help (operation manual). (1) Click button located in the camcorder LCD screen do not indicate malfunction: - If you view images using your computer with the USB connection, the following operations after quitting the application: - Notes on using your computer... from your camcorder. •When your camcorder is in the standby mode with your computer Communications between your camcorder and your computer. The ImageMixer's Manual screen appears. (2) You can access the desired topics from Suspend, Resume, or Sleep. 66 disconnect the USB cable - Perform...
... Seeing the on -line help (operation manual). (1) Click button located in the camcorder LCD screen do not indicate malfunction: - If you view images using your computer with the USB connection, the following operations after quitting the application: - Notes on using your computer... from your camcorder. •When your camcorder is in the standby mode with your computer Communications between your camcorder and your computer. The ImageMixer's Manual screen appears. (2) You can access the desired topics from Suspend, Resume, or Sleep. 66 disconnect the USB cable - Perform...
Operating Instructions
Page 76
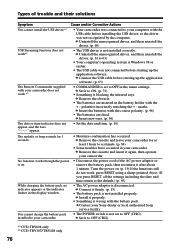
...The AC power adaptor is disconnected. c Set it again, then operate your Sony dealer or local authorized Sony service facility. • The POWER switch is not set to OFF (CHG). *1) CCD-TRV608 only *2) CCD-TRV107/TRV408 only 76 c Remove the cassette and insert it to OFF ...the bars "--:--:--" appear. • Your camcorder was connected to your camcorder. c Remove the cassette and leave your camcorder for 5 seconds. c Install it firmly. (p. 15) • The battery pack is not installed properly. c Connect the USB cable before installing the USB driver, so the driver was not ...
...The AC power adaptor is disconnected. c Set it again, then operate your Sony dealer or local authorized Sony service facility. • The POWER switch is not set to OFF (CHG). *1) CCD-TRV608 only *2) CCD-TRV107/TRV408 only 76 c Remove the cassette and insert it to OFF ...the bars "--:--:--" appear. • Your camcorder was connected to your camcorder. c Remove the cassette and leave your camcorder for 5 seconds. c Install it firmly. (p. 15) • The battery pack is not installed properly. c Connect the USB cable before installing the USB driver, so the driver was not ...
Operating Instructions
Page 98
Index A, B AC power adaptor 15 Adjusting viewfinder .......... 23 A/V connecting cable 32, 49, 55 BACK LIGHT 25 Battery pack 11 BEEP 72 ... G, H Fade in/out 35 FADER 35 FOCUS 41 Grip strap 95 Heads 85 Hi8 system 80 I, J, K, L "InfoLITHIUM" battery ..... 81 Infrared rays emitter 26 LCD screen 20 LP mode 70 M, N Manual focus 41 Menu settings 67 Mirror mode ...51 T, U, V Tape counter indicator ........ 24 TBC 69 Telephoto 22 Title 42 Transition 20 TV color systems 83 USB Streaming 59 VF B.L 23 W, X, Y, Z Warning indicators 78 Wide-angle 22 Wide mode 33 WORLD TIME 72 Write-...
Index A, B AC power adaptor 15 Adjusting viewfinder .......... 23 A/V connecting cable 32, 49, 55 BACK LIGHT 25 Battery pack 11 BEEP 72 ... G, H Fade in/out 35 FADER 35 FOCUS 41 Grip strap 95 Heads 85 Hi8 system 80 I, J, K, L "InfoLITHIUM" battery ..... 81 Infrared rays emitter 26 LCD screen 20 LP mode 70 M, N Manual focus 41 Menu settings 67 Mirror mode ...51 T, U, V Tape counter indicator ........ 24 TBC 69 Telephoto 22 Title 42 Transition 20 TV color systems 83 USB Streaming 59 VF B.L 23 W, X, Y, Z Warning indicators 78 Wide-angle 22 Wide mode 33 WORLD TIME 72 Write-...


