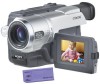

Operating Instructions
Page 2
...be of sufficient magnitude to constitute a risk of electric shock to persons. Never expose the battery pack to use. You can capture life's precious moments with advanced features, but at the ... the unit to come. and Canada RECYCLING LITHIUM-ION BATTERIES Lithium-Ion batteries are recyclable. Caution: Do not handle damaged or leaking Lithium-Ion batteries. 2 For the customers in the sun or under ...help preserve our environment by returning your purchase of rechargeable batteries, call toll free 1-800-822-8837, or visit http://www.rbrc.org/. For more information ...
...be of sufficient magnitude to constitute a risk of electric shock to persons. Never expose the battery pack to use. You can capture life's precious moments with advanced features, but at the ... the unit to come. and Canada RECYCLING LITHIUM-ION BATTERIES Lithium-Ion batteries are recyclable. Caution: Do not handle damaged or leaking Lithium-Ion batteries. 2 For the customers in the sun or under ...help preserve our environment by returning your purchase of rechargeable batteries, call toll free 1-800-822-8837, or visit http://www.rbrc.org/. For more information ...
Operating Instructions
Page 5
...Guide 6 Getting started Using this manual 8 Checking supplied accessories 10 Step 1 Preparing the power supply ... 11 Installing the battery pack 11 Charging the battery pack 12 Connecting to a wall outlet 15 Step 2 Setting the date and time ........ 16 Step 3 Inserting a ...Camcorder Changing the menu settings 67 Recording - Basics Playing back a tape 29 Viewing the recording on pictures 27 Checking the recording - Easy dubbing 51 PC Connection (CCD-TRV608 only) Viewing images using your computer - END SEARCH 28 Playback - BACK LIGHT 25 Shooting in light (CCD-TRV107/TRV308...
...Guide 6 Getting started Using this manual 8 Checking supplied accessories 10 Step 1 Preparing the power supply ... 11 Installing the battery pack 11 Charging the battery pack 12 Connecting to a wall outlet 15 Step 2 Setting the date and time ........ 16 Step 3 Inserting a ...Camcorder Changing the menu settings 67 Recording - Basics Playing back a tape 29 Viewing the recording on pictures 27 Checking the recording - Easy dubbing 51 PC Connection (CCD-TRV608 only) Viewing images using your computer - END SEARCH 28 Playback - BACK LIGHT 25 Shooting in light (CCD-TRV107/TRV308...

Operating Instructions
Page 6
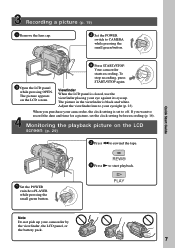
Connecting the power cord (p. 15) Use the battery pack when using your camcorder. Close the lid of your camcorder outdoors (p. 11). See the page in parentheses "( )" for more information. EJECT 2 Insert a cassette into the cassette compartment with its window facing out and the write-...
Connecting the power cord (p. 15) Use the battery pack when using your camcorder. Close the lid of your camcorder outdoors (p. 11). See the page in parentheses "( )" for more information. EJECT 2 Insert a cassette into the cassette compartment with its window facing out and the write-...
Operating Instructions
Page 7
... want to record the date and time for a picture, set to off. Your camcorder PL starts recording. Viewfinder When the LCD panel is closed, use the viewfinder placing your camcorder by the viewfinder, the LCD panel, or the battery pack. 7 RA RA RA Quick Start Guide Recording a picture (p. 19) 1 ...eye against its eyecup. AYER OFF(CHG) CAME AYER OFF(CHG) 4 Press START/STOP. The picture appears on the LCD screen (p. 29) 2 Press m to your camcorder, the clock setting is black and white. The picture in the viewfinder is set the clock setting before recording (p. 16)....
... want to record the date and time for a picture, set to off. Your camcorder PL starts recording. Viewfinder When the LCD panel is closed, use the viewfinder placing your camcorder by the viewfinder, the LCD panel, or the battery pack. 7 RA RA RA Quick Start Guide Recording a picture (p. 19) 1 ...eye against its eyecup. AYER OFF(CHG) CAME AYER OFF(CHG) 4 Press START/STOP. The picture appears on the LCD screen (p. 29) 2 Press m to your camcorder, the clock setting is black and white. The picture in the viewfinder is set the clock setting before recording (p. 16)....
Operating Instructions
Page 10
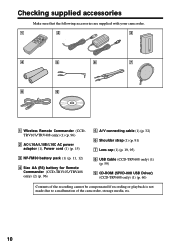
... accessories Make sure that the following accessories are supplied with your camcorder. 1 2 3 4 5 6 7 8 9 1 Wireless Remote Commander (CCDTRV107/TRV408 only) (1) (p. 96) 2 AC-L10A/L10B/L10C AC power adaptor (1), Power cord (1) (p. 15) 3 NP-FM30 battery pack (1) (p. 11, 12) 4 Size AA (R6) battery for Remote Commander (CCD-TRV107/TRV408 only) (2) (p. 96) 5 A/V connecting cable (1) (p. 32) 6 Shoulder strap (1) (p. 91) 7 Lens...
... accessories Make sure that the following accessories are supplied with your camcorder. 1 2 3 4 5 6 7 8 9 1 Wireless Remote Commander (CCDTRV107/TRV408 only) (1) (p. 96) 2 AC-L10A/L10B/L10C AC power adaptor (1), Power cord (1) (p. 15) 3 NP-FM30 battery pack (1) (p. 11, 12) 4 Size AA (R6) battery for Remote Commander (CCD-TRV107/TRV408 only) (2) (p. 96) 5 A/V connecting cable (1) (p. 32) 6 Shoulder strap (1) (p. 91) 7 Lens...

Operating Instructions
Page 11
Getting started Step 1 Preparing the power supply Installing the battery pack Slide the battery pack down . V BATT release lever 11 To remove the battery pack Slide the battery pack out in the direction of the arrow while pressing V BATT down until it clicks.
Getting started Step 1 Preparing the power supply Installing the battery pack Slide the battery pack down . V BATT release lever 11 To remove the battery pack Slide the battery pack out in the direction of the arrow while pressing V BATT down until it clicks.
Operating Instructions
Page 12
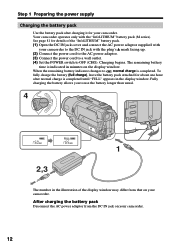
... may differ from the DC IN jack on your camcorder. Fully charging the battery allows you to , normal charge is completed. AYER 4 PL POWER OFF(CHG) CAME RA FULL 1 2,3 The number in the illustration of the "InfoLITHIUM" battery pack. (1) Open the DC IN jack cover and... connect the AC power adaptor supplied with your camcorder. To fully charge the battery (full charge), leave the battery pack attached for your camcorder. 12 Charging begins. Your camcorder operates only with the plug's v mark facing up. (2) Connect the power cord to the...
... may differ from the DC IN jack on your camcorder. Fully charging the battery allows you to , normal charge is completed. AYER 4 PL POWER OFF(CHG) CAME RA FULL 1 2,3 The number in the illustration of the "InfoLITHIUM" battery pack. (1) Open the DC IN jack cover and... connect the AC power adaptor supplied with your camcorder. To fully charge the battery (full charge), leave the battery pack attached for your camcorder. 12 Charging begins. Your camcorder operates only with the plug's v mark facing up. (2) Connect the power cord to the...

Operating Instructions
Page 13
...not installed properly. - The battery pack is disconnected. - We recommend charging the battery pack in the display window roughly indicates the recording time with the LCD screen Continuous* Typical** 120 65...CCD-TRV107/TRV108/TRV308/TRV408 Battery pack Recording with the viewfinder Continuous* Typical** NP-FM30 (supplied) 165 90 NP-FM50 265 145 NP-FM70 540 295 NP-QM71 640 350 NP-FM90 820 450 NP-FM91/QM91 955 525 Recording with the viewfinder. Until your camcorder calculates the actual remaining battery time "- - - - While charging the battery...
...not installed properly. - The battery pack is disconnected. - We recommend charging the battery pack in the display window roughly indicates the recording time with the LCD screen Continuous* Typical** 120 65...CCD-TRV107/TRV108/TRV308/TRV408 Battery pack Recording with the viewfinder Continuous* Typical** NP-FM30 (supplied) 165 90 NP-FM50 265 145 NP-FM70 540 295 NP-QM71 640 350 NP-FM90 820 450 NP-FM91/QM91 955 525 Recording with the viewfinder. Until your camcorder calculates the actual remaining battery time "- - - - While charging the battery...

Operating Instructions
Page 14
... with compatible electronic equipment. What is compatible with the "InfoLITHIUM" battery pack (M series). Your camcorder operates only with the "InfoLITHIUM" battery pack. Step 1 Preparing the power supply CCD-TRV608 Battery pack Recording with the viewfinder Recording with the LCD screen Continuous* Typical** Continuous* Typical** NP-FM30 (supplied) 165 90 100 55 NP-FM50 265 145 160...
... with compatible electronic equipment. What is compatible with the "InfoLITHIUM" battery pack (M series). Your camcorder operates only with the "InfoLITHIUM" battery pack. Step 1 Preparing the power supply CCD-TRV608 Battery pack Recording with the viewfinder Recording with the LCD screen Continuous* Typical** Continuous* Typical** NP-FM30 (supplied) 165 90 100 55 NP-FM50 265 145 160...

Operating Instructions
Page 15
... (wall outlet) as long as possible to cut off . Using a car battery Use Sony DC Adaptor/Charger (optional). Getting started Step 1 Preparing the power supply Connecting to a wall outlet When you use your camcorder for further information. 15 Refer to your camcorder. •The DC IN jack has "source priority." Notes •The AC...
... (wall outlet) as long as possible to cut off . Using a car battery Use Sony DC Adaptor/Charger (optional). Getting started Step 1 Preparing the power supply Connecting to a wall outlet When you use your camcorder for further information. 15 Refer to your camcorder. •The DC IN jack has "source priority." Notes •The AC...
Operating Instructions
Page 16
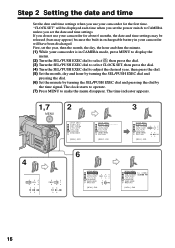
First, set the date and time settings. If you do not use your camcorder for the first time. The clock starts to operate. (7) Press MENU to adjust the...set the year, then the month, the day, the hour and then the minute. (1) While your camcorder is in your camcorder for about 6 months, the date and time settings may be displayed each time when you set the ...power switch to CAMERA unless you use your camcorder will be released (bars may appear) because the built-in rechargeable battery in CAMERA mode, press MENU to display the menu. (2) Turn the SEL...
First, set the date and time settings. If you do not use your camcorder for the first time. The clock starts to operate. (7) Press MENU to adjust the...set the year, then the month, the day, the hour and then the minute. (1) While your camcorder is in your camcorder for about 6 months, the date and time settings may be displayed each time when you set the ...power switch to CAMERA unless you use your camcorder will be released (bars may appear) because the built-in rechargeable battery in CAMERA mode, press MENU to display the menu. (2) Turn the SEL...
Operating Instructions
Page 20
... smooth as long as you do not eject the cassette even if you turn off your camcorder in the standby mode for recording, set the POWER switch to 90 degrees. If your camcorder is to save battery power and to start recording. To set it vertically until it clicks, and swing it to... CAMERA, or press START/STOP without chainging the POWER switch again to prevent battery and tape wear. If you turn the LCD panel over so that you use...
... smooth as long as you do not eject the cassette even if you turn off your camcorder in the standby mode for recording, set the POWER switch to 90 degrees. If your camcorder is to save battery power and to start recording. To set it vertically until it clicks, and swing it to... CAMERA, or press START/STOP without chainging the POWER switch again to prevent battery and tape wear. If you turn the LCD panel over so that you use...

Operating Instructions
Page 21
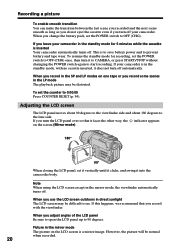
After using your camcorder (CCD-TRV107/TRV308/TRV408/TRV608 only) Remove the battery pack from your camcorder do not work. Adjusting the brightness of the LCD screen (1) In CAMERA mode, select LCD BRIGHT in in the menu settings (p. 69). (2) Turn the SEL/PUSH EXEC dial to adjust the brightness of ...be normal when recorded. MENU 1 LCD/VF SET LCD BR I G HT LCD B. Recording - Some of the LCD screen. After recording (1) Set the POWER switch to avoid turning on the built-in the mirror mode DATE and TIME on your camcorder to OFF (CHG). (2) Close the LCD panel. (3) Eject the cassette. ...
After using your camcorder (CCD-TRV107/TRV308/TRV408/TRV608 only) Remove the battery pack from your camcorder do not work. Adjusting the brightness of the LCD screen (1) In CAMERA mode, select LCD BRIGHT in in the menu settings (p. 69). (2) Turn the SEL/PUSH EXEC dial to adjust the brightness of ...be normal when recorded. MENU 1 LCD/VF SET LCD BR I G HT LCD B. Recording - Some of the LCD screen. After recording (1) Set the POWER switch to avoid turning on the built-in the mirror mode DATE and TIME on your camcorder to OFF (CHG). (2) Close the LCD panel. (3) Eject the cassette. ...
Operating Instructions
Page 24
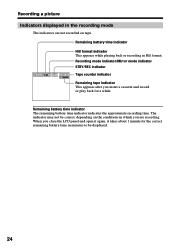
... may not be displayed. 24 Remaining battery time indicator Hi8 format indicator This appears while playing back or recording in Hi8 format. When you insert a cassette and record or play back for the correct remaining battery time in minutes to be correct, depending...battery time indicator indicates the approximate recording time. Recording a picture Indicators displayed in the recording mode The indicators are recording. Recording mode indicator/Mirror mode indicator STBY/REC indicator 40min SP REC 0:00:01 Tape counter indicator Remaining tape indicator This appears after you close the LCD...
... may not be displayed. 24 Remaining battery time indicator Hi8 format indicator This appears while playing back or recording in Hi8 format. When you insert a cassette and record or play back for the correct remaining battery time in minutes to be correct, depending...battery time indicator indicates the approximate recording time. Recording a picture Indicators displayed in the recording mode The indicators are recording. Recording mode indicator/Mirror mode indicator STBY/REC indicator 40min SP REC 0:00:01 Tape counter indicator Remaining tape indicator This appears after you close the LCD...
Operating Instructions
Page 47
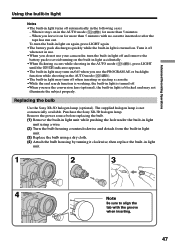
...;The built-in light may turn the built-in light on again, press LIGHT again. •The battery pack discharges quickly while the built-in the following cases: - Replacing the bulb Use the Sony XB-3D halogen lamp (optional). To turn on/off when you use the conversion lens (optional), the...Replace the bulb using a dry cloth. (4) Attach the bulb housing by turning it off when not in use. •When you do not use your camcorder, turn off when inserting or ejecting a cassette. •While the end search function is working, the built-in light is turned off automatically in light...
...;The built-in light may turn the built-in light on again, press LIGHT again. •The battery pack discharges quickly while the built-in the following cases: - Replacing the bulb Use the Sony XB-3D halogen lamp (optional). To turn on/off when you use the conversion lens (optional), the...Replace the bulb using a dry cloth. (4) Attach the bulb housing by turning it off when not in use. •When you do not use your camcorder, turn off when inserting or ejecting a cassette. •While the end search function is working, the built-in light is turned off automatically in light...
Operating Instructions
Page 69
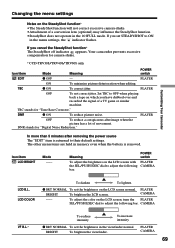
.... * CCD-TRV308/TRV408/TRV608 only Icon/item Mode Meaning POWER switch EDIT z OFF - Icon/item LCD BRIGHT Mode --- Meaning POWER switch To adjust the brightness on the LCD screen with...normal. If you set the brightness in the menu settings, the indicator flashes. Your camcorder prevents excessive compensation for "Time Base Corrector." In more than 5 minutes after removing ...may influence the SteadyShot function. •SteadyShot does not operate in memory even when the battery is returned to adjust the following CAMERA bar. DNR stands for "Digital Noise Reduction." ...
.... * CCD-TRV308/TRV408/TRV608 only Icon/item Mode Meaning POWER switch EDIT z OFF - Icon/item LCD BRIGHT Mode --- Meaning POWER switch To adjust the brightness on the LCD screen with...normal. If you set the brightness in the menu settings, the indicator flashes. Your camcorder prevents excessive compensation for "Time Base Corrector." In more than 5 minutes after removing ...may influence the SteadyShot function. •SteadyShot does not operate in memory even when the battery is returned to adjust the following CAMERA bar. DNR stands for "Digital Noise Reduction." ...
Operating Instructions
Page 70
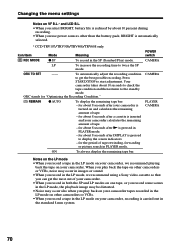
...tape on and calculates the remaining amount of tape rewinding, forwarding or picture search in the LP mode on VF B.L.* and LCD B.L. •When you select BRIGHT, battery life is reduced by about 10 seconds to check the tape condition and then returns to twice the SP mode. for the... selected. * CCD-TRV107/TRV308/TRV408/TRV608 only Icon/item Mode Meaning REC MODE z SP To record in the SP (Standard Play) mode. POWER switch CAMERA CAMERA PLAYER CAMERA Notes on the LP mode •When you record a tape in the LP mode on your camcorder, we recommend using a Sony video cassette so...
...tape on and calculates the remaining amount of tape rewinding, forwarding or picture search in the LP mode on VF B.L.* and LCD B.L. •When you select BRIGHT, battery life is reduced by about 10 seconds to check the tape condition and then returns to twice the SP mode. for the... selected. * CCD-TRV107/TRV308/TRV408/TRV608 only Icon/item Mode Meaning REC MODE z SP To record in the SP (Standard Play) mode. POWER switch CAMERA CAMERA PLAYER CAMERA Notes on the LP mode •When you record a tape in the LP mode on your camcorder, we recommend using a Sony video cassette so...
Operating Instructions
Page 72
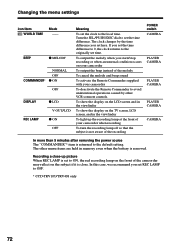
...when the battery is returned to the originally set the time difference. In this case, we recommend you set the time difference to 0, the clock returns to the default setting. To show the display on the LCD screen and in the viewfinder To show the display on your camcorder To deactivate... the Remote Commander to avoid unintentional operations caused by the time difference you set REC LAMP to set time. Changing the menu settings Icon/item WORLD TIME Mode -- Turn the SEL/PUSH EXEC dial to OFF. * CCD...
...when the battery is returned to the originally set the time difference. In this case, we recommend you set the time difference to 0, the clock returns to the default setting. To show the display on the LCD screen and in the viewfinder To show the display on your camcorder To deactivate... the Remote Commander to avoid unintentional operations caused by the time difference you set REC LAMP to set time. Changing the menu settings Icon/item WORLD TIME Mode -- Turn the SEL/PUSH EXEC dial to OFF. * CCD...
Operating Instructions
Page 73
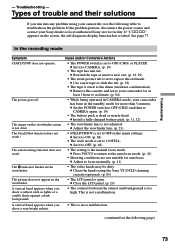
.... c Set it to 16:9FULL. c Remove the cassette and leave your camcorder, use the following page) 73 c Close the LCD panel. (p. 20) • The contrast between the subject and background is...to acclimate. (p. 84) • While being operated in CAMERA mode, your Sony dealer or local authorized Sony service facility. See page 77. The image on the screen, the self-diagnosis .... The SteadyShot function does not work.* The autofocusing function does not work. c Install a fully charged battery pack. (p. 11, 12) • The viewfinder lens is not a malfunction. (continued on the following...
.... c Set it to 16:9FULL. c Remove the cassette and leave your camcorder, use the following page) 73 c Close the LCD panel. (p. 20) • The contrast between the subject and background is...to acclimate. (p. 84) • While being operated in CAMERA mode, your Sony dealer or local authorized Sony service facility. See page 77. The image on the screen, the self-diagnosis .... The SteadyShot function does not work.* The autofocusing function does not work. c Install a fully charged battery pack. (p. 11, 12) • The viewfinder lens is not a malfunction. (continued on the following...
Operating Instructions
Page 74
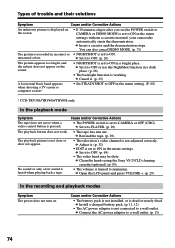
...CCD-TRV308/TRV408/TRV608 only In the playback mode Symptom The tape does not move when a video control button is pressed. Cause and/or Corrective Actions • The battery... pack is not installed, or is heard when playing back a tape. c Set it to OFF. (p. 69) • The video head may be dirty. c Clean the heads using the Sony...LCD panel and press VOLUME +. (p. 29) In the recording and playback modes Symptom The power does not turn on. c Install a charged battery...menu settings without a cassette inserted, your camcorder automatically starts the demonstration. Types of trouble ...
...CCD-TRV308/TRV408/TRV608 only In the playback mode Symptom The tape does not move when a video control button is pressed. Cause and/or Corrective Actions • The battery... pack is not installed, or is heard when playing back a tape. c Set it to OFF. (p. 69) • The video head may be dirty. c Clean the heads using the Sony...LCD panel and press VOLUME +. (p. 29) In the recording and playback modes Symptom The power does not turn on. c Install a charged battery...menu settings without a cassette inserted, your camcorder automatically starts the demonstration. Types of trouble ...


