
Operating Instructions
Page 6
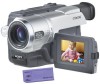
...cassette compartment automatically goes down. Connecting the power cord (p. 15) Use the battery pack when using your camcorder. AC power adaptor (supplied) Inserting a cassette (p. 18) 1 Open the lid of the cassette compartment. Close the lid of the cassette compartment, and press Z EJECT.... Quick Start Guide This chapter introduces you to the basic features of your camcorder outdoors (p. 11). EJECT 2 Insert a cassette ...
...cassette compartment automatically goes down. Connecting the power cord (p. 15) Use the battery pack when using your camcorder. AC power adaptor (supplied) Inserting a cassette (p. 18) 1 Open the lid of the cassette compartment. Close the lid of the cassette compartment, and press Z EJECT.... Quick Start Guide This chapter introduces you to the basic features of your camcorder outdoors (p. 11). EJECT 2 Insert a cassette ...
Operating Instructions
Page 7
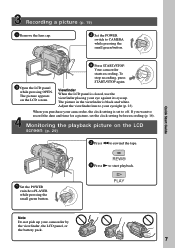
... OFF(CHG) 4 Press START/STOP. Viewfinder When the LCD panel is closed, use the viewfinder placing your camcorder, the clock setting is black and white. The picture ... your eyesight (p. 23). Your camcorder PL starts recording. To POWER stop recording, press START/STOP again. Monitoring the playback picture on the LCD screen. The picture appears on the LCD screen (p. 29) 2 Press... (p. 19) 1 Remove the lens cap. 2 Set the POWER switch to your camcorder by the viewfinder, the LCD panel, or the battery pack. 7 Adjust the viewfinder lens to CAMERA PL while pressing...
... OFF(CHG) 4 Press START/STOP. Viewfinder When the LCD panel is closed, use the viewfinder placing your camcorder, the clock setting is black and white. The picture ... your eyesight (p. 23). Your camcorder PL starts recording. To POWER stop recording, press START/STOP again. Monitoring the playback picture on the LCD screen. The picture appears on the LCD screen (p. 29) 2 Press... (p. 19) 1 Remove the lens cap. 2 Set the POWER switch to your camcorder by the viewfinder, the LCD panel, or the battery pack. 7 Adjust the viewfinder lens to CAMERA PL while pressing...
Operating Instructions
Page 12
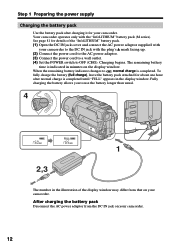
...you to , normal charge is indicated in the illustration of the "InfoLITHIUM" battery pack. (1) Open the DC IN jack cover and connect the AC power adaptor supplied with your camcorder. See page 81 for your camcorder. 12 AYER 4 PL POWER OFF(CHG) CAME RA FULL 1 2,3 The number in minutes on...battery pack attached for about one hour after charging it for details of the display window may differ from the DC IN jack on your camcorder to the DC IN jack with the "InfoLITHIUM" battery pack (M series). Charging begins. After charging the battery pack Disconnect the AC power...
...you to , normal charge is indicated in the illustration of the "InfoLITHIUM" battery pack. (1) Open the DC IN jack cover and connect the AC power adaptor supplied with your camcorder. See page 81 for your camcorder. 12 AYER 4 PL POWER OFF(CHG) CAME RA FULL 1 2,3 The number in minutes on...battery pack attached for about one hour after charging it for details of the display window may differ from the DC IN jack on your camcorder to the DC IN jack with the "InfoLITHIUM" battery pack (M series). Charging begins. After charging the battery pack Disconnect the AC power...

Operating Instructions
Page 15
Using a car battery Use Sony DC Adaptor/Charger (optional). Refer to the operating instructions of the DC Adaptor /Charger for a...been turned off the power. While using the AC power adaptor. (1) Open the DC IN jack cover, and connect the AC power adaptor to the DC IN jack on your camcorder. •The DC IN jack has "source priority." Notes •...The AC power adaptor can supply power even if the battery pack is attached to your camcorder with this unit, disconnect the plug from the AC power source (wall outlet) as long as possible to cut off ...
Using a car battery Use Sony DC Adaptor/Charger (optional). Refer to the operating instructions of the DC Adaptor /Charger for a...been turned off the power. While using the AC power adaptor. (1) Open the DC IN jack cover, and connect the AC power adaptor to the DC IN jack on your camcorder. •The DC IN jack has "source priority." Notes •...The AC power adaptor can supply power even if the battery pack is attached to your camcorder with this unit, disconnect the plug from the AC power source (wall outlet) as long as possible to cut off ...
Operating Instructions
Page 18
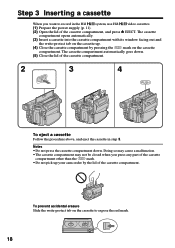
... the procedure above, and eject the cassette in the Hi8 system, use Hi8 video cassettes. (1) Prepare the power supply (p. 11). (2) Open the lid of the cassette compartment, and press Z EJECT. To prevent accidental erasure Slide the write-protect tab on the cassette up your camcorder by pressing the mark on the cassette compartment. Step...
... the procedure above, and eject the cassette in the Hi8 system, use Hi8 video cassettes. (1) Prepare the power supply (p. 11). (2) Open the lid of the cassette compartment, and press Z EJECT. To prevent accidental erasure Slide the write-protect tab on the cassette up your camcorder by pressing the mark on the cassette compartment. Step...

Operating Instructions
Page 19
... and insert a cassette. Recording - Basics - Recording a picture Your camcorder automatically focuses for more information (p. 11 to 18). (3) Set the POWER switch to the standby mode. (4) Open the LCD panel while pressing OPEN. To stop recording, press START/STOP again. Basics - When you .... (1) Remove the lens cap by pressing both knobs on your camcorder. 19 The viewfinder automatically turns off. (5) Press...
... and insert a cassette. Recording - Basics - Recording a picture Your camcorder automatically focuses for more information (p. 11 to 18). (3) Set the POWER switch to the standby mode. (4) Open the LCD panel while pressing OPEN. To stop recording, press START/STOP again. Basics - When you .... (1) Remove the lens cap by pressing both knobs on your camcorder. 19 The viewfinder automatically turns off. (5) Press...
Operating Instructions
Page 20
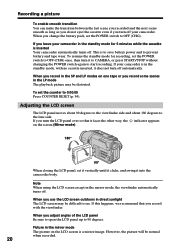
... about 90 degrees to the viewfinder side and about 180 degrees to start recording. If you turn the LCD panel over so that you adjust angles of the LCD panel Be sure to open the LCD panel up to 0:00:00 Press COUNTER RESET (p. 94). To set the POWER switch to OFF (CHG)... swing it faces the other way, the indicator appears on the LCD screen is inserted Your camcorder automatically turns off your camcorder is to save battery power and to OFF (CHG). If this happens, we recommend that it into the camcorder body. Picture in the LP mode The playback picture may be difficult...
... about 90 degrees to the viewfinder side and about 180 degrees to start recording. If you turn the LCD panel over so that you adjust angles of the LCD panel Be sure to open the LCD panel up to 0:00:00 Press COUNTER RESET (p. 94). To set the POWER switch to OFF (CHG)... swing it faces the other way, the indicator appears on the LCD screen is inserted Your camcorder automatically turns off your camcorder is to save battery power and to OFF (CHG). If this happens, we recommend that it into the camcorder body. Picture in the LP mode The playback picture may be difficult...
Operating Instructions
Page 24
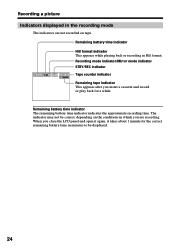
... may not be displayed. 24 Recording a picture Indicators displayed in the recording mode The indicators are recording. When you close the LCD panel and open it again, it takes about 1 minute for a while. Recording mode indicator/Mirror mode indicator STBY/REC indicator 40min SP REC ...0:00:01 Tape counter indicator Remaining tape indicator This appears after you are not recorded on the conditions in Hi8 format. Remaining battery time indicator Hi8...
... may not be displayed. 24 Recording a picture Indicators displayed in the recording mode The indicators are recording. When you close the LCD panel and open it again, it takes about 1 minute for a while. Recording mode indicator/Mirror mode indicator STBY/REC indicator 40min SP REC ...0:00:01 Tape counter indicator Remaining tape indicator This appears after you are not recorded on the conditions in Hi8 format. Remaining battery time indicator Hi8...
Operating Instructions
Page 29
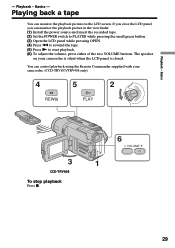
...your camcorder is silent when the LCD panel is closed. The speaker on the LCD screen. If you close the LCD panel, you can monitor the playback picture on your camcorder. (CCD-TRV107/TRV408 only) AYER OFF(CHG) 4 REW 5 2 PL POWER PLAY RA CAME 3 CCD-...TRV408 To stop playback Press x. 6 VOLUME 1 29 Basics - Playback - Playing back a tape You can monitor the playback picture in the viewfinder. (1) Install the power source and insert the recorded tape. (2) Set the POWER switch to PLAYER while pressing the small green button. (3) Open the LCD panel while pressing OPEN...
...your camcorder is silent when the LCD panel is closed. The speaker on the LCD screen. If you close the LCD panel, you can monitor the playback picture on your camcorder. (CCD-TRV107/TRV408 only) AYER OFF(CHG) 4 REW 5 2 PL POWER PLAY RA CAME 3 CCD-...TRV408 To stop playback Press x. 6 VOLUME 1 29 Basics - Playback - Playing back a tape You can monitor the playback picture in the viewfinder. (1) Install the power source and insert the recorded tape. (2) Set the POWER switch to PLAYER while pressing the small green button. (3) Open the LCD panel while pressing OPEN...
Operating Instructions
Page 32
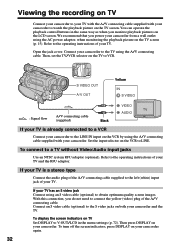
...playback control buttons in the menu settings (p. 72). Then press DISPLAY on your camcorder again. 32 With this connection, you monitor playback pictures on the LCD screen. To display the screen indicators on TV Set DISPLAY to V-OUT/LCD in the same way as when you do not need to connect the yellow... (video) plug of your TV. To turn off the screen indicators, press DISPLAY on your camcorder. Open the jack cover. Connect an S video cable (optional) to a ...
...playback control buttons in the menu settings (p. 72). Then press DISPLAY on your camcorder again. 32 With this connection, you monitor playback pictures on the LCD screen. To display the screen indicators on TV Set DISPLAY to V-OUT/LCD in the same way as when you do not need to connect the yellow... (video) plug of your TV. To turn off the screen indicators, press DISPLAY on your camcorder. Open the jack cover. Connect an S video cable (optional) to a ...

Operating Instructions
Page 62
... appears. Windows XP: Select "Start" t "Control Panel" t "System" t "Hardware" tab, and click the "Device Manager" button. In this case, click "Switch to CAMERA or PLAYER. 4 Open your computer - Windows 98 SE Windows Me Windows 2000 Professional 62 Windows XP USB Streaming (Windows users only) 3 Connect the AC power adaptor, and set...
... appears. Windows XP: Select "Start" t "Control Panel" t "System" t "Hardware" tab, and click the "Device Manager" button. In this case, click "Switch to CAMERA or PLAYER. 4 Open your computer - Windows 98 SE Windows Me Windows 2000 Professional 62 Windows XP USB Streaming (Windows users only) 3 Connect the AC power adaptor, and set...
Operating Instructions
Page 73
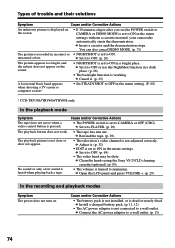
...18) • The tape is stuck to CAMERA again. (p. 19) • The battery pack is open. c Set the POWER switch to OFF (CHG) and then to the drum (moisture condensation). c ...clear. c Adjust to acclimate. (p. 84) • While being operated in CAMERA mode, your camcorder for more than 5 minutes. c Close the LCD panel. (p. 20) • The contrast between the subject and background is not a malfunction. ...(p. 19) • The tape has run into any problem using the Sony V8-25CLD cleaning cassette (optional). (p. 85) • The LCD panel is dead or nearly dead. c Set it to ON. (p. 68...
...18) • The tape is stuck to CAMERA again. (p. 19) • The battery pack is open. c Set the POWER switch to OFF (CHG) and then to the drum (moisture condensation). c ...clear. c Adjust to acclimate. (p. 84) • While being operated in CAMERA mode, your camcorder for more than 5 minutes. c Close the LCD panel. (p. 20) • The contrast between the subject and background is not a malfunction. ...(p. 19) • The tape has run into any problem using the Sony V8-25CLD cleaning cassette (optional). (p. 85) • The LCD panel is dead or nearly dead. c Set it to ON. (p. 68...
Operating Instructions
Page 74
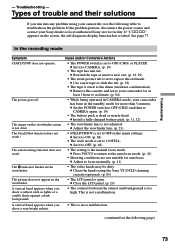
...The picture is recorded in the menu setting. (P. 68) * CCD-TRV308/TRV408/TRV608 only In the playback mode Symptom The tape does not... or use the NightShot function in the menu settings. c Clean the heads using the Sony V8-25CLD cleaning cassette (optional). (p. 85) • The volume is turned to... button does not work. c Adjust it to a wall outlet. c Open the LCD panel and press VOLUME +. (p. 29) In the recording and playback modes...ON in the menu settings without a cassette inserted, your camcorder automatically starts the demonstration. unnatural colors. Types of trouble ...
...The picture is recorded in the menu setting. (P. 68) * CCD-TRV308/TRV408/TRV608 only In the playback mode Symptom The tape does not... or use the NightShot function in the menu settings. c Clean the heads using the Sony V8-25CLD cleaning cassette (optional). (p. 85) • The volume is turned to... button does not work. c Adjust it to a wall outlet. c Open the LCD panel and press VOLUME +. (p. 29) In the recording and playback modes...ON in the menu settings without a cassette inserted, your camcorder automatically starts the demonstration. unnatural colors. Types of trouble ...

Operating Instructions
Page 78
...diagnosis display function is dead. - Warning indicators The video heads are 5 to clean the heads using the Sony V8-25CLD cleaning cassette (optional). (p. 85) The battery pack is near the end. The battery pack is... or beep sound. *2) This indicator appears in parentheses "( )" for about 1 hour with the cassette compartment open. (p. 84) You need to 10 minutes battery remaining. The battery pack is activated. (p. 77) Tape/...: - Eject the cassette, turn off your camcorder, and leave it for more information. Moisture condensation has occurred. (p. 84) - The tape has run out.*1)...
...diagnosis display function is dead. - Warning indicators The video heads are 5 to clean the heads using the Sony V8-25CLD cleaning cassette (optional). (p. 85) The battery pack is near the end. The battery pack is... or beep sound. *2) This indicator appears in parentheses "( )" for about 1 hour with the cassette compartment open. (p. 84) You need to 10 minutes battery remaining. The battery pack is activated. (p. 77) Tape/...: - Eject the cassette, turn off your camcorder, and leave it for more information. Moisture condensation has occurred. (p. 84) - The tape has run out.*1)...

Operating Instructions
Page 84
... place into a warm place (or vice versa) or when you bring your camcorder from a cold place into a warm place, put your camcorder may stick to prevent moisture condensation When you use your camcorder after about 1 hour with the cassette compartment open. You bring your camcorder from a ski slope into a hot place outside. - You bring your...
... place into a warm place (or vice versa) or when you bring your camcorder from a cold place into a warm place, put your camcorder may stick to prevent moisture condensation When you use your camcorder after about 1 hour with the cassette compartment open. You bring your camcorder from a ski slope into a hot place outside. - You bring your...
Operating Instructions
Page 91
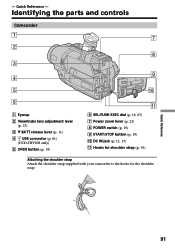
Quick Reference 91 Quick Reference - Identifying the parts and controls Camcorder 1 7 2 8 3 9 4 5 q; 6 1 Eyecup 2 Viewfinder lens adjustment lever (p. 23) 3 V BATT release lever (p. 11) 4 USB connector (p. 61) (CCD-TRV608 only) 5 OPEN button (p. 19) qa 6 SEL/PUSH EXEC dial (p. 16, 67) 7 Power zoom lever (p. 22) 8 POWER switch (p. 19) 9 START/STOP button (p. 19) 0 DC IN jack (p. 12, 15) qa Hooks for shoulder strap (p. 91) Attaching the shoulder strap Attach the shoulder strap supplied with your camcorder to the hooks for the shoulder strap. -
Quick Reference 91 Quick Reference - Identifying the parts and controls Camcorder 1 7 2 8 3 9 4 5 q; 6 1 Eyecup 2 Viewfinder lens adjustment lever (p. 23) 3 V BATT release lever (p. 11) 4 USB connector (p. 61) (CCD-TRV608 only) 5 OPEN button (p. 19) qa 6 SEL/PUSH EXEC dial (p. 16, 67) 7 Power zoom lever (p. 22) 8 POWER switch (p. 19) 9 START/STOP button (p. 19) 0 DC IN jack (p. 12, 15) qa Hooks for shoulder strap (p. 91) Attaching the shoulder strap Attach the shoulder strap supplied with your camcorder to the hooks for the shoulder strap. -


