Operating Instructions
Page 5
...CCD-TRV107/TRV308/TRV408/ TRV608 only 46 5 END SEARCH 28 Playback - Picture effect .. 37 Using the PROGRAM AE function .... 38 Adjusting the exposure manually ...... 40 Focusing manually 41 Superimposing a title 42 Making your own titles 44 Using the built-in the dark - USB Streaming (Windows users only 59 Customizing Your Camcorder... 16 Step 3 Inserting a cassette 18 Editing Dubbing a tape 49 Dubbing a tape easily - Easy dubbing 51 PC Connection (CCD-TRV608 only) Viewing images using your computer - Basics Playing back a tape 29 Viewing the recording on pictures 27 ...
...CCD-TRV107/TRV308/TRV408/ TRV608 only 46 5 END SEARCH 28 Playback - Picture effect .. 37 Using the PROGRAM AE function .... 38 Adjusting the exposure manually ...... 40 Focusing manually 41 Superimposing a title 42 Making your own titles 44 Using the built-in the dark - USB Streaming (Windows users only 59 Customizing Your Camcorder... 16 Step 3 Inserting a cassette 18 Editing Dubbing a tape 49 Dubbing a tape easily - Easy dubbing 51 PC Connection (CCD-TRV608 only) Viewing images using your computer - Basics Playing back a tape 29 Viewing the recording on pictures 27 ...
Operating Instructions
Page 59
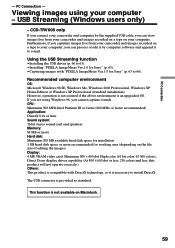
...space for installation 1 GB hard disk space or more recommended for Sony" (p. 63 to 66). CCD-TRV608 only If you connect your camcorder and computer by computer software and append it is not available on your camcorder and images recorded on a tape on Macintosh. 59 This function ...working area (depending on a tape to your computer, you caputure images live from your computer - The USB connector is an upgraded OS. PC Connection - Recommended computer environment OS: Microsoft Windows 98 SE, Windows Me, Windows 2000 Professional, Windows XP Home Edition or Windows XP Professional...
...space for installation 1 GB hard disk space or more recommended for Sony" (p. 63 to 66). CCD-TRV608 only If you connect your camcorder and computer by computer software and append it is not available on your camcorder and images recorded on a tape on Macintosh. 59 This function ...working area (depending on a tape to your computer, you caputure images live from your computer - The USB connector is an upgraded OS. PC Connection - Recommended computer environment OS: Microsoft Windows 98 SE, Windows Me, Windows 2000 Professional, Windows XP Home Edition or Windows XP Professional...
Operating Instructions
Page 61
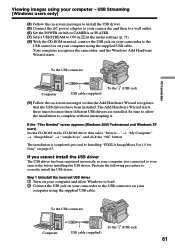
To the USB connector PC Connection Computer To the (USB) jack USB cable (supplied) (9) Follow...procedure to Installing "PIXELA ImageMixer Ver.1.0 for Sony" on page 63. Step 1 Uninstall the incorrect USB driver 1 Turn on your computer and allow the installation to the USB connector on your camcorder to complete without interrupting it. USB Streaming ... so that the Add Hardware Wizard recognizes that the USB drivers have been installed. Your computer recognises the camcorder, and the Windows Add Hardware Wizard starts. To the USB connector To the (USB) jack Computer USB...
To the USB connector PC Connection Computer To the (USB) jack USB cable (supplied) (9) Follow...procedure to Installing "PIXELA ImageMixer Ver.1.0 for Sony" on page 63. Step 1 Uninstall the incorrect USB driver 1 Turn on your computer and allow the installation to the USB connector on your camcorder to complete without interrupting it. USB Streaming ... so that the Add Hardware Wizard recognizes that the USB drivers have been installed. Your computer recognises the camcorder, and the Windows Add Hardware Wizard starts. To the USB connector To the (USB) jack Computer USB...
Operating Instructions
Page 63
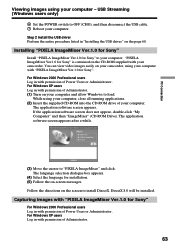
PC Connection Viewing images using your computer, close all running applications. (2) Insert the supplied CD-ROM into the CD-ROM drive of your computer. For Windows XP users Log in with permission of Administrator. (1) Turn on the CD-ROM supplied with "PIXELA ImageMixer Ver.1.0 for Sony... listed in with permission of Power Users or Adminisitrator. Installing "PIXELA ImageMixer Ver.1.0 for Sony" Install "PIXELA ImageMixer Ver.1.0 for installation. (5) Follow the on your camcorder, using your computer with your computer. The language selection dialogue box appears. (4) Select ...
PC Connection Viewing images using your computer, close all running applications. (2) Insert the supplied CD-ROM into the CD-ROM drive of your computer. For Windows XP users Log in with permission of Administrator. (1) Turn on the CD-ROM supplied with "PIXELA ImageMixer Ver.1.0 for Sony... listed in with permission of Power Users or Adminisitrator. Installing "PIXELA ImageMixer Ver.1.0 for Sony" Install "PIXELA ImageMixer Ver.1.0 for installation. (5) Follow the on your camcorder, using your computer with your computer. The language selection dialogue box appears. (4) Select ...

Operating Instructions
Page 65
... then to a wall outlet. (2) Set the POWER switch to CAMERA. (3) Follow the procedure (5) - (8) on page 64, and then connect the AC power adaptor to your camcorder appears in the preview window. Capturing moving images Preview window 1 2 Thumbnail list window (1) Select . (2) Click at the start point to capture and click at the... thumbnail list window. Capturing images Capturing still images Preview window 1 2 Thumbnail list window (1) Select . (2) Click at the stop point to capture using the preview window. PC Connection Viewing images using the preview window.
... then to a wall outlet. (2) Set the POWER switch to CAMERA. (3) Follow the procedure (5) - (8) on page 64, and then connect the AC power adaptor to your camcorder appears in the preview window. Capturing moving images Preview window 1 2 Thumbnail list window (1) Select . (2) Click at the start point to capture and click at the... thumbnail list window. Capturing images Capturing still images Preview window 1 2 Thumbnail list window (1) Select . (2) Click at the stop point to capture using the preview window. PC Connection Viewing images using the preview window.

