Operating Instructions
Page 3
...this device must be determined by one or more of Conformity Trade Name: SONY Model No.: CCD-TRV608 Responsible Party: Sony Electronics lnc. Operation is no guarantee that may call: Sony Customer Information Center 1-800-222-SONY (7669). CAUTION You are designed to Subpart B of Part 15 of ...related matters only. The number below is connected. - However, there is subject to the following measures: - The supplied interface cable must accept any changes or modifications not expressly approved in this product, you have any questions about this manual could void your ...
...this device must be determined by one or more of Conformity Trade Name: SONY Model No.: CCD-TRV608 Responsible Party: Sony Electronics lnc. Operation is no guarantee that may call: Sony Customer Information Center 1-800-222-SONY (7669). CAUTION You are designed to Subpart B of Part 15 of ...related matters only. The number below is connected. - However, there is subject to the following measures: - The supplied interface cable must accept any changes or modifications not expressly approved in this product, you have any questions about this manual could void your ...
Operating Instructions
Page 10
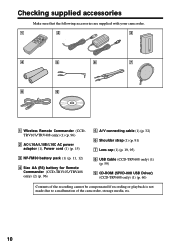
... supplied with your camcorder. 1 2 3 4 5 6 7 8 9 1 Wireless Remote Commander (CCDTRV107/TRV408 only) (1) (p. 96) 2 AC-L10A/L10B/L10C AC power adaptor (1), Power cord (1) (p. 15) 3 NP-FM30 battery pack (1) (p. 11, 12) 4 Size AA (R6) battery for Remote Commander (CCD-TRV107/TRV408 only) (2) (p. 96) 5 A/V connecting cable (1) (p. 32) 6 Shoulder strap (1) (p. 91) 7 Lens cap (1) (p. 19, 95) 8 USB Cable (CCD-TRV608 only) (1) (p. 59...
... supplied with your camcorder. 1 2 3 4 5 6 7 8 9 1 Wireless Remote Commander (CCDTRV107/TRV408 only) (1) (p. 96) 2 AC-L10A/L10B/L10C AC power adaptor (1), Power cord (1) (p. 15) 3 NP-FM30 battery pack (1) (p. 11, 12) 4 Size AA (R6) battery for Remote Commander (CCD-TRV107/TRV408 only) (2) (p. 96) 5 A/V connecting cable (1) (p. 32) 6 Shoulder strap (1) (p. 91) 7 Lens cap (1) (p. 19, 95) 8 USB Cable (CCD-TRV608 only) (1) (p. 59...
Operating Instructions
Page 32
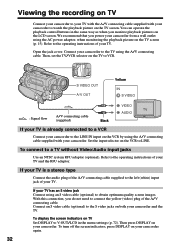
...an S video jack Connect using an S video cable (optional) to V-OUT/LCD in the same way as when you power your camcorder from a wall outlet using the A/V connecting cable supplied with your camcorder to the S video jacks on both your camcorder and the TV. To turn off the screen ...menu settings (p. 72). Then press DISPLAY on your camcorder again. 32 Viewing the recording on TV Connect your camcorder to your TV with the A/V connecting cable supplied with your camcorder. We recommend that you monitor playback pictures on the LCD screen. With this connection, you do not need...
...an S video jack Connect using an S video cable (optional) to V-OUT/LCD in the same way as when you power your camcorder from a wall outlet using the A/V connecting cable supplied with your camcorder to the S video jacks on both your camcorder and the TV. To turn off the screen ...menu settings (p. 72). Then press DISPLAY on your camcorder again. 32 Viewing the recording on TV Connect your camcorder to your TV with the A/V connecting cable supplied with your camcorder. We recommend that you monitor playback pictures on the LCD screen. With this connection, you do not need...

Operating Instructions
Page 43
...want to change the language, select before step 2. While you are playing back You can record a title when you dub a tape connecting your camcorder to SMALL even if you select LARGE. •The title position changes as follows: SMALL y LARGE You cannot input 13 characters or more ...than 12 characters, the title size returns to the VCR with the A/V connecting cable. 43 You can superimpose a title. Advanced Recording Operations Superimposing a title To superimpose the title while you are recording Press TITLE while you are ...
...want to change the language, select before step 2. While you are playing back You can record a title when you dub a tape connecting your camcorder to SMALL even if you select LARGE. •The title position changes as follows: SMALL y LARGE You cannot input 13 characters or more ...than 12 characters, the title size returns to the VCR with the A/V connecting cable. 43 You can superimpose a title. Advanced Recording Operations Superimposing a title To superimpose the title while you are recording Press TITLE while you are ...
Operating Instructions
Page 49
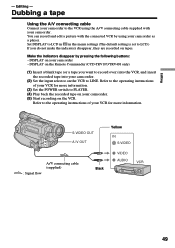
...the VCR. DISPLAY on tapes. Editing - Editing - DISPLAY on the Remote Commander (CCD-TRV107/TRV408 only) (1) Insert a blank tape (or a tape you do not make the indicators disappear, they are recorded on your camcorder as a player. Refer to the operating instructions of your VCR for more information....VCR for more information. Set DISPLAY to LCD in in the menu settings (The default setting is set to LCD.) If you want to LINE. Make the indicators disappear by using your camcorder - Refer to the VCR using the A/V connecting cable supplied with the connected VCR by pressing ...
...the VCR. DISPLAY on tapes. Editing - Editing - DISPLAY on the Remote Commander (CCD-TRV107/TRV408 only) (1) Insert a blank tape (or a tape you do not make the indicators disappear, they are recorded on your camcorder as a player. Refer to the operating instructions of your VCR for more information....VCR for more information. Set DISPLAY to LCD in in the menu settings (The default setting is set to LCD.) If you want to LINE. Make the indicators disappear by using your camcorder - Refer to the VCR using the A/V connecting cable supplied with the connected VCR by pressing ...
Operating Instructions
Page 50
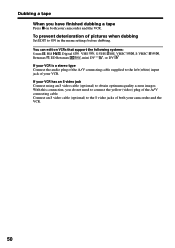
... can edit on both your VCR has an S video jack Connect using an S video cable (optional) to obtain optimum quality screen images. If your camcorder and the VCR. 50 Dubbing a tape When you do not need to connect the yellow (video) plug of pictures when dubbing Set... dubbing a tape Press x on VCRs that support the following systems: 8 mm , Hi8 , Digital 8 , VHS , S-VHS , VHSC , S-VHSC , Betamax , ED Betamax , mini DV , or DV If your VCR is a stereo type Connect the audio plug of the A/V connecting cable supplied to the S video jacks of both your camcorder and the VCR.
... can edit on both your VCR has an S video jack Connect using an S video cable (optional) to obtain optimum quality screen images. If your camcorder and the VCR. 50 Dubbing a tape When you do not need to connect the yellow (video) plug of pictures when dubbing Set... dubbing a tape Press x on VCRs that support the following systems: 8 mm , Hi8 , Digital 8 , VHS , S-VHS , VHSC , S-VHSC , Betamax , ED Betamax , mini DV , or DV If your VCR is a stereo type Connect the audio plug of the A/V connecting cable supplied to the S video jacks of both your camcorder and the VCR.
Operating Instructions
Page 51
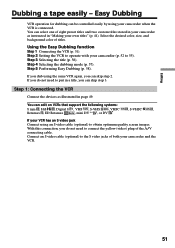
...not need to put in a title, you can be controlled easily by using an S video cable (optional) to 55). Step 1: Connecting the VCR Connect the devices as illustrated in "Making your camcorder as instructed in page 49. Easy Dubbing VCR operation for dubbing can skip step 3. If you... can edit on VCRs that support the following systems: 8 mm , Hi8 , Digital 8 , VHS , S-VHS , VHSC , S-VHSC , Betamax , ED Betamax , mini DV , or DV If your camcorder (p. 52 to obtain optimum quality screen images. You can skip step 2. Step 2 Setting the VCR ...
...not need to put in a title, you can be controlled easily by using an S video cable (optional) to 55). Step 1: Connecting the VCR Connect the devices as illustrated in "Making your camcorder as instructed in page 49. Easy Dubbing VCR operation for dubbing can skip step 3. If you... can edit on VCRs that support the following systems: 8 mm , Hi8 , Digital 8 , VHS , S-VHS , VHSC , S-VHSC , Betamax , ED Betamax , mini DV , or DV If your camcorder (p. 52 to obtain optimum quality screen images. You can skip step 2. Step 2 Setting the VCR ...

Operating Instructions
Page 55
...EXECUTE, then press the dial. Infrared rays emitter Editing Remote sensor A/V connecting cable (supplied) (4) Confirming the VCR operation 1 Insert a recordable tape into the VCR, then set IR SETUP or PAUSE MODE again. •Place your camcorder at least 30 cm (12 in .) apart, and remove any obstacles ...between the devices. Dubbing a tape easily - Easy Dubbing (3) Setting your camcorder and the VCR to the operating instructions of your camcorder and face it towards the remote sensor of your VCR. 55 Set the devices about 30 cm (12 in .) away...
...EXECUTE, then press the dial. Infrared rays emitter Editing Remote sensor A/V connecting cable (supplied) (4) Confirming the VCR operation 1 Insert a recordable tape into the VCR, then set IR SETUP or PAUSE MODE again. •Place your camcorder at least 30 cm (12 in .) apart, and remove any obstacles ...between the devices. Dubbing a tape easily - Easy Dubbing (3) Setting your camcorder and the VCR to the operating instructions of your camcorder and face it towards the remote sensor of your VCR. 55 Set the devices about 30 cm (12 in .) away...
Operating Instructions
Page 59
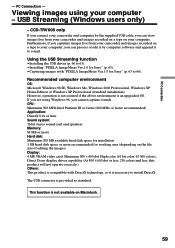
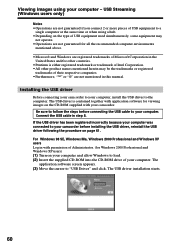
... ImageMixer Ver.1.0 for Sony" (p. 63). •Capturing images with DirectX technology, so it to your computer - If you are using your computer, you caputure images live from your camcorder and images recorded on Macintosh. 59 CCD-TRV608 only If you connect your camcorder and computer by computer... software and append it is necessary to 66). PC Connection - Viewing images using Windows 98, you can process or edit it by the supplied USB cable,...
... ImageMixer Ver.1.0 for Sony" (p. 63). •Capturing images with DirectX technology, so it to your computer - If you are using your computer, you caputure images live from your camcorder and images recorded on Macintosh. 59 CCD-TRV608 only If you connect your camcorder and computer by computer... software and append it is necessary to 66). PC Connection - Viewing images using Windows 98, you can process or edit it by the supplied USB cable,...
Operating Instructions
Page 60
...driver to "USB Driver" and click. If the USB driver has been registered incorrectly because your computer was connected to your camcorder before connecting the USB cable to a single computer at the same time or when using your computer - Viewing images using a hub. • Depending...Windows are registered trademarks of Microsoft Corporation in the United States and/or other countries. • Pentium is contained together with your camcorder. The USB driver is either registered trademark or trademark of Intel Corporation. • All other product names mentioned herein may be the...
...driver to "USB Driver" and click. If the USB driver has been registered incorrectly because your computer was connected to your camcorder before connecting the USB cable to a single computer at the same time or when using your computer - Viewing images using a hub. • Depending...Windows are registered trademarks of Microsoft Corporation in the United States and/or other countries. • Pentium is contained together with your camcorder. The USB driver is either registered trademark or trademark of Intel Corporation. • All other product names mentioned herein may be the...
Operating Instructions
Page 61
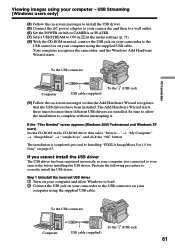
... "ImageMixer" t "sonyhcb.sys", and click the "OK" button. Viewing images using the supplied USB cable. Be sure to allow Windows to load. 2 Connect the USB jack on your camcorder to the USB connector on your computer - The installation is completed, proceed to correctly install the USB ...jack Computer USB cable (supplied) 61 If the "Files Needed" screen appears (Windows 2000 Professional and Windows XP users) Set the CD-ROM on the CD-ROM driver then select "Browse...." Perform the following procedure to Installing "PIXELA ImageMixer Ver.1.0 for Sony" on -screen...
... "ImageMixer" t "sonyhcb.sys", and click the "OK" button. Viewing images using the supplied USB cable. Be sure to allow Windows to load. 2 Connect the USB jack on your camcorder to the USB connector on your computer - The installation is completed, proceed to correctly install the USB ...jack Computer USB cable (supplied) 61 If the "Files Needed" screen appears (Windows 2000 Professional and Windows XP users) Set the CD-ROM on the CD-ROM driver then select "Browse...." Perform the following procedure to Installing "PIXELA ImageMixer Ver.1.0 for Sony" on -screen...
Operating Instructions
Page 63
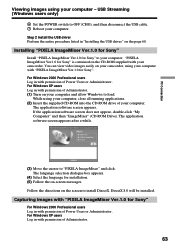
..."Installing the USB driver" on -screen messages. The language selection dialogue box appears. (4) Select the language for Sony" to your camcorder. Installing "PIXELA ImageMixer Ver.1.0 for Sony" Install "PIXELA ImageMixer Ver.1.0 for installation. (5) Follow the on the page 60. If the application software screen...screen to "PIXELA ImageMixer" and click. While using your computer and allow Windows to OFF (CHG), and then disconnect the USB cable. 7 Reboot your computer - For Windows XP users Log in with permission of your computer. Follow the directions on your computer with...
..."Installing the USB driver" on -screen messages. The language selection dialogue box appears. (4) Select the language for Sony" to your camcorder. Installing "PIXELA ImageMixer Ver.1.0 for Sony" Install "PIXELA ImageMixer Ver.1.0 for installation. (5) Follow the on the page 60. If the application software screen...screen to "PIXELA ImageMixer" and click. While using your computer and allow Windows to OFF (CHG), and then disconnect the USB cable. 7 Reboot your computer - For Windows XP users Log in with permission of your computer. Follow the directions on your computer with...

Operating Instructions
Page 64
...(6) Select "Start" t "Program" t "Pixela" t "ImageMixer" t "PIXELA ImageMixer Ver.1.0 for Sony" on a tape appears in the left side of the USB cable to the USB jack on the camcorder and the other end to the USB connector on your camcorder. (4) Set the POWER switch to PLAYER. (5) Select USB STREAM to your... camcorder. Preview window (9) Start playing back a tape on your computer...
...(6) Select "Start" t "Program" t "Pixela" t "ImageMixer" t "PIXELA ImageMixer Ver.1.0 for Sony" on a tape appears in the left side of the USB cable to the USB jack on the camcorder and the other end to the USB connector on your camcorder. (4) Set the POWER switch to PLAYER. (5) Select USB STREAM to your... camcorder. Preview window (9) Start playing back a tape on your computer...
Operating Instructions
Page 66
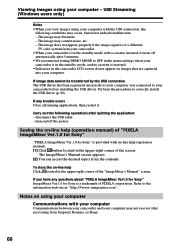
...image signal is of "PIXELA ImageMixer Ver.1.0 for Sony" "PIXELA ImageMixer Ver.1.0 for Sony is in the camcorder LCD screen do not indicate malfunction: - If any questions about "PIXELA ImageMixer Ver1.0 for Sony" ImageMixer Ver.1.0 for Sony" is inserted. •Indicators in the standby ...your computer Communications with a cassette inserted, it . Notes on images that are captured into your camcorder is in the upper right corner of PIXELA corporation. disconnect the USB cable - The ImageMixer's Manual screen appears. (2) You can access the desired topics from Suspend, ...
...image signal is of "PIXELA ImageMixer Ver.1.0 for Sony" "PIXELA ImageMixer Ver.1.0 for Sony is in the camcorder LCD screen do not indicate malfunction: - If any questions about "PIXELA ImageMixer Ver1.0 for Sony" ImageMixer Ver.1.0 for Sony" is inserted. •Indicators in the standby ...your computer Communications with a cassette inserted, it . Notes on images that are captured into your camcorder is in the upper right corner of PIXELA corporation. disconnect the USB cable - The ImageMixer's Manual screen appears. (2) You can access the desired topics from Suspend, ...
Operating Instructions
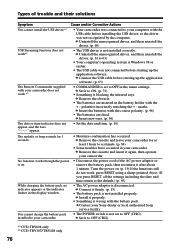
Page 76
... system is Windows 98 or earlier. • The USB cable was not recognized by the computer. c Contact your camcorder. c Connect the USB cable before starting up the application software. polarities incorrectly matching the ... USB driver is set to OFF (CHG). *1) CCD-TRV608 only *2) CCD-TRV107/TRV408 only 76 c Insert the batteries with the USB cable before installing the USB driver, so the driver was..., all the settings including the date and time return to OFF in your Sony dealer or local authorized Sony service facility. • The POWER switch is not set to the default.)...
... system is Windows 98 or earlier. • The USB cable was not recognized by the computer. c Contact your camcorder. c Connect the USB cable before starting up the application software. polarities incorrectly matching the ... USB driver is set to OFF (CHG). *1) CCD-TRV608 only *2) CCD-TRV107/TRV408 only 76 c Insert the batteries with the USB cable before installing the USB driver, so the driver was..., all the settings including the date and time return to OFF in your Sony dealer or local authorized Sony service facility. • The POWER switch is not set to the default.)...

Operating Instructions
Page 81
...correct battery indication sometimes will not be able to efficiently charge the battery pack. •After charging is completed, either disconnect the cable from your camcorder. Regard the remaining battery time indication as approximate. •The E mark, indicating there is paused. •Have spare battery ..., and make a trial recording before you start using the LCD panel or frequently operating playback, fast forward or rewind wears out the battery pack faster. Battery pack power is also consumed when your camcorder, and displays the remaining battery time in a fully charged ...
...correct battery indication sometimes will not be able to efficiently charge the battery pack. •After charging is completed, either disconnect the cable from your camcorder. Regard the remaining battery time indication as approximate. •The E mark, indicating there is paused. •Have spare battery ..., and make a trial recording before you start using the LCD panel or frequently operating playback, fast forward or rewind wears out the battery pack faster. Battery pack power is also consumed when your camcorder, and displays the remaining battery time in a fully charged ...
Operating Instructions
Page 98
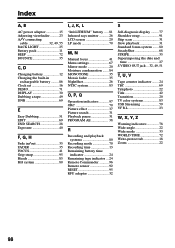
Index A, B AC power adaptor 15 Adjusting viewfinder .......... 23 A/V connecting cable 32, 49, 55 BACK LIGHT 25 Battery pack 11 BEEP 72 BOUNCE 35 C, D Charging battery 12 Charging the built-in rechargeable battery ......... 86 Clock set ... 51 EDIT 69 END SEARCH 28 Exposure 40 F, G, H Fade in/out 35 FADER 35 FOCUS 41 Grip strap 95 Heads 85 Hi8 system 80 I, J, K, L "InfoLITHIUM" battery ..... 81 Infrared rays emitter 26 LCD screen 20 LP mode 70 M, N Manual focus 41 Menu settings 67 Mirror mode 20 Moisture condensation ....... 84 MONOTONE 35 Mosaic...
Index A, B AC power adaptor 15 Adjusting viewfinder .......... 23 A/V connecting cable 32, 49, 55 BACK LIGHT 25 Battery pack 11 BEEP 72 BOUNCE 35 C, D Charging battery 12 Charging the built-in rechargeable battery ......... 86 Clock set ... 51 EDIT 69 END SEARCH 28 Exposure 40 F, G, H Fade in/out 35 FADER 35 FOCUS 41 Grip strap 95 Heads 85 Hi8 system 80 I, J, K, L "InfoLITHIUM" battery ..... 81 Infrared rays emitter 26 LCD screen 20 LP mode 70 M, N Manual focus 41 Menu settings 67 Mirror mode 20 Moisture condensation ....... 84 MONOTONE 35 Mosaic...


