
Service Manual
Page 2
...SONY. SAFETY CHECK-OUT After correcting the original service problem, perform the following safety checks before releasing the set to +60°C) Dimentions (Approx.) 4 1/4 x 4 1/4 x 7 5/8 in. 107 x 107 x 193 mm)(w/h/d) Mass (Approx.) CCD-TR315/TR716 : 1 lb 11 oz (790 g) CCD-TR416/TR416PK/TR516/ TR516PK : 1 lb 11 oz (780 g) CCD-TRV16... are "pinched" or contact high-wattage resistors. 3. Check the area of the soldering iron around 270°C during a previous repair. Point them out to +60°C) Dimentions (Approx.) 5 x 1 9/16 x 2 1/2 in operating mode Operating temperature 32...
...SONY. SAFETY CHECK-OUT After correcting the original service problem, perform the following safety checks before releasing the set to +60°C) Dimentions (Approx.) 4 1/4 x 4 1/4 x 7 5/8 in. 107 x 107 x 193 mm)(w/h/d) Mass (Approx.) CCD-TR315/TR716 : 1 lb 11 oz (790 g) CCD-TR416/TR416PK/TR516/ TR516PK : 1 lb 11 oz (780 g) CCD-TRV16... are "pinched" or contact high-wattage resistors. 3. Check the area of the soldering iron around 270°C during a previous repair. Point them out to +60°C) Dimentions (Approx.) 5 x 1 9/16 x 2 1/2 in operating mode Operating temperature 32...

Service Manual
Page 5
POWER SUPPLY DURING REPAIRS SERVICE NOTE In this . TO TAKE OUT A CASSETTE WHEN NOT EJECT (FORCE EJECT) 1 Refer to take care not to damage) to prevent this unit, about ... supplied (8.4V) to the battery terminal using adhesive tape, etc. Method 1. Take note of a tape to remove the front panel block. 2 Refer to use during repairs.
POWER SUPPLY DURING REPAIRS SERVICE NOTE In this . TO TAKE OUT A CASSETTE WHEN NOT EJECT (FORCE EJECT) 1 Refer to take care not to damage) to prevent this unit, about ... supplied (8.4V) to the battery terminal using adhesive tape, etc. Method 1. Take note of a tape to remove the front panel block. 2 Refer to use during repairs.

Service Manual
Page 6
... first time [4] : Occurred fourth time [2] : Occurred second time [5] : Occurred fifth time [3] : Occurred third time [6] : Occurred the last time 3-3. tion manual. This 5-character display indicates the "repaired by customer Indicates the appropriate step to "VTR or PLAYER", and continue pressing the "STOP" key for 5 seconds continuously. Self-diagnosis codes Order of Backup...
... first time [4] : Occurred fourth time [2] : Occurred second time [5] : Occurred fifth time [3] : Occurred third time [6] : Occurred the last time 3-3. tion manual. This 5-character display indicates the "repaired by customer Indicates the appropriate step to "VTR or PLAYER", and continue pressing the "STOP" key for 5 seconds continuously. Self-diagnosis codes Order of Backup...

Service Manual
Page 7
..., connect, and perform operations from the beginning. Clean with the optional cleaning cassette. UNLOAD direction loading motor time- Self-diagnosis Code Table Self-diagnosis Code Repaired by: Block Detailed Function Code Symptom/State Correction C 2 1 0 0 Condensation. C 2 2 0 0 Video head is not performed. C 3 1 4 2 FG fault during normal drum operations Load the tape again, and...
..., connect, and perform operations from the beginning. Clean with the optional cleaning cassette. UNLOAD direction loading motor time- Self-diagnosis Code Table Self-diagnosis Code Repaired by: Block Detailed Function Code Symptom/State Correction C 2 1 0 0 Condensation. C 2 2 0 0 Video head is not performed. C 3 1 4 2 FG fault during normal drum operations Load the tape again, and...

Service Manual
Page 8
... from instruction manual of DD-117 and PJ-90/91 Boards 2-4 2-11. Removal of CCD-TRV36/TRV43/TRV46. Circuit Boards Location 2-8 2-17. Audio Block Diagram 3-19 3-7. Removal of... 1-14 Tips for using the battery pack 1-15 Maintenance information and precautions 1-15 Using your camcorder abroad 1-17 Truoble check 1-17 Self-diagnosis display 1-18 Identifying the parts 1-18 Warning Indicators... Flexible Boards and Flat Cables Location 2-8 3. Power Supply During Repairs 5 2. TABLE OF CONTENTS SERVICE NOTE 2. Removal of Battery Panel Block 2-3 2-7.
... from instruction manual of DD-117 and PJ-90/91 Boards 2-4 2-11. Removal of CCD-TRV36/TRV43/TRV46. Circuit Boards Location 2-8 2-17. Audio Block Diagram 3-19 3-7. Removal of... 1-14 Tips for using the battery pack 1-15 Maintenance information and precautions 1-15 Using your camcorder abroad 1-17 Truoble check 1-17 Self-diagnosis display 1-18 Identifying the parts 1-18 Warning Indicators... Flexible Boards and Flat Cables Location 2-8 3. Power Supply During Repairs 5 2. TABLE OF CONTENTS SERVICE NOTE 2. Removal of Battery Panel Block 2-3 2-7.

Service Manual
Page 10
...Precautions on Adjusting 5-36 3-1-3. Recording Mode (Standard 8/Hi8) switching (Hi8 model 5-39 3-1-8. Test mode setting 5-39 2. Battery End Adjustment (VC-215 board 5-45 3-3. C OUT Level Adjustment (VC-215 board 5-49 6. REPAIR PARTS LIST 6-1. Mechanism Chassis Assembly 6-13 6-2. Tape.../TR416/TR416PK CCD-TRV16/TRV16PK 5-54 11. Preparations before Adjustment 5-35 3-1-1. Switch check (2 5-43 6. CAP FG Offset Adjustment (VC-215 board 5-46 2. Electrical Parts List 6-14 Hi8 REC Y Current Adjustment (VC-215 board) (CCD-TR516/TR516PK/TR716 CCD-TRV36/ TRV36PK/...
...Precautions on Adjusting 5-36 3-1-3. Recording Mode (Standard 8/Hi8) switching (Hi8 model 5-39 3-1-8. Test mode setting 5-39 2. Battery End Adjustment (VC-215 board 5-45 3-3. C OUT Level Adjustment (VC-215 board 5-49 6. REPAIR PARTS LIST 6-1. Mechanism Chassis Assembly 6-13 6-2. Tape.../TR416/TR416PK CCD-TRV16/TRV16PK 5-54 11. Preparations before Adjustment 5-35 3-1-1. Switch check (2 5-43 6. CAP FG Offset Adjustment (VC-215 board 5-46 2. Electrical Parts List 6-14 Hi8 REC Y Current Adjustment (VC-215 board) (CCD-TR516/TR516PK/TR716 CCD-TRV36/ TRV36PK/...

Service Manual
Page 103
...oscillator will be disrupted and operations will vibrate up and down or left and right during hand-shake correction operations. Precautions on the repair parts. Handle it with care as if it was attached to the adjusting method after replacement. Type A : ENC03EA or ENC ...according to . Page F F Address Data 43 58 44 5E Note: The sensor sensitivity of SE451 and SE452 of repair parts. Angular Velocity Sensor Sensitivity Check (CCD-TR716/TRV43/TRV46/TRV46PK) • This adjustment is written only on Angular Velocity Sensor The sensor incorporates a precision oscillator....
...oscillator will be disrupted and operations will vibrate up and down or left and right during hand-shake correction operations. Precautions on the repair parts. Handle it with care as if it was attached to the adjusting method after replacement. Type A : ENC03EA or ENC ...according to . Page F F Address Data 43 58 44 5E Note: The sensor sensitivity of SE451 and SE452 of repair parts. Angular Velocity Sensor Sensitivity Check (CCD-TR716/TRV43/TRV46/TRV46PK) • This adjustment is written only on Angular Velocity Sensor The sensor incorporates a precision oscillator....

Service Manual
Page 120
...and return the data to the original condition. 1. Test mode setting Set/release each test mode. Recording Mode (Standard 8/Hi8) switching (Hi8 model) The record mode (Standard 8/Hi8) of the all adjustments, cancell the ser- And select page: 0, address: 01, and set by pressing the ...: 00. Perform resetting.) 2) After data on the adjusting remote commander. The playback mode (Standard 8/Hi8) switches automaticaly according to 00 after completing adjustments/repairs and press the PAUSE button of the tape played back. Output Level and Impedance Video output Phono jack...
...and return the data to the original condition. 1. Test mode setting Set/release each test mode. Recording Mode (Standard 8/Hi8) switching (Hi8 model) The record mode (Standard 8/Hi8) of the all adjustments, cancell the ser- And select page: 0, address: 01, and set by pressing the ...: 00. Perform resetting.) 2) After data on the adjusting remote commander. The playback mode (Standard 8/Hi8) switches automaticaly according to 00 after completing adjustments/repairs and press the PAUSE button of the tape played back. Output Level and Impedance Video output Phono jack...

Service Manual
Page 121
... mechanism starts shifting 1A the last time Lower: MSW code when the last emergency occurs 1B Lower: Target MSW code of the remote commander after repairs/adjustments. In the same way, when the second emergency occurs, the data corresponding to the emergency will be written in the above addresses (10 to...
... mechanism starts shifting 1A the last time Lower: MSW code when the last emergency occurs 1B Lower: Target MSW code of the remote commander after repairs/adjustments. In the same way, when the second emergency occurs, the data corresponding to the emergency will be written in the above addresses (10 to...

Service Manual
Page 141
Hong Kong model is abbreviated as HK. No. 1 2 3 *4 5 5 5 5 Part No. SECTION 6 REPAIR PARTS LIST • Abbreviation Canadian model is abbreviated as CND. Taiwan model is abbreviated as TW. 6-1-1. Description Remark 3-987-645-01 CABINET (N) (... The components identified by mark ! Replace only with no reference number in the exploded views are not supplied. CCD-TR315/TR416/TR416PK/TR516/TR516PK/TR716 CCD-TRV16/TRV16PK/TRV36/TRV36PK/TRV43/TRV46/TRV46PK 6-1. EXPLODED VIEWS NOTE: • Items marked "*" are not stocked since they are critical for routine service. ...
Hong Kong model is abbreviated as HK. No. 1 2 3 *4 5 5 5 5 Part No. SECTION 6 REPAIR PARTS LIST • Abbreviation Canadian model is abbreviated as CND. Taiwan model is abbreviated as TW. 6-1-1. Description Remark 3-987-645-01 CABINET (N) (... The components identified by mark ! Replace only with no reference number in the exploded views are not supplied. CCD-TR315/TR416/TR416PK/TR516/TR516PK/TR716 CCD-TRV16/TRV16PK/TRV36/TRV36PK/TRV43/TRV46/TRV46PK 6-1. EXPLODED VIEWS NOTE: • Items marked "*" are not stocked since they are critical for routine service. ...
Operating Instructions
Page 4
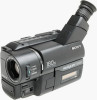
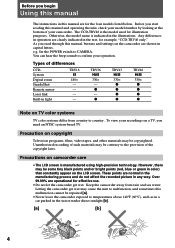
... and/or bright points (red, blue or green in color) that constantly appear on camcorder care •The LCD screen is indicated in light TRV16 h 180× - - - - Letting the camcorder get wet. Before you begin Using this manual The instructions in this manual are for illustration...this malfunction cannot be repaired [a]. •Never leave the camcorder exposed to the provision of such materials may be contrary to temperatures above 140°F (60°C), such as in a car parked in operation are operational for example, "CCD-TRV46 only." Keep the camcorder away from country to...
... and/or bright points (red, blue or green in color) that constantly appear on camcorder care •The LCD screen is indicated in light TRV16 h 180× - - - - Letting the camcorder get wet. Before you begin Using this manual The instructions in this manual are for illustration...this malfunction cannot be repaired [a]. •Never leave the camcorder exposed to the provision of such materials may be contrary to temperatures above 140°F (60°C), such as in a car parked in operation are operational for example, "CCD-TRV46 only." Keep the camcorder away from country to...
Operating Instructions
Page 66
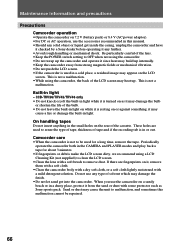
...Camcorder care •When the camcorder is not to be repaired. 66 If there are used for about 3 minutes. •If fingerprints or debris make the LCD screen dirty, we recommend using the camcorder. •Do not wrap up the camcorder...get inside the casing, unplug the camcorder and have it checked by a Sony dealer before operating it , remove them with a soft cloth. •Clean the camcorder body with a dry soft cloth,... it is not a malfunction. When you use the camcorder on it any solid object or liquid get into the camcorder. CCD-TRV36/TRV43/TRV46 only • Do not knock or...
...Camcorder care •When the camcorder is not to be repaired. 66 If there are used for about 3 minutes. •If fingerprints or debris make the LCD screen dirty, we recommend using the camcorder. •Do not wrap up the camcorder...get inside the casing, unplug the camcorder and have it checked by a Sony dealer before operating it , remove them with a soft cloth. •Clean the camcorder body with a dry soft cloth,... it is not a malfunction. When you use the camcorder on it any solid object or liquid get into the camcorder. CCD-TRV36/TRV43/TRV46 only • Do not knock or...


