
Operating Instructions
Page 14
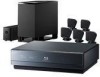
Getting Started Getting Started Unpacking BDV-IT1000ES • Front speakers (2) • Foot pads (thick 2, thin 2) • Video cord (1) • Surround speakers (2) • Center speaker (1) • Subwoofer (1) • Desktop stands (4) • Wall mounting brackets (top) (5) • Remote commander (remote) (1) • Wall mounting brackets (bottom) (5) • Bracket covers (10) • Screws (5) • R6 (size AA) batteries (2) &#...
Getting Started Getting Started Unpacking BDV-IT1000ES • Front speakers (2) • Foot pads (thick 2, thin 2) • Video cord (1) • Surround speakers (2) • Center speaker (1) • Subwoofer (1) • Desktop stands (4) • Wall mounting brackets (top) (5) • Remote commander (remote) (1) • Wall mounting brackets (bottom) (5) • Bracket covers (10) • Screws (5) • R6 (size AA) batteries (2) &#...
Operating Instructions
Page 18
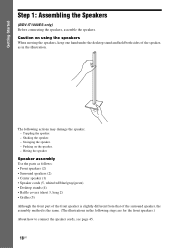
... method is slightly different from that of the speaker, as in the following actions may damage the speaker. - Caution on the speaker. - Hitting the speaker Speaker assembly Use the parts as follows: • Front speakers (2) • Surround speakers (2) • Center speaker (1) • Speaker cords (5, white/red/blue/gray/green) • Desktop stands (4) • Baffle covers (short 3, long 2) • Grilles (5) Although...
... method is slightly different from that of the speaker, as in the following actions may damage the speaker. - Caution on the speaker. - Hitting the speaker Speaker assembly Use the parts as follows: • Front speakers (2) • Surround speakers (2) • Center speaker (1) • Speaker cords (5, white/red/blue/gray/green) • Desktop stands (4) • Baffle covers (short 3, long 2) • Grilles (5) Although...

Operating Instructions
Page 19
...; Surround right speaker (R): SUR R (gray) • Center speaker: CENTER (green) Front and surround speakers 1 Thread the speaker cord through the hole in the bottom of the desktop stand Speaker cord 19US Ex. In this case, you assemble the speakers. • When assembling, take care not to identify the speakers Check the label on a wall by attaching speaker stands (WS-IT1000F...
...; Surround right speaker (R): SUR R (gray) • Center speaker: CENTER (green) Front and surround speakers 1 Thread the speaker cord through the hole in the bottom of the desktop stand Speaker cord 19US Ex. In this case, you assemble the speakers. • When assembling, take care not to identify the speakers Check the label on a wall by attaching speaker stands (WS-IT1000F...

Operating Instructions
Page 20
Be sure not to touch the speaker unit. 20US Screw Front speaker Surround speaker Note • When assembling, take care not to lose the screw. The removed screw is used when attaching the desktop stand. Getting Started 2 Remove the screw from the speaker.
Be sure not to touch the speaker unit. 20US Screw Front speaker Surround speaker Note • When assembling, take care not to lose the screw. The removed screw is used when attaching the desktop stand. Getting Started 2 Remove the screw from the speaker.

Operating Instructions
Page 22
...8226; When assembling, take care not to touch the speaker unit. 5 Take up slack in Step 2. Getting Started 4 Attach the speaker to touch the speaker units. 22US Front speaker , Adjust the length of the desktop stand and secure the speaker cord by running it through the slot. Screw Note ...• When assembling, take care not to the desktop stand. Be careful with the screw ...
...8226; When assembling, take care not to touch the speaker unit. 5 Take up slack in Step 2. Getting Started 4 Attach the speaker to touch the speaker units. 22US Front speaker , Adjust the length of the desktop stand and secure the speaker cord by running it through the slot. Screw Note ...• When assembling, take care not to the desktop stand. Be careful with the screw ...

Operating Instructions
Page 26
... grille. Attach the foot pads (thick) to the front of the speaker and the foot pads (thin) to the bottom of the center speaker Side view Foot pads (thin) Foot pads (thin) Foot pads (thick) 26US "SONY" mark Grille Note • When assembling, take care not to touch... the speaker units. • Be sure to the speaker. Foot pads (thick) Bottom of the speaker. Getting Started 5 Attach the grille to use the speakers with their grilles attached. • Do not push...
... grille. Attach the foot pads (thick) to the front of the speaker and the foot pads (thin) to the bottom of the center speaker Side view Foot pads (thin) Foot pads (thin) Foot pads (thick) 26US "SONY" mark Grille Note • When assembling, take care not to touch... the speaker units. • Be sure to the speaker. Foot pads (thick) Bottom of the speaker. Getting Started 5 Attach the grille to use the speakers with their grilles attached. • Do not push...

Operating Instructions
Page 27
Ex. Front speaker 27US Getting Started Fully-assembled illustration Front left speaker (L): White label Front right speaker (R): Surround left speaker (L): Surround right speaker (R): Red label Blue label Gray label White Red Blue Gray Green Center speaker: Green label Note • When moving the front or surround speaker, hold the desktop stand part (1), not the speaker part (2).
Ex. Front speaker 27US Getting Started Fully-assembled illustration Front left speaker (L): White label Front right speaker (R): Surround left speaker (L): Surround right speaker (R): Red label Blue label Gray label White Red Blue Gray Green Center speaker: Green label Note • When moving the front or surround speaker, hold the desktop stand part (1), not the speaker part (2).
Operating Instructions
Page 28
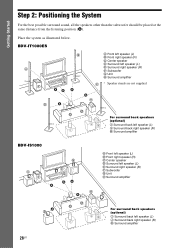
... 28US A H D A A A JK I For surround back speakers (optional) I Surround back left speaker (L) J Surround back right speaker (R) K Surround amplifier BDV-IS1000 A F B C G AA A A A Front left speaker (L) B Front right speaker (R) C Center speaker D Surround left speaker (L) E Surround right speaker (R) F Subwoofer G Unit H Surround amplifier H E A D A A JK I For surround back speakers (optional) I Surround back left speaker (L) E Surround right speaker (R) A F Subwoofer G Unit C H Surround amplifier G F AA A E * Speaker stands are not supplied. Place the...
... 28US A H D A A A JK I For surround back speakers (optional) I Surround back left speaker (L) J Surround back right speaker (R) K Surround amplifier BDV-IS1000 A F B C G AA A A A Front left speaker (L) B Front right speaker (R) C Center speaker D Surround left speaker (L) E Surround right speaker (R) F Subwoofer G Unit H Surround amplifier H E A D A A JK I For surround back speakers (optional) I Surround back left speaker (L) E Surround right speaker (R) A F Subwoofer G Unit C H Surround amplifier G F AA A E * Speaker stands are not supplied. Place the...

Operating Instructions
Page 29
... type of the speakers, Sony recommends that you change the settings. It may result. • Do not use the surround amplifier for the surround back speakers. For details, see "Using an S-AIR Product" (page 89). Subject to direct sunlight • Use caution when placing the speakers and/or speaker stands attached to the speakers on a specially treated...
... type of the speakers, Sony recommends that you change the settings. It may result. • Do not use the surround amplifier for the surround back speakers. For details, see "Using an S-AIR Product" (page 89). Subject to direct sunlight • Use caution when placing the speakers and/or speaker stands attached to the speakers on a specially treated...
Operating Instructions
Page 123
...color irregularity persists, turn off the TV set once, then turn it on after 15 to 30 minutes. • If howling occurs, reposition the speakers farther away from the TV set. • Make sure that no picture. • The video connecting cords are not connected securely. • ...seconds to reset the video output resolution to the lowest resolution. Additional Information Picture Symptom Remedy There is no magnetic object (magnetic latch on a TV stand, health care device, toy, etc.) is fixed. Video signals are damaged. • The unit is not connected to the correct TV input jack...
...color irregularity persists, turn off the TV set once, then turn it on after 15 to 30 minutes. • If howling occurs, reposition the speakers farther away from the TV set. • Make sure that no picture. • The video connecting cords are not connected securely. • ...seconds to reset the video output resolution to the lowest resolution. Additional Information Picture Symptom Remedy There is no magnetic object (magnetic latch on a TV stand, health care device, toy, etc.) is fixed. Video signals are damaged. • The unit is not connected to the correct TV input jack...
Operating Instructions
Page 136
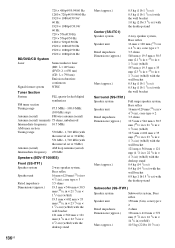
... oz) 0.5 kg (1 lb 1 3/4 oz) with the wall bracket 1.0 kg (2 lbs 3 1/2 oz) with the desktop stand Center (SS-ITC1) Speaker system Speaker unit Rated impedance Dimensions (approx.) Mass (approx.) 2-way speaker system, Bass reflex 16 mm × 120 mm (21/32 in × 4 3/4 in), cone type × 3...215; 22 1/8 in × 4 7/8 in) (w/h/d) with the desktop stand 0.4 kg (14 1/4 oz) 0.4 kg (14 1/4 oz) with the wall bracket 0.9 kg (1 lb 15 7/8 oz) with the desktop stand Subwoofer (SS-ITW1) Speaker system Speaker unit Rated impedance Dimensions (approx.) Mass (approx.) Subwoofer system, Bass reflex ...
... oz) 0.5 kg (1 lb 1 3/4 oz) with the wall bracket 1.0 kg (2 lbs 3 1/2 oz) with the desktop stand Center (SS-ITC1) Speaker system Speaker unit Rated impedance Dimensions (approx.) Mass (approx.) 2-way speaker system, Bass reflex 16 mm × 120 mm (21/32 in × 4 3/4 in), cone type × 3...215; 22 1/8 in × 4 7/8 in) (w/h/d) with the desktop stand 0.4 kg (14 1/4 oz) 0.4 kg (14 1/4 oz) with the wall bracket 0.9 kg (1 lb 15 7/8 oz) with the desktop stand Subwoofer (SS-ITW1) Speaker system Speaker unit Rated impedance Dimensions (approx.) Mass (approx.) Subwoofer system, Bass reflex ...


