
Operating Instructions
Page 6
Table of Contents WARNING 2 Precautions 3 Guide to Parts and Controls 8 Hookups and Settings Hooking Up the Player 13 Step 1: Connecting to Your TV 14 Connecting to an HDMI jack 15 About the BRAVIA Sync features (for HDMI connections only 16... time and play information 34 Adjusting pictures and sound for videos 34 Playing CDs 36 Playing Photo Files 37 Settings and Adjustments Using the Settings Displays 39 Network Update 40 Video Settings 41 Audio Settings 44 BD/DVD Viewing Settings 46 Photo Settings 48 System Settings 49 Network Settings 50 Easy Setup 52 Resetting 52 6
Table of Contents WARNING 2 Precautions 3 Guide to Parts and Controls 8 Hookups and Settings Hooking Up the Player 13 Step 1: Connecting to Your TV 14 Connecting to an HDMI jack 15 About the BRAVIA Sync features (for HDMI connections only 16... time and play information 34 Adjusting pictures and sound for videos 34 Playing CDs 36 Playing Photo Files 37 Settings and Adjustments Using the Settings Displays 39 Network Update 40 Video Settings 41 Audio Settings 44 BD/DVD Viewing Settings 46 Photo Settings 48 System Settings 49 Network Settings 50 Easy Setup 52 Resetting 52 6
Operating Instructions
Page 8
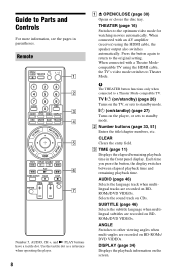
...amplifier (receiver) using the HDMI cable, the TV's video mode switches to Theater Mode. TV [/1 (on/standby) (page 26) Turns on the TV, or sets to standby mode. [/1 (on/standby) (page 27) Turns on BD-ROMs/ DVD VIDEOs. Remote Number 5, AUDIO, CH +, and N PLAY buttons have a ... automatically. ANGLE Switches to other viewing angles when multi-angles are recorded on the player, or sets to standby mode. Use the tactile dot as a reference when operating the player. 8 A Z OPEN/CLOSE (page 30) Opens or closes the disc tray. B Number buttons (page 33, 51) Enters the title/chapter numbers, ...
...amplifier (receiver) using the HDMI cable, the TV's video mode switches to Theater Mode. TV [/1 (on/standby) (page 26) Turns on the TV, or sets to standby mode. [/1 (on/standby) (page 27) Turns on BD-ROMs/ DVD VIDEOs. Remote Number 5, AUDIO, CH +, and N PLAY buttons have a ... automatically. ANGLE Switches to other viewing angles when multi-angles are recorded on the player, or sets to standby mode. Use the tactile dot as a reference when operating the player. 8 A Z OPEN/CLOSE (page 30) Opens or closes the disc tray. B Number buttons (page 33, 51) Enters the title/chapter numbers, ...
Operating Instructions
Page 10
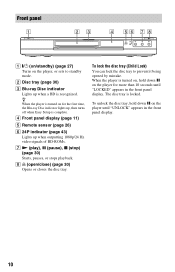
.../close) (page 30) Opens or closes the disc tray. The disc tray is turned on, hold down X on the player, or sets to prevent it being opened by mistake. When the player is locked. Front panel A [/1 (on/standby) (page 27) Turns on the player for the first time, the Blu-ray Disc indicator lights up, then turns off when...
.../close) (page 30) Opens or closes the disc tray. The disc tray is turned on, hold down X on the player, or sets to prevent it being opened by mistake. When the player is locked. Front panel A [/1 (on/standby) (page 27) Turns on the player for the first time, the Blu-ray Disc indicator lights up, then turns off when...
Operating Instructions
Page 13
Hookups and Settings 13 Do not connect the AC power cord until you have the following items. • Audio/video cable (phono plug ×3) (1) • AC power cord (1) • Remote commander (remote) (1) • Size AA (R6) batteries (2) Follow steps 1 through 7 to hook up and adjust the settings of the player. Hookups and Settings Hooking Up the Player Check that you reach "Step 5: Connecting the AC Power Cord" (page 25).
Hookups and Settings 13 Do not connect the AC power cord until you have the following items. • Audio/video cable (phono plug ×3) (1) • AC power cord (1) • Remote commander (remote) (1) • Size AA (R6) batteries (2) Follow steps 1 through 7 to hook up and adjust the settings of the player. Hookups and Settings Hooking Up the Player Check that you reach "Step 5: Connecting the AC Power Cord" (page 25).
Operating Instructions
Page 15
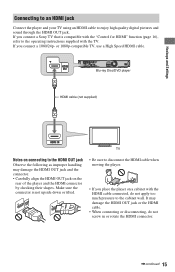
If you connect a Sony TV that is not upside down or tilted. • Be sure to disconnect the HDMI cable when moving the player. • If you connect a 1080/24p- or 1080p-compatible...apply too much pressure to enjoy high quality digital pictures and sound through the HDMI OUT jack. Blu-ray Disc/DVD player HDMI cable (not supplied) TV Notes on connecting to the operating instructions supplied with the HDMI ...OUT jack on a cabinet with the TV. Hookups and Settings Connecting to an HDMI jack Connect the player and your TV using an HDMI cable to the cabinet wall. If you place ...
If you connect a Sony TV that is not upside down or tilted. • Be sure to disconnect the HDMI cable when moving the player. • If you connect a 1080/24p- or 1080p-compatible...apply too much pressure to enjoy high quality digital pictures and sound through the HDMI OUT jack. Blu-ray Disc/DVD player HDMI cable (not supplied) TV Notes on connecting to the operating instructions supplied with the HDMI ...OUT jack on a cabinet with the TV. Hookups and Settings Connecting to an HDMI jack Connect the player and your TV using an HDMI cable to the cabinet wall. If you place ...
Operating Instructions
Page 16
...When connected with the TV. • When connecting the Sony TV that bears the HDMI logo. z • When connecting the Sony TV that not all high definition television sets are questions regarding our TV set to use only an HDMI cable that is compatible with ...Blu-ray Disc/DVD player, please contact our customer service center. • If the picture is not clear, not natural or not to your satisfaction, change the language for the onscreen display on your TV or other connected components, refer to the player automatically. - [/1 - To prepare for the BRAVIA Sync features Set...
...When connected with the TV. • When connecting the Sony TV that bears the HDMI logo. z • When connecting the Sony TV that not all high definition television sets are questions regarding our TV set to use only an HDMI cable that is compatible with ...Blu-ray Disc/DVD player, please contact our customer service center. • If the picture is not clear, not natural or not to your satisfaction, change the language for the onscreen display on your TV or other connected components, refer to the player automatically. - [/1 - To prepare for the BRAVIA Sync features Set...
Operating Instructions
Page 17
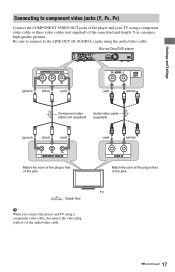
... video cable, disconnect the video plug (yellow) of the jack. Match the color of the plug to that of the same kind and length. Blu-ray Disc/DVD player Hookups and Settings (green) (blue) (red) (red) (white) Component video cable (not supplied) Audio/video cable (supplied) (green) (blue) (red) (red) (...,continued 17 You can enjoy high-quality pictures. Connecting to component video jacks (Y, PB, PR) Connect the COMPONENT VIDEO OUT jacks of the player and your TV using a component video cable or three video cables (not supplied) of the jack. Be sure to connect to the LINE ...
... video cable, disconnect the video plug (yellow) of the jack. Match the color of the plug to that of the same kind and length. Blu-ray Disc/DVD player Hookups and Settings (green) (blue) (red) (red) (white) Component video cable (not supplied) Audio/video cable (supplied) (green) (blue) (red) (red) (...,continued 17 You can enjoy high-quality pictures. Connecting to component video jacks (Y, PB, PR) Connect the COMPONENT VIDEO OUT jacks of the player and your TV using a component video cable or three video cables (not supplied) of the jack. Be sure to connect to the LINE ...

Operating Instructions
Page 19
... L/R jacks" (page 22). See "Connecting to an HDMI jack" (page 20). Connect the player to your AV amplifier (receiver) using an HDMI cable, do one of the following audio jacks....an HDMI cable (component video cable, S-video cable, or audio/video cable). • If you connect the player to your TV using an HDMI cable, or - Analog See "Connecting to the operating instructions supplied with the ...the speakers, which could damage your AV amplifier (receiver). Connect the player to your AV amplifier (receiver) according to the input jack on your ears or the speakers. ,continued...
... L/R jacks" (page 22). See "Connecting to an HDMI jack" (page 20). Connect the player to your AV amplifier (receiver) using an HDMI cable, do one of the following audio jacks....an HDMI cable (component video cable, S-video cable, or audio/video cable). • If you connect the player to your TV using an HDMI cable, or - Analog See "Connecting to the operating instructions supplied with the ...the speakers, which could damage your AV amplifier (receiver). Connect the player to your AV amplifier (receiver) according to the input jack on your ears or the speakers. ,continued...
Operating Instructions
Page 20
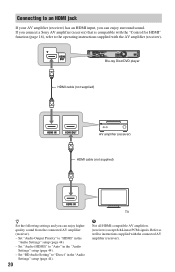
... you connect a Sony AV amplifier (receiver) that is compatible with the "Control for HDMI" function (page 16), refer to the operating instructions supplied with the connected AV amplifier (receiver). Set "BD Audio Setting" to "Auto" in the "Audio Settings" setup (page 44). - Set "Audio (HDMI)"...b Not all HDMI-compatible AV amplifiers (receivers) accept 8ch Linear PCM signals. Blu-ray Disc/DVD player HDMI cable (not supplied) AV amplifier (receiver) HDMI cable (not supplied) TV z Set the following settings and you can enjoy higher quality sound from the connected AV amplifier (receiver). ...
... you connect a Sony AV amplifier (receiver) that is compatible with the "Control for HDMI" function (page 16), refer to the operating instructions supplied with the connected AV amplifier (receiver). Set "BD Audio Setting" to "Auto" in the "Audio Settings" setup (page 44). - Set "Audio (HDMI)"...b Not all HDMI-compatible AV amplifiers (receivers) accept 8ch Linear PCM signals. Blu-ray Disc/DVD player HDMI cable (not supplied) AV amplifier (receiver) HDMI cable (not supplied) TV z Set the following settings and you can enjoy higher quality sound from the connected AV amplifier (receiver). ...
Operating Instructions
Page 21
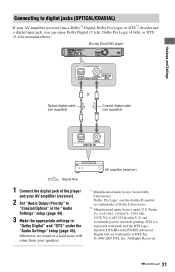
Blu-ray Disc/DVD player or Optical digital cable (not supplied) Coaxial digital cable (not supplied) : Signal flow 1 Connect the digital jack of the player *1 and your AV amplifier (receiver). 2 Set "Audio Output Priority" to digital jacks (OPTICAL/COAXIAL) If your speakers. AV amplifier (receiver) ,continued...can enjoy Dolby Digital (5.1ch), Dolby Pro Logic (4.0ch), or DTS (5.1ch) surround effects. Hookups and Settings Connecting to "Coaxial/Optical" in the "Audio *2 Settings" setup (page 44). 3 Make the appropriate settings in "Dolby Digital" and "DTS" under the "Audio...
Blu-ray Disc/DVD player or Optical digital cable (not supplied) Coaxial digital cable (not supplied) : Signal flow 1 Connect the digital jack of the player *1 and your AV amplifier (receiver). 2 Set "Audio Output Priority" to digital jacks (OPTICAL/COAXIAL) If your speakers. AV amplifier (receiver) ,continued...can enjoy Dolby Digital (5.1ch), Dolby Pro Logic (4.0ch), or DTS (5.1ch) surround effects. Hookups and Settings Connecting to "Coaxial/Optical" in the "Audio *2 Settings" setup (page 44). 3 Make the appropriate settings in "Dolby Digital" and "DTS" under the "Audio...
Operating Instructions
Page 23
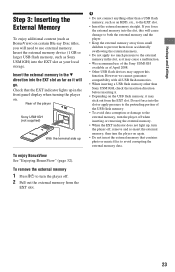
...the USB flash memory, it may stick out from the EXT slot. 23 Rear of the Sony USM1GH available as your local storage. To enjoy BonusView See "Enjoying BonusView" (page 32). Hookups and Settings Step 3: Inserting the External Memory To enjoy additional content (such as BonusView) on . Insert... memory data. Do not force into the slot, this function. Insert the external memory in the front panel display when turning the player on certain Blu-ray Disc titles, you force the external memory into the slot or apply pressure to the EXT slot. • Insert the external memory straight...
...the USB flash memory, it may stick out from the EXT slot. 23 Rear of the Sony USM1GH available as your local storage. To enjoy BonusView See "Enjoying BonusView" (page 32). Hookups and Settings Step 3: Inserting the External Memory To enjoy additional content (such as BonusView) on . Insert... memory data. Do not force into the slot, this function. Insert the external memory in the front panel display when turning the player on certain Blu-ray Disc titles, you force the external memory into the slot or apply pressure to the EXT slot. • Insert the external memory straight...
Operating Instructions
Page 24
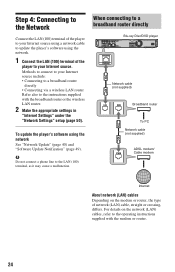
...Blu-ray Disc/DVD player Network cable (not supplied) Broadband router To PC Network cable (not supplied) ADSL modem/ Cable modem Internet About network (LAN) cables Depending on the network (LAN) cables, refer to the operating instructions supplied with the broadband router or the wireless LAN router. 2 Make the appropriate settings in "Internet Settings..." under the "Network Settings" setup (page 50). For details on the modem or router, the type of the player to your Internet source include: • Connecting ...
...Blu-ray Disc/DVD player Network cable (not supplied) Broadband router To PC Network cable (not supplied) ADSL modem/ Cable modem Internet About network (LAN) cables Depending on the network (LAN) cables, refer to the operating instructions supplied with the broadband router or the wireless LAN router. 2 Make the appropriate settings in "Internet Settings..." under the "Network Settings" setup (page 50). For details on the modem or router, the type of the player to your Internet source include: • Connecting ...
Operating Instructions
Page 25
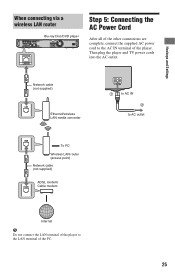
Network cable (not supplied) Ethernet/wireless LAN media converter 1 to AC IN 2 to AC outlet To PC Wireless LAN router (access point) Network cable (not supplied) ADSL modem/ Cable modem Internet b Do not connect the LAN terminal of the player to the AC IN terminal of the PC. 25 Then plug the player and TV power cords into the AC outlet. Hookups and Settings When connecting via a wireless LAN router Blu-ray Disc/DVD player Step 5: Connecting the AC Power Cord After all of the other connections are complete, connect the supplied AC power cord to the LAN terminal of the player.
Network cable (not supplied) Ethernet/wireless LAN media converter 1 to AC IN 2 to AC outlet To PC Wireless LAN router (access point) Network cable (not supplied) ADSL modem/ Cable modem Internet b Do not connect the LAN terminal of the player to the AC IN terminal of the PC. 25 Then plug the player and TV power cords into the AC outlet. Hookups and Settings When connecting via a wireless LAN router Blu-ray Disc/DVD player Step 5: Connecting the AC Power Cord After all of the other connections are complete, connect the supplied AC power cord to the LAN terminal of the player.
Operating Instructions
Page 26
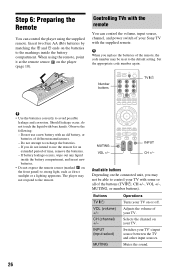
...not expose the remote sensor (marked on the connected unit, you may not be reset to the default setting. Set the appropriate code number again. Do not use the remote for an extended period of time, remove the...and other input sources. Insert two Size AA (R6) batteries by matching the 3 and # ends on the player (page 10). Number buttons TV [/1 b • Use the batteries correctly to recharge the batteries. - ... control the volume, input source, channel, and power switch of your Sony TV with the supplied remote. INPUT CH +/- Turns your TV on your TV. INPUT (input select...
...not expose the remote sensor (marked on the connected unit, you may not be reset to the default setting. Set the appropriate code number again. Do not use the remote for an extended period of time, remove the...and other input sources. Insert two Size AA (R6) batteries by matching the 3 and # ends on the player (page 10). Number buttons TV [/1 b • Use the batteries correctly to recharge the batteries. - ... control the volume, input source, channel, and power switch of your Sony TV with the supplied remote. INPUT CH +/- Turns your TV on your TV. INPUT (input select...
Operating Instructions
Page 27
... not complete Easy Setup, it will be erased. 1 While holding down TV [/1, enter the TV's manufacturer code using the player. Make the settings below to enter "09," press "0" then "9." Code numbers of non-Sony TVs as well. b If you enter a new code number, the code number previously entered will appear each time you...
... not complete Easy Setup, it will be erased. 1 While holding down TV [/1, enter the TV's manufacturer code using the player. Make the settings below to enter "09," press "0" then "9." Code numbers of non-Sony TVs as well. b If you enter a new code number, the code number previously entered will appear each time you...

Operating Instructions
Page 28
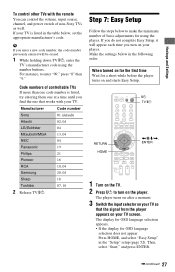
...confirmation. When you select "Component Video" in step 6 Select "HDMI" when connecting your TV using the HDMI cable, and go to connect the player and your TV using the component video cable, and go to step 6 and change the video output resolution, a picture is selected. When you ...video signals may not output from the jacks, other than from the HDMI OUT jack, when "Auto" or "1080p" is displayed in step 6 The initial settings message appears. 5 Select "Start," and press ENTER. 6 Select the cable type used to step 7. Select "Video or S Video" when connecting your TV...
...confirmation. When you select "Component Video" in step 6 Select "HDMI" when connecting your TV using the HDMI cable, and go to connect the player and your TV using the component video cable, and go to step 6 and change the video output resolution, a picture is selected. When you ...video signals may not output from the jacks, other than from the HDMI OUT jack, when "Auto" or "1080p" is displayed in step 6 The initial settings message appears. 5 Select "Start," and press ENTER. 6 Select the cable type used to step 7. Select "Video or S Video" when connecting your TV...
Operating Instructions
Page 29
... Select "4:3" when connecting to "On" or "Off," and press ENTER. If the selected video output resolution is distorted or no picture appears on the player for HDMI" function to a 4:3 screen TV without pressing any button in "Setup" (page 52). Select "16:9" when connecting to a widescreen TV ...or a TV with the "Control for HDMI" function when connecting Sony components that matches your TV using the HDMI cable) Set the "Control for more than 10 seconds to reset the video output resolution to use the "Control for about 30 ...
... Select "4:3" when connecting to "On" or "Off," and press ENTER. If the selected video output resolution is distorted or no picture appears on the player for HDMI" function to a 4:3 screen TV without pressing any button in "Setup" (page 52). Select "16:9" when connecting to a widescreen TV ...or a TV with the "Control for HDMI" function when connecting Sony components that matches your TV using the HDMI cable) Set the "Control for more than 10 seconds to reset the video output resolution to use the "Control for about 30 ...
Operating Instructions
Page 31
4 Press HOME. 5 Select "Video" using
4 Press HOME. 5 Select "Video" using
Operating Instructions
Page 32
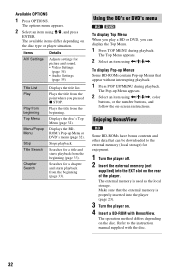
... Title Search Chapter Search Displays the title list. The available items differ depending on the disc type or player situation. Displays the disc's Top Menu (page 32). Searches for picture and sound. • Video Settings (page 34) • Audio Settings (page 35) Title List Play Play from the point where you can display the Top...
... Title Search Chapter Search Displays the title list. The available items differ depending on the disc type or player situation. Displays the disc's Top Menu (page 32). Searches for picture and sound. • Video Settings (page 34) • Audio Settings (page 35) Title List Play Play from the point where you can display the Top...
Operating Instructions
Page 34
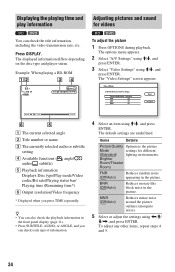
.... A The current selected angle B Title number or name C The currently selected audio or subtitle setting D Available functions ( angle/ audio/ subtitle) E Playback information Displays Disc type/Play mode/Video codec/Bit rate/Playing status bar/ Playing time (Remaining time*) F Output resolution... Items Details Picture Quality Optimizes the picture Mode settings for videos BD DVD To adjust the picture 1 Press OPTIONS during playback. The displayed information differs depending on the disc type and player status. The "Video Settings" screen appears. BNR (Off/Auto) Reduces ...
.... A The current selected angle B Title number or name C The currently selected audio or subtitle setting D Available functions ( angle/ audio/ subtitle) E Playback information Displays Disc type/Play mode/Video codec/Bit rate/Playing status bar/ Playing time (Remaining time*) F Output resolution... Items Details Picture Quality Optimizes the picture Mode settings for videos BD DVD To adjust the picture 1 Press OPTIONS during playback. The displayed information differs depending on the disc type and player status. The "Video Settings" screen appears. BNR (Off/Auto) Reduces ...


