
Dimensions Diagrams
Page 1
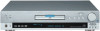
AVD-S50ES RM-SP50 REMOTE CONTROL DESCRIPTION: CD/DVD DIMENSIONS Receiver (WHD): 17 " X 3 7/8 " X 18 " WEIGHT: Approx 10 lbs POWER REQUIREMENTS:120VAC POWER 60Hz CONSUMPTION: 98W 1.7(stby) R 1/2 " 2 " FRONT VIEW 17 " 12 " SIDE VIEW 18 " 16 3/4" 3 7/8 " 3 1/4 " 2 " 1/2 " 5/8" 1 5/8 " 2" 9 ... OR APPLICATIONS WHICH REQUIRE A GREAT DEGREE OF PRECISION WE RECOMMEND THAT THE PRODUCT ITSELF BE USED TO MAKE THE ACTUAL MEASUREMENTS. SONY WILL NOT BE RESPONSIBLE FOR INACCURACIES IN THE DESIGN OR MANUFACTURE OF ENCLOSURES . Consumer Integrated Systems • Park Ridge, New Jersey...
AVD-S50ES RM-SP50 REMOTE CONTROL DESCRIPTION: CD/DVD DIMENSIONS Receiver (WHD): 17 " X 3 7/8 " X 18 " WEIGHT: Approx 10 lbs POWER REQUIREMENTS:120VAC POWER 60Hz CONSUMPTION: 98W 1.7(stby) R 1/2 " 2 " FRONT VIEW 17 " 12 " SIDE VIEW 18 " 16 3/4" 3 7/8 " 3 1/4 " 2 " 1/2 " 5/8" 1 5/8 " 2" 9 ... OR APPLICATIONS WHICH REQUIRE A GREAT DEGREE OF PRECISION WE RECOMMEND THAT THE PRODUCT ITSELF BE USED TO MAKE THE ACTUAL MEASUREMENTS. SONY WILL NOT BE RESPONSIBLE FOR INACCURACIES IN THE DESIGN OR MANUFACTURE OF ENCLOSURES . Consumer Integrated Systems • Park Ridge, New Jersey...
Operating Instructions
Page 1
4-240-933-12(1) Super Audio CD/ DVD RECEIVER Operating instructions UFSR Mode d'emploi FFRR AVD-S50ES © 2002 Sony Corporation
4-240-933-12(1) Super Audio CD/ DVD RECEIVER Operating instructions UFSR Mode d'emploi FFRR AVD-S50ES © 2002 Sony Corporation
Operating Instructions
Page 2
...not use with the instructions, may cause harmful interference to rain or moisture. If this CD/ DVD player is intended to alert the user to which have the following measures: - Connect ...and can be determined by one or more of this product. Reorient or relocate the receiving antenna. - AVD-S50ES Serial No CAUTION Use of the following marking located near output. This label is a ... with any changes or modifications not expressly approved in this manual could void your Sony dealer regarding this appliance with the limits for help. These limits are located at...
...not use with the instructions, may cause harmful interference to rain or moisture. If this CD/ DVD player is intended to alert the user to which have the following measures: - Connect ...and can be determined by one or more of this product. Reorient or relocate the receiving antenna. - AVD-S50ES Serial No CAUTION Use of the following marking located near output. This label is a ... with any changes or modifications not expressly approved in this manual could void your Sony dealer regarding this appliance with the limits for help. These limits are located at...
Operating Instructions
Page 3
Welcome! It is designed to be operated in a horizontal position only. • Keep the unit and discs away from equipment with strong magnets, such as radiators, or air ducts, or in a place subject to direct sunlight, excessive dust, mechanical vibration, or shock. &#... built-in an inclined position. When you first install the unit, or when you for future reference. Before operating this system, please read this Sony Super Audio CD/DVD RECEIVER. Precautions Safety • If anything falls into the cabinet, unplug the unit and have it out by the plug, never by qualified personnel before...
Welcome! It is designed to be operated in a horizontal position only. • Keep the unit and discs away from equipment with strong magnets, such as radiators, or air ducts, or in a place subject to direct sunlight, excessive dust, mechanical vibration, or shock. &#... built-in an inclined position. When you first install the unit, or when you for future reference. Before operating this system, please read this Sony Super Audio CD/DVD RECEIVER. Precautions Safety • If anything falls into the cabinet, unplug the unit and have it out by the plug, never by qualified personnel before...
Operating Instructions
Page 4
... checked by qualified personnel before operating it on the lenses inside the receiver. If color irregularity should be completely turned off by putting anything on your nearest Sony dealer. IMPORTANT NOTICE Caution: This receiver is completely off the TV at once then turn up in a...on after 15 to a warm location, or is brought directly from the set. The receiver is poor as alcohol or benzine. The use a commercially available CD/DVD cleaning disc. On placement • Place the receiver in a very damp room, moisture may cause overheating. • Do not block ...
... checked by qualified personnel before operating it on the lenses inside the receiver. If color irregularity should be completely turned off by putting anything on your nearest Sony dealer. IMPORTANT NOTICE Caution: This receiver is completely off the TV at once then turn up in a...on after 15 to a warm location, or is brought directly from the set. The receiver is poor as alcohol or benzine. The use a commercially available CD/DVD cleaning disc. On placement • Place the receiver in a very damp room, moisture may cause overheating. • Do not block ...
Operating Instructions
Page 5
Table of Contents WARNING ...2 Welcome! ...3 Precautions ...4 About this Manual 7 This receiver Can Play the Following Discs 7 Notes about the Discs 9 Index to Parts and Controls 10 Guide to the Control Menu Display 14 Getting Started 16 Quick Overview 16 Unpacking ...16 ...TV and Video Component Hookups 22 Speaker Setup 24 Presetting Radio Stations 29 Playing Discs 31 Playing Discs 31 Resuming Playback from the Point Where You Stopped the Disc (Resume Play 32 Using the DVD's Menu 33 Playing VIDEO CDs with PBC Functions (PBC Playback 34 Playing an MP3 Audio Track 35 Creating...
Table of Contents WARNING ...2 Welcome! ...3 Precautions ...4 About this Manual 7 This receiver Can Play the Following Discs 7 Notes about the Discs 9 Index to Parts and Controls 10 Guide to the Control Menu Display 14 Getting Started 16 Quick Overview 16 Unpacking ...16 ...TV and Video Component Hookups 22 Speaker Setup 24 Presetting Radio Stations 29 Playing Discs 31 Playing Discs 31 Resuming Playback from the Point Where You Stopped the Disc (Resume Play 32 Using the DVD's Menu 33 Playing VIDEO CDs with PBC Functions (PBC Playback 34 Playing an MP3 Audio Track 35 Creating...
Operating Instructions
Page 6
... 51 Enjoying Movies 52 Changing the Angles 52 Displaying the Subtitles 53 Using Various Additional Functions 54 Locking Discs (CUSTOM PARENTAL CONTROL, PARENTAL CONTROL) ... 54 Other Operations 59 Controlling the TV or satellite receiver with the Supplied Remote 59 Using the Video or other Unit 61 Listening to the Radio 62 Naming... 69 Additional Information 72 Troubleshooting 72 Self-diagnosis Function (When letters/numbers appear in the display 76 Glossary ...76 Specifications 79 Language Code List 81 DVD Setup Menu List 82 Index ...83 6US
... 51 Enjoying Movies 52 Changing the Angles 52 Displaying the Subtitles 53 Using Various Additional Functions 54 Locking Discs (CUSTOM PARENTAL CONTROL, PARENTAL CONTROL) ... 54 Other Operations 59 Controlling the TV or satellite receiver with the Supplied Remote 59 Using the Video or other Unit 61 Listening to the Radio 62 Naming... 69 Additional Information 72 Troubleshooting 72 Self-diagnosis Function (When letters/numbers appear in the display 76 Glossary ...76 Specifications 79 Language Code List 81 DVD Setup Menu List 82 Index ...83 6US
Operating Instructions
Page 7
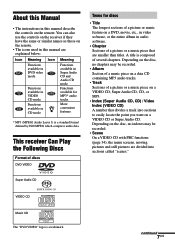
... use the controls on the receiver if they have the same or similar names as those on the remote. • The icons used in this manual describe the controls on the remote. This receiver Can Play the Following Discs Format of discs DVD VIDEO Terms for discs • Title The longest ...sections of a picture or music feature on a DVD, movie, etc., in video software, or the entire album in Super Audio CD and Audio CD mode Functions available for MP3* ...
... use the controls on the receiver if they have the same or similar names as those on the remote. • The icons used in this manual describe the controls on the remote. This receiver Can Play the Following Discs Format of discs DVD VIDEO Terms for discs • Title The longest ...sections of a picture or music feature on a DVD, movie, etc., in video software, or the entire album in Super Audio CD and Audio CD mode Functions available for MP3* ...
Operating Instructions
Page 8
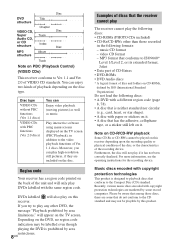
Disc DVD Title structure Chapter VIDEO CD, Disc Super Track Audio CD, or CD structure Index Disc MP3 structure Album Track Note on PBC (Playback Control) (VIDEO CDs) This receiver conforms to Ver. 1.1 and Ver. 2.0 of playback depending on the disc type. Furthermore, the disc will only play high-resolution still pictures, if they are included on this receiver. You can enjoy two...
Disc DVD Title structure Chapter VIDEO CD, Disc Super Track Audio CD, or CD structure Index Disc MP3 structure Album Track Note on PBC (Playback Control) (VIDEO CDs) This receiver conforms to Ver. 1.1 and Ver. 2.0 of playback depending on the disc type. Furthermore, the disc will only play high-resolution still pictures, if they are included on this receiver. You can enjoy two...
Operating Instructions
Page 9
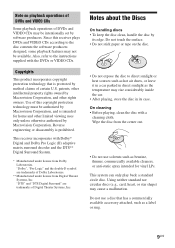
... certain U.S. patents, other rights owners. Use of this receiver plays DVDs and VIDEO CDs according to the instructions supplied with a cleaning cloth. "Dolby", "Pro Logic" and the double-D symbol are trademarks of Dolby Laboratories. ** Manufactured under license from the center out. • Do not use a disc that is intended for vinyl LPs. Wipe the...
... certain U.S. patents, other rights owners. Use of this receiver plays DVDs and VIDEO CDs according to the instructions supplied with a cleaning cloth. "Dolby", "Pro Logic" and the double-D symbol are trademarks of Dolby Laboratories. ** Manufactured under license from the center out. • Do not use a disc that is intended for vinyl LPs. Wipe the...
Operating Instructions
Page 14
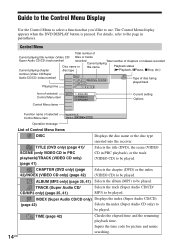
... Control Menu item SUBTITLE Select: ENTER Operation message List of Control Menu Items DISC Displays the disc name or the disc type inserted into the receiver. CHAPTER (DVD only) (page 42)/INDEX (VIDEO CD only) (page 42) Selects the chapter (DVD) or the index (VIDEO CD) to be played. ALBUM (MP3 only) (page 35, 41) Selects the album...
... Control Menu item SUBTITLE Select: ENTER Operation message List of Control Menu Items DISC Displays the disc name or the disc type inserted into the receiver. CHAPTER (DVD only) (page 42)/INDEX (VIDEO CD only) (page 42) Selects the chapter (DVD) or the index (VIDEO CD) to be played. ALBUM (MP3 only) (page 35, 41) Selects the album...
Operating Instructions
Page 16
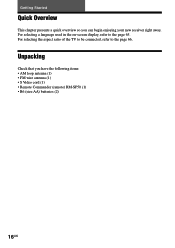
For selecting the aspect ratio of the TV to be connected, refer to the page 65. For selecting a language used in the on-screen display, refer to the page 66. Unpacking Check that you can begin enjoying your new receiver right away. Getting Started Quick Overview This chapter presents a quick overview so you have the following items: • AM loop antenna (1) • FM wire antenna (1) • S Video cord (1) • Remote Commander (remote) RM-SP50 (1) • R6 (size AA) batteries (2) 16US
For selecting the aspect ratio of the TV to be connected, refer to the page 65. For selecting a language used in the on-screen display, refer to the page 66. Unpacking Check that you can begin enjoying your new receiver right away. Getting Started Quick Overview This chapter presents a quick overview so you have the following items: • AM loop antenna (1) • FM wire antenna (1) • S Video cord (1) • Remote Commander (remote) RM-SP50 (1) • R6 (size AA) batteries (2) 16US
Operating Instructions
Page 17
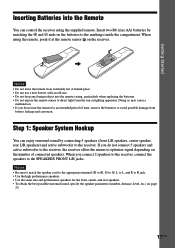
Getting Started Inserting Batteries into the remote casing, particularly when replacing the batteries. • Do not expose the remote sensor to the receiver. Insert two R6 (size AA) batteries by connecting 5 speakers (front L/R speakers, center speaker, rear L/R speakers) and active subwoofer to ... size and performance speakers for an extended period of connected speakers. When you do not connect 5 speakers and active subwoofer to the receiver, the receiver offers the means to the markings inside the compartment. Notes • Do not leave the remote in an extremely hot or humid ...
Getting Started Inserting Batteries into the remote casing, particularly when replacing the batteries. • Do not expose the remote sensor to the receiver. Insert two R6 (size AA) batteries by connecting 5 speakers (front L/R speakers, center speaker, rear L/R speakers) and active subwoofer to ... size and performance speakers for an extended period of connected speakers. When you do not connect 5 speakers and active subwoofer to the receiver, the receiver offers the means to the markings inside the compartment. Notes • Do not leave the remote in an extremely hot or humid ...
Operating Instructions
Page 19
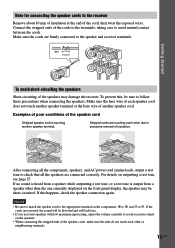
..., and AC power cord (mains lead), output a test tone to check that all the speakers are firmly connected to the speaker and receiver terminals. 10mm To avoid short-circuiting the speakers Short-circuiting of the speakers may be short-circuited. Make sure the cords are connected correctly... speaker cord is output from a speaker other than the one currently displayed on the front panel display, the speaker may damage the receiver. If the cords are touching each other due to excessive removal of another speaker terminal. Getting Started Note for connecting the speaker cords...
..., and AC power cord (mains lead), output a test tone to check that all the speakers are firmly connected to the speaker and receiver terminals. 10mm To avoid short-circuiting the speakers Short-circuiting of the speakers may be short-circuited. Make sure the cords are connected correctly... speaker cord is output from a speaker other than the one currently displayed on the front panel display, the speaker may damage the receiver. If the cords are touching each other due to excessive removal of another speaker terminal. Getting Started Note for connecting the speaker cords...

Operating Instructions
Page 20
... ANALOG R L SUB WOOFER SURROUND CENTER SPEAKERS FRONT IMPEDANCE USE 6-16Ω Notes • To prevent noise pickup, keep the AM loop antenna away from the receiver and other components. • Be sure to fully extend the FM wire antenna. • After connecting the FM wire antenna, keep it as horizontal as...
... ANALOG R L SUB WOOFER SURROUND CENTER SPEAKERS FRONT IMPEDANCE USE 6-16Ω Notes • To prevent noise pickup, keep the AM loop antenna away from the receiver and other components. • Be sure to fully extend the FM wire antenna. • After connecting the FM wire antenna, keep it as horizontal as...
Operating Instructions
Page 21
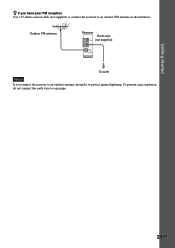
Getting Started z If you connect the receiver to an outdoor antenna, ground it to protect against lightning. To prevent a gas explosion, do not connect the earth wire to an outdoor FM antenna as shown below. Outdoor FM antenna Receiver Earth wire AM (not supplied) FM 75Ω COAXIAL ANTENNA To earth Note If you have poor FM reception Use a 75-ohms coaxial cable (not supplied) to connect the receiver to a gas pipe. 21US
Getting Started z If you connect the receiver to an outdoor antenna, ground it to protect against lightning. To prevent a gas explosion, do not connect the earth wire to an outdoor FM antenna as shown below. Outdoor FM antenna Receiver Earth wire AM (not supplied) FM 75Ω COAXIAL ANTENNA To earth Note If you have poor FM reception Use a 75-ohms coaxial cable (not supplied) to connect the receiver to a gas pipe. 21US
Operating Instructions
Page 22
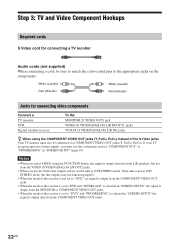
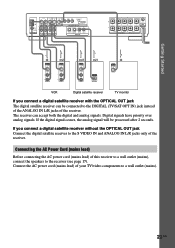
...line outputs may not function properly. • When the mode of the receiver is not set to "DVD," no signal is output from the COMPONENT VIDEO OUT jacks. • When the mode of the receiver is set to DVD and "INTERLACE" is selected in "SCREEN SETUP," the signal is output..."SCREEN SETUP" (page 67). Step 3: TV and Video Component Hookups Required cords S Video cord for connecting video components Connect a TV monitor VCR Digital satellite receiver To the MONITOR (S VIDEO OUT) jack VIDEO (S VIDEO/ANALOG L/R IN/OUT) jacks TV/SAT (S VIDEO/ANALOG L/R IN) jacks z When using the FUNCTION...
...line outputs may not function properly. • When the mode of the receiver is not set to "DVD," no signal is output from the COMPONENT VIDEO OUT jacks. • When the mode of the receiver is set to DVD and "INTERLACE" is selected in "SCREEN SETUP," the signal is output..."SCREEN SETUP" (page 67). Step 3: TV and Video Component Hookups Required cords S Video cord for connecting video components Connect a TV monitor VCR Digital satellite receiver To the MONITOR (S VIDEO OUT) jack VIDEO (S VIDEO/ANALOG L/R IN/OUT) jacks TV/SAT (S VIDEO/ANALOG L/R IN) jacks z When using the FUNCTION...
Operating Instructions
Page 23
...digital signal ceases, the analog signal will be connected to the DIGITAL (TV/SAT OPT IN) jack instead of the ANALOG IN L/R jacks of this receiver to a wall outlet (mains), connect the speakers to a wall outlet (mains). 23US Getting Started S VIDEO OUT IN S VIDEO S VIDEO IN...I G I TA L COAX IN AUX + R L - Connecting the AC Power Cord (mains lead) Before connecting the AC power cord (mains lead) of the receiver. Digital signals have priority over analog signals. OUT ANALOG R L SUB WOOFER SURROUND CENTER SPEAKERS FRONT IMPEDANCE USE 6-16Ω IN S VIDEO IN AUDIO IN L ...
...digital signal ceases, the analog signal will be connected to the DIGITAL (TV/SAT OPT IN) jack instead of the ANALOG IN L/R jacks of this receiver to a wall outlet (mains), connect the speakers to a wall outlet (mains). 23US Getting Started S VIDEO OUT IN S VIDEO S VIDEO IN...I G I TA L COAX IN AUX + R L - Connecting the AC Power Cord (mains lead) Before connecting the AC power cord (mains lead) of the receiver. Digital signals have priority over analog signals. OUT ANALOG R L SUB WOOFER SURROUND CENTER SPEAKERS FRONT IMPEDANCE USE 6-16Ω IN S VIDEO IN AUDIO IN L ...
Operating Instructions
Page 24
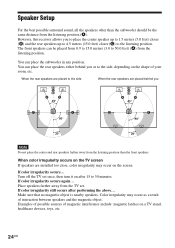
.... Color irregularity may occur on the screen. Speaker Setup For the best possible surround sound, all the speakers other than the front speakers. However, this receiver allows you or to 50.0 feet) (A) from the listening position.
.... Color irregularity may occur on the screen. Speaker Setup For the best possible surround sound, all the speakers other than the front speakers. However, this receiver allows you or to 50.0 feet) (A) from the listening position.
Operating Instructions
Page 25
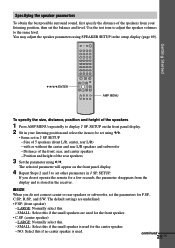
... set using X/x. • Items set the parameters for F.SP., C.SP., R.SP., and S.W. Distance of the rear speakers 3 Set the parameter using SPEAKER SETUP in the receiver. xSIZE When you do not connect center or rear speakers or subwoofer, set in 9 SP. Use the test tone to adjust the speaker volumes to...
... set using X/x. • Items set the parameters for F.SP., C.SP., R.SP., and S.W. Distance of the rear speakers 3 Set the parameter using SPEAKER SETUP in the receiver. xSIZE When you do not connect center or rear speakers or subwoofer, set in 9 SP. Use the test tone to adjust the speaker volumes to...


