
Child Safety: It Makes A Difference Where Your TV Stands
Page 1
.... 4 Don't allow children to climb on or play with furniture and television sets. 5 Avoid placing any items on top of TVs such as VCRs and remotes that may pique the children's curiosity. 6 Remember that is large enough to support the weight of your television (and other electronic components). 2 Use appropriate angle...
.... 4 Don't allow children to climb on or play with furniture and television sets. 5 Avoid placing any items on top of TVs such as VCRs and remotes that may pique the children's curiosity. 6 Remember that is large enough to support the weight of your television (and other electronic components). 2 Use appropriate angle...

Dimensions Diagrams
Page 1
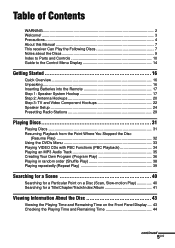
... • Park Ridge, New Jersey 07656 • FAX (201) 930 7891 • b2b.sel.sony.com Features and specifications subject to change without notice. • Non-metric weights and measurements are approximate. AVD-S50ES RM-SP50 REMOTE CONTROL DESCRIPTION: CD/DVD DIMENSIONS Receiver (WHD): 17 " X 3 7/8 " X 18 " WEIGHT: Approx 10 lbs POWER REQUIREMENTS:120VAC POWER 60Hz CONSUMPTION: 98W...
... • Park Ridge, New Jersey 07656 • FAX (201) 930 7891 • b2b.sel.sony.com Features and specifications subject to change without notice. • Non-metric weights and measurements are approximate. AVD-S50ES RM-SP50 REMOTE CONTROL DESCRIPTION: CD/DVD DIMENSIONS Receiver (WHD): 17 " X 3 7/8 " X 18 " WEIGHT: Approx 10 lbs POWER REQUIREMENTS:120VAC POWER 60Hz CONSUMPTION: 98W...
Operating Instructions
Page 5
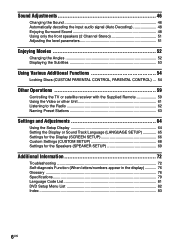
... About this Manual 7 This receiver Can Play the Following Discs 7 Notes about the Discs 9 Index to Parts and Controls 10 Guide to the Control Menu Display 14 Getting Started 16 Quick Overview 16 Unpacking ...16 Inserting Batteries into the Remote 17 Step 1: Speaker System ...Hookup 17 Step 2: Antenna Hookups 20 Step 3: TV and Video Component Hookups 22 Speaker Setup 24 Presetting Radio Stations 29 Playing Discs 31 Playing Discs 31 Resuming Playback from the Point Where You Stopped the Disc (Resume Play 32 Using the DVD's Menu 33 Playing VIDEO CDs...
... About this Manual 7 This receiver Can Play the Following Discs 7 Notes about the Discs 9 Index to Parts and Controls 10 Guide to the Control Menu Display 14 Getting Started 16 Quick Overview 16 Unpacking ...16 Inserting Batteries into the Remote 17 Step 1: Speaker System ...Hookup 17 Step 2: Antenna Hookups 20 Step 3: TV and Video Component Hookups 22 Speaker Setup 24 Presetting Radio Stations 29 Playing Discs 31 Playing Discs 31 Resuming Playback from the Point Where You Stopped the Disc (Resume Play 32 Using the DVD's Menu 33 Playing VIDEO CDs...
Operating Instructions
Page 6
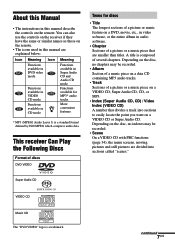
... Enjoying Movies 52 Changing the Angles 52 Displaying the Subtitles 53 Using Various Additional Functions 54 Locking Discs (CUSTOM PARENTAL CONTROL, PARENTAL CONTROL) ... 54 Other Operations 59 Controlling the TV or satellite receiver with the Supplied Remote 59 Using the Video or other Unit 61 Listening to the Radio 62 Naming Preset Stations... 69 Additional Information 72 Troubleshooting 72 Self-diagnosis Function (When letters/numbers appear in the display 76 Glossary ...76 Specifications 79 Language Code List 81 DVD Setup Menu List 82 Index ...83 6US
... Enjoying Movies 52 Changing the Angles 52 Displaying the Subtitles 53 Using Various Additional Functions 54 Locking Discs (CUSTOM PARENTAL CONTROL, PARENTAL CONTROL) ... 54 Other Operations 59 Controlling the TV or satellite receiver with the Supplied Remote 59 Using the Video or other Unit 61 Listening to the Radio 62 Naming Preset Stations... 69 Additional Information 72 Troubleshooting 72 Self-diagnosis Function (When letters/numbers appear in the display 76 Glossary ...76 Specifications 79 Language Code List 81 DVD Setup Menu List 82 Index ...83 6US
Operating Instructions
Page 7
... recorded. • Scene On a VIDEO CD with PBC functions (page 34), the menu screens, moving pictures and still pictures are smaller than titles. This receiver Can Play the Following Discs Format of discs DVD VIDEO Terms for MP3* audio tracks More ...remote. • The icons used in this manual are explained below: Icon Meaning Functions available in DVD video mode Icon Functions available in VIDEO CD mode Functions available in z CD mode Meaning Functions available in this Manual • The instructions in Super Audio CD and Audio CD mode Functions available for discs...
... recorded. • Scene On a VIDEO CD with PBC functions (page 34), the menu screens, moving pictures and still pictures are smaller than titles. This receiver Can Play the Following Discs Format of discs DVD VIDEO Terms for MP3* audio tracks More ...remote. • The icons used in this manual are explained below: Icon Meaning Functions available in DVD video mode Icon Functions available in VIDEO CD mode Functions available in z CD mode Meaning Functions available in this Manual • The instructions in Super Audio CD and Audio CD mode Functions available for discs...

Operating Instructions
Page 10
PRESET+ SOUND FIELD AUTO DEC 2CH ST MODE 1 POWER switch (31) 2 STANDBY indicator (31) 3 (remote sensor) (17) 4 Disc tray (31) 5 MULTI CHANNEL DECODING indicator 6 A (open/close) (31) 7 H (play) (31) 8 FUNCTION +/- (61) 9 VOLUME control (31, 71) 0 ./>, PRESET +/- (32) qa SOUND FIELD AUTO DEC/2CH ST/ MODE (48, 49, 51) qs x (stop) (30, 31) qd X (pause) (32) qf Front panel display (11) qg DISPLAY (62) qh PHONES jack (31) 10US Front Panel PHONES DISPLAY FUNCTION - + VOLUME - Index to Parts and Controls For more information, refer to the pages indicated in parentheses.
PRESET+ SOUND FIELD AUTO DEC 2CH ST MODE 1 POWER switch (31) 2 STANDBY indicator (31) 3 (remote sensor) (17) 4 Disc tray (31) 5 MULTI CHANNEL DECODING indicator 6 A (open/close) (31) 7 H (play) (31) 8 FUNCTION +/- (61) 9 VOLUME control (31, 71) 0 ./>, PRESET +/- (32) qa SOUND FIELD AUTO DEC/2CH ST/ MODE (48, 49, 51) qs x (stop) (30, 31) qd X (pause) (32) qf Front panel display (11) qg DISPLAY (62) qh PHONES jack (31) 10US Front Panel PHONES DISPLAY FUNCTION - + VOLUME - Index to Parts and Controls For more information, refer to the pages indicated in parentheses.
Operating Instructions
Page 13
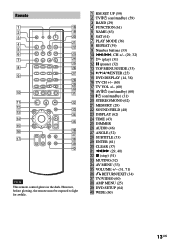
...wd DISPLAY (62) wf TIME (43) wg DIMMER wh AUDIO (46) wj ANGLE (52) wk SUBTITLE (53) wl ENTER (61) e; Remote Note This remote control glows in the dark. However, before glowing, the remote must be exposed to light for awhile. 1 RM SET UP (59) 2 TV [/1 (on/standby) (59) 3 BAND (29) 4 ...FUNCTION (61) 5 NAME (63) 6 SAT (61) 7 PLAY MODE (36) 8 REPEAT (39) 9 Number buttons (33) 0 ./>, CH +/- (29, 32) qa H (play) (31) qs X (pause) (32) qd TOP MENU/GUIDE (33) qf C/X/x/c/ENTER (25) qg DVD...
...wd DISPLAY (62) wf TIME (43) wg DIMMER wh AUDIO (46) wj ANGLE (52) wk SUBTITLE (53) wl ENTER (61) e; Remote Note This remote control glows in the dark. However, before glowing, the remote must be exposed to light for awhile. 1 RM SET UP (59) 2 TV [/1 (on/standby) (59) 3 BAND (29) 4 ...FUNCTION (61) 5 NAME (63) 6 SAT (61) 7 PLAY MODE (36) 8 REPEAT (39) 9 Number buttons (33) 0 ./>, CH +/- (29, 32) qa H (play) (31) qs X (pause) (32) qd TOP MENU/GUIDE (33) qf C/X/x/c/ENTER (25) qg DVD...
Operating Instructions
Page 16
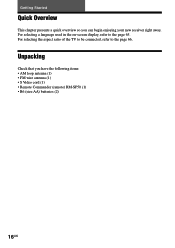
For selecting the aspect ratio of the TV to be connected, refer to the page 65. For selecting a language used in the on-screen display, refer to the page 66. Unpacking Check that you can begin enjoying your new receiver right away. Getting Started Quick Overview This chapter presents a quick overview so you have the following items: • AM loop antenna (1) • FM wire antenna (1) • S Video cord (1) • Remote Commander (remote) RM-SP50 (1) • R6 (size AA) batteries (2) 16US
For selecting the aspect ratio of the TV to be connected, refer to the page 65. For selecting a language used in the on-screen display, refer to the page 66. Unpacking Check that you can begin enjoying your new receiver right away. Getting Started Quick Overview This chapter presents a quick overview so you have the following items: • AM loop antenna (1) • FM wire antenna (1) • S Video cord (1) • Remote Commander (remote) RM-SP50 (1) • R6 (size AA) batteries (2) 16US
Operating Instructions
Page 17
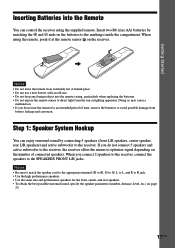
...not use a new battery with an old one. • Do not drop any foreign object into the Remote You can enjoy surround sound by matching the 3 and # ends on the receiver. Doing so may cause a malfunction. • If you do not connect 5 speakers and active subwoofer... to avoid possible damage from the sun or lighting apparatus. When using the supplied remote. Step 1: Speaker System Hookup You can control the receiver using the remote, point it at the remote sensor on the batteries to the receiver. Insert two R6 (size AA) batteries by connecting 5 speakers (front L/R speakers...
...not use a new battery with an old one. • Do not drop any foreign object into the Remote You can enjoy surround sound by matching the 3 and # ends on the receiver. Doing so may cause a malfunction. • If you do not connect 5 speakers and active subwoofer... to avoid possible damage from the sun or lighting apparatus. When using the supplied remote. Step 1: Speaker System Hookup You can control the receiver using the remote, point it at the remote sensor on the batteries to the receiver. Insert two R6 (size AA) batteries by connecting 5 speakers (front L/R speakers...
Operating Instructions
Page 25
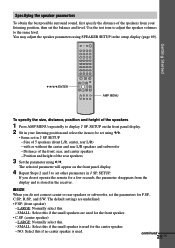
... used . SETUP on the front panel display. 4 Repeat Steps 2 and 3 to be set using X/x. • Items set in 9 SP. If you do not operate the remote for a few seconds, the parameter disappears from your listening position and select the item to set the parameters for the center speaker. -NO: Select this... the speaker parameters To obtain the best possible surround sound, first specify the distance of the speakers from the display and is stored in the receiver. You may adjust the speaker parameters using C/c. SETUP -
... used . SETUP on the front panel display. 4 Repeat Steps 2 and 3 to be set using X/x. • Items set in 9 SP. If you do not operate the remote for a few seconds, the parameter disappears from your listening position and select the item to set the parameters for the center speaker. -NO: Select this... the speaker parameters To obtain the best possible surround sound, first specify the distance of the speakers from the display and is stored in the receiver. You may adjust the speaker parameters using C/c. SETUP -
Operating Instructions
Page 27
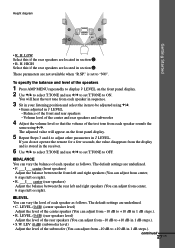
H. is stored in the receiver. 6 Use X/x to select T.TONE and use C/c to set to +10 dB in 1 dB steps.). • R. The default settings are not available when "R.SP." LEVEL (0 dB) (...) (subwoofer level) Adjust the level of the center speaker (You can adjust from -10 dB to OFF. continued 27US If you do not operate the remote for a few seconds, the value disappears from -10 dB to "NO". xLEVEL You can adjust from each speaker as follows. H. LOW Select this if the...
H. is stored in the receiver. 6 Use X/x to select T.TONE and use C/c to set to +10 dB in 1 dB steps.). • R. The default settings are not available when "R.SP." LEVEL (0 dB) (...) (subwoofer level) Adjust the level of the center speaker (You can adjust from -10 dB to OFF. continued 27US If you do not operate the remote for a few seconds, the value disappears from -10 dB to "NO". xLEVEL You can adjust from each speaker as follows. H. LOW Select this if the...
Operating Instructions
Page 30
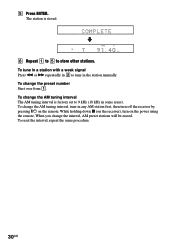
... 9 kHz (10 kHz in the station manually. While holding down x (on the receiver), turn off the receiver by pressing [/1 on the power using the remote. To change the AM tuning interval, tune in any AM station first, then turn on the remote. When you change the preset number Start over from 1. To reset the...
... 9 kHz (10 kHz in the station manually. While holding down x (on the receiver), turn off the receiver by pressing [/1 on the power using the remote. To change the AM tuning interval, tune in any AM station first, then turn on the remote. When you change the preset number Start over from 1. To reset the...
Operating Instructions
Page 31
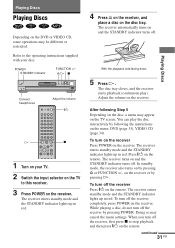
... indicator lights up in red. 4 Press A on the receiver, and place a disc on the DVD or VIDEO CD, some operations may cancel the menu settings. AH x - + - To turn off . When you turn on the receiver Press POWER on the remote. Playing Discs Playing Discs Depending on the disc tray. The receiver enters standby mode and the STANDBY indicator lights up...
... indicator lights up in red. 4 Press A on the receiver, and place a disc on the DVD or VIDEO CD, some operations may cancel the menu settings. AH x - + - To turn off . When you turn on the receiver Press POWER on the remote. Playing Discs Playing Discs Depending on the disc tray. The receiver enters standby mode and the STANDBY indicator lights up...
Operating Instructions
Page 32
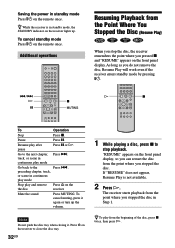
... You Stopped the Disc (Resume Play) When you stop playback. To cancel muting, press it . As long as you stopped the disc. Go to stop the disc, the receiver remembers the point where you stopped the disc in standby mode, the STANDBY indicator on the remote once. preceding chapter..., track, or scene in standby mode Press [/1 on the receiver lights up the volume. Go back...
... You Stopped the Disc (Resume Play) When you stop playback. To cancel muting, press it . As long as you stopped the disc. Go to stop the disc, the receiver remembers the point where you stopped the disc in standby mode, the STANDBY indicator on the remote once. preceding chapter..., track, or scene in standby mode Press [/1 on the receiver lights up the volume. Go back...
Operating Instructions
Page 39
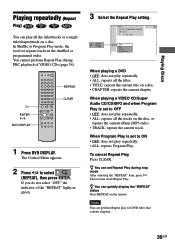
...quickly display the "REPEAT" status Press REPEAT on the remote. DVD DVD 1 2 ( 2 7 ) MAKING SCENE 1 8 ( 3 4 ) T 1:32:55 OFF ALL TITLE CHAPTER When playing a DVD • OFF: does not play all the titles/tracks or a single title/chapter/track on a disc. You cannot perform Repeat Play during stop mode After...VIDEO CDs (page 34). Playing Discs Playing repeatedly (Repeat Play) You can play repeatedly. • ALL: repeats all the tracks on the disc, or repeats the current album (MP3 only). • TRACK: repeats the current track. In Shuffle or Program Play mode, the receiver repeats ...
...quickly display the "REPEAT" status Press REPEAT on the remote. DVD DVD 1 2 ( 2 7 ) MAKING SCENE 1 8 ( 3 4 ) T 1:32:55 OFF ALL TITLE CHAPTER When playing a DVD • OFF: does not play all the titles/tracks or a single title/chapter/track on a disc. You cannot perform Repeat Play during stop mode After...VIDEO CDs (page 34). Playing Discs Playing repeatedly (Repeat Play) You can play repeatedly. • ALL: repeats all the tracks on the disc, or repeats the current album (MP3 only). • TRACK: repeats the current track. In Shuffle or Program Play mode, the receiver repeats ...
Operating Instructions
Page 48
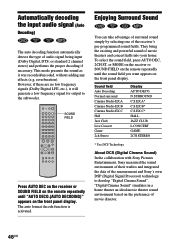
...B* C.S.EX C* HALL JAZZ CLUB L.CONCERT GAME 2CH STEREO * Use DCS Technology About DCS (Digital Cinema Sound) In the collaboration with Sony Pictures Entertainment, Sony measured the sound environment of their studios and integrated the data of movie theaters and concert halls into your home. "Digital Cinema Sound" ...format decode function is activated. To select the sound field, press AUTO DEC, 2CH ST, or MODE on the receiver or SOUND FIELD on the remote repeatedly until "AUTO DECO.(AUTO DECODING)" appears on the preference of movie director. 48US This mode presents the sound ...
...B* C.S.EX C* HALL JAZZ CLUB L.CONCERT GAME 2CH STEREO * Use DCS Technology About DCS (Digital Cinema Sound) In the collaboration with Sony Pictures Entertainment, Sony measured the sound environment of their studios and integrated the data of movie theaters and concert halls into your home. "Digital Cinema Sound" ...format decode function is activated. To select the sound field, press AUTO DEC, 2CH ST, or MODE on the receiver or SOUND FIELD on the remote repeatedly until "AUTO DECO.(AUTO DECODING)" appears on the preference of movie director. 48US This mode presents the sound ...

Operating Instructions
Page 49
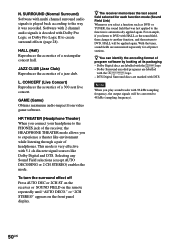
... provided by shifting the sound of the Sony Pictures Entertainment "Cary Grant Theater" cinema production studio. Selecting other sound fields Press MODE on the receiver or SOUND FIELD on the remote repeatedly until "C.S.EX A (or B, C)" appears on the remote repeatedly until the sound field you will ...the Dolby Digital DVD. This element creates the same sensation in your listening room by the virtual speakers may cause increased noise in the soundtrack. Cinema Studio EX is ideal for watching most any sound coming directly from a single pair of the Sony Pictures Entertainment ...
... provided by shifting the sound of the Sony Pictures Entertainment "Cary Grant Theater" cinema production studio. Selecting other sound fields Press MODE on the receiver or SOUND FIELD on the remote repeatedly until "C.S.EX A (or B, C)" appears on the remote repeatedly until the sound field you will ...the Dolby Digital DVD. This element creates the same sensation in your listening room by the virtual speakers may cause increased noise in the soundtrack. Cinema Studio EX is ideal for watching most any sound coming directly from a single pair of the Sony Pictures Entertainment ...
Operating Instructions
Page 50
...maximum audio impact from video game software. DTS Digital Surround discs are memorized separately for each function mode (Sound Field Link) Whenever you listen to DVD with DTS. L. For example, if you select a ... concert hall. To turn the surround effect off Press AUTO DEC or 2CH ST on the receiver or SOUND FIELD on the front panel display. This mode is very effective with 96 kHz... and DTS. or "2CH STEREO" appears on the remote repeatedly until "AUTO DECO." With the tuner, sound fields are marked with HALL as DVD or TUNER, the sound field that was recorded. Note...
...maximum audio impact from video game software. DTS Digital Surround discs are memorized separately for each function mode (Sound Field Link) Whenever you listen to DVD with DTS. L. For example, if you select a ... concert hall. To turn the surround effect off Press AUTO DEC or 2CH ST on the receiver or SOUND FIELD on the front panel display. This mode is very effective with 96 kHz... and DTS. or "2CH STEREO" appears on the remote repeatedly until "AUTO DECO." With the tuner, sound fields are marked with HALL as DVD or TUNER, the sound field that was recorded. Note...
Operating Instructions
Page 51
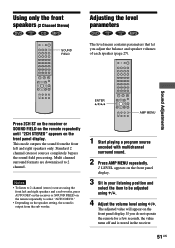
...you adjust the balance and speaker volumes of each speaker (page 27). Sound Adjustments Press 2CH ST on the receiver or SOUND FIELD on the remote repeatedly until "2CH STEREO" appears on the speaker setting, the sound is stored in your listening position and ...Notes • To listen to 2 channel (stereo) sources using C/c. The adjusted value will appear on the front panel display. 3 Sit in the receiver. 51US Multi channel surround formats are downmixed to 2 channel. Standard 2 channel (stereo) sources completely bypass the sound field processing. ENTER C/X/x/c AMP MENU ...
...you adjust the balance and speaker volumes of each speaker (page 27). Sound Adjustments Press 2CH ST on the receiver or SOUND FIELD on the remote repeatedly until "2CH STEREO" appears on the speaker setting, the sound is stored in your listening position and ...Notes • To listen to 2 channel (stereo) sources using C/c. The adjusted value will appear on the front panel display. 3 Sit in the receiver. 51US Multi channel surround formats are downmixed to 2 channel. Standard 2 channel (stereo) sources completely bypass the sound field processing. ENTER C/X/x/c AMP MENU ...
Operating Instructions
Page 59
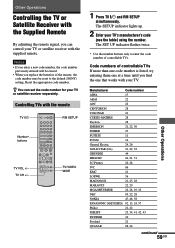
... Use the number buttons only to enter the code number of the remote, the code number may be reset to the default (SONY) setting. The SETUP indicator lights up. 2 Enter your TV or satellite receiver with the supplied remote. Code numbers of controllable TVs If more than one code number is ...listed, try entering them one that works with the remote TV ?/1 RM SETUP Number* ...
... Use the number buttons only to enter the code number of the remote, the code number may be reset to the default (SONY) setting. The SETUP indicator lights up. 2 Enter your TV or satellite receiver with the supplied remote. Code numbers of controllable TVs If more than one code number is ...listed, try entering them one that works with the remote TV ?/1 RM SETUP Number* ...


