User Guide
Page 1
Contents Getting started 5 Assembly 5 Turning on the phone 6 Help 7 Charging the battery 7 Phone overview 8 Menu overview 10 Navigation 12 Phone language 14 Entering text 14 Internet 16 Internet security and certificates .... 18 Web feeds 18 GPS 19 Using the GPS 19 More GPS features ...Speed dial 25 Voicemail 25 Voice control 26 More than one call 27 Restricted dialing 29 Call time and cost 30 Showing or hiding your phone number 30 Messaging 31 Text messages 31 Picture messages 32 Message options 32 Templates 32 Voice messages 33 Instant Messaging (IM 33 Area and ...
Contents Getting started 5 Assembly 5 Turning on the phone 6 Help 7 Charging the battery 7 Phone overview 8 Menu overview 10 Navigation 12 Phone language 14 Entering text 14 Internet 16 Internet security and certificates .... 18 Web feeds 18 GPS 19 Using the GPS 19 More GPS features ...Speed dial 25 Voicemail 25 Voice control 26 More than one call 27 Restricted dialing 29 Call time and cost 30 Showing or hiding your phone number 30 Messaging 31 Text messages 31 Picture messages 32 Message options 32 Templates 32 Voice messages 33 Instant Messaging (IM 33 Area and ...
User Guide
Page 2
... video clips.......... 42 Entertainment 42 Video player 42 Ringtones and melodies 42 MusicDJ 43 Sound recorder 43 Games 43 Applications 44 Connectivity 45 Settings 45 Phone name 45 Bluetooth™ wireless technology ..... 45 Using the USB cable 47 Synchronizing 48 More features 49 Flight mode 49 File manager 49 Alarms 50...
... video clips.......... 42 Entertainment 42 Video player 42 Ringtones and melodies 42 MusicDJ 43 Sound recorder 43 Games 43 Applications 44 Connectivity 45 Settings 45 Phone name 45 Bluetooth™ wireless technology ..... 45 Using the USB cable 47 Synchronizing 48 More features 49 Flight mode 49 File manager 49 Alarms 50...

User Guide
Page 3
... Publication number: 1208-0969.1 Please note: Some of the services in this User guide are not supported by Sony Ericsson is under license. Your mobile phone has the capability to the GSM International Emergency Number 112. and any use of the User guide. ©...trademark or registered trademark of Open Mobile Alliance LTD. Ericsson is a trademark or registered trademark of Telefonaktiebolaget LM Ericsson. No. 51383; Sony Ericsson TM506 UMTS HSDPA 1700/2100 GSM EDGE 850/1800/1900 This User guide is published by Sony Ericsson Mobile Communications AB at any time and without any...
... Publication number: 1208-0969.1 Please note: Some of the services in this User guide are not supported by Sony Ericsson is under license. Your mobile phone has the capability to the GSM International Emergency Number 112. and any use of the User guide. ©...trademark or registered trademark of Open Mobile Alliance LTD. Ericsson is a trademark or registered trademark of Telefonaktiebolaget LM Ericsson. No. 51383; Sony Ericsson TM506 UMTS HSDPA 1700/2100 GSM EDGE 850/1800/1900 This User guide is published by Sony Ericsson Mobile Communications AB at any time and without any...
User Guide
Page 4
... only and may not be the trademarks of , Cuba, Iraq, Iran, North Korea, Libya, Sudan, Syria (as applicable. Software may not accurately depict the actual phone. export control laws, including the U.S. has embargoed goods; or (ii) to scroll and select. Treasury Department's list of Denial Orders. Restricted Rights: Use, duplication or...
... only and may not be the trademarks of , Cuba, Iraq, Iran, North Korea, Libya, Sudan, Syria (as applicable. Software may not accurately depict the actual phone. export control laws, including the U.S. has embargoed goods; or (ii) to scroll and select. Treasury Department's list of Denial Orders. Restricted Rights: Use, duplication or...
User Guide
Page 5
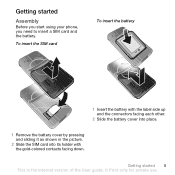
Getting started 5 This is the Internet version of the User guide. © Print only for private use. Getting started Assembly Before you start using your phone, you need to insert a SIM card and the battery. To insert the SIM card To insert the battery 1 Insert the battery with the label side up and the connectors facing each other. 2 Slide the battery cover into place. 1 Remove the battery cover by pressing and sliding it as shown in the picture. 2 Slide the SIM card into its holder with the gold-colored contacts facing down.
Getting started 5 This is the Internet version of the User guide. © Print only for private use. Getting started Assembly Before you start using your phone, you need to insert a SIM card and the battery. To insert the SIM card To insert the battery 1 Insert the battery with the label side up and the connectors facing each other. 2 Slide the battery cover into place. 1 Remove the battery cover by pressing and sliding it as shown in the picture. 2 Slide the SIM card into its holder with the gold-colored contacts facing down.
User Guide
Page 6
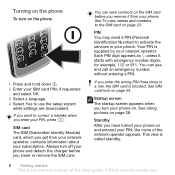
...PIN You may need a PIN (Personal Identification Number) to correct a mistake when you turn your phone on. If you get from your phone. You can save contacts on the SIM card before you have turned your phone on and entered your PIN, the name of the User guide. © Print only for example... appears when you enter your PIN, press . This view is called standby. 6 Getting started This is supplied by your network operator. Always turn on the phone 1 Press and hold down . 2 Enter your SIM card PIN, if requested and select OK. 3 Select a language. 4 Select Yes to the SIM card on page ...
...PIN You may need a PIN (Personal Identification Number) to correct a mistake when you turn your phone on. If you get from your phone. You can save contacts on the SIM card before you have turned your phone on and entered your PIN, the name of the User guide. © Print only for example... appears when you enter your PIN, press . This view is called standby. 6 Getting started This is supplied by your network operator. Always turn on the phone 1 Press and hold down . 2 Enter your SIM card PIN, if requested and select OK. 3 Select a language. 4 Select Yes to the SIM card on page ...
User Guide
Page 7
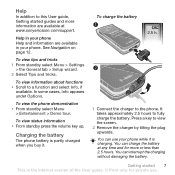
... and information are available at any time and for private use your phone. It takes approximately 2.5 hours to the phone. You can use . To view the phone demonstration • From standby select Menu > Entertainment > Demo tour. To view status information • From standby press the volume key...and tricks 1 From standby select Menu > Settings > the General tab > Setup wizard. 2 Select Tips and tricks. Charging the battery The phone battery is partly charged when you buy it is the Internet version of the User guide. © Print only for more information are available in...
... and information are available at any time and for private use your phone. It takes approximately 2.5 hours to the phone. You can use . To view the phone demonstration • From standby select Menu > Entertainment > Demo tour. To view status information • From standby press the volume key...and tricks 1 From standby select Menu > Settings > the General tab > Setup wizard. 2 Select Tips and tricks. Charging the battery The phone battery is partly charged when you buy it is the Internet version of the User guide. © Print only for more information are available in...
User Guide
Page 8
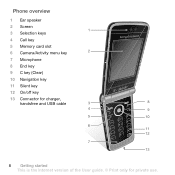
Phone overview 1 Ear speaker 2 Screen 1 3 Selection keys 4 Call key 5 Memory card slot 6 Camera/Activity menu key 2 7 Microphone 8 End key 9 C key (Clear) 10 Navigation key 11 Silent key 12 On/off key 13 Connector for charger, handsfree and USB cable 3 8 4 9 5 10 6 11 12 7 13 8 Getting started This is the Internet version of the User guide. © Print only for private use.
Phone overview 1 Ear speaker 2 Screen 1 3 Selection keys 4 Call key 5 Memory card slot 6 Camera/Activity menu key 2 7 Microphone 8 End key 9 C key (Clear) 10 Navigation key 11 Silent key 12 On/off key 13 Connector for charger, handsfree and USB cable 3 8 4 9 5 10 6 11 12 7 13 8 Getting started This is the Internet version of the User guide. © Print only for private use.
User Guide
Page 11
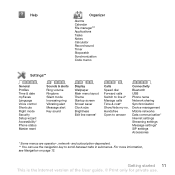
... Code memo Settings** General Profiles Time & date myFaves Language Voice control Shortcuts Flight mode Security Setup wizard Accessibility* Phone status Master reset Sounds & alerts Ring volume Ringtone Silent mode Increasing ring Vibrating alert Message alert Key sound Display ...Screen saver Clock size Brightness Edit line names* Calls Speed dial Forward calls Switch to answer Connectivity Bluetooth USB Phone name Network sharing Synchronization Device management Mobile networks Data communication* Internet settings Streaming settings Message settings* SIP settings Accessories ...
... Code memo Settings** General Profiles Time & date myFaves Language Voice control Shortcuts Flight mode Security Setup wizard Accessibility* Phone status Master reset Sounds & alerts Ring volume Ringtone Silent mode Increasing ring Vibrating alert Message alert Key sound Display ...Screen saver Clock size Brightness Edit line names* Calls Speed dial Forward calls Switch to answer Connectivity Bluetooth USB Phone name Network sharing Synchronization Device management Mobile networks Data communication* Internet settings Streaming settings Message settings* SIP settings Accessories ...
User Guide
Page 12
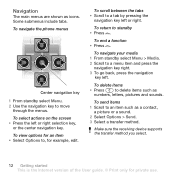
... as numbers, letters, pictures and sounds. To scroll between the tabs • Scroll to move through the menus. Some submenus include tabs. To navigate the phone menus Center navigation key 1 From standby select Menu. 2 Use the navigation key to a tab by pressing the navigation key left or right. To delete items...
... as numbers, letters, pictures and sounds. To scroll between the tabs • Scroll to move through the menus. Some submenus include tabs. To navigate the phone menus Center navigation key 1 From standby select Menu. 2 Use the navigation key to a tab by pressing the navigation key left or right. To delete items...
User Guide
Page 13
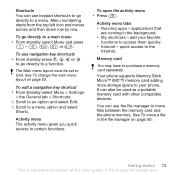
...use the file manager to move a file in the background. • My shortcuts - See To move files between the memory card and the phone memory. To go directly to purchase a memory card separately. The Main menu layout must be used as a portable memory card with other compatible ...devices. See To change the main menu layout on page 50. add your favorite functions to your phone. Your phone supports Memory Stick Micro™ (M2™) memory card adding more storage space to access them quickly. • Internet - To edit a...
...use the file manager to move a file in the background. • My shortcuts - See To move files between the memory card and the phone memory. To go directly to purchase a memory card separately. The Main menu layout must be used as a portable memory card with other compatible ...devices. See To change the main menu layout on page 50. add your favorite functions to your phone. Your phone supports Memory Stick Micro™ (M2™) memory card adding more storage space to access them quickly. • Internet - To edit a...
User Guide
Page 14
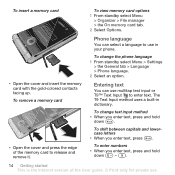
...language to use multitap text input or T9™ Text Input to release and remove it. The T9 Text Input method uses a built-in your phone. To shift between capitals and lowercase letters • When you enter text, press and hold down - . 14 Getting started This is the ...enter text, press and hold down . To enter numbers • When you enter text, press . To change the phone language 1 From standby select Menu > Settings > the General tab > Language > Phone language. 2 Select an option. • Open the cover and insert the memory card with the gold-colored contacts facing...
...language to use multitap text input or T9™ Text Input to release and remove it. The T9 Text Input method uses a built-in your phone. To shift between capitals and lowercase letters • When you enter text, press and hold down - . 14 Getting started This is the ...enter text, press and hold down . To enter numbers • When you enter text, press . To change the phone language 1 From standby select Menu > Settings > the General tab > Language > Phone language. 2 Select an option. • Open the cover and insert the memory card with the gold-colored contacts facing...
User Guide
Page 18
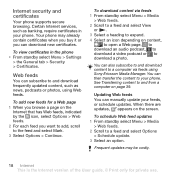
...to and from a computer on content, to open a Web page, to download an audio podcast, to download a video podcast or to your phone. Your phone may be costly. 18 Internet This is the Internet version of the User guide. © Print only for a Web page 1 When you ... to the feed and select Mark. 3 Select Options > Continue. Updating Web feeds You can manually update your phone. Certain Internet services, such as news, podcasts or photos, using Sony Ericsson Media Manager. To download content via feeds using Web feeds. To schedule Web feed updates 1 From standby select ...
...to and from a computer on content, to open a Web page, to download an audio podcast, to download a video podcast or to your phone. Your phone may be costly. 18 Internet This is the Internet version of the User guide. © Print only for a Web page 1 When you ... to the feed and select Mark. 3 Select Options > Continue. Updating Web feeds You can manually update your phone. Certain Internet services, such as news, podcasts or photos, using Sony Ericsson Media Manager. To download content via feeds using Web feeds. To schedule Web feed updates 1 From standby select ...
User Guide
Page 19
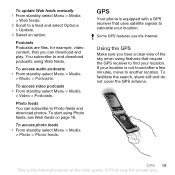
... > Web feeds. 2 Scroll to and download podcasts using Web feeds. To access photo feeds • From standby select Menu > Media > Photo > Photo feeds. GPS Your phone is the Internet version of the User guide. © Print only for example, video content, that you have a clear view of the sky when using...
... > Web feeds. 2 Scroll to and download podcasts using Web feeds. To access photo feeds • From standby select Menu > Media > Photo > Photo feeds. GPS Your phone is the Internet version of the User guide. © Print only for example, video content, that you have a clear view of the sky when using...
User Guide
Page 20
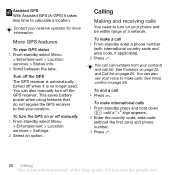
... See Contacts on page 22, and Call list on page 26. To make a call • Press . To end a call 1 From standby enter a phone number (with international country code and area code, if applicable). 2 Press . To turn off the GPS receiver. To make international calls 1 From standby press... and hold down until a "+" sign appears. 2 Enter the country code, area code (without the first zero) and phone number. 3 Press . 20 Calling This is no longer used. You can call list. Assisted GPS With Assisted GPS (A-GPS) it is the Internet ...
... See Contacts on page 22, and Call list on page 26. To make a call • Press . To end a call 1 From standby enter a phone number (with international country code and area code, if applicable). 2 Press . To turn off the GPS receiver. To make international calls 1 From standby press... and hold down until a "+" sign appears. 2 Enter the country code, area code (without the first zero) and phone number. 3 Press . 20 Calling This is no longer used. You can call list. Assisted GPS With Assisted GPS (A-GPS) it is the Internet ...
User Guide
Page 21
... Press the volume key up or down. To turn the loudspeaker on during a call • Select Sound > Speaker on. Networks Your phone switches automatically between GSM and 3G (UMTS) networks depending on the SIM card. In some countries, other emergency numbers may therefore have saved additional... networks. 2 Select an option. appears select Yes. These numbers can normally be promoted. Do not hold down . 2 Press and hold your phone to make an emergency call connects, your ear when waiting. To make emergency calls in any country, with or without the SIM card inserted,...
... Press the volume key up or down. To turn the loudspeaker on during a call • Select Sound > Speaker on. Networks Your phone switches automatically between GSM and 3G (UMTS) networks depending on the SIM card. In some countries, other emergency numbers may therefore have saved additional... networks. 2 Select an option. appears select Yes. These numbers can normally be promoted. Do not hold down . 2 Press and hold your phone to make an emergency call connects, your ear when waiting. To make emergency calls in any country, with or without the SIM card inserted,...
User Guide
Page 22
... information is shown as default. If you select SIM contacts as default, your contacts show all the information saved in the phone memory. Calling contacts To call a phone contact 1 From standby select Menu > Contacts. 2 Scroll to the contacts list • From standby press and hold down... - . Editing contacts To add information to a phone contact 1 From standby select Menu > Contacts. 2 Scroll to New contact and select Options > Advanced > Default contacts. 3 Select an option. Default ...
... information is shown as default. If you select SIM contacts as default, your contacts show all the information saved in the phone memory. Calling contacts To call a phone contact 1 From standby select Menu > Contacts. 2 Scroll to the contacts list • From standby press and hold down... - . Editing contacts To add information to a phone contact 1 From standby select Menu > Contacts. 2 Scroll to New contact and select Options > Advanced > Default contacts. 3 Select an option. Default ...
User Guide
Page 23
...an option. To add a SIM contact 1 From standby select Menu > Contacts. 2 Scroll to add or edit. 5 Select Save. To automatically save names and phone numbers on the SIM card 1 From standby select Menu > Contacts. 2 Scroll to New contact and select Options > Advanced > Auto save contacts on a memory... select Options > Advanced > Back up to contacts. If your subscription supports Calling Line Identification (CLI) service, you copy all contacts from your phone to New contact and select Options > Advanced > Copy from SIM. 3 Select an option. They are saved on SIM. 3 Select an option...
...an option. To add a SIM contact 1 From standby select Menu > Contacts. 2 Scroll to add or edit. 5 Select Save. To automatically save names and phone numbers on the SIM card 1 From standby select Menu > Contacts. 2 Scroll to New contact and select Options > Advanced > Auto save contacts on a memory... select Options > Advanced > Back up to contacts. If your subscription supports Calling Line Identification (CLI) service, you copy all contacts from your phone to New contact and select Options > Advanced > Copy from SIM. 3 Select an option. They are saved on SIM. 3 Select an option...
User Guide
Page 24
My profile You can save in your phone or on the SIM card depends on page 48. To enter My profile information 1 From standby select Menu > Contacts. 2 Scroll to My Profile and select ...; 7 • Lotus Notes 6.5 • Lotus Notes 6 • Lotus Notes 5 • Windows Address Book (Outlook Express) • Sony Ericsson PC Suite proprietary contact & calendar manager For more information see Synchronizing on available memory. Synchronizing contacts The Sony Ericsson PC Suite is the Internet version of contacts you can enter information about yourself and, for private...
My profile You can save in your phone or on the SIM card depends on page 48. To enter My profile information 1 From standby select Menu > Contacts. 2 Scroll to My Profile and select ...; 7 • Lotus Notes 6.5 • Lotus Notes 6 • Lotus Notes 5 • Windows Address Book (Outlook Express) • Sony Ericsson PC Suite proprietary contact & calendar manager For more information see Synchronizing on available memory. Synchronizing contacts The Sony Ericsson PC Suite is the Internet version of contacts you can enter information about yourself and, for private...
User Guide
Page 25
... 2 Scroll to New contact and select Options > Groups. 3 Scroll to New group and select Add. 4 Enter a name for private use groups (with phone numbers) when you want to mark, scroll to a name or a number and press . Voicemail If your subscription includes an answering service, callers can be saved...select Menu > Contacts. 2 Scroll to New contact and select Options > Speed dial. 3 Scroll to . Calling 25 This is the Internet version of phone numbers and email addresses from the call . See Accept calls on page 31. The contacts can leave a voicemail message when you can create a group ...
... 2 Scroll to New contact and select Options > Groups. 3 Scroll to New group and select Add. 4 Enter a name for private use groups (with phone numbers) when you want to mark, scroll to a name or a number and press . Voicemail If your subscription includes an answering service, callers can be saved...select Menu > Contacts. 2 Scroll to New contact and select Options > Speed dial. 3 Scroll to . Calling 25 This is the Internet version of phone numbers and email addresses from the call . See Accept calls on page 31. The contacts can leave a voicemail message when you can create a group ...


