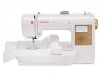
Instruction Manual
Page 2
... children aged from all instructions before using and before cleaning. Never operate this sewing machine if it has a damaged cord or plug, if it is required around the sewing machine needle and/or cutting blade. 11. Switch this sewing machine off ("O") position, then remove plug from accumulation of lint, dust and loose cloth. 5. Do not pull or push fabric while stitching. Return this owner's manual. 3. DANGER- Do not allow...
... children aged from all instructions before using and before cleaning. Never operate this sewing machine if it has a damaged cord or plug, if it is required around the sewing machine needle and/or cutting blade. 11. Switch this sewing machine off ("O") position, then remove plug from accumulation of lint, dust and loose cloth. 5. Do not pull or push fabric while stitching. Return this owner's manual. 3. DANGER- Do not allow...
Instruction Manual
Page 3
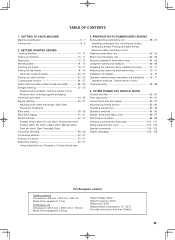
... Accessories 5 GETTING READY TO SEW Connecting the Power Supply 6 Polarized Plug 6 Start/Stop Button 7 Presser Foot Lifter 7 Winding & Inserting the Bobbin 8-10 Removing Bobbin from Bobbin Case 8 Preparing Thread Spool 8 Using Auxiliary Spool Pin 8 Winding the Bobbin 9 Inserting the Bobbin 10 Threading the Machine 11 Needle Threader 12 Drawing Up the Bobbin Thread 13 Changing the Needle 14 Adjusting the Thread Tension 15 Balanced thread tension 15 When the needle thread tension is too tight 15 When the needle thread tension is too loose.......... 15 Using Fabric and...
... Accessories 5 GETTING READY TO SEW Connecting the Power Supply 6 Polarized Plug 6 Start/Stop Button 7 Presser Foot Lifter 7 Winding & Inserting the Bobbin 8-10 Removing Bobbin from Bobbin Case 8 Preparing Thread Spool 8 Using Auxiliary Spool Pin 8 Winding the Bobbin 9 Inserting the Bobbin 10 Threading the Machine 11 Needle Threader 12 Drawing Up the Bobbin Thread 13 Changing the Needle 14 Adjusting the Thread Tension 15 Balanced thread tension 15 When the needle thread tension is too tight 15 When the needle thread tension is too loose.......... 15 Using Fabric and...
Instruction Manual
Page 4
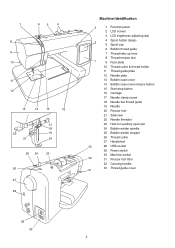
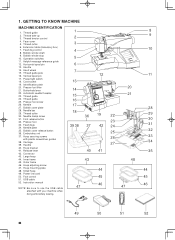
... 3 LCD brightness adjusting dial 4 Spool holder (large) 5 Spool cap 6 Bobbin thread guide 7 Thread take-up lever 8 Thread tension dial 9 Face plate 10 Thread cutter & thread holder 11 Thread guide plate 12 Needle plate 13 Bobbin case cover 14 Bobbin case cover release button 15 Start/stop button 16 Carriage 17 Needle clamp screw 18 Needle bar thread guide 19 Needle 20 Presser foot 21 Setscrew 22 Needle threader 23 Hole for auxiliary spool pin 24 Bobbin winder spindle 25 Bobbin winder stopper 26 Thread cutter 27 Handwheel 28 USB socket 29 Power switch 30 Machine socket 31 Presser foot lifter 32...
... 3 LCD brightness adjusting dial 4 Spool holder (large) 5 Spool cap 6 Bobbin thread guide 7 Thread take-up lever 8 Thread tension dial 9 Face plate 10 Thread cutter & thread holder 11 Thread guide plate 12 Needle plate 13 Bobbin case cover 14 Bobbin case cover release button 15 Start/stop button 16 Carriage 17 Needle clamp screw 18 Needle bar thread guide 19 Needle 20 Presser foot 21 Setscrew 22 Needle threader 23 Hole for auxiliary spool pin 24 Bobbin winder spindle 25 Bobbin winder stopper 26 Thread cutter 27 Handwheel 28 USB socket 29 Power switch 30 Machine socket 31 Presser foot lifter 32...
Instruction Manual
Page 50
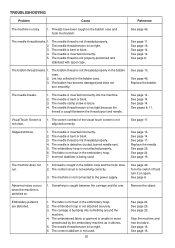
... attached properly. 6. The embroidery hoop is not See page 17. Incorrect stabilizer is not threaded properly. 2. Replace the needle. See page 6. Stop the machine and free the fabric. See page 16. The needle thread is being used . 50 See page 24. The needle clamp screw is 1. See page 14. See page 14. Visual Touch Screen is loose. 4. Skipped stitches. 1. See page 49. 3. The needle is caught between the thread spool...
... attached properly. 6. The embroidery hoop is not See page 17. Incorrect stabilizer is not threaded properly. 2. Replace the needle. See page 6. Stop the machine and free the fabric. See page 16. The needle thread is being used . 50 See page 24. The needle clamp screw is 1. See page 14. See page 14. Visual Touch Screen is loose. 4. Skipped stitches. 1. See page 49. 3. The needle is caught between the thread spool...
Instruction Manual 2
Page 3
OTHER THINGS YOU SHOULD KNOW Presser foot lifter 90 - 91 Feed dog control 90 - 91 Converting to free-arm sewing 90 - 91 Adjusting top thread tension 92 - 93 Changing presser foot 92 - 93 Operation switches 94 - 95 Needle, thread and fabric chart 96 - 97 Performance checklist 98 - 99 Cleaning hook area and feed dogs 100 - 101 Oiling inside the face cover 102 - 103 Special accessories 104 - 105 Helpful messages 106 - 109 For European version Sewing machine Dimensions: 428 mm...
OTHER THINGS YOU SHOULD KNOW Presser foot lifter 90 - 91 Feed dog control 90 - 91 Converting to free-arm sewing 90 - 91 Adjusting top thread tension 92 - 93 Changing presser foot 92 - 93 Operation switches 94 - 95 Needle, thread and fabric chart 96 - 97 Performance checklist 98 - 99 Cleaning hook area and feed dogs 100 - 101 Oiling inside the face cover 102 - 103 Special accessories 104 - 105 Helpful messages 106 - 109 For European version Sewing machine Dimensions: 428 mm...
Instruction Manual 2
Page 6
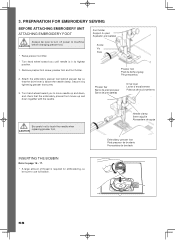
Thread guide 2. Feed dog control 8. Power/light switch 18. Needle 27. Foot release button 32. Embroidery unit 37. Large hoop 44. Power line cord 50. Bobbin winder stop 10. Vertical spool pin 17. Thread guide 24. Presser foot 33. Carriage 39. Inner frame 45. Outer frame 46. Small hoop 49. USB cable 52. Thread take-up 3. Thread cutter 6. Operation switches 11. Thread guide pole 16. Cord socket 19. Needle clamp screw 31. Feed dogs 34. Hoop securing screws with your machine when doing embroidery sewing. 1 2 3 4 5 6 7 13 14 15 16 17 18 39...
Thread guide 2. Feed dog control 8. Power/light switch 18. Needle 27. Foot release button 32. Embroidery unit 37. Large hoop 44. Power line cord 50. Bobbin winder stop 10. Vertical spool pin 17. Thread guide 24. Presser foot 33. Carriage 39. Inner frame 45. Outer frame 46. Small hoop 49. USB cable 52. Thread take-up 3. Thread cutter 6. Operation switches 11. Thread guide pole 16. Cord socket 19. Needle clamp screw 31. Feed dogs 34. Hoop securing screws with your machine when doing embroidery sewing. 1 2 3 4 5 6 7 13 14 15 16 17 18 39...
Instruction Manual 2
Page 8
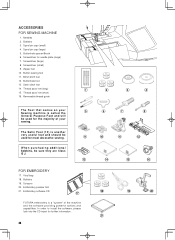
... EMBROIDERY 17. Vinyl bag 18. Spool pin cap (large) 5. Screwdriver (large) 8. Bobbins 19. Embroidery presser foot 21. Blind stitch foot 12. ACCESSORIES FOR SEWING MACHINE 1. Thread spool net (short) 16. Bobbins 3. Screwdriver (small) 9. Buttonhole foot 13. Satin stitch foot 14. In order to install the software, please look into the CD insert for needle plate (large) 7. Needles 2. Zipper foot 10. Scissors 20. Spool pin cap (small) 4. Embroidery software CD 17 FUTURA embroidery is another very useful foot and should be used for most decorative sewing...
... EMBROIDERY 17. Vinyl bag 18. Spool pin cap (large) 5. Screwdriver (large) 8. Bobbins 19. Embroidery presser foot 21. Blind stitch foot 12. ACCESSORIES FOR SEWING MACHINE 1. Thread spool net (short) 16. Bobbins 3. Screwdriver (small) 9. Buttonhole foot 13. Satin stitch foot 14. In order to install the software, please look into the CD insert for needle plate (large) 7. Needles 2. Zipper foot 10. Scissors 20. Spool pin cap (small) 4. Embroidery software CD 17 FUTURA embroidery is another very useful foot and should be used for most decorative sewing...
Instruction Manual 2
Page 10
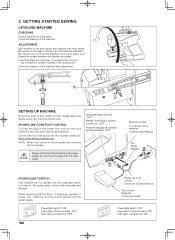
... machine after adjustment. (1) SETTING UP MACHINE Be sure to wipe off any surplus oil from the power supply. Connect the foot control plug into the machine socket (3), when using your machine the first time. The same switch controls both machine and table. Be careful not to have your wall outlet (2) as illustrated. Insert the driver into the cord socket (1) and your fingers be disconnected from needle plate area before using sewing machine only. Set power/light...
... machine after adjustment. (1) SETTING UP MACHINE Be sure to wipe off any surplus oil from the power supply. Connect the foot control plug into the machine socket (3), when using your machine the first time. The same switch controls both machine and table. Be careful not to have your wall outlet (2) as illustrated. Insert the driver into the cord socket (1) and your fingers be disconnected from needle plate area before using sewing machine only. Set power/light...
Instruction Manual 2
Page 30
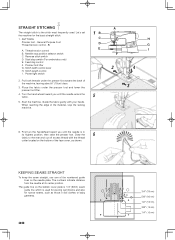
... Stitch length control I 4 2. Power/light switch 1B C D E A F 2 H G I . Start the machine. The numbers indicate distance from the needle at its highest position, then raise the presser foot. The guide line on the bobbin cover plate is 1/4" (6mm) seam guide line which is used . Presser foot lifter G. Turn the hand wheel toward you until the needle enters the fabric. 5 5. Guide the fabric gently with the thread cutter located on the needle plate. Start/stop position selector switch C. Pull both threads under the presser foot and lower the 3 presser foot...
... Stitch length control I 4 2. Power/light switch 1B C D E A F 2 H G I . Start the machine. The numbers indicate distance from the needle at its highest position, then raise the presser foot. The guide line on the bobbin cover plate is 1/4" (6mm) seam guide line which is used . Presser foot lifter G. Turn the hand wheel toward you until the needle enters the fabric. 5 5. Guide the fabric gently with the thread cutter located on the needle plate. Start/stop position selector switch C. Pull both threads under the presser foot and lower the 3 presser foot...
Instruction Manual 2
Page 36
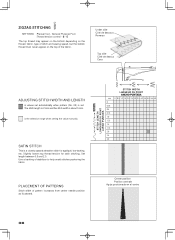
... appear on the bottom depending on the thread, fabric, type of stitch and sewing speed, but the bobbin thread must never appear on the top of the fabric. is about 5 mm. Under side Côté de dessous Reverso Top side Côté de dessus Cara ADJUSTING STITCH WIDTH AND LENGTH is values set automatically when pattern (No. 03) is a closely spaced attractive stitch for satin stitching. Set length between 0.5 and 2.0. ZIGZAG STITCHING SETTINGS :Presser foot -
... appear on the bottom depending on the thread, fabric, type of stitch and sewing speed, but the bobbin thread must never appear on the top of the fabric. is about 5 mm. Under side Côté de dessous Reverso Top side Côté de dessus Cara ADJUSTING STITCH WIDTH AND LENGTH is values set automatically when pattern (No. 03) is a closely spaced attractive stitch for satin stitching. Set length between 0.5 and 2.0. ZIGZAG STITCHING SETTINGS :Presser foot -

Instruction Manual 2
Page 38
... B 3. Regular blind stitch for soft, stretchable fabrics 1. Place the fabric under on fine fabrics or overcasting it does not, adjust the guide A (B) on the right side of the fabric. If it on the foot. First finish the raw edge. Turn the handwheel towards 3 you by turning it under the foot. NOTE: It takes practice to your desired length and width. BLIND STITCH SETTINGS :Presser foot - Blind Hem Foot :Thread tension control - Now...
... B 3. Regular blind stitch for soft, stretchable fabrics 1. Place the fabric under on fine fabrics or overcasting it does not, adjust the guide A (B) on the right side of the fabric. If it on the foot. First finish the raw edge. Turn the handwheel towards 3 you by turning it under the foot. NOTE: It takes practice to your desired length and width. BLIND STITCH SETTINGS :Presser foot - Blind Hem Foot :Thread tension control - Now...
Instruction Manual 2
Page 42
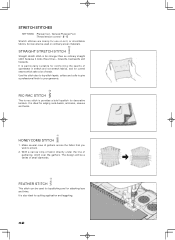
STRAIGHT STRETCH STITCH Straight stretch stitch is ideal for edging neck-bands, armholes, sleeves and hems. HONEYCOMB STITCH 1. Use this stitch also to top-stitch lapels, collars and cuffs to give a professional finish to smock. 2. It is far stronger than an ordinary straight stitch because it locks three times - STRETCH STITCHES SETTINGS :Presser foot - With a narrow strip of fabric directly under the line of gathers across the fabric that you wish to your garments. RIC...
STRAIGHT STRETCH STITCH Straight stretch stitch is ideal for edging neck-bands, armholes, sleeves and hems. HONEYCOMB STITCH 1. Use this stitch also to top-stitch lapels, collars and cuffs to give a professional finish to smock. 2. It is far stronger than an ordinary straight stitch because it locks three times - STRETCH STITCHES SETTINGS :Presser foot - With a narrow strip of fabric directly under the line of gathers across the fabric that you wish to your garments. RIC...
Instruction Manual 2
Page 50
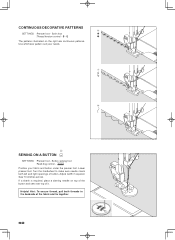
...A BUTTON SETTINGS :Presser foot - Position your needs. Lower presser foot. S - Sew 10 stitches across. Helpful Hint: To secure thread, pull both threads to make sure needle clears both left and right openings of button. Turn the handwheel to the backside of it. Use whichever pattern suit your fabric and button under the presser foot. If a shank is required, place a darning needle on the right are continuous patterns. Button sewing foot :Feed dog control - Adjust width if required. Satin foot :Thread tension control - CONTINUOUS DECORATIVE PATTERNS SETTINGS :Presser foot...
...A BUTTON SETTINGS :Presser foot - Position your needs. Lower presser foot. S - Sew 10 stitches across. Helpful Hint: To secure thread, pull both threads to make sure needle clears both left and right openings of button. Turn the handwheel to the backside of it. Use whichever pattern suit your fabric and button under the presser foot. If a shank is required, place a darning needle on the right are continuous patterns. Button sewing foot :Feed dog control - Adjust width if required. Satin foot :Thread tension control - CONTINUOUS DECORATIVE PATTERNS SETTINGS :Presser foot...
Instruction Manual 2
Page 58
... not to use full bobbin. Remove presser foot screw, presser foot and foot holder. 2. Secure it by tightening presser foot screw. 3. 3. Turn hand wheel toward you until needle is required for embroidering, so be sure to turn off power to machine CAUTION before changing presser foot. * Raise presser foot lifter. * Turn hand wheel toward you to page 16 - 17. * A large amount of thread is in its highest position. 1. Needle clamp Serre-aiguille Abrazadera de aguja Embroidery presser foot Pied...
... not to use full bobbin. Remove presser foot screw, presser foot and foot holder. 2. Secure it by tightening presser foot screw. 3. 3. Turn hand wheel toward you until needle is required for embroidering, so be sure to turn off power to machine CAUTION before changing presser foot. * Raise presser foot lifter. * Turn hand wheel toward you to page 16 - 17. * A large amount of thread is in its highest position. 1. Needle clamp Serre-aiguille Abrazadera de aguja Embroidery presser foot Pied...
Instruction Manual 2
Page 60
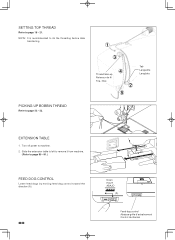
NOTE: It is recommended to page 22 - 23. 1 3 Thread take-up Releveur de fil Tria- PICKING UP BOBBIN THREAD Refer to do the threading before data transferring. SETTING TOP THREAD Refer to machine. 2. hilos 4 2 5 tab Languette Lengüeta EXTENSION TABLE 1. Turn off power to page 18 - 21. Slide the extension table to left to remove it from machine. (Refer to page 90 - 91.) FEED DOG CONTROL Lower feed dogs by moving feed dog control toward the direction (A). 60 Down HAUT ABAJO (A) Feed dog control Abaisse-griffe d'entraînement Control de dientes
NOTE: It is recommended to page 22 - 23. 1 3 Thread take-up Releveur de fil Tria- PICKING UP BOBBIN THREAD Refer to do the threading before data transferring. SETTING TOP THREAD Refer to machine. 2. hilos 4 2 5 tab Languette Lengüeta EXTENSION TABLE 1. Turn off power to page 18 - 21. Slide the extension table to left to remove it from machine. (Refer to page 90 - 91.) FEED DOG CONTROL Lower feed dogs by moving feed dog control toward the direction (A). 60 Down HAUT ABAJO (A) Feed dog control Abaisse-griffe d'entraînement Control de dientes
Instruction Manual 2
Page 74
... the installation set-up. Pressing the "Next" button will finally start -up protocol. The installation procedure is . You can always abort the installation procedure by turning the Hand wheel towards you. 2. Finally you are requested to continue. A progress bar will automatically close the software, switch the hoop and the open the software again. 74 Next attach the embroidery unit to your sewing machine and connect the USB...
... the installation set-up. Pressing the "Next" button will finally start -up protocol. The installation procedure is . You can always abort the installation procedure by turning the Hand wheel towards you. 2. Finally you are requested to continue. A progress bar will automatically close the software, switch the hoop and the open the software again. 74 Next attach the embroidery unit to your sewing machine and connect the USB...
Instruction Manual 2
Page 76
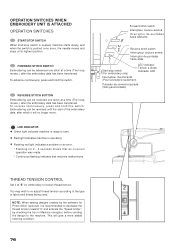
... ATTACHED OPERATION SWITCHES START/STOP SWITCH When start/stop switch (For embroidery only) LED indicator Témoin a diode Indicador LED Interrupteur marche/arrêt (Pour la broderie seulement) Pulsador de comienzo/parada (Sólo para bordado) THREAD TENSION CONTROL Set it at "E" for embroidery to loosen thread tension. FORWARD STITCH SWITCH Embroidering can be reversed one stitch at a time (The hoop moves.), after which it will give a more , the needle...
... ATTACHED OPERATION SWITCHES START/STOP SWITCH When start/stop switch (For embroidery only) LED indicator Témoin a diode Indicador LED Interrupteur marche/arrêt (Pour la broderie seulement) Pulsador de comienzo/parada (Sólo para bordado) THREAD TENSION CONTROL Set it at "E" for embroidery to loosen thread tension. FORWARD STITCH SWITCH Embroidering can be reversed one stitch at a time (The hoop moves.), after which it will give a more , the needle...
Instruction Manual 2
Page 82
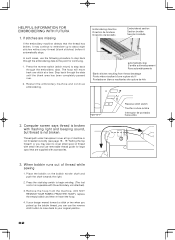
... accessories. 3. When bobbin runs out of machine is not threaded correctly (see page 18 - 19 "Setting the top thread") or you picked up to move back one stitch at top of thread while sewing 1. If stitches are missing If the embroidery machine detects that are supplied with small net and use the reverse stitch button to about eight stitches without any thread (blank stitches) before it automatically stops. In such cases, use...
... accessories. 3. When bobbin runs out of machine is not threaded correctly (see page 18 - 19 "Setting the top thread") or you picked up to move back one stitch at top of thread while sewing 1. If stitches are missing If the embroidery machine detects that are supplied with small net and use the reverse stitch button to about eight stitches without any thread (blank stitches) before it automatically stops. In such cases, use...

Instruction Manual 2
Page 98
...Buttonhole lever is too short - Clean hook (see page 90 - 91). * Stitch length is not raised when sewing stitch patterns. - Fabric does not move. * Presser foot is not threaded correctly. - Lower presser foot (see page 100 - 101). * Needle is being pulled or pushed against machine feeding action. - See page 96 - 97. * Machine is not lowered - Needle breaks. * Fabric is damaged. - THREAD PROBLEMS Thread bunches. * Top and bobbin threads are formed (see page 24 - 27). * Feed dogs are irregular. * Needle size is not threaded correctly. - Bobbin thread breaks. * Bobbin case...
...Buttonhole lever is too short - Clean hook (see page 90 - 91). * Stitch length is not raised when sewing stitch patterns. - Fabric does not move. * Presser foot is not threaded correctly. - Lower presser foot (see page 100 - 101). * Needle is being pulled or pushed against machine feeding action. - See page 96 - 97. * Machine is not lowered - Needle breaks. * Fabric is damaged. - THREAD PROBLEMS Thread bunches. * Top and bobbin threads are formed (see page 24 - 27). * Feed dogs are irregular. * Needle size is not threaded correctly. - Bobbin thread breaks. * Bobbin case...
Instruction Manual 2
Page 112
..., repair, electrical or mechanical adjustment." 4. "IMPORTANT SAFETY INSTRUCTIONS" " When using this sewing machine from the accumulation of The Singer Company Ltd or its intended use outdoors." 7. "This sewing machine should always be left unattended when plugged in. Replace bulb with a damaged needle plate as threading needle, changing needle, threading bobbin, or changing presser foot, etc." 15. To reduce the risk of electric shock:" 1. "Never operate this can cause needle to break." 14. "Never drop or insert any opening." 6. To...
..., repair, electrical or mechanical adjustment." 4. "IMPORTANT SAFETY INSTRUCTIONS" " When using this sewing machine from the accumulation of The Singer Company Ltd or its intended use outdoors." 7. "This sewing machine should always be left unattended when plugged in. Replace bulb with a damaged needle plate as threading needle, changing needle, threading bobbin, or changing presser foot, etc." 15. To reduce the risk of electric shock:" 1. "Never operate this can cause needle to break." 14. "Never drop or insert any opening." 6. To...


