Singer S10 I STUDIO Support Question
Singer S10 I STUDIO Support Question
Find answers below for this question about Singer S10 I STUDIO.Need a Singer S10 I STUDIO manual? We have 2 online manuals for this item!
Question posted by maryhancock1234 on June 29th, 2015
My Usb Wont Work On My Machine
The person who posted this question about this Singer product did not include a detailed explanation. Please use the "Request More Information" button to the right if more details would help you to answer this question.
Current Answers
Answer #1: Posted by BusterDoogen on June 29th, 2015 12:31 PM
BusterDoogen

Member since:
October 30th, 2011 Points: 28,565,407

Member since:
October 30th, 2011 Points: 28,565,407
Make sure the (optional) usb memory stick is inserted & formatted per the Manual.
I hope this is helpful to you!
Please respond to my effort to provide you with the best possible solution by using the "Acceptable Solution" and/or the "Helpful" buttons when the answer has proven to be helpful. Please feel free to submit further info for your question, if a solution was not provided. I appreciate the opportunity to serve you!
Related Singer S10 I STUDIO Manual Pages
Instruction Manual - Page 2
...sewing machine.... Return this sewing machine is designed and... in this sewing machine and foot controller...attention is necessary when this sewing machine to break. 12. Use...following:
This sewing machine is used by...on disposal, this sewing machine from the electric outlet... sewing machine from the electrical outlet ... manual. Switch this sewing machine off ("O") position, ...
Instruction Manual - Page 3
... 41 Saving in Designs 26 Ready to Sew Screen 26 Color List Screen 26 Preparing Machine and Hoop for Machine 19 HELP ?
How to Save to Sew Screen 31
Color Change 31 Placement of... 16
Creating a New Folder on the USB Memory Stick.. 44 Opening a File from the Internal Machine Memory.. 45 Deleting a File 45 Opening a File from the USB Memory Stick (Optional 46
Small hoop embroidery...
Instruction Manual - Page 4
7
8 9 10
65
4
11 12
13
14
15
16
17 18
22
19
21
20
25 24
23
26 27 28
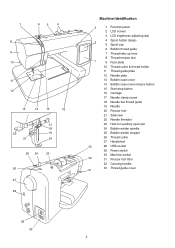
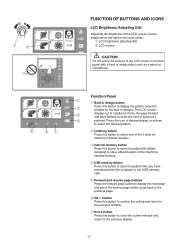
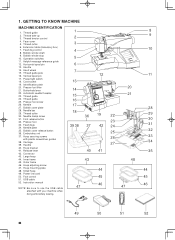
Machine Identification
3 2 1
33 32 31
1 Function panel 2 LCD screen 3 LCD brightness adjusting dial 4 Spool holder (large) 5...winder spindle 25 Bobbin winder stopper 26 Thread cutter 27 Handwheel 28 USB socket 29 Power switch 30 Machine socket 31 Presser foot lifter 32 Carrying handle 33 Thread guide cover
29 30 4
Instruction Manual - Page 6
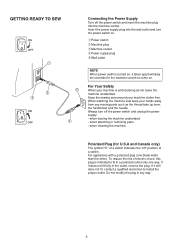
... U.S.A and Canada only)
The symbol "O" of a switch indicates the "off the power switch and unplug the power supply: - Insert the power supply plug into the machine socket.
When watching the machine sew keep your machine clutter free. To reduce the risk of electric shock, this plug is embroidering do not leave the...
Instruction Manual - Page 8
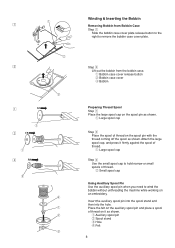
... out the bobbin from Bobbin Case Step z Slide the bobbin case cover plate release button to the right to wind the bobbin without unthreading the machine while working on the spool pin as shown. q Large spool cap
Step x Place the spool of thread.
Instruction Manual - Page 17
... reverse page buttons Press the forward page button to display the next page and press the reverse page button to go back to the USB memory stick. r USB memory button Press this button to open the pattern files you have transferred from the computer to the previous page.
q
w
FUNCTION OF BUTTONS AND...
Instruction Manual - Page 19
...spm
q
we
Maximum
1
speed setting
650 spm
2
ON OFF
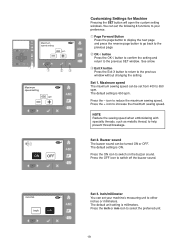
Customizing Settings for Machine
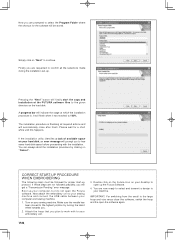
Pressing the SET button will open the custom setting windows. See arrow.
Set 1....inch
mm
Set 3. icon to the previous window without changing the setting. Set 2.
Maximum speed The maximum sewing speed can be set from 400 to 650 spm.
Inch/millimeter You can set your preference.
w OK &#...
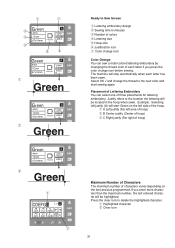
Instruction Manual - Page 20
... erase all data stored in the key position adjustment window. The color number of the thread you . Do not turn the machine off or remove the USB memory stick until the machine prompts you wish to choose from. Set 6.
Step z Press the YES icon.
Reformat using SET 5. Format
q
5
w
Format Memory?
5
z
Key Position
6
Adjustment...
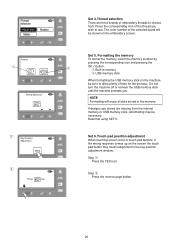
Instruction Manual - Page 26
... Built-in Designs
Step z Your SINGER® Studio™ S10 embroidery machine
provides you with 55 ready-to-sew built-in the selected design.
The ready to sew screen will move to display a list of the...button !2 Exit X button !3 Positioning buttons
26 q Complete image of the selected design w Sewing time in minutes e Number of colors in design r Spool icon t Design size in ...
Instruction Manual - Page 28
...
wr
q
e
Step v Lower the presser foot. Trim the thread tail at the beginning of thread breakage r Stitch forward button
28 The machine will buzz when design is finished. Step , Continue sewing and changing threads until the design is feeding evenly off of bobbin thread. Select the OK √ button to return to...
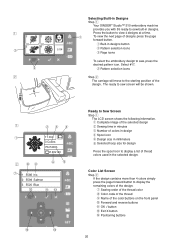
Instruction Manual - Page 30

...SIZE
MC
i
. Step x Press the page forward button w to save in the machine internal memory, press the file save a lettering combination you would need to select lower...A 2/7
kl mno
z. Step b Press the cursor icon forward t to select "e".
Step n Press the r icon 5 times to sew screen.
30 To save is complete. The display will say M-001. See page 41 Step 1 and Step 2 for diagrams. Step ...
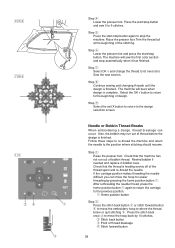
Instruction Manual - Page 31
...left justify (A) will be highlighted. q Highlighted character w Clear icon
31
The machine will be located in minutes e Number of colors r Lettering size t Hoop ...A
color change ABC
q
Green
4min
1Color
67x19mm
A
color change 140x140 A B C
w
Ready to Sew Screen
q Lettering embroidery design w Sewing time in the hoop when sewn.
Select OK √ and change 140x140 A B C
e
q
...
Instruction Manual - Page 41
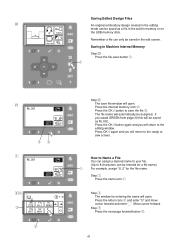
...from page 30 this will return to the ready to 8 characters can only be saved in Machine Internal Memory
Step ¤0 Press the file-save the file e. Move cursor forward. If ...you will be saved as a file in the built-in memory or on
100%
the USB memory stick.
140x140
Remember a file can be entered for a file name.)
q
For example, assign... to your file.
(Up to sew screen.
Instruction Manual 2 - Page 6
... 8. Presser foot 33. Release lever 42. Instruction manual
NOTE: Be sure to use the USB cable attached with plastic screwdriver guides 38. 1. Hand wheel 15. Automatic needle threader 23. ...Vertical spool pin 17. Buttonhole lever 22. Needle clamp screw 31. Hoop securing screws
with your machine when doing embroidery sewing.
1 2 3 4 5 6 7 13 14 15 16 17 18
39 38
47
36...
Instruction Manual 2 - Page 74
...to your embroidery unit.
3. Turn on "Cancel". Attach the hoop that you plan to work with the installation.
Pressing the "Next" button will get a "Transmission Pending" error message... free some hard disk space before proceeding with to your sewing machine and connect the USB cable between your computer and sewing machine.
1.
A progress bar will automatically close the software, ...
Instruction Manual 2 - Page 90
...to -reach places.
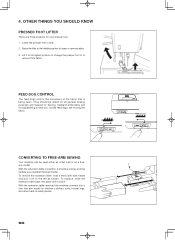
90 CONVERTING TO FREE-ARM SEWING
Your machine can be raised for all general sewing purposes and lowered for darning, freehand embroidery and ...monogramming so that is being sewn. bed or as a standard flat-bed model. With the extension table removed the machine converts into place until it provides a large working...
Instruction Manual 2 - Page 94
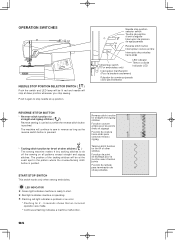
START/STOP SWITCH
This switch works only when sewing embroidery.
Push it again to stop needle at down position whenever you stop sewing.
LED INDICATOR Green light indicates machine is ready to start. Red light indicates machine is pushed. Reverse stitch function for straight and zigzag stitches
Fonction couture arrière pour les...
Instruction Manual 2 - Page 106

...and on power switch.
106
Needle is not connected. Connect your PC to the sewing machine with LED lamps above stitch pattern numbers on the control panel and/or PC screen. On ...233;férence des messages d'aide Guía de referencia de mensajes de ayuda
USB cable is lowered when starting embroidery sewing. Raise needle by rotating hand wheel toward you. When a message is...
Instruction Manual 2 - Page 108
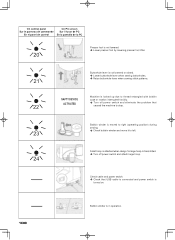
... left. SAFTY DEVICE ACTIVATED
Machine is transmitted. Turn off power switch and eliminate the problem that USB cable is connected and power switch is
turned on.
108
Bobbin winder is not lowered or raised. Lower buttonhole lever when sewing buttonholes. Raise buttonhole lever when sewing stitch patterns. Small hoop is attached...
Instruction Manual 2 - Page 112
...." 2. Special care is for all moving parts. "Do not use outdoors." 7.
To reduce the risk of electric shock, this sewing machine if it has a damaged cord or plug, if it is not working properly, if it in the outlet, reverse the plug.
This equipment is being used as a toy. "IMPORTANT SAFETY INSTRUCTIONS"
" When...
Similar Questions

Singer S10 Studio - Needle Going Crazy
I have a Singer S10 Studio I bought earlier this year in April. It only has about 20 hours of embroi...
I have a Singer S10 Studio I bought earlier this year in April. It only has about 20 hours of embroi...
(Posted by yvonneagostinho 6 years ago)

Handwheel Won't Turn
I tried to thread the s10 machine and the handwheel will not turn at all. Is there a lock position f...
I tried to thread the s10 machine and the handwheel will not turn at all. Is there a lock position f...
(Posted by LoisM 7 years ago)

Too Many Colors
when I load a design from usb to machine it says too many colors. The Design is all one color! Why i...
when I load a design from usb to machine it says too many colors. The Design is all one color! Why i...
(Posted by Texasgunns 8 years ago)

Sewing Machine Will Start Sewing By Itself
I tuen the sewing machine on and c it starts sewing by itself. I try to stop it and the only way is ...
I tuen the sewing machine on and c it starts sewing by itself. I try to stop it and the only way is ...
(Posted by susienolen 9 years ago)

Usb Cord
When connecting usb cord from machine to lap top, I click on The Futura icon it tells me to connect ...
When connecting usb cord from machine to lap top, I click on The Futura icon it tells me to connect ...
(Posted by baylady55 11 years ago)