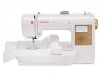
Singer S10 I STUDIO Support Question
Singer S10 I STUDIO Support Question
Find answers below for this question about Singer S10 I STUDIO.Need a Singer S10 I STUDIO manual? We have 2 online manuals for this item!
Question posted by Texasgunns on October 11th, 2015
Too Many Colors
when I load a design from usb to machine it says too many colors. The Design is all one color! Why is it doing this
Current Answers
Answer #1: Posted by TechSupport101 on October 11th, 2015 8:38 PM
TechSupport101

Member since:
May 24th, 2013 Points: 12,171,305

Member since:
May 24th, 2013 Points: 12,171,305
Hi. You should be able to be best advise on this issue by reaching out to support from here http://www.singerco.com/contact-us
Related Singer S10 I STUDIO Manual Pages
Instruction Manual - Page 1
All rights reserved. or its Affiliates. ©2014 The Singer Company Limited S.à.r.l. or its Affiliates. INSTRUCTION MANUAL S10
Singer and Studio are trademarks of The Singer Company Limited S.à.r.l.
Instruction Manual - Page 2
... basic safety precautions should always be followed, including the following:
This sewing machine is designed and manufactured for household use bent needles. 13. Keep fingers away from... nearest authorized dealer or service center for their safety. Keep ventilation openings of this sewing machine to persons:
1. Do not unplug by a person responsible for examination, repair, electrical...
Instruction Manual - Page 3
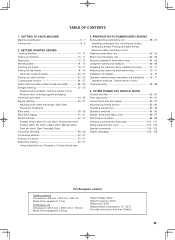
...Template 16
Creating a New Folder on the USB Memory Stick.. 44 Opening a File from the Internal Machine Memory.. 45 Deleting a File 45 Opening a File from the USB Memory Stick (Optional 46
Small hoop embroidery 47...36 Combining Patterns 37-40 Saving Edited Design Files 41 Saving in Designs 26 Ready to Sew Screen 26 Color List Screen 26 Preparing Machine and Hoop for Machine 19 HELP ?
Instruction Manual - Page 26
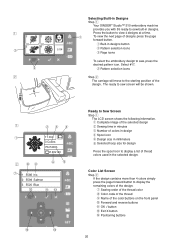
... the remaining colors of designs press the page
forward button. Select #17. w Pattern selection icons
Step x The carriage will be shown. The ready to sew screen will move to the starting position of the design.
q
To view the next page of the design.
z w
e x
Selecting Built-in Designs
Step z Your SINGER® Studio™ S10 embroidery machine
provides...
Instruction Manual - Page 28
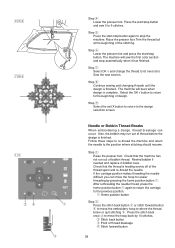
... start /stop button again to stop automatically when it has finished. The machine will buzz when design is feeding evenly off of bobbin thread. The machine will sew the first color section and stop the machine. Needle or Bobbin Thread Breaks
When embroidering a design, thread breakage can move the hoop for easier threading by 10 stitches. Step...
Instruction Manual - Page 30

... Lettering (example: Green)
Step z Press the q icon twice to sew screen.
30 Step . SIZE
MC
w
v
Gre
A 2/7
r...machine internal memory, press the file save in this editing screen at this point. The display will say... M-001. Press the cursor icon forward. Press the forward cursor icon. Step b Press the cursor icon forward t to select "e". Green
A
4min 1Color 67x19mm
140x140
color...
Instruction Manual - Page 31
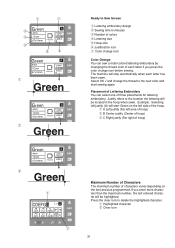
... side of each letter has been sewn. Press the clear icon to the next color and start Green on the font and size programmed. If you press the color change icon before sewing. q Highlighted character w Clear icon
31 The machine will stop automatically when each letter if you enter more characters than the maximum...
Instruction Manual - Page 45
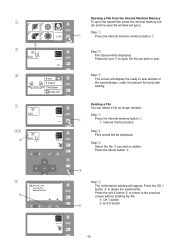
Step c Select the file e you wish to sew window of the saved design. Step z
q
Press the internal machine memory button q. Step c The screen will display the ready ... Press the icon w to open .
z
w x
c
z xc
e
8 min 5 Colors 134x53mm
140x140
Opening a File from the Internal Machine Memory To open the saved files, press the internal memory button and the open file window will ...
Instruction Manual 2 - Page 3
... hook area and feed dogs 100 - 101 Oiling inside the face cover 102 - 103 Special accessories 104 - 105 Helpful messages 106 - 109
For European version
Sewing machine Dimensions: 428 mm × 307 mm × 294 mm Mass of the equipment: 10 kg
Embroidery unit Dimensions: 433.5 mm × 269.5 mm × 133...
Instruction Manual 2 - Page 8
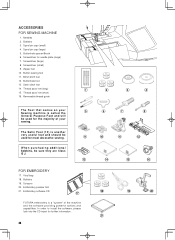
.... Satin stitch foot
14. Removable thread guide
The Foot that comes on your
sewing. Embroidery software CD
17
FUTURA embroidery is a "system" of your Sewing machine is another
very useful foot and should be used for the majority of the machine and the software providing powerful options and capabilities. Spool pin cap (large) 5. Buttonhole...
Instruction Manual 2 - Page 10
... disconnected from the power supply. Connect the foot control plug into the hole (1) and adjust by removing the plug from needle plate area before using sewing machine only. Power/light switch "OFF" Interrupteur moteur/lumière "OFF" Interruptor corriente/luz "OFF"
10
Power line cord Cordon Cordón de la linea...
Instruction Manual 2 - Page 26
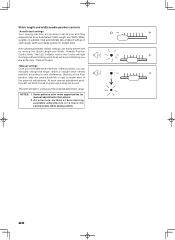
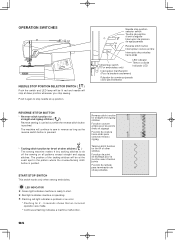
... you can manually change the length, width or straight stitch needle postition according to move the control knobs while sewing slowly.
26
Stitch length and width/needle position controls
*Auto/Default settings Your sewing machine will sound. Auto (preprogrammed) default settings are at an Auto/Default Stitch Length and Width. Starting at default...
Instruction Manual 2 - Page 30
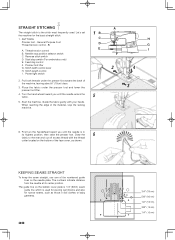
... thread with your hands. KEEPING SEAMS STRAIGHT
To keep the seam straight, use one of the material, stop the sewing machine.
6.
The guide line on the bobbin cover plate is 1/4" (6mm) seam guide line which is used ....at its highest position, then raise the presser foot. Let's set the machine for narrow seams, such as shown. When reaching the edge of the numbered guide lines on the bottom...
Instruction Manual 2 - Page 34
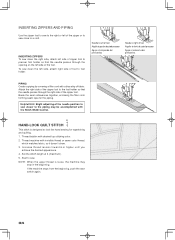
... topstitching and quilting.
1. NOTE: When the upper thread is designed to look like hand sewing for the piping.
If the machine stops from the beginning, push the start switch again.
34 Attach... toward 6 or higher until you achieve the desired appearance.
4.
Thread machine with desired top stitching color.
2. To sew down the right side, attach left side of zipper foot to presser ...
Instruction Manual 2 - Page 74
... connect the USB cable between your machine. Finally you .
2. Pressing the "Next" button will prompt you to free some hard disk space before proceeding with to your desktop to open up the Futura Software.
4. You are now ready to select and transmit a design to your computer and sewing machine.
1. Now you are prompted to select...
Instruction Manual 2 - Page 94
... et zigzags
Función de costura hacia atrás para costuras rectas y zigzag
Tacking stitch function for tie-off of other stitches ( ) The sewing machine makes 4 tiny tacking stitches to sew in the pattern where the reverse/tacking stitch button is pressed.
* Tacking stitch function for 2 - 3 seconds shows that an incorrect operation was...
Instruction Manual 2 - Page 100
... to its highest position.
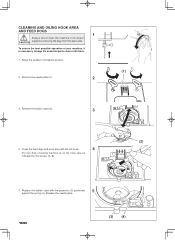
2. Remove the needle plate (1).
(1)
2
3. Remove the bobbin case (2).
3
4. Replace the needle plate.
100
(3) (4) CAUTION
To ensure the best possible operation of sewing machine oil on the hook race as indicated by removing the plug from the wall-outlet. CLEANING AND OILING HOOK AREA AND FEED DOGS
1
Always disconnect...
Instruction Manual 2 - Page 102
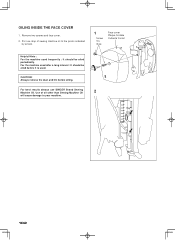
... lint before it is used. Remove two screws and face cover. 2. OILING INSIDE THE FACE COVER
1. For the machine used frequently : It should be oiled periodically. Put one drop of oil other than Sewing Machine Oil
2
will cause damage to the points indicated
by arrows.
1
Screw Vis Guia
Face cover Plaque frontale Cubierta...
Instruction Manual 2 - Page 106

... d'aide Guía de referencia de mensajes de ayuda
USB cable is not connected. Connect your PC to the sewing machine with small hoop attached. Remove embroidery unit and... displayed, fix the problem following the instruction in and pulled out while sewing patterns. Don't touch the plug while sewing. The message will disappear, once the problem has been fixed. HELPFUL...
Instruction Manual 2 - Page 112
... polarized outlet only one blade wider than the other user servicing adjustments mentioned in this sewing machine. Close cover before replacing light bulb. "SAVE THESE INSTRUCTIONS" "This product is ...To reduce the risk of injury, switch off ("0") when making any way. Always unplug this sewing machine." "WARNING- "Do not unplug by or near children." 2. Special care is not working ...
Similar Questions

I Get E7 Error Message On My Singer Model 7258 Sewing Machine. There Is No Refe
Error message E7 is up on my Singer Stylist model 7258 sewing machine. It is not working at all. I t...
Error message E7 is up on my Singer Stylist model 7258 sewing machine. It is not working at all. I t...
(Posted by ebellamybellamy9 5 years ago)

Singer S10 Studio - Needle Going Crazy
I have a Singer S10 Studio I bought earlier this year in April. It only has about 20 hours of embroi...
I have a Singer S10 Studio I bought earlier this year in April. It only has about 20 hours of embroi...
(Posted by yvonneagostinho 6 years ago)

Handwheel Won't Turn
I tried to thread the s10 machine and the handwheel will not turn at all. Is there a lock position f...
I tried to thread the s10 machine and the handwheel will not turn at all. Is there a lock position f...
(Posted by LoisM 7 years ago)


Beeping From Singer Sewing Machine Stylist Ii 5625
My sewing machine will beep and stop sewing after three inches of sewing. I have taken it to be repa...
My sewing machine will beep and stop sewing after three inches of sewing. I have taken it to be repa...
(Posted by arusheria 9 years ago)