Singer SES2000 Support Question
Singer SES2000 Support Question
Find answers below for this question about Singer SES2000.Need a Singer SES2000 manual? We have 1 online manual for this item!
Question posted by baylady55 on February 13th, 2013
Usb Cord
When connecting usb cord from machine to lap top, I click on The Futura icon it tells me to connect usb cord and turn machine on which is done
Current Answers
Answer #1: Posted by tintinb on February 14th, 2013 1:32 AM
tintinb

Member since:
October 26th, 2012 Points: 7,056,560

Member since:
October 26th, 2012 Points: 7,056,560
I believe that the USB cord may be connected but loosened. The very first thing you have to do is to connect the cord properly and tightly. If this solution didn't work, your USB cord should be replaced. You should also refer to the user's manual for further details/instructions. Here's the link:
http://www.helpowl.com/manuals/Singer/SES2000/179390
If you have more questions, please don't hesitate to ask here at HelpOwl. Experts here are always willing to answer your questions to the best of our knowledge and expertise.
Regards,
Tintin
Related Singer SES2000 Manual Pages
Instruction Manual - Page 3
... 54 - 55 Continuous patterns 56 - 57 Novelty patterns 58 - 59
Sewing on a button 58 - 59 Buttonhole making 60 - 65
Using buttonhole foot, Procedure, Corded buttonholes Manual buttonhole 66 - 67
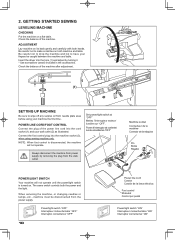
3. GETTING TO KNOW MACHINE Machine identification 6 - 7 Accessories 8 - 9
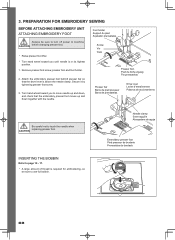
2. PREPARATION FOR EMBROIDERY SEWING Before attaching embroidery unit 68 - 71
Attaching embroidery foot, Inserting the...
Instruction Manual - Page 6
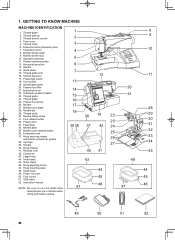
... unit 37. Hoop bracket 41. USB cable 52. Face cover 5. Bobbin winder stop 10. Power/light switch...lifter 21. Needle clamp screw 31. Hoop securing screws
with your machine when doing embroidery sewing.
1 2 3 4 5 6 7 13 14 15 16 17...
51
52
6 Hoop adjusting screw 47. 1. GETTING TO KNOW MACHINE
MACHINE IDENTIFICATION
1. Cord socket 19. Needle bar 29. Carriage 39. Small hoop 49....
Instruction Manual - Page 8
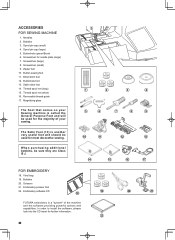
... CD
19
20
18
FUTURA embroidery is a "system" of your sewing.
1
2
3
5
6
7
8
The Satin Foot (13) is called the General Purpose Foot and will be used for needle plate (large) 7. Needles 2. Buttonhole opener/Brush 6. Screwdriver (large) 8. Blind stitch foot 12. Vinyl bag 19. Scissors 21. ACCESSORIES FOR SEWING MACHINE
1. Screwdriver (small) 9. Button sewing foot 11. Buttonhole...
Instruction Manual - Page 10
Be careful not to drop the machine and not to have your wall outlet (2) as illustrated.
Power line cord/FOOT CONTROL
Connect the plug of the power line cord into the hole (1) and adjust by removing the plug from power supply by turning it. * Use screwdriver (small) included in the accessories. Poner el Interruptor de corriente...
Instruction Manual - Page 24
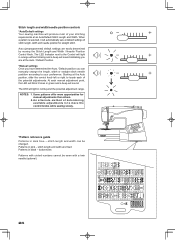
...o d o f d e t e r m i n i n g available adjustments is selected, it will automatically sew at the Auto / Default Position. *Manual settings Once you have determined the Auto / Default position you are at default ...sewing slowly.
*Pattern reference guide
Patterns in pink - Patterns in dark blue - Stitch length and width/needle position controls
*Auto/Default settings Your sewing machine...
Instruction Manual - Page 26
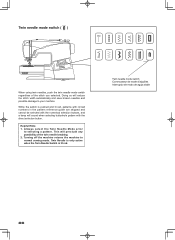
...s s e l e c t t h e Tw i n N e e d l e M o d e p r i o r
to normal sewing mode. Doing so will sound when selecting buttonhole pattern with the numerical selection buttons, and a beep will reduce the stitch width automatically and save broken... needles and possible damage to your machine. Twin needle mode switch ( )
When using twin needles, push the twin...
Instruction Manual - Page 32
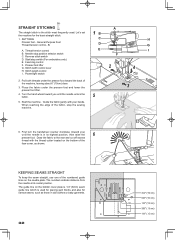
... control B. Feed dog control F. Turn the hand wheel toward you ) until the needle enters the fabric.
5
5. First turn the handwheel counter clockwise (toward the back of
the machine, leaving about 6" (15cm) clear... use one of the numbered guide lines on the bottom of the fabric, stop the sewing machine.
6. Stitch length control I
4
2. Place the fabric under the presser foot toward...
Instruction Manual - Page 36
...stop .
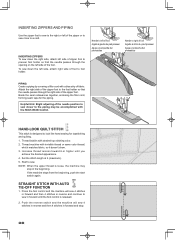
36 Push the reverse switch and the machine will sew 4 stitches in forward and then 4 stitches in ...cord, forming seam tape for topstitching and quilting. 1. NOTE: When the upper thread is designed to foot holder. To sew down the right side, attach left side of foot to look like hand sewing for the piping. Helpful Hint: Slight adjusting of fabric.
Needle to sew. Thread machine...
Instruction Manual - Page 62
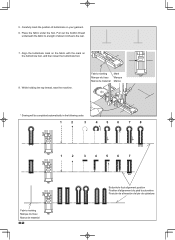
5. Pull out the bobbin thread
underneath the fabric to the rear.
7. Fabric marking Marque du tissu Marca de material
mark Marque Marca
* Sewing will be completed automatically in the following order.
1
2
3
4
5
6
7
8
1
2
3
4
5
6
7
Fabric marking Marque du tissu Marca de ... garment. 6. Place the fabric under the foot.
While holding the top thread, start the machine.
Instruction Manual - Page 64
... Saliente Tige
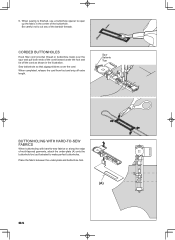
BUTTONHOLING WITH HARD-TO-SEW FABRICS
When buttonholing with hard-to open up the fabric in the illustration. CORDED BUTTONHOLES
Hook filler cord (crochet thread or buttonhole twist) ...64
Be careful not to make perfect buttonholes. When completed, release the cord from foot and snip off the cord as illustrated to cut any of the buttonhole.
Place the fabric between the...
Instruction Manual - Page 66
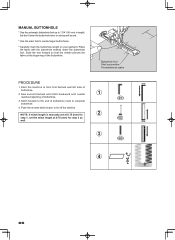
...Push the reverse stitch button to form first bartack and left side of the buttonhole. Start the machine to tie off the stitches. NOTE: If stitch length is manually set at 0.75 (mm)...that the needle pierces the fabric at 0.75 (mm) for step 3 as
well.
3
4
66 Sew second bartack and stitch backward until needle
1
reaches beginning of buttonhole mark to create larger buttonholes.
* ...
Instruction Manual - Page 68
...machine CAUTION before changing presser foot.
* Raise presser foot lifter.
* Turn hand wheel toward you until needle is in its highest position.
1.
Secure it by tightening presser foot screw.
3. INSERTING THE BOBBIN
Refer to page 16 - 17. * A large amount of thread is above the needle clamp.
PREPARATION FOR EMBROIDERY SEWING...embroidering, so
be sure to turn off power to move needle ...
Instruction Manual - Page 84
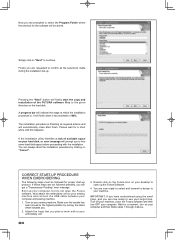
... transmit a design to continue. Simply click on your desktop to your sewing machine and connect the USB cable between your hard disk, an error message will prompt you are now ready to 100%.
The installation procedure is . Next attach the embroidery unit to open the Futura software. Turn on your computer and sewing machine.
1. IMPORTANT: If you have embroidered...
Instruction Manual - Page 104

... couture arrière interruptor de puntadas hacia atrás
Start/stop needle at up position.
The position of other stitches ( ) The sewing machine makes 4 tiny tacking stitches to sew in the pattern where the reverse/tacking stitch button is pushed. OPERATION SWITCHES
NEEDLE STOP POSITION SELECTOR SWITCH ( )
Push the switch and LED...
Instruction Manual - Page 110
...
6.
DO NOT use "all times.
(1)
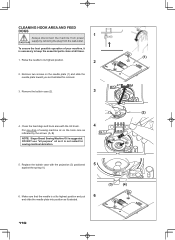
1. Remove two screws on the hook race as illustrated for sewing machine lubrication.
(2)
(A) (B)
5. Make sure that the needle is not suited for removal.
3. Replace the bobbin ...oil as illustrated.
(3)
(4)
110 To ensure the best possible operation of sewing machine oil on the needle plate (1) and slide the needle plate toward you as indicated by...
Instruction Manual - Page 112
...
1. CAUTION: Always remove the dust and lint before it is used frequently : It should be oiled periodically. Use of sewing machine oil to your machine.
112 Put one drop of oil other than Sewing Machine Oil
2
will cause damage to the points indicated
by arrows.
1
Screw Vis Guia
Face cover Plaque frontale Cubierta frontal
Helpful...
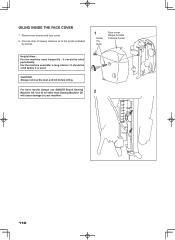
Instruction Manual - Page 116
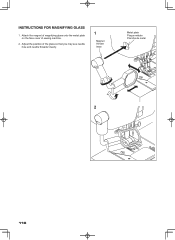
Attach the magnet of magnifying glass onto the metal plate on the face cover of the glass so that you may see needle hole and needle threader clearly.
1
Magnet Aimant Iman
Metal plate Plaque métale Plancha de metal
2
116 Adjust the position of sewing machine.
2. INSTRUCTIONS FOR MAGNIFYING GLASS
1.
Instruction Manual - Page 118
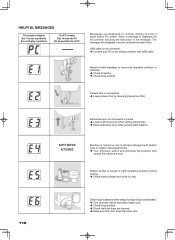
...; Connect your PC to stop.
Needle thread breakage or incorrectly threaded condition is not lowered or raised. Lower buttonhole lever when sewing buttonholes. Raise buttonhole lever when sewing stitch patterns. USB cable is transmitted. Turn off power switch and attach large hoop. Check hoop position. Check that
caused the machine to...
Instruction Manual - Page 120
... hoop and then re- Bobbin winder is
turned on power switch.
Check cable and power switch. Check that USB cable is connected and power switch is in and pulled out while sewing patterns. Don't touch the plug while sewing. Embroidery unit is lowered when starting embroidery sewing. Raise needle by rotating hand wheel...
Instruction Manual - Page 124
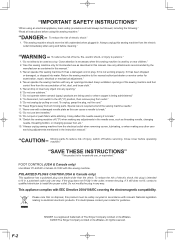
...7. "Do not pull or push fabric while stitching. Please note that on cord.
"Always unplug sewing machine from the electric outlet immediately after using an electrical appliance, basic safety precautions ...Keep ventilation openings of the sewing machine and foot control free from outlet." 9. "Never drop or insert any object into water. "To disconnect, turn switch to fit in the...
Similar Questions

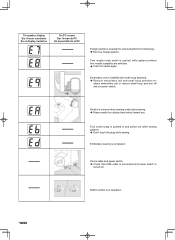
I Get E7 Error Message On My Singer Model 7258 Sewing Machine. There Is No Refe
Error message E7 is up on my Singer Stylist model 7258 sewing machine. It is not working at all. I t...
Error message E7 is up on my Singer Stylist model 7258 sewing machine. It is not working at all. I t...
(Posted by ebellamybellamy9 5 years ago)


Beeping From Singer Sewing Machine Stylist Ii 5625
My sewing machine will beep and stop sewing after three inches of sewing. I have taken it to be repa...
My sewing machine will beep and stop sewing after three inches of sewing. I have taken it to be repa...
(Posted by arusheria 9 years ago)

Bobbin Not Threading On Sears Superb 2010 Sewing Machine
I am having an issue with the bobbin not threading to meet the upper thread. I have threaded it on t...
I am having an issue with the bobbin not threading to meet the upper thread. I have threaded it on t...
(Posted by Bellaluna07 10 years ago)
Usb Connection
when trying to open profram. it tells me to connect usb cord and turn on machine. both are done alre...
when trying to open profram. it tells me to connect usb cord and turn on machine. both are done alre...
(Posted by baylady55 11 years ago)