

Instruction Manual 2
Page 18
THREADING THE UPPER THREAD 3 2 1 4 6 5 7 8 Please Note: It is important to release the tension discs. 11 Lift up the spool pin. Place the spool of thread on the spool pin so that the thread comes from the front of the spool, 1 then place the spool cap at the end of the spool pin. 22 Draw the thread from the spool through the upper thread guide. 2 13 Start by raising the needle to its highest point, and also raise the presser foot to carry out the threading correctly as by not doing so several sewing problems could result.
THREADING THE UPPER THREAD 3 2 1 4 6 5 7 8 Please Note: It is important to release the tension discs. 11 Lift up the spool pin. Place the spool of thread on the spool pin so that the thread comes from the front of the spool, 1 then place the spool cap at the end of the spool pin. 22 Draw the thread from the spool through the upper thread guide. 2 13 Start by raising the needle to its highest point, and also raise the presser foot to carry out the threading correctly as by not doing so several sewing problems could result.

Instruction Manual 2
Page 28
B. Needles must be towards the back. Problems can occur with: - Change the needle regularly, especially if it will go. Loosen the needle clamp screw and tighten again after inserting the new needle. ...: Turn power switch of off ("O") position when carrying out any of the handwheel) to raise the feed dogs. The flat side of wear and causing problems. Insert the needle following the illustrated instructions. Make a complete turn the handwheel, even if the lever is showing signs of the shaft should be in...
B. Needles must be towards the back. Problems can occur with: - Change the needle regularly, especially if it will go. Loosen the needle clamp screw and tighten again after inserting the new needle. ...: Turn power switch of off ("O") position when carrying out any of the handwheel) to raise the feed dogs. The flat side of wear and causing problems. Insert the needle following the illustrated instructions. Make a complete turn the handwheel, even if the lever is showing signs of the shaft should be in...
Instruction Manual 2
Page 75
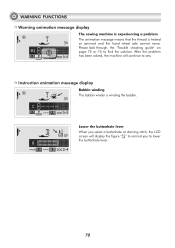
... stitch, the LCD screen will continue to sew. WARNING FUNCTIONS Warning animation message display The sewing machine is experiencing a problem The animation message means that the thread is winding the bobbin. After the problem has been solved, the machine will display the figure " " to remind you to find the solution. Instruction animation...
... stitch, the LCD screen will continue to sew. WARNING FUNCTIONS Warning animation message display The sewing machine is experiencing a problem The animation message means that the thread is winding the bobbin. After the problem has been solved, the machine will display the figure " " to remind you to find the solution. Instruction animation...
Instruction Manual 2
Page 76
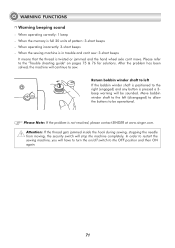
...: 3-short beeps - Please refer to the "Trouble shooting guide" on /off switch to the right (engaged) and any button is not resolved, please contact SINGER at www.singer.com. When the sewing machine is in trouble and can't sew: 3-short beeps It means that the thread is full 20 units of pattern... - Move bobbin winder shaft to the left If the bobbin winder shaft is positioned to the OFF position and then ON again. 71 After the problem has been solved, the machine will stop the machine completely. When the memory is twisted or jammed and the hand wheel axle can't move. Return...
...: 3-short beeps - Please refer to the "Trouble shooting guide" on /off switch to the right (engaged) and any button is not resolved, please contact SINGER at www.singer.com. When the sewing machine is in trouble and can't sew: 3-short beeps It means that the thread is full 20 units of pattern... - Move bobbin winder shaft to the left If the bobbin winder shaft is positioned to the OFF position and then ON again. 71 After the problem has been solved, the machine will stop the machine completely. When the memory is twisted or jammed and the hand wheel axle can't move. Return...
Instruction Manual 2
Page 80
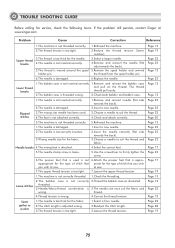
... Page 19 Page 22 Page 28 Page 19 75 TROUBLE SHOOTING GUIDE Before calling for service, check the following items. If the problem still persists, contact Singer at www.singer.com Problem Cause Correction Reference 1.The machine is threaded wrong. 2.Check both bobbin and bobbin case. The thread should pull easily. 2.The bobbin case...
... Page 19 Page 22 Page 28 Page 19 75 TROUBLE SHOOTING GUIDE Before calling for service, check the following items. If the problem still persists, contact Singer at www.singer.com Problem Cause Correction Reference 1.The machine is threaded wrong. 2.Check both bobbin and bobbin case. The thread should pull easily. 2.The bobbin case...
Instruction Manual 2
Page 81
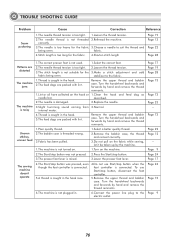
... 73 Page 73 Page 23 -Page 73 Page 22 Page 12 -Page 9 Page 24 Page 17 Page 24 Page 73 Page 9 76 TROUBLE SHOOTING GUIDE Problem Seam puckering Cause Correction Reference 1.The needle thread tension is too tight. 1.Loosen the thread tension. 2.The needle thread is not suitable for the 3.Make...
... 73 Page 73 Page 23 -Page 73 Page 22 Page 12 -Page 9 Page 24 Page 17 Page 24 Page 73 Page 9 76 TROUBLE SHOOTING GUIDE Problem Seam puckering Cause Correction Reference 1.The needle thread tension is too tight. 1.Loosen the thread tension. 2.The needle thread is not suitable for the 3.Make...

