Singer XL-420 FUTURA Support Question
Singer XL-420 FUTURA Support Question
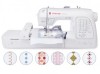
Find answers below for this question about Singer XL-420 FUTURA.Need a Singer XL-420 FUTURA manual? We have 1 online manual for this item!
Question posted by marygibbons825 on October 24th, 2015
Hoop Problems
While I am sewing with my Futura XL 420 it will stop in the middle of sewing and give me the error 12 which is hoop size is smaller than embroidery data. It will then turn back to a green light and I will hit start and it will do the same thing again. I have done several things to try to trouble shoot but nothing has fixed the problem. It continues to do it during the entire time I am sewing.
Current Answers
Answer #1: Posted by TechSupport101 on October 24th, 2015 9:40 AM
TechSupport101

Member since:
May 24th, 2013 Points: 12,171,305

Member since:
May 24th, 2013 Points: 12,171,305
Hi. If the Sewing Machine's condition has not improved in spite the said several troubleshooting attempts, then I will suggest you reach out to Singer's tech support directly from here http://www.singerco.com/contact-us for further help or an advise on your options in case service is deemed necessary.
Related Singer XL-420 FUTURA Manual Pages
Instruction Manual - Page 2

³,03257$176$)(7
Instruction Manual - Page 5
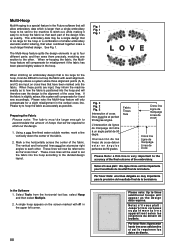
... inside the face cover 104 - 105 Special accessories 106 - 107 Knee lifter 108 Endless embroidery hoop 108 - 117 Helpful messages 118 - 119
For European version
Sewing machine Dimensions: 567 mm × 240 mm × 317 mm 0DVVRIWKHHTXLSPHQW
NJ
Embroidery unit Dimensions: 504 mm × 411 mm × 141 mm 0DVVRIWKH...
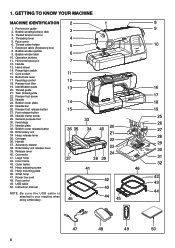
Instruction Manual - Page 8
...
39. Hoop mounting plate
46. Power/light switch &RUGVRFNHW
11
16. Thread guide
13
16
21. Inner frame 43. Hoop adjusting screw
41
46
45. Bobbin cover plate
14
18
25. Embroidery unit
21
34 Hoop release lever
35. Release lever
40. Instruction manual
43
44
NOTE: B e s u r e t h e U S B c a b l e i s
attached to your machine when doing embroidery.
45...
Instruction Manual - Page 10
...
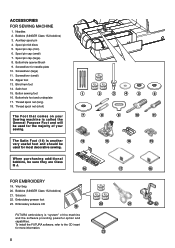
19
FUTURA embroidery is another
12
very useful foot and should be sure they are Class I5 J.
16
)25(0%52,'(5<
19. Screwdriver for more information.
8
2
3
4
5
6
8
9
10
11
13
14
15
17
18
20
21
22
23 Bobbins (SINGER Class 15J bobbins) 21. Button sewing foot
1
16. The Satin Foot (14) is "system" of your
7
Sewing machine...
Instruction Manual - Page 12
NOTE: In sewing mode, the machine can be operated either
with or without the foot control (see page 28 - 29). SETTING UP YOUR MACHINE
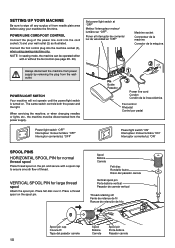
Be sure to wipe off any surplus oil from the walloutlet. POWER/LIGHT SWITCH
Always disconnect the machine from power supply by ...RXUZDOORXWOHW
DVLOOXVWUDWHG &RQQHFWWKHIRRWFRQWUROSOXJLQWRWKHPDFKLQHVRFNHW
when using sewing machine only.
Instruction Manual - Page 30
..., when foot control is used, the lever serves as a top speed limiter.
6
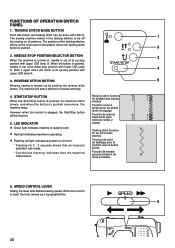
28 LED INDICATOR
¿ Green light indicates machine is ready to its up -stop .
4.
REVERSE STITCH BUTTON
5
Reverse sewing is operating.
¿ Flashing red light indicates a problem or an error. * Flashing for tie-off of other stitches
Fonction de point GHIDX¿ODJHSRXUOD...
Instruction Manual - Page 64
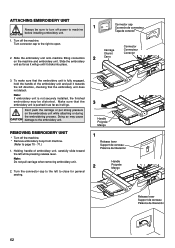
... the left while pressing release lever. Turn off the machine. * Remove embroidery hoop from machine.
(Refer to the embroidery unit. Don't push the carriage or put strong pressure on the machine and embroidery unit. Note: Do not pull carriage when removing embroidery unit.
2. ATTACHING EMBROIDERY UNIT
1
Always be sure to turn off power to close for general sewing.
3
Handle Poignée 0DQJR...
Instruction Manual - Page 70
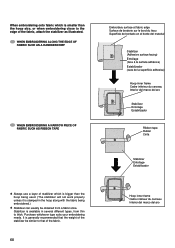
...When embroidering onto fabric which is bigger than the hoop size, or when embroidering close to that of the fabric...
WHEN EMBROIDERING A NARROW PIECE OF FABRIC SUCH AS RIBBON TAPE
Embroidery surface at fabric edge Surface de broderie sur le bord du ...Entoilage Estabilizador
¿ Always use a layer of stabilizer which is smaller than the KRRS EHLQJ XVHG
7KH VWDELOL]HU ZLOO QRW...
Instruction Manual - Page 74
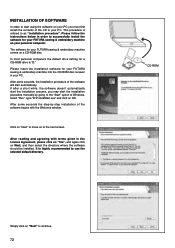
...After reading and agreeing with terms given in order to successfully install the software for your FUTURA VHZLQJ HPEURLGHU\PDFKLQHLQWRWKH&'520GLVFUHFHLYHU in your PC. If after ...After some seconds the step-by going to your personal computer. The software for your FUTURA sewing & embroidery machine FRPHVRQD&'520GLVF
In most personal computers the default drive setting for a &'...
Instruction Manual - Page 76
If the installation utility identifies a lack of the FUTURA software files to the given GLUHFWRU\RQWKHKDUGGLVN
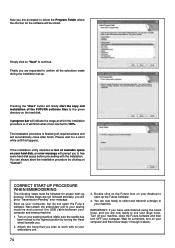
A progress bar will indicate ... finish. Pressing the ³1H[W´ button will finally start the copy and installation of available space on your hard disk, an error message will be stored.
6LPSO\FOLFNRQ³1H[W´ to continue.
)LQDOO\ \RX DUH UHTXHVWHG WR FRQ¿...
Instruction Manual - Page 78
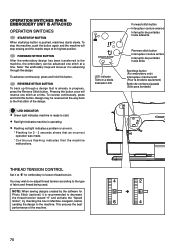
... CONTROL
Set it is operating.
¿ Flashing red light indicates a problem or an error. * Flashing for 2 - 3 seconds shows that an incorrect operation was made. * Continuous flashing indicates that the machine malfunctions.
Pressing the button once will reverse one stitch at a time. Note: The embroidery hoop will stop button is ready to loosen thread tension. OPERATION SWITCHES...
Instruction Manual - Page 88
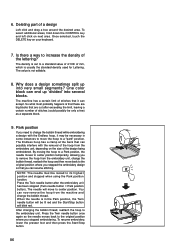
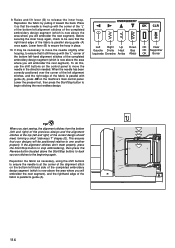
... µGLYLGHG¶ LQWR VHYHUDO EORFNV
The machine has a certain limit of mm, which is not editable...FDQ possibly interfere with the removal of the hoop from the embroidery unit, depending on the size of stitches (could possibly be only a ...hoop from the embroidery unit, change the EREELQWKUHDGUHDWWDFKWKHKRRSDQGWKHQPRYHEDFNWRWKH original position where you stopped the embroidery...
Instruction Manual - Page 90
...thin line is very important to each part of smaller embroidery HOHPHQWV DQGRU OHWWHULQJ WKDW ZKHQ FRPELQHG...line. When these points are input, they inform the machine exactly as í lo requieren los datos de ...sews them precisely, matching one VHFWLRQ WR WKH RWKHU :KHQ UHKRRSLQJ WKH IDEULF WKH 0XOWL hoop feature will be at perfect 90 degree angles. This embroidery data...
Instruction Manual - Page 92
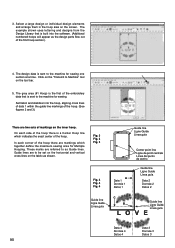
... sets of the embroidery data that is a Center Hoop line which indicates the exact center of the hoop.
,Q HDFK FRUQHU RI WKH KRRS WKHUH DUH PDUNLQJV ZKLFK WRJHWKHU GHILQH WKH PD[LPXP VHZLQJ DUHD IRU 0XOWLSOH +RRSLQJ 7KHVH PDUNV DUH UHIHUUHG WR DV *XLGH OLQHV Guide lines are to the machine for sewing one VHFWLRQDW...
Instruction Manual - Page 102
...turned off.- Replace needle. (see page 98 - 99). STITCHING PROBLEMS 0DFKLQHVNLSVVWLWFKHV * Needle is not all the way up into the needle clamp. (see page
98 - 99). * Stitch length is not raised when sewing stitch patterns.
-
PERFORMANCE CHECKLIST
GENERAL PROBLEMS...(see page 20 - 21). * Needle size is being pulled or pushed against machine feeding
action. - Shorten
stitch length. ...
Instruction Manual - Page 110
... DQGUHSODFHWKHVRFNHWFRYHU
Attention: Do not touch or move the knee lifter while sewing, otherwise the machine beeps with an error message and stops. KNEE LIFTER
7KHNQHHOLIWHULVYHU\KHOSIXOZLWKVHZLQJWHFKQLTXHVVXFKDV machine applique and free-motion sewing.
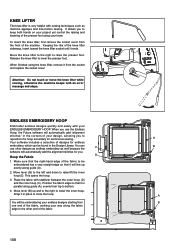
ENDLESS EMBROIDERY HOOP
(PEURLGHU HQGOHVV GHVLJQV TXLFNO\ DQG HDVLO\ ZLWK \RXU (1'/(66(0%52,'(5
Instruction Manual - Page 112
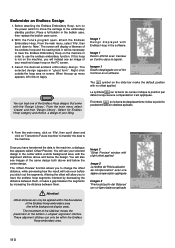
... endless hoop and the sewing feld.
Once you will be necessary to have the Endless Embroidery Hoop on the machine, you have transferred the data to the embroidery standby position. The V\PERO RQ WKH VOLGH EDU PDUNV WKH GHIDXOW SRVLWLRQ with Endless Hoop in the bobbin case, then replace the bobbin case cover.
2. Before attaching the Endless Embroidery Hoop, turn on...
Instruction Manual - Page 114
... a thread tail approximately 6-8" long.
6. Before you start to embroider the endless GHVLJQ Press the Start/Stop button to sew, deactivate the Thread Cutter Mode on the machine's main control panel. At this point, you have determined how you want your endless embroidery designs to be placed relative to one another when they stitch out.
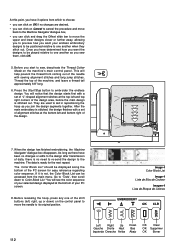
Instruction Manual - Page 116
... to stop embroidering, then press the
Reverse button (located above the area where you start sewing, the alignment stitches from the bottom
(left and right) of the previous design and the alignment
stitches at the corner of the alignment stitch on the machine's main control panel. This ensures
that the needle is lined...
Instruction Manual - Page 118
...bobbin. Press the Start/Stop button to resume embroidery. ‡ Should you find that you to remove the hoop from the machine. Helpful Tips: ‡...sewing the alignment stitches and long jump stitches. ‡ To change a bobbin during embroidery, raise the needle by turning the handwheel toward you are embroidering, remove the presser foot and needle to remove the hoop. Remove the hoop...
Similar Questions

Thread Breakage
I'm using sulky embroidery thread and bobbin fill , I have tried loosening tension but thread contin...
I'm using sulky embroidery thread and bobbin fill , I have tried loosening tension but thread contin...
(Posted by thread18 6 years ago)

Singer Futura Xl 420, Won't Turn On.
I have the singer futura xl420, Thursday night I turned it off and this morning, Saturday, it will N...
I have the singer futura xl420, Thursday night I turned it off and this morning, Saturday, it will N...
(Posted by kristinahyers 8 years ago)

Singer Futura 420 Straight Sewing. While I Am Sewing The Stitch Pattern Changes
the stitch pattern changes from straight to a scalloped pattern and won't sew for me... Wait a few s...
the stitch pattern changes from straight to a scalloped pattern and won't sew for me... Wait a few s...
(Posted by Stevie9963 8 years ago)

Meaning Of Trouble Shooting Numbers On Machine
What does the number E7 mean on a fashion mate 7256
What does the number E7 mean on a fashion mate 7256
(Posted by elb60 9 years ago)

How Do You Trouble Shoot, When The Machine Won't Pull Material Through.
The singer 9340 Signature, will not pull the material through. the trouble shooting guide does not g...
The singer 9340 Signature, will not pull the material through. the trouble shooting guide does not g...
(Posted by jdpolar 11 years ago)