
Singer Futura XL-400 Support Question
Singer Futura XL-400 Support Question
Find answers below for this question about Singer Futura XL-400.Need a Singer Futura XL-400 manual? We have 1 online manual for this item!
Question posted by sjpatt on December 6th, 2013
Problems With This Machine
I have had this machine for about 2 months and have had nothing but problems. If the needle is not breaking, the bobbin thread is bunching up on the bottom of the design. I have made two different types of thread guides that have helped a little. It will sew for a little while without any problems and then it starts. I am so disgusted with this machine , if i could I would send it back to HSN where I bought it.
Current Answers
Answer #1: Posted by ladazart on January 18th, 2014 8:44 PM
ladazart

Member since:
January 18th, 2014 Points: 1,110
Member since:
January 18th, 2014 Points: 1,110
Answer #2: Posted by TommyKervz on December 6th, 2013 6:30 PM
TommyKervz

Member since:
January 10th, 2013 Points: 17,776,813

Member since:
January 10th, 2013 Points: 17,776,813
Greetings. Sorry about the husstle. The machine may sadly have a manufacturer fault. Do contact Customer Care for the best advice on how to resolve the matter.
Related Singer Futura XL-400 Manual Pages
Instruction Manual - Page 2
... trademark of the appliance by the manufacturer as threading needle, changing
needle, threading bobbin, or changing presser foot, etc." 18....4. "Keep fingers away from outlet." 11. "Switch the sewing machine off („0") position, then remove plug from all instructions ...it still does not fit, contact a qualified electrician to break." 17. To reduce the risk of electric shock:"
1....
Instruction Manual - Page 5

TABLE OF CONTENTS
1.GETTING TO KNOW YOUR MACHINE Machine identification 6 - 7 Accessories 8 - 9 Setting up your machine 10 - 11 Spool pins 10 - 11 Winding bobbin 12 - 13 Threading the bobbin thread 14 - 15 Threading the top thread 16 - 17 Using automatic needle threader 18 - 19 Needle, thread and fabric chart 20 - 21 Adjusting top thread tension 22 - 23 Changing presser foot 22 - 23 ...
Instruction Manual - Page 8
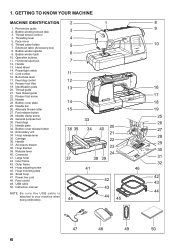
... tension disk
3
9
3. Operation buttons
11. Cord socket
11
16. Identification plate 20. Needle 24. Bobbin cover plate
14
18
25. Carriage 36. Power line cord 48. GETTING TO KNOW YOUR MACHINE
MACHINE IDENTIFICATION
2
1
8
1. Face cover
6. Handle
13. Alternate thread cutter
15
19
27. Needle plate 32. Hoop bracket 39. Accessory drawer 38. Release lever 40. Connector...
Instruction Manual - Page 10

... the majority of your
7
Sewing machine is "system" of the machine and the software providing powerful option and capabilities. Bobbins 21. Embroidery software CD
19
FUTURA embroidery is called the
General Purpose Foot and will
be
used for most decorative sewing. To install the FUTURA software, refer to the CD insert for needle plate
10. Bobbins
3. Spool pin cap...
Instruction Manual - Page 12
...;ostat
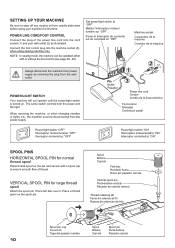
XL-550-P04-1.Ceonptrsol por pedal
Power/light switch "OFF" Interrupteur moteur/lumière "OFF" Interruptor corriente/luz "OFF"
Power/light switch "ON" Interrupteur moteur/lumière "ON" Interruptor corriente/luz "ON"
SPOOL PINS HORIZONTAL SPOOL PIN for large thread spool
Attach the spool pin. NOTE: In sewing mode, the machine...
Instruction Manual - Page 16
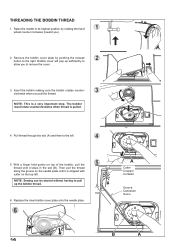
... clockwise (toward you pull the thread. Insert the bobbin making sure the bobbin rotates counterclockwise when you ).
2. NOTE: This is pulled.
4. NOTE: Sewing can be started without having to pull up sufficiently to allow you to its highest position by pushing the release button to the left . Raise the needle to remove the cover.
3. The...
Instruction Manual - Page 24

...
Be sure the needle is in the middle of layers of both top and bottom) is recommended for straight stitch sewing. The tension is irregular, you are sewing. Make all adjustments...BOBBIN TENSION
The bobbin tension has been correctly set thread tension at the factory, so you have determined that the machine is largely determined by the balanced tension of the fabric you will need to sew...
Instruction Manual - Page 28

... to locate each manual adjustment point, the LED will blink 3 times in red beyond the potential adjustment range. Stitch length and width/needle position controls
*Auto/Default settings Your sewing machine will produce most of the potential adjustments. When a pattern is to your stitching requirements at default settings of stitch length, width and...
Instruction Manual - Page 30
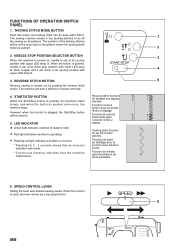
..., the lever serves as a top speed limiter.
6
28 NEEDLE STOP POSITION SELECTOR BUTTON
3
When the machine is turned on, needle is operating.
Flashing red light indicates a problem or an error. * Flashing for tie-off
1
the sewing on all patterns. LED INDICATOR
Green light indicates machine is ready to its up -stop
position with LED...
Instruction Manual - Page 34
... needle
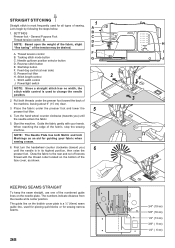
position. 2. KEEPING SEAMS STRAIGHT
To keep the seam straight, use one of the numbered guide lines on the bobbin cover plate is a ¼" (6mm) seam guide line, used for piecing quilt blocks or for sewing ...sewing. The guide line on the needle plate. Guide the fabric gently with the thread cutter located on the bottom of the
face cover, as an aid for all types of
3
the machine...
Instruction Manual - Page 38

ZIGZAG STITCHING
SETTINGS :Presser foot - S
The top thread may appear on the bottom depending on the thread, fabric, type of stitch and sewing speed, but the bobbin thread must never appear on the weight of pattern increases from center needle position as illustrated.
General Purpose Foot :Thread tension control - Under side Côté de dessous Reverso
Top side Cô...
Instruction Manual - Page 52
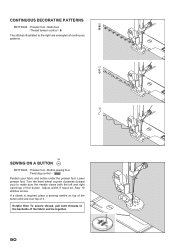
... are examples of it. If a shank is required, place a darning needle on top of the button and sew over top of continuous patterns. Lower presser foot.
Adjust width if required.
SEWING ON A BUTTON
SETTINGS :Presser foot - Sew 10 stitches across. Helpful Hint: To secure thread, pull both the left and right openings of the fabric...
Instruction Manual - Page 56

... the fabric with the mark on your garment. 6. When sewing is finished, use a buttonhole opener to the rear.
7. Carefully mark the position of the buttonhole. While holding the top thread, start the machine. 5.
Pull out the bobbin thread
underneath the fabric to a length of the bartack threads.
54
Buttonhole foot alignment position Position d'alignement du pied...
Instruction Manual - Page 60

... machine CAUTION before changing presser foot.
* Raise presser foot lifter. 3. Turn hand wheel toward you to use full bobbin. Remove presser foot screw, presser foot and foot holder.
2. INSERTING THE BOBBIN
Refer to page 14 - 15. * A large amount of thread is required for embroidering, so
be sure to turn off power to touch the needle...
Instruction Manual - Page 76

...sewing machine and connect the USB cable between your computer and sewing machine.
1.
If these steps are not followed precisely, you will indicate the stage at which the installation procedure is finalizing all the selections made during the installation set-up the Futura...3. You are now ready to select and transmit a design to your machine. Now you are prompted to select the Program Folder ...
Instruction Manual - Page 78
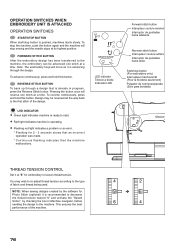
... (optional) it is ready to the type of the design. You may be advanced one stitch at its highest position. Note: The embroidery hoop will stop sewing and the needle stops at a time. LED INDICATOR Green light indicates machine is advancing through a design that the machine malfunctions. NOTE: When sewing designs created by checking the box in progress...
Instruction Manual - Page 84

... thread is broken, machine lights are missing
If the embroidery machine detects that the thread has broken, it may ensure that is not broken. Upper thread is...thread is supplied with the accessories over .
2. Rethread upper thread, (see page 16 - 17 "Threading the Top Thread".) Placing the small net that the thread is not in the thread tension. HELPFUL INFORMATION FOR EMBROIDERING WITH FUTURA...
Instruction Manual - Page 90

...Futura software that will allow embroidery data which is larger than a single embroidery hoop to be sent to the machine...machine exactly as to how the fabric is positioned into the hoop according to four different parts; Please try to stitch out the design....as possible.
These lines will only compensate for the hoop, it and sew accordingly.
See Fig. 1. Fig. 2 Fig. 2 Fig. 2
...
Instruction Manual - Page 102
...
24 - 27). * Feed dogs are irregular. * Needle size is not correct for thread and fabric. (see page 22 - 23). * Fabric is not raised when sewing stitch patterns.
- Remove lint
(see page 20 - 21). Replace needle. (see page 102 - 103). THREAD PROBLEMS Needle thread breaks. * Machine is not threaded correctly. (see page 16 - 19). * Top thread tension is too tight. (see page 10...
Instruction Manual - Page 108
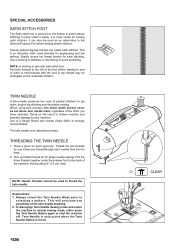
....
Pick up bobbin thread as one thread through each spool pin. Helpful Hints: 1. To disengage Twin Needle Sewing mode and return the machine to avoid puckering. This is lit red.
106
Place a spool on the bottom to permit dense stitching to pass under the presser foot to back.
2. Thread the two threads as for single needle sewing. This will result...
Similar Questions

Why Does My Bobbin Thread Keep Bunching Up When I Start To Sew?
(Posted by Mmonnin 1 year ago)

Singer Futura Xl-400
I am in need of a Singer Futura XL-400 Startup disc. Any idea where I can get one
I am in need of a Singer Futura XL-400 Startup disc. Any idea where I can get one
(Posted by fayevb 4 years ago)

Thread When Sewing Doesn't Catch Bobbin Thread, What Do I Do?
How do I fix this problem? When I pull the thread it was only the spool thread.
How do I fix this problem? When I pull the thread it was only the spool thread.
(Posted by arcand1772 9 years ago)

Support Groups For The Xl Futura? Classes I Maya Attend To Learn About The Oper
I am interested in classes to help with all the operations of the futura. Are there singer classes a...
I am interested in classes to help with all the operations of the futura. Are there singer classes a...
(Posted by Gpspencer 10 years ago)

How Do I Install The Software For The Singer Futura Machine And Make Files For
xl 400
xl 400
(Posted by gdonlch 10 years ago)