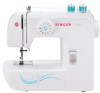
Singer Start 1304 Support Question
Singer Start 1304 Support Question
Find answers below for this question about Singer Start 1304.Need a Singer Start 1304 manual? We have 2 online manuals for this item!
Question posted by Mmonnin on July 23rd, 2022
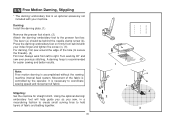
Why Does My Bobbin Thread Keep Bunching Up When I Start To Sew?
Current Answers
Answer #1: Posted by Odin on July 23rd, 2022 8:34 AM

Member since:
April 10th, 2010 Points: 41,236,690

Are you using a SINGER brand needle? Are you using the bobbins that came with your machine?
Thread looping under your fabric is usually caused by not threading the upper tension correctly.
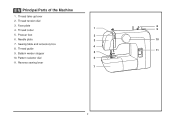
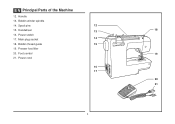
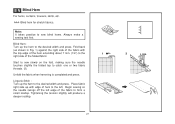
With the presser foot lever in the UP position and tension set at 4, follow the threading guides/graphics on the top of the machine.
- Place the thread spool on the spool pin and secure with a thread spool cap.
- While holding the thread with your right hand, use your left hand to take the thread down into the tension channel around the bottom and up the other side. As the thread comes up the opposite channel, and reaches the top, you will need to slip the thread from back to front into the take up lever. Continue to thread the machine, but do not thread the needle.
PRO TIP: Before threading the needle, perform this easy test to make sure the upper thread is threaded correctly. Making sure the presser foot is raised, pull the thread. It should pull easily. Now lower the presser foot, the thread should now resist when you pull it. There should be a significant increase in the tension of the thread. If there is no increased tension, the machine is not threaded correctly.
Watch this VIDEO on threading a sewing machine.
Hope this is useful. Please don't forget to click the Accept This Answer button if you do accept it. My aim is to provide reliable helpful answers, not just a lot of them. See https://www.helpowl.com/profile/Odin.
Answer #2: Posted by SonuKumar on July 23rd, 2022 9:06 AM

Member since:
May 9th, 2021 Points: 16,621,300
Why is my bobbin thread bunching up singer?
Threads can get bunched up at the beginning of sewing if the top and bobbin threads have not been properly placed underneath the presser foot before starting to sew. Ensure that both threads are under the presser foot and placed toward the back of the machine before lowering the presser foot to start sewing.
Please respond to my effort to provide you with the best possible solution by using the "Acceptable Solution" and/or the "Helpful" buttons when the answer has proven to be helpful.
Regards,
Sonu
Your search handyman for all e-support needs!!
Related Singer Start 1304 Manual Pages


Similar Questions


How to thread the singer fashionmate sewing machine with twin needle without inertwining the threads...

Everythime I sew the needle thread breaks and the bobbin pukles up in the bobbin case. The needle co...