
Instruction Manual
Page 6
...face cover 102 - 103 Special accessories 104 - 105 Helpful messages 106 - 109 Sewing machine Dimensions: 428 mm × 307 mm × 294 mm Mass of software 72 - 75 Operation switches when embroidery unit is attached - 76 - 77 Operation switches, Thread tension control Troubleshooting 78 -... 89 4. GETTING STARTED SEWING Leveling Machine 10- 1 1 Setting up machine 10 - 11 Spool pins 12- 13 Winding bobbin 14 - 15 Inserting...
...face cover 102 - 103 Special accessories 104 - 105 Helpful messages 106 - 109 Sewing machine Dimensions: 428 mm × 307 mm × 294 mm Mass of software 72 - 75 Operation switches when embroidery unit is attached - 76 - 77 Operation switches, Thread tension control Troubleshooting 78 -... 89 4. GETTING STARTED SEWING Leveling Machine 10- 1 1 Setting up machine 10 - 11 Spool pins 12- 13 Winding bobbin 14 - 15 Inserting...
Instruction Manual
Page 10
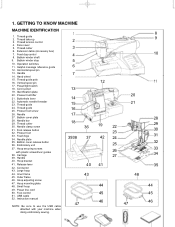
...mounting plate 48. Small hoop 49. Power line cord 50. Feed dog control 8. Horizontal spool pin 13. Thread guide pole 16. Foot release button 32. Embroidery unit 37. Thread tension control 4. Face cover 5. Handle 14. Power/light switch 18. Cord socket 19. Needle 27. Outer frame 46. Hoop adjusting ... 30. Presser foot 33. Release lever 42. Inner frame 45. Thread cutter 6. Automatic needle threader 23. Thread guide 24. Hoop securing screws with your machine when doing embroidery sewing. 1 2 3 4 5 6 7 13 14 15 16 17 18 3938 47 36 37 40 43 12 19 42 41 44 45 46 20 21 ...
...mounting plate 48. Small hoop 49. Power line cord 50. Feed dog control 8. Horizontal spool pin 13. Thread guide pole 16. Foot release button 32. Embroidery unit 37. Thread tension control 4. Face cover 5. Handle 14. Power/light switch 18. Cord socket 19. Needle 27. Outer frame 46. Hoop adjusting ... 30. Presser foot 33. Release lever 42. Inner frame 45. Thread cutter 6. Automatic needle threader 23. Thread guide 24. Hoop securing screws with your machine when doing embroidery sewing. 1 2 3 4 5 6 7 13 14 15 16 17 18 3938 47 36 37 40 43 12 19 42 41 44 45 46 20 21 ...
Instruction Manual
Page 12
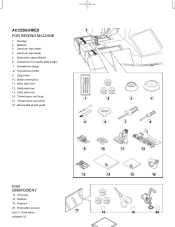
...small) 4. Screwdriver for needle plate (large) 7. Screwdriver (small) 9. Zipper foot 10. Vinyl bag 18. Embroidery presser foot 21. Embroidery software CD 9 10 11 12 13 14 15 16 17 18 19 20 Spool pin cap (large) 5. Screwdriver... (large) 8. Satin stitch foot 14. Thread spool net (short) 16. Scissors 20. ACCESSORIES FOR SEWING MACHINE 1. Bobbins 19. Button sewing foot 11. Removable thread guide 1 2 3 4 5 6 7 8 FOR EMBROIDERY 17. Bobbins 3. Buttonhole foot 13. Needles 2. Buttonhole opener/Brush 6. Blind stitch foot 12. Thread spool ...
...small) 4. Screwdriver for needle plate (large) 7. Screwdriver (small) 9. Zipper foot 10. Vinyl bag 18. Embroidery presser foot 21. Embroidery software CD 9 10 11 12 13 14 15 16 17 18 19 20 Spool pin cap (large) 5. Screwdriver... (large) 8. Satin stitch foot 14. Thread spool net (short) 16. Scissors 20. ACCESSORIES FOR SEWING MACHINE 1. Bobbins 19. Button sewing foot 11. Removable thread guide 1 2 3 4 5 6 7 8 FOR EMBROIDERY 17. Bobbins 3. Buttonhole foot 13. Needles 2. Buttonhole opener/Brush 6. Blind stitch foot 12. Thread spool ...
Instruction Manual
Page 34
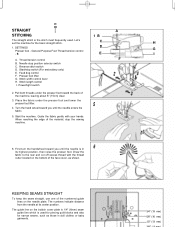
... hands. SETTINGS Presser foot - Feed dog control F. Turn the hand wheel toward you until the needle enters the fabric. 5. Start the machine. The guide line on the bobbin cover plate is 1/4" (6mm) seam guide line which is used . Needle stop the sewing... quilt blocks and also for the basic straight stitch. 1. Let's set the machine for narrow seams, such as shown. General Purpose Foot Thread tension control - Thread tension control B. Reverse stitch switch D. Start/stop switch (For embroidery only) E. Stitch width control lever H. Guide the fabric gently with the thread...
... hands. SETTINGS Presser foot - Feed dog control F. Turn the hand wheel toward you until the needle enters the fabric. 5. Start the machine. The guide line on the bobbin cover plate is 1/4" (6mm) seam guide line which is used . Needle stop the sewing... quilt blocks and also for the basic straight stitch. 1. Let's set the machine for narrow seams, such as shown. General Purpose Foot Thread tension control - Thread tension control B. Reverse stitch switch D. Start/stop switch (For embroidery only) E. Stitch width control lever H. Guide the fabric gently with the thread...
Instruction Manual
Page 62
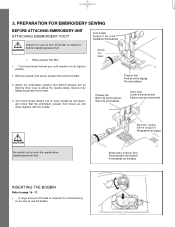
... Screw Vis Guia ∗ Turn hand wheel toward you until needle is above the needle clamp. Turn hand wheel toward you to machine before changing presser foot. Presser foot Pied de biche zigzag Pie prensatelas Presser bar Barre de pied presseur Barra de prensatelas Drive lever ...check that the drive lever is in its highest position. 1. Secure it by tightening presser foot screw. 3. Needle clamp Serre-aiguille Abrazadera de aguja Embroidery presser foot Pied presseur de broderie Prensatelas de bordado INSERTING THE BOBBIN Refer to page 16 - 17. ∗ A large amount of thread is...
... Screw Vis Guia ∗ Turn hand wheel toward you until needle is above the needle clamp. Turn hand wheel toward you to machine before changing presser foot. Presser foot Pied de biche zigzag Pie prensatelas Presser bar Barre de pied presseur Barra de prensatelas Drive lever ...check that the drive lever is in its highest position. 1. Secure it by tightening presser foot screw. 3. Needle clamp Serre-aiguille Abrazadera de aguja Embroidery presser foot Pied presseur de broderie Prensatelas de bordado INSERTING THE BOBBIN Refer to page 16 - 17. ∗ A large amount of thread is...
Instruction Manual
Page 66
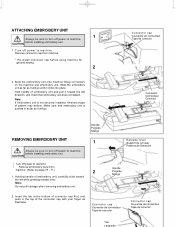
... may deform. Connector cap Couvercle de connecteur Tapa de conector Connector Connecteur Conector REMOVING EMBROIDERY UNIT Always be sure to turn off power to machine before installing embroidery unit. Insert the tab at the bottom of connector cap first, and push in...left direction, and check that embroidery unit is not securely installed, finished shape of embroidery unit, carefully slide toward the left while pressing release lever. Slide the embroidery unit onto machine fitting connectors on the machine and embroidery unit. ATTACHING EMBROIDERY UNIT 1 Always be sure to...
... may deform. Connector cap Couvercle de connecteur Tapa de conector Connector Connecteur Conector REMOVING EMBROIDERY UNIT Always be sure to turn off power to machine before installing embroidery unit. Insert the tab at the bottom of connector cap first, and push in...left direction, and check that embroidery unit is not securely installed, finished shape of embroidery unit, carefully slide toward the left while pressing release lever. Slide the embroidery unit onto machine fitting connectors on the machine and embroidery unit. ATTACHING EMBROIDERY UNIT 1 Always be sure to...

Instruction Manual
Page 74
... by aligning hoop mounting (D) screws (D) and the grooves in hoop mounting plate. PREPARING THE MACHINE BEFORE INSTALLING THE HOOP 1 1. ATTACHING AND REMOVING EMBROIDERY HOOP 1 (A) 1. Attach hoop to slide it . NOTE: Before attaching small hoop, turn on hoop bracket into ... toward you until needle comes to embroidering standby position. To remove, loosen hoop mounting screws (D) and remove the hoop from underneath the embroidery foot. 2 (C) (D) 3. Carriage Chariot Carro (B) (B) Hoop mounting plate Plaque de montage de cerceau Placa de montaje de aro Securely...
... by aligning hoop mounting (D) screws (D) and the grooves in hoop mounting plate. PREPARING THE MACHINE BEFORE INSTALLING THE HOOP 1 1. ATTACHING AND REMOVING EMBROIDERY HOOP 1 (A) 1. Attach hoop to slide it . NOTE: Before attaching small hoop, turn on hoop bracket into ... toward you until needle comes to embroidering standby position. To remove, loosen hoop mounting screws (D) and remove the hoop from underneath the embroidery foot. 2 (C) (D) 3. Carriage Chariot Carro (B) (B) Hoop mounting plate Plaque de montage de cerceau Placa de montaje de aro Securely...
Instruction Manual
Page 78
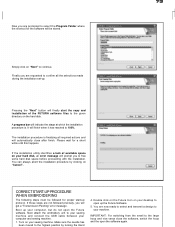
...Next" to the highest position by clicking on "Cancel". CORRECT START-UP PROCEDURE WHEN EMBROIDERING The following steps must be stored. Boot up the Futura Software. 5. Make sure the needle has been moved to continue. Pressing the "Next" button will finish when it has reached to 100%.... are requested to confirm all required actions and will indicate the stage at which the installation procedure is. Next attach the embroidery unit to your sewing machine and connect the USB cable between your desktop to open the software again. Finally you are now ready to select and ...
...Next" to the highest position by clicking on "Cancel". CORRECT START-UP PROCEDURE WHEN EMBROIDERING The following steps must be stored. Boot up the Futura Software. 5. Make sure the needle has been moved to continue. Pressing the "Next" button will finish when it has reached to 100%.... are requested to confirm all required actions and will indicate the stage at which the installation procedure is. Next attach the embroidery unit to your sewing machine and connect the USB cable between your desktop to open the software again. Finally you are now ready to select and ...
Instruction Manual
Page 80
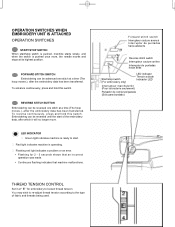
...has been transferred. To reverse continuously, press and hold this switch. LED INDICATOR Green light indicates machine is ready to the type of the embroidery data, after the embroidery data has been transferred. You may wish to re-adjust thread tension according to start. Flashing red... light indicates a problem or an error. ∗ Flashing for embroidery to loosen thread tension. To advance continuously, press and hold this switch. Red light indicates machine is pushed once more, the needle moves and stops at " E " for 2 - 3...
...has been transferred. To reverse continuously, press and hold this switch. LED INDICATOR Green light indicates machine is ready to the type of the embroidery data, after the embroidery data has been transferred. You may wish to re-adjust thread tension according to start. Flashing red... light indicates a problem or an error. ∗ Flashing for embroidery to loosen thread tension. To advance continuously, press and hold this switch. Red light indicates machine is pushed once more, the needle moves and stops at " E " for 2 - 3...
Instruction Manual
Page 84
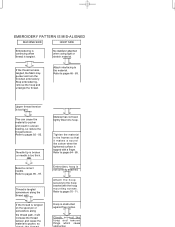
.... Check around the hoop and remove things which cause If the thread remains tangled, the fabric may pucker and ruin the finished embroidery. Stop embroidering, remove the hoop and untangle the thread. Attach the hoop securely to pucker, so Material has not been tightly ...material. Select a correct needle. If the thread is not correctly attached. EMBROIDERY PATTERN IS MIS-ALIGNED MACHINE SIDE HOOP SIDE Embroidering is continuing when thread is too thick. Refer to pages 70 - 71. Embroidery hoop is tangled on the spool pin or somewhere along the thread path...
.... Check around the hoop and remove things which cause If the thread remains tangled, the fabric may pucker and ruin the finished embroidery. Stop embroidering, remove the hoop and untangle the thread. Attach the hoop securely to pucker, so Material has not been tightly ...material. Select a correct needle. If the thread is not correctly attached. EMBROIDERY PATTERN IS MIS-ALIGNED MACHINE SIDE HOOP SIDE Embroidering is continuing when thread is too thick. Refer to pages 70 - 71. Embroidery hoop is tangled on the spool pin or somewhere along the thread path...
Instruction Manual
Page 86
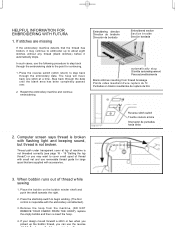
...rupture du fil Puntadas en blanco resultantes de ruptura de hilo 2. HELPFUL INFORMATION FOR EMBROIDERING WITH FUTURA 1. In such cases, use removable thread guide for continuing. 1. If stitches are missing If the embroidery machine detects that are supplied with flashing light and beeping sound, but thread is inoperable with small ... path under transparent cover at a time. Place the bobbin on the bobbin winder shaft and push the shaft towards the right. 2. Restart the embroidery machine and continue embroidering. The hoop will move back one stitch at top of thread while sewing 1.
...rupture du fil Puntadas en blanco resultantes de ruptura de hilo 2. HELPFUL INFORMATION FOR EMBROIDERING WITH FUTURA 1. In such cases, use removable thread guide for continuing. 1. If stitches are missing If the embroidery machine detects that are supplied with flashing light and beeping sound, but thread is inoperable with small ... path under transparent cover at a time. Place the bobbin on the bobbin winder shaft and push the shaft towards the right. 2. Restart the embroidery machine and continue embroidering. The hoop will move back one stitch at top of thread while sewing 1.
Instruction Manual
Page 94
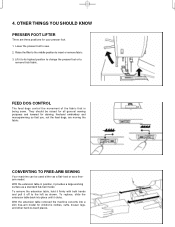
4. Lift it clicks. CONVERTING TO FREE-ARM SEWING Your machine can be raised for all general sewing purposes and lowered for your presser foot. 1. To replace, slide the extension table back into a slim free-arm ... movement of the fabric that you, not the feed dogs, are three positions for darning, freehand embroidery and monogramming so that is being sewn. bed or as a flat- With the extension table removed the machine converts into place until it to its highest position to change the presser foot or to insert...
4. Lift it clicks. CONVERTING TO FREE-ARM SEWING Your machine can be raised for all general sewing purposes and lowered for your presser foot. 1. To replace, slide the extension table back into a slim free-arm ... movement of the fabric that you, not the feed dogs, are three positions for darning, freehand embroidery and monogramming so that is being sewn. bed or as a flat- With the extension table removed the machine converts into place until it to its highest position to change the presser foot or to insert...
Instruction Manual
Page 98
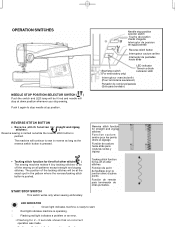
... for 2 - 3 seconds shows that an incorrect operation was made. START/STOP SWITCH This switch works only when sewing embroidery. LED INDICATOR Green light indicates machine is pressed. Flashing red light indicates a problem or an error. ∗ Flashing for tie-off of other stitches (...posicion de aguja parada Reverse stitch button Interrupteur couture arrière Interruptor de puntadas hacia atrás Start/stop switch (For embroidery only) LED indicator Témoin a diode Indicador LED Interrupteur marche/arrêt (Pour la broderie seulement) Pulsador de comienzo/parada...
... for 2 - 3 seconds shows that an incorrect operation was made. START/STOP SWITCH This switch works only when sewing embroidery. LED INDICATOR Green light indicates machine is pressed. Flashing red light indicates a problem or an error. ∗ Flashing for tie-off of other stitches (...posicion de aguja parada Reverse stitch button Interrupteur couture arrière Interruptor de puntadas hacia atrás Start/stop switch (For embroidery only) LED indicator Témoin a diode Indicador LED Interrupteur marche/arrêt (Pour la broderie seulement) Pulsador de comienzo/parada...
Instruction Manual
Page 112
... into cord socket for foot control plug. → Remove foreign particle. Connect your PC to the sewing machine with small hoop attached. eign particle is not connected. attach embroidery unit or remove small hoop and turn off edle is pushed in and pulled out while sewing patterns. Check... threading. ot control plug is lowered when starting embroidery sewing. → Raise needle by rotating hand wheel toward you. edle thread breakage or incorrectly threaded condition is installed with USB cable....
... into cord socket for foot control plug. → Remove foreign particle. Connect your PC to the sewing machine with small hoop attached. eign particle is not connected. attach embroidery unit or remove small hoop and turn off edle is pushed in and pulled out while sewing patterns. Check... threading. ot control plug is lowered when starting embroidery sewing. → Raise needle by rotating hand wheel toward you. edle thread breakage or incorrectly threaded condition is installed with USB cable....


