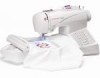
Instruction Manual
Page 3
... outlet." 9. "To disconnect, turn switch to the nearest authorized dealer or service center for its intended use , or equivalent." "Switch the sewing machine off ("0") position, then remove plug from the accumulation of electric shock, this manual." 3. To reduce the risk of lint, dust, and...- "Do not allow to install the proper outlet. "Never drop or insert any air openings blocked. Special care is marked with this sewing machine." It may deflect the needle causing it still does not fit, contact a qualified electrician to be followed, including the following." POLARIZED ...
... outlet." 9. "To disconnect, turn switch to the nearest authorized dealer or service center for its intended use , or equivalent." "Switch the sewing machine off ("0") position, then remove plug from the accumulation of electric shock, this manual." 3. To reduce the risk of lint, dust, and...- "Do not allow to install the proper outlet. "Never drop or insert any air openings blocked. Special care is marked with this sewing machine." It may deflect the needle causing it still does not fit, contact a qualified electrician to be followed, including the following." POLARIZED ...

Instruction Manual
Page 6
...identification 6 - 7 Accessories 8-9 2. OTHER THINGS YOU SHOULD KNOW Presser foot lifter 90-91 Feed dog control 90-91 Converting to free-arm sewing 90 - 91 Adjusting top thread tension 92 - 93 Changing presser foot 92 - 93 Operation switches 94 - 95 Needle, thread and fabric ..., Feather stitch, Pin stitch, Ladder stitch, Blanket stitch, Slant pin stitch, Slant Overedge Stitch Decorative Stitching 48 - 49 Continuous patterns 50 - 51 Sewing on a button 50 - 51 Buttonhole making 52 - 57 Using buttonhole foot, Procedure, Corded buttonholes 3. TABLE OF CONTENTS 1. PRE P AR AT ION...
...identification 6 - 7 Accessories 8-9 2. OTHER THINGS YOU SHOULD KNOW Presser foot lifter 90-91 Feed dog control 90-91 Converting to free-arm sewing 90 - 91 Adjusting top thread tension 92 - 93 Changing presser foot 92 - 93 Operation switches 94 - 95 Needle, thread and fabric ..., Feather stitch, Pin stitch, Ladder stitch, Blanket stitch, Slant pin stitch, Slant Overedge Stitch Decorative Stitching 48 - 49 Continuous patterns 50 - 51 Sewing on a button 50 - 51 Buttonhole making 52 - 57 Using buttonhole foot, Procedure, Corded buttonholes 3. TABLE OF CONTENTS 1. PRE P AR AT ION...
Instruction Manual
Page 10
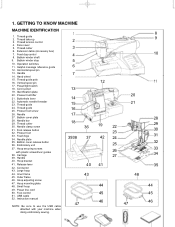
... screwdriver guides 38. Thread guide pole 16. Handle 40. Feed dog control 8. Presser foot lifter 21. Hoop securing screws with your machine when doing embroidery sewing. 1 2 3 4 5 6 7 13 14 15 16 17 18 3938 47 36 37 40 43 12 19 42 41 44 45 46 20 21 22 23 24 25...
... screwdriver guides 38. Thread guide pole 16. Handle 40. Feed dog control 8. Presser foot lifter 21. Hoop securing screws with your machine when doing embroidery sewing. 1 2 3 4 5 6 7 13 14 15 16 17 18 3938 47 36 37 40 43 12 19 42 41 44 45 46 20 21 22 23 24 25...
Instruction Manual
Page 12
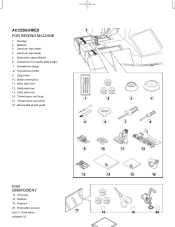
.... Buttonhole foot 13. Thread spool net (long) 15. Bobbins 19. Needles 2. Bobbins 3. Vinyl bag 18. Embroidery presser foot 21. ACCESSORIES FOR SEWING MACHINE 1. Buttonhole opener/Brush 6. Screwdriver (small) 9. Screwdriver (large) 8. Button sewing foot 11. Thread spool net (short) 16. Removable thread guide 1 2 3 4 5 6 7 8 FOR EMBROIDERY 17. Embroidery software CD 9 10 11 12 13...
.... Buttonhole foot 13. Thread spool net (long) 15. Bobbins 19. Needles 2. Bobbins 3. Vinyl bag 18. Embroidery presser foot 21. ACCESSORIES FOR SEWING MACHINE 1. Buttonhole opener/Brush 6. Screwdriver (small) 9. Screwdriver (large) 8. Button sewing foot 11. Thread spool net (short) 16. Removable thread guide 1 2 3 4 5 6 7 8 FOR EMBROIDERY 17. Embroidery software CD 9 10 11 12 13...
Instruction Manual
Page 14
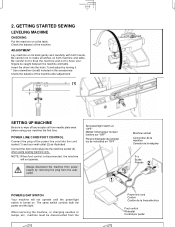
GETTING STARTED SEWING LEVELING MACHINE CHECKING Put the machine on its back gently and carefully with both hands. ADJUSTMENT Lay machine on a flat table. Check the balance of ... machine the first time. Be careful not to drop the machine and not to wipe off any surplus oil from needle plate area before using sewing machine only. POWER LINE CORD/FOOT CONTROL Connect the plug of the machine. When servicing the machine, or changing needles or Iamps, etc., machine must...
GETTING STARTED SEWING LEVELING MACHINE CHECKING Put the machine on its back gently and carefully with both hands. ADJUSTMENT Lay machine on a flat table. Check the balance of ... machine the first time. Be careful not to drop the machine and not to wipe off any surplus oil from needle plate area before using sewing machine only. POWER LINE CORD/FOOT CONTROL Connect the plug of the machine. When servicing the machine, or changing needles or Iamps, etc., machine must...
Instruction Manual
Page 30
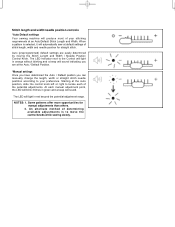
... adjustments than others. 2. An alternate method of the potential adjustments. Stitch length and width/needle position controls *Auto/Default settings Your sewing machine will sound. The LED will automatically sew at the Auto position, slide the control knob left or right to your stitching requirements at an Auto/Default Stitch Length and...
... adjustments than others. 2. An alternate method of the potential adjustments. Stitch length and width/needle position controls *Auto/Default settings Your sewing machine will sound. The LED will automatically sew at the Auto position, slide the control knob left or right to your stitching requirements at an Auto/Default Stitch Length and...
Instruction Manual
Page 34
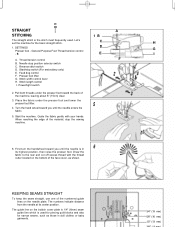
S A. Thread tension control B. Start/stop the sewing machine. 6. Power/light switch 1B C D E A F 2 H G I . When reaching the edge of the numbered guide lines on the bobbin cover plate is 1/4" (6mm) seam guide line which ...
S A. Thread tension control B. Start/stop the sewing machine. 6. Power/light switch 1B C D E A F 2 H G I . When reaching the edge of the numbered guide lines on the bobbin cover plate is 1/4" (6mm) seam guide line which ...
Instruction Manual
Page 38
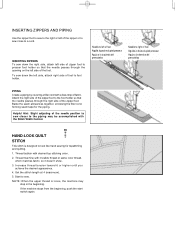
...LOOK QUILT STITCH This stitch is loose, the machine may be accomplished with a bias strip of fabric. Start to look like hand sewing for the piping. Baste the seam allowances together, enclosing the filler cord, forming seam tape for topstitching and quilting. 1. Attach the ... derecha del prensatelas PIPING Create a piping by covering a filler cord with the Stitch Width Control. NOTE: When the upper thread is designed to sew. Set the stitich length at 4 (maximum). 5. Increase thread tension toward 6 or higher until you achieve the desired appearance. 4. Thread bobbin ...
...LOOK QUILT STITCH This stitch is loose, the machine may be accomplished with a bias strip of fabric. Start to look like hand sewing for the piping. Baste the seam allowances together, enclosing the filler cord, forming seam tape for topstitching and quilting. 1. Attach the ... derecha del prensatelas PIPING Create a piping by covering a filler cord with the Stitch Width Control. NOTE: When the upper thread is designed to sew. Set the stitich length at 4 (maximum). 5. Increase thread tension toward 6 or higher until you achieve the desired appearance. 4. Thread bobbin ...

Instruction Manual
Page 40
... position Position centrale Aguja posicionada en el centro E The top thread may appear on the bottom depending on the thread, fabric, type of stitch and sewing speed, but the bobbin thread must never appear on the top of pattern increases from center needle position as illustrated. Use a backing of stabilizer to...
... position Position centrale Aguja posicionada en el centro E The top thread may appear on the bottom depending on the thread, fabric, type of stitch and sewing speed, but the bobbin thread must never appear on the top of pattern increases from center needle position as illustrated. Use a backing of stabilizer to...
Instruction Manual
Page 42
... up the required depth, press and pin in place. 2. Blind Hem Foot :Thread tension control - Do this by hand until the needle swings fully to sew blind hems. Always PDNQ L DQwiHZ tQst I rsH 4 Top side Cara End roit Sew slowly, guiding the fabric carefully along the edge of the fabric. S -
... up the required depth, press and pin in place. 2. Blind Hem Foot :Thread tension control - Do this by hand until the needle swings fully to sew blind hems. Always PDNQ L DQwiHZ tQst I rsH 4 Top side Cara End roit Sew slowly, guiding the fabric carefully along the edge of the fabric. S -

Instruction Manual
Page 48
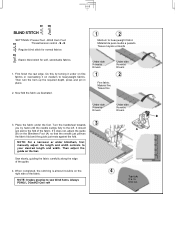
... stitch enables it to applique a quilt. BLANKET STITCH The decorative appearance combined with practical use for the ladder stitch is a traditional stitch pattern used for sewing over narrow ribbon, yarn or elastic. LADDER STITCH The Ladder stitch is primarily used for hemstitching and to be obtained for decoration. It can also...
... stitch enables it to applique a quilt. BLANKET STITCH The decorative appearance combined with practical use for the ladder stitch is a traditional stitch pattern used for sewing over narrow ribbon, yarn or elastic. LADDER STITCH The Ladder stitch is primarily used for hemstitching and to be obtained for decoration. It can also...
Instruction Manual
Page 50
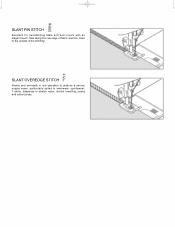
Sew along the raw edge of the stitching. SLANT OVEREDGE STITCH Seams and overcasts in one operation to produce a narrow, supple seam, particularly suited to the outside of fabric and trim close to swimwear, sportswear, T-shirts, babywear in stretch nylon, stretch towelling, jersey and cotton jersey. SLANT PIN STITCH Excellent for hemstitching table and bed covers with an elegant touch.
Sew along the raw edge of the stitching. SLANT OVEREDGE STITCH Seams and overcasts in one operation to produce a narrow, supple seam, particularly suited to the outside of fabric and trim close to swimwear, sportswear, T-shirts, babywear in stretch nylon, stretch towelling, jersey and cotton jersey. SLANT PIN STITCH Excellent for hemstitching table and bed covers with an elegant touch.
Instruction Manual
Page 52
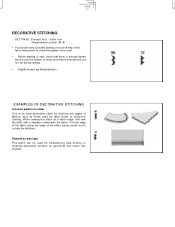
... home dec projects. Trim the edge of the fabric along the edge of fabrics, such as those used . ∗ Before starting to sew, check that there is an ideal decorative stitch for finishing the edges of the stitch, being sewn to check the pattern to cut into the... or children's clothing. DECORATIVE STITCHING SETTINGS :Presser foot - EXAMPLES OF DECORATIVE STITCHING Crescent pattern on a fabric edge, first sew the stitch with a stabilizer underneath the fabric. When sewing this stitch on collar This is enough thread wound onto the bobbin to make sure that the thread will not run...
... home dec projects. Trim the edge of the fabric along the edge of fabrics, such as those used . ∗ Before starting to sew, check that there is an ideal decorative stitch for finishing the edges of the stitch, being sewn to check the pattern to cut into the... or children's clothing. DECORATIVE STITCHING SETTINGS :Presser foot - EXAMPLES OF DECORATIVE STITCHING Crescent pattern on a fabric edge, first sew the stitch with a stabilizer underneath the fabric. When sewing this stitch on collar This is enough thread wound onto the bobbin to make sure that the thread will not run...
Instruction Manual
Page 54
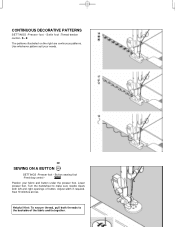
... handwheel to make sure needle clears both threads to the backside of button. Use whichever pattern suit your fabric and button under the presser foot. Sew 10 stitches across. Helpful Hint: To secure thread, pull both left and right openings of the fabric and tie together. S - Button...
... handwheel to make sure needle clears both threads to the backside of button. Use whichever pattern suit your fabric and button under the presser foot. Sew 10 stitches across. Helpful Hint: To secure thread, pull both left and right openings of the fabric and tie together. S - Button...
Instruction Manual
Page 56
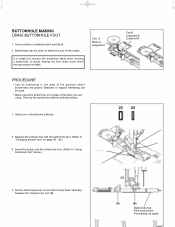
It is helpful to remove the extension table when sewing a buttonhole, to "Using buttonhole foot" above.) 7. Select one of the garment where buttonholes are using. Set the buttonhole lever (C) so that it drops down vertically ...
It is helpful to remove the extension table when sewing a buttonhole, to "Using buttonhole foot" above.) 7. Select one of the garment where buttonholes are using. Set the buttonhole lever (C) so that it drops down vertically ...
Instruction Manual
Page 58
... pied boutonnière Posición de alineación del pie de ojaladora Be careful not to the rear. 8. W h i l e h o l d i n g t h e t o p t h r e a d , s t a r t t h e m a c h i n e . * Sewing will be completed automatically in the center of buttonhole on the buttonhole foot, and then lower the buttonhole foot. 9. When... sewing is finished, use a buttonhole opener to open up the fabric in the following order. 5. Fabric marking Marque Marque du...
... pied boutonnière Posición de alineación del pie de ojaladora Be careful not to the rear. 8. W h i l e h o l d i n g t h e t o p t h r e a d , s t a r t t h e m a c h i n e . * Sewing will be completed automatically in the center of buttonhole on the buttonhole foot, and then lower the buttonhole foot. 9. When... sewing is finished, use a buttonhole opener to open up the fabric in the following order. 5. Fabric marking Marque Marque du...
Instruction Manual
Page 60
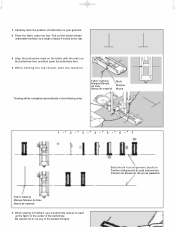
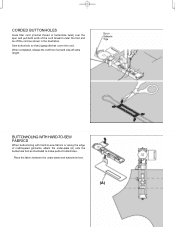
When completed, release the cord from foot and snip off the cord as illustrated to -sew fabrics or along the edge of the cord forward under -plate and buttonhole foot. (A) Place the fabric between the under the foot and tie off ... ends of multi-layered garments, attach the under-plate (A) onto the buttonhole foot as shown in the illustration. Spur Saliente Tige BUTTONHOLING WITH HARD-TO-SEW FABRICS When buttonholing with hard-to make perfect buttonholes. Sew buttonhole so that zigzag stitches cover the cord.
When completed, release the cord from foot and snip off the cord as illustrated to -sew fabrics or along the edge of the cord forward under -plate and buttonhole foot. (A) Place the fabric between the under the foot and tie off ... ends of multi-layered garments, attach the under-plate (A) onto the buttonhole foot as shown in the illustration. Spur Saliente Tige BUTTONHOLING WITH HARD-TO-SEW FABRICS When buttonholing with hard-to make perfect buttonholes. Sew buttonhole so that zigzag stitches cover the cord.
Instruction Manual
Page 62
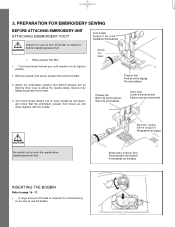
... lever Levier d'entraînement Palanca de accionamiento CAUTION Be careful not to move needle up and down together with the needle. PREPARATION FOR EMBROIDERY SEWING BEFORE ATTACHING EMBROIDERY UNIT ATTACHING EMBROIDERY FOOT Always be sure to machine before changing presser foot. Turn hand wheel toward you to touch the needle...
... lever Levier d'entraînement Palanca de accionamiento CAUTION Be careful not to move needle up and down together with the needle. PREPARATION FOR EMBROIDERY SEWING BEFORE ATTACHING EMBROIDERY UNIT ATTACHING EMBROIDERY FOOT Always be sure to machine before changing presser foot. Turn hand wheel toward you to touch the needle...
Instruction Manual
Page 66
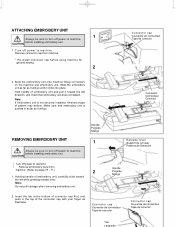
... de connecteur Tapa de conector Connector Connecteur Conector REMOVING EMBROIDERY UNIT Always be sure to turn off power to machine before using machine for general sewing. 2 3. Handle Poignée Mango 1 2 Release lever Support de cerceau Palanca de liberación Handle Poignée Mango 2. Note: If embroidery unit is pushed in as...
... de connecteur Tapa de conector Connector Connecteur Conector REMOVING EMBROIDERY UNIT Always be sure to turn off power to machine before using machine for general sewing. 2 3. Handle Poignée Mango 1 2 Release lever Support de cerceau Palanca de liberación Handle Poignée Mango 2. Note: If embroidery unit is pushed in as...
Instruction Manual
Page 78
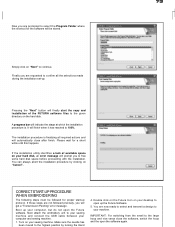
...start the copy and installation of available space on "Cancel". Next attach the embroidery unit to your sewing machine and connect the USB cable between your computer, but do not open the Futura software. You can always abort the installation procedure by turning the Hand 4. CORRECT START-UP PROCEDURE... close the software, switch the hoop and the open up your computer and sewing machine. 1. IMPORTANT: For switching from the small to the large hoop and vice versa close after finish. Double click on the Futura Icon on "Next" to continue. Now you are now ready to select ...
...start the copy and installation of available space on "Cancel". Next attach the embroidery unit to your sewing machine and connect the USB cable between your computer, but do not open the Futura software. You can always abort the installation procedure by turning the Hand 4. CORRECT START-UP PROCEDURE... close the software, switch the hoop and the open up your computer and sewing machine. 1. IMPORTANT: For switching from the small to the large hoop and vice versa close after finish. Double click on the Futura Icon on "Next" to continue. Now you are now ready to select ...


