
Instruction Manual
Page 6
... Feed dog control Attaching embroidery unit 62 - 63 Removing embroidery unit 62 - 63 Securing material in embroidery hoop 64 - 65 Using the material and stabilizer 66 - 69 Preparing the machine before installing the hoop ------- 70 - 71 Attaching and removing embroidery hoop 70 - 71 ...Installation of software 72 - 75 Operation switches when embroidery unit is attached - 76 - 77 Operation switches, Thread tension control...
... Feed dog control Attaching embroidery unit 62 - 63 Removing embroidery unit 62 - 63 Securing material in embroidery hoop 64 - 65 Using the material and stabilizer 66 - 69 Preparing the machine before installing the hoop ------- 70 - 71 Attaching and removing embroidery hoop 70 - 71 ...Installation of software 72 - 75 Operation switches when embroidery unit is attached - 76 - 77 Operation switches, Thread tension control...
Instruction Manual
Page 10
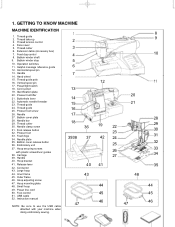
.... Hoop bracket 41. Large hoop 44. Hoop mounting plate 48. Thread cutter 6. Thread guide 25. Foot release button 32. Hoop securing screws with your machine when doing embroidery sewing. 1 2 3 4 5 6 7 13 14 15 16 17 18 3938 47 36 37 40 43 12 19 42 41 44 45 46 20 21 22 23.... Feed dogs 34. Bobbin cover release button 36. Thread guide 2. Thread guide 24. Release lever 42. Inner frame 45. Cord socket 19. GETTING TO KNOW MACHINE MACHINE IDENTIFICATION 1. Thread guide pole 16. Bobbin winder shaft 9. Needle 27. Embroidery unit 37.
.... Hoop bracket 41. Large hoop 44. Hoop mounting plate 48. Thread cutter 6. Thread guide 25. Foot release button 32. Hoop securing screws with your machine when doing embroidery sewing. 1 2 3 4 5 6 7 13 14 15 16 17 18 3938 47 36 37 40 43 12 19 42 41 44 45 46 20 21 22 23.... Feed dogs 34. Bobbin cover release button 36. Thread guide 2. Thread guide 24. Release lever 42. Inner frame 45. Cord socket 19. GETTING TO KNOW MACHINE MACHINE IDENTIFICATION 1. Thread guide pole 16. Bobbin winder shaft 9. Needle 27. Embroidery unit 37.
Instruction Manual
Page 12
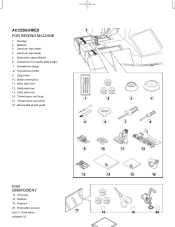
...) 5. Screwdriver (small) 9. Thread spool net (long) 15. Bobbins 19. ACCESSORIES FOR SEWING MACHINE 1. Bobbins 3. Blind stitch foot 12. Embroidery software CD 9 10 11 12 13 14 15 16 17 18 19 20 Button sewing foot 11. Removable thread guide 1 2 3 4 5 6 7 8 FOR EMBROIDERY 17. Scissors 20. Satin stitch foot 14. Vinyl bag 18. Needles 2. Spool...
...) 5. Screwdriver (small) 9. Thread spool net (long) 15. Bobbins 19. ACCESSORIES FOR SEWING MACHINE 1. Bobbins 3. Blind stitch foot 12. Embroidery software CD 9 10 11 12 13 14 15 16 17 18 19 20 Button sewing foot 11. Removable thread guide 1 2 3 4 5 6 7 8 FOR EMBROIDERY 17. Scissors 20. Satin stitch foot 14. Vinyl bag 18. Needles 2. Spool...
Instruction Manual
Page 34
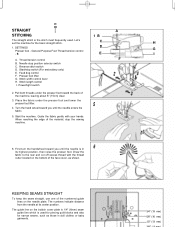
... needle at its highest position, then raise the presser foot. Pull both threads under the presser foot and lower the presser foot lifter. 5 4. Start the machine. The guide line on the needle plate. Power/light switch 1B C D E A F 2 H G I . When reaching the edge of the numbered guide lines on the bobbin cover plate... . STRAIGHT STITCHING The straight stitch is the stitch most frequently used for piecing quilt blocks and also for the basic straight stitch. 1. Let's set the machine for narrow seams, such as shown. Start/stop switch (For embroidery only) E.
... needle at its highest position, then raise the presser foot. Pull both threads under the presser foot and lower the presser foot lifter. 5 4. Start the machine. The guide line on the needle plate. Power/light switch 1B C D E A F 2 H G I . When reaching the edge of the numbered guide lines on the bobbin cover plate... . STRAIGHT STITCHING The straight stitch is the stitch most frequently used for piecing quilt blocks and also for the basic straight stitch. 1. Let's set the machine for narrow seams, such as shown. Start/stop switch (For embroidery only) E.
Instruction Manual
Page 62
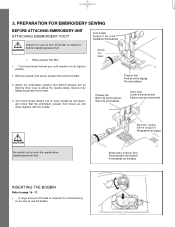
...needle up and down, and check that the drive lever is in its highest position. 1. Needle clamp Serre-aiguille Abrazadera de aguja Embroidery presser foot Pied presseur de broderie Prensatelas de bordado INSERTING THE BOBBIN Refer to page 16 - 17. ∗ A large amount of... up and down together with the needle. Secure it by tightening presser foot screw. 3. PREPARATION FOR EMBROIDERY SEWING BEFORE ATTACHING EMBROIDERY UNIT ATTACHING EMBROIDERY FOOT Always be sure to machine before changing presser foot. Foot holder Support du pied Sujetador prensatelas Screw Vis Guia ∗ Turn hand...
...needle up and down, and check that the drive lever is in its highest position. 1. Needle clamp Serre-aiguille Abrazadera de aguja Embroidery presser foot Pied presseur de broderie Prensatelas de bordado INSERTING THE BOBBIN Refer to page 16 - 17. ∗ A large amount of... up and down together with the needle. Secure it by tightening presser foot screw. 3. PREPARATION FOR EMBROIDERY SEWING BEFORE ATTACHING EMBROIDERY UNIT ATTACHING EMBROIDERY FOOT Always be sure to machine before changing presser foot. Foot holder Support du pied Sujetador prensatelas Screw Vis Guia ∗ Turn hand...
Instruction Manual
Page 66
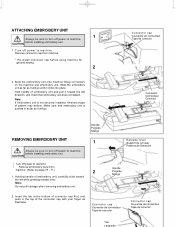
... installed, finished shape of the connector cap with your finger as it clicks into place. CAUTION ∗ Turn off power to machine. ∗ Remove embroidery hoop from machine. * Re-install connector cap before installing embroidery unit. CAUTION 1. Handle Poignée Mango 1 2 Release lever Support de cerceau Palanca de liberación Handle Poignée Mango...
... installed, finished shape of the connector cap with your finger as it clicks into place. CAUTION ∗ Turn off power to machine. ∗ Remove embroidery hoop from machine. * Re-install connector cap before installing embroidery unit. CAUTION 1. Handle Poignée Mango 1 2 Release lever Support de cerceau Palanca de liberación Handle Poignée Mango...

Instruction Manual
Page 74
..., loosen hoop mounting screws (D) and remove the hoop from underneath the embroidery foot. 2 (C) (D) 3. Carriage Chariot Carro (B) (B) Hoop mounting plate Plaque de montage de cerceau Placa de montaje de aro PREPARING THE MACHINE BEFORE INSTALLING THE HOOP 1 1. Raise presser foot and needle, and push... up lever (A) of embroidery foot with screwdriver. Securely tighten hoop mounting screws (D) with your finger and pass embroidery hoop under it out from the ...
..., loosen hoop mounting screws (D) and remove the hoop from underneath the embroidery foot. 2 (C) (D) 3. Carriage Chariot Carro (B) (B) Hoop mounting plate Plaque de montage de cerceau Placa de montaje de aro PREPARING THE MACHINE BEFORE INSTALLING THE HOOP 1 1. Raise presser foot and needle, and push... up lever (A) of embroidery foot with screwdriver. Securely tighten hoop mounting screws (D) with your finger and pass embroidery hoop under it out from the ...
Instruction Manual
Page 78
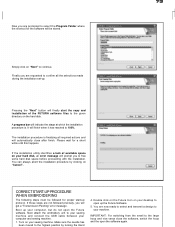
...from the small to confirm all required actions and will indicate the stage at which the installation procedure is. Simply click on your machine. CORRECT START-UP PROCEDURE WHEN EMBROIDERING The following steps must be stored. You are requested to the large hoop and vice versa... made during the installation set-up the Futura Software. 5. Next attach the embroidery unit to free some hard disk space before proceeding with the installation. It will finally start -up your computer and sewing machine. 1. Finally you to your sewing machine and connect the USB cable between your ...
...from the small to confirm all required actions and will indicate the stage at which the installation procedure is. Simply click on your machine. CORRECT START-UP PROCEDURE WHEN EMBROIDERING The following steps must be stored. You are requested to the large hoop and vice versa... made during the installation set-up the Futura Software. 5. Next attach the embroidery unit to free some hard disk space before proceeding with the installation. It will finally start -up your computer and sewing machine. 1. Finally you to your sewing machine and connect the USB cable between your ...
Instruction Manual
Page 80
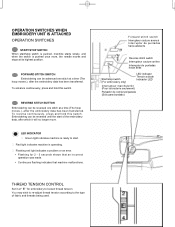
... an incorrect operation was made. ∗ Continuous flashing indicates that machine malfunctions. Embroidering can be reversed until the start . Red light indicates machine is operating. FORWARD STITCH SWITCH Embroidering can be advanced one stitch at a time (The hoop moves.), after the embroidery data has been transferred. To advance continuously, press and hold this...
... an incorrect operation was made. ∗ Continuous flashing indicates that machine malfunctions. Embroidering can be reversed until the start . Red light indicates machine is operating. FORWARD STITCH SWITCH Embroidering can be advanced one stitch at a time (The hoop moves.), after the embroidery data has been transferred. To advance continuously, press and hold this...
Instruction Manual
Page 84
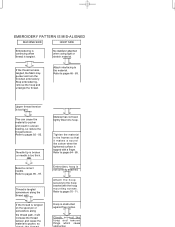
... pages 92 - 93. Attach the hoop securely to pucker, so Material has not been tightly fitted into hoop. Select a correct needle. Embroidery hoop is too tight. No stabilizer attached when using light or stretch material. Attach interfacing to pages 70 - 71. Refer to the material... thread tension. Hoop is tangled. Check around the hoop and remove things which cause If the thread is too thick. EMBROIDERY PATTERN IS MIS-ALIGNED MACHINE SIDE HOOP SIDE Embroidering is continuing when thread is obstructed against free motion. Refer to pages 96 - 97. Needle tip...
... pages 92 - 93. Attach the hoop securely to pucker, so Material has not been tightly fitted into hoop. Select a correct needle. Embroidery hoop is too tight. No stabilizer attached when using light or stretch material. Attach interfacing to pages 70 - 71. Refer to the material... thread tension. Hoop is tangled. Check around the hoop and remove things which cause If the thread is too thick. EMBROIDERY PATTERN IS MIS-ALIGNED MACHINE SIDE HOOP SIDE Embroidering is continuing when thread is obstructed against free motion. Refer to pages 96 - 97. Needle tip...
Instruction Manual
Page 86
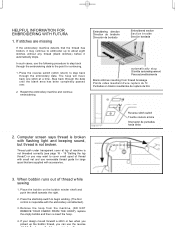
If stitches are missing If the embroidery machine detects that the thread has broken, it may want to cover small spool of thread with small net and use removable thread guide for continuing. 1. Step back through the embroidery data. Place the bobbin on the bobbin winder shaft and ...bobbin thread, you may continue to embroider up to the point for large spool that are supplied with accessories. 3. HELPFUL INFORMATION FOR EMBROIDERING WITH FUTURA 1. Thread path under transparent cover at a time. Press the reverse switch (stitch return) to begin winding. (The foot control is inoperable...
If stitches are missing If the embroidery machine detects that the thread has broken, it may want to cover small spool of thread with small net and use removable thread guide for continuing. 1. Step back through the embroidery data. Place the bobbin on the bobbin winder shaft and ...bobbin thread, you may continue to embroider up to the point for large spool that are supplied with accessories. 3. HELPFUL INFORMATION FOR EMBROIDERING WITH FUTURA 1. Thread path under transparent cover at a time. Press the reverse switch (stitch return) to begin winding. (The foot control is inoperable...
Instruction Manual
Page 94
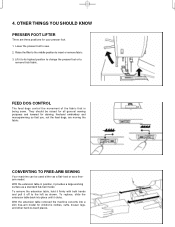
... hold it firmly with both hands and pull it clicks. OTHER THINGS YOU SHOULD KNOW PRESSER FOOT LIFTER There are three positions for darning, freehand embroidery and monogramming so that is being sewn. They should be used either as a standard flat-bed model. FEED DOG CONTROL The feed dogs control the... movement of the fabric that you, not the feed dogs, are moving the fabric. With the extension table removed the machine converts into place until it off to -reach places. Lower the presser foot to insert or remove fabric. 3. CONVERTING TO FREE-ARM SEWING Your...
... hold it firmly with both hands and pull it clicks. OTHER THINGS YOU SHOULD KNOW PRESSER FOOT LIFTER There are three positions for darning, freehand embroidery and monogramming so that is being sewn. They should be used either as a standard flat-bed model. FEED DOG CONTROL The feed dogs control the... movement of the fabric that you, not the feed dogs, are moving the fabric. With the extension table removed the machine converts into place until it off to -reach places. Lower the presser foot to insert or remove fabric. 3. CONVERTING TO FREE-ARM SEWING Your...
Instruction Manual
Page 98
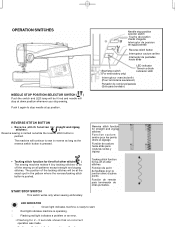
...;re Interruptor de puntadas hacia atrás Start/stop sewing. START/STOP SWITCH This switch works only when sewing embroidery. LED INDICATOR Green light indicates machine is ready to tie off the sewing on all patterns except straight and zigzag stitches. Reverse stitch function for straight... SELECTOR SWITCH ( ) Push the switch and LED lamp will be at up position. The machine will be lit red and needle will stop at down position whenever you stop switch (For embroidery only) LED indicator Témoin a diode Indicador LED Interrupteur marche/arrêt (Pour la...
...;re Interruptor de puntadas hacia atrás Start/stop sewing. START/STOP SWITCH This switch works only when sewing embroidery. LED INDICATOR Green light indicates machine is ready to tie off the sewing on all patterns except straight and zigzag stitches. Reverse stitch function for straight... SELECTOR SWITCH ( ) Push the switch and LED lamp will be at up position. The machine will be lit red and needle will stop at down position whenever you stop switch (For embroidery only) LED indicator Témoin a diode Indicador LED Interrupteur marche/arrêt (Pour la...
Instruction Manual
Page 112
Check threading. and on power switch. → Remove embroidery unit and small hoop and then re- eign particle is detected. edle thread breakage or incorrectly threaded condition is inserted into cord socket for foot ...control plug. → Remove foreign particle. B cable is pushed in and pulled out while sewing patterns. broidery unit is lowered when starting embroidery sewing. → Raise needle by rotating hand wheel toward you. Don't touch the plug while sewing. Connect your PC to the sewing...
Check threading. and on power switch. → Remove embroidery unit and small hoop and then re- eign particle is detected. edle thread breakage or incorrectly threaded condition is inserted into cord socket for foot ...control plug. → Remove foreign particle. B cable is pushed in and pulled out while sewing patterns. broidery unit is lowered when starting embroidery sewing. → Raise needle by rotating hand wheel toward you. Don't touch the plug while sewing. Connect your PC to the sewing...


