Instruction Manual
Page 2
... by an authorized service representative. 2SINGER is the exclusive trademark of the sewing machine and foot controller free from all instructions before using and before cleaning. Always unplug sewing machine from the electric outlet immediately after using . Keep ventilation openings of The Singer Company Limited S.à.r.l. Never drop or insert any object into water. Do...
... by an authorized service representative. 2SINGER is the exclusive trademark of the sewing machine and foot controller free from all instructions before using and before cleaning. Always unplug sewing machine from the electric outlet immediately after using . Keep ventilation openings of The Singer Company Limited S.à.r.l. Never drop or insert any object into water. Do...
Instruction Manual
Page 3
... 74 MODEL 9980 8 C. SINGLE CORDING 80 B. SEWING LIGHTWEIGHT FABRICS .... 82 USING THE EVEN-FEED FOOT 82 A. SPEED CONTROL BUTTON 20 A. PRESSURE REGULATOR 22 J. DECORATIVE & LETTER STITCH FOOT 58 DECORATIVE AND LETTER BUTTON 24 E. PREPARING TO THREAD MACHINE . 32 ... ATTACHING THE DARING/ C. PATTERN CHART 24 A. INSERTING THE BOBBIN 30 THREADING THE MACHINE . 32 A. FUNCTION BUTTONS 24 BLIND HEM STITCHING ........ 60 STITCH CHART 98 F. SEWING HEAVY FABRIC F. DARING 84 FOOT CONTROLLER 18 A. THREADING THE UPPER THREAD ... 32 ...
... 74 MODEL 9980 8 C. SINGLE CORDING 80 B. SEWING LIGHTWEIGHT FABRICS .... 82 USING THE EVEN-FEED FOOT 82 A. SPEED CONTROL BUTTON 20 A. PRESSURE REGULATOR 22 J. DECORATIVE & LETTER STITCH FOOT 58 DECORATIVE AND LETTER BUTTON 24 E. PREPARING TO THREAD MACHINE . 32 ... ATTACHING THE DARING/ C. PATTERN CHART 24 A. INSERTING THE BOBBIN 30 THREADING THE MACHINE . 32 A. FUNCTION BUTTONS 24 BLIND HEM STITCHING ........ 60 STITCH CHART 98 F. SEWING HEAVY FABRIC F. DARING 84 FOOT CONTROLLER 18 A. THREADING THE UPPER THREAD ... 32 ...
Instruction Manual
Page 8
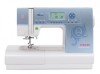
...is colored brown must be connected to change the appearance, design or accessories of this mains lead are colored in the mains lead of this sewing machine. If a 13 Amp. (BS 1363) plug is to heavy material. fuse must be used by children aged from light to be ...or obligation. Cet appareil ne doit pas entre utiliser comme un jouet par les enfants. 3. Neither cord is used , a 5 Amp. MODEL 9980 PREFACE Thank you for radio and television interference with the International Electrotechnical Commission requirements of the CISPR. This appliance can be connected to operate the...
...is colored brown must be connected to change the appearance, design or accessories of this mains lead are colored in the mains lead of this sewing machine. If a 13 Amp. (BS 1363) plug is to heavy material. fuse must be used by children aged from light to be ...or obligation. Cet appareil ne doit pas entre utiliser comme un jouet par les enfants. 3. Neither cord is used , a 5 Amp. MODEL 9980 PREFACE Thank you for radio and television interference with the International Electrotechnical Commission requirements of the CISPR. This appliance can be connected to operate the...
Instruction Manual
Page 12
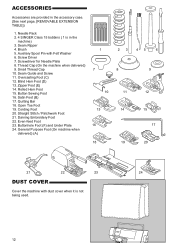
Screwdriver for Needle Plate 8. Thread Cap (On the machine when delivered) 9. Blind Hem Foot (D) 13. Button Sewing Foot 16. Rolled Hem Foot 15. Open Toe Foot 19. Even-feed Foot 23. Brush 5. Screw Driver 7. Satin Foot (B) 17. Needle Pack 2. 4 SINGER Class 15 bobbins ( 1 is not being used. 12 Seam ...12. Zipper Foot (E) 14. Quilting Bar 18. Buttonhole Foot (F) and Under Plate 24. Straight Stitch / Patchwork Foot 21. General Purpose Foot (On machine when delivered) (A) 1 7 10 13 16 18 23 8 11 14 19 45 6 9 12 15 17 20 21 22 23 24 DUST COVER Cover the...
Screwdriver for Needle Plate 8. Thread Cap (On the machine when delivered) 9. Blind Hem Foot (D) 13. Button Sewing Foot 16. Rolled Hem Foot 15. Open Toe Foot 19. Even-feed Foot 23. Brush 5. Screw Driver 7. Satin Foot (B) 17. Needle Pack 2. 4 SINGER Class 15 bobbins ( 1 is not being used. 12 Seam ...12. Zipper Foot (E) 14. Quilting Bar 18. Buttonhole Foot (F) and Under Plate 24. Straight Stitch / Patchwork Foot 21. General Purpose Foot (On machine when delivered) (A) 1 7 10 13 16 18 23 8 11 14 19 45 6 9 12 15 17 20 21 22 23 24 DUST COVER Cover the...

Instruction Manual
Page 14
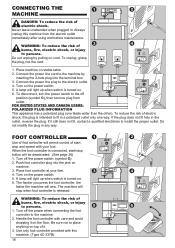
...prevent accidents. Remove the presser foot. 2. REMOVABLE EXTENSION TABLE A. Note: Your machines accessories are stored inside this drawer. Place desired foot with its highest point. 2.... 1. REMOVING THE PRESSER FOOT HOLDER When attaching presser feet that have their own shank, or when cleaning the machine, you change the presser foot. A. CHANGING THE PRESSER FOOT 1. Remove the presser foot by pushing the presser... foot lifter. 3. To attach, push the table to the stitch you sew, or work you . CHANGING THE PRESSER FOOT The presser foot must be changed according to the right.
...prevent accidents. Remove the presser foot. 2. REMOVABLE EXTENSION TABLE A. Note: Your machines accessories are stored inside this drawer. Place desired foot with its highest point. 2.... 1. REMOVING THE PRESSER FOOT HOLDER When attaching presser feet that have their own shank, or when cleaning the machine, you change the presser foot. A. CHANGING THE PRESSER FOOT 1. Remove the presser foot by pushing the presser... foot lifter. 3. To attach, push the table to the stitch you sew, or work you . CHANGING THE PRESSER FOOT The presser foot must be changed according to the right.
Instruction Manual
Page 18
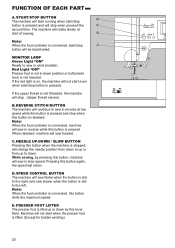
... of foot controller will light up when switch is turned on . 6. Turn on stable table. 2. A lamp will sew. WARNING: To reduce the risk of electric shock, this machine. (Type 4C-337B) 18 Connect the power line plug to persons. 1. FOR UNITED STATES AND CANADA USERS: POLARIZED ... . 3. A lamp will permit control of electric shock. Turn off the power when connecting the foot controller to place anything on machine. 3. CONNECTING THE MACHINE DANGER: To reduce the risk of start /stop button will stop and speed with this plug is released. If the plug does...
... of foot controller will light up when switch is turned on . 6. Turn on stable table. 2. A lamp will sew. WARNING: To reduce the risk of electric shock, this machine. (Type 4C-337B) 18 Connect the power line plug to persons. 1. FOR UNITED STATES AND CANADA USERS: POLARIZED ... . 3. A lamp will permit control of electric shock. Turn off the power when connecting the foot controller to place anything on machine. 3. CONNECTING THE MACHINE DANGER: To reduce the risk of start /stop button will stop and speed with this plug is released. If the plug does...
Instruction Manual
Page 20
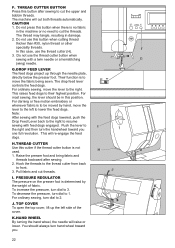
... foot is lifed up to the left. START/STOP BUTTON The machine will sew in down by pressing this lever. E. If the upper thread is pressed. Note: When the foot controller is connected, machine will sew in reverse at start when the presser foot is released. Pressing ...this button is not threaded, the machine will be deactivated. Note: When the foot controller is connected, start /stop button is...
... foot is lifed up to the left. START/STOP BUTTON The machine will sew in down by pressing this lever. E. If the upper thread is pressed. Note: When the foot controller is connected, machine will sew in reverse at start when the presser foot is released. Pressing ...this button is not threaded, the machine will be deactivated. Note: When the foot controller is connected, start /stop button is...
Instruction Manual
Page 22
Their function is no fabric in the machine or no need to be in damage. 2. For ordinary sewing, move the fabric being sewn. For darning or free motion embroidery or whenever fabric is to cut the upper and bobbin threads. Push the lever ... their highest position. Raise the presser foot and bring fabric and threads backward after sewing to the right. I. TOP COVER To open the top cover, lift up through the needle plate, directly below the presser foot. The machine will cut threads. In this button when cutting thread thicker than #30, nylon thread...
Their function is no fabric in the machine or no need to be in damage. 2. For ordinary sewing, move the fabric being sewn. For darning or free motion embroidery or whenever fabric is to cut the upper and bobbin threads. Push the lever ... their highest position. Raise the presser foot and bring fabric and threads backward after sewing to the right. I. TOP COVER To open the top cover, lift up through the needle plate, directly below the presser foot. The machine will cut threads. In this button when cutting thread thicker than #30, nylon thread...
Instruction Manual
Page 24
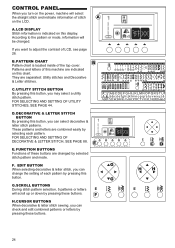
...When selecting decorative & letter stitch, you can select decorative & letter stitch patterns. CONTROL PANEL When you turn on the power, machine will be changed by selected stitch pattern and mode. A. These patterns and letters are separated: Utility stitches and Decorative & Letter ...SCROLL BUTTONS During stitch pattern selection, 5 patterns or letters will scroll up or down by pressing this machine are changed . H.CURSOR BUTTONS When decorative & letter stitch sewing, you want to the pattern or mode, information will select the straight stitch and indicate information of ...
...When selecting decorative & letter stitch, you can select decorative & letter stitch patterns. CONTROL PANEL When you turn on the power, machine will be changed by selected stitch pattern and mode. A. These patterns and letters are separated: Utility stitches and Decorative & Letter ...SCROLL BUTTONS During stitch pattern selection, 5 patterns or letters will scroll up or down by pressing this machine are changed . H.CURSOR BUTTONS When decorative & letter stitch sewing, you want to the pattern or mode, information will select the straight stitch and indicate information of ...
Instruction Manual
Page 30
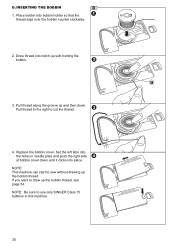
a 3. NOTE: This machine can start to use only SINGER Class 15 bobbins in needle plate and push the right side of bobbin cover down . Pull thread along the groove up and then down until it clicks into the holes in this machine. 30 NOTE: Be sure to sew without drawing up the bobbin thread, see...
a 3. NOTE: This machine can start to use only SINGER Class 15 bobbins in needle plate and push the right side of bobbin cover down . Pull thread along the groove up and then down until it clicks into the holes in this machine. 30 NOTE: Be sure to sew without drawing up the bobbin thread, see...
Instruction Manual
Page 34
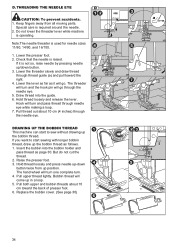
... will go . Hook will turn and the hook pin will turn and pass thread through the needle eye. 5. DRAWING UP THE BOBBIN THREAD This machine can start sewing with longer bobbin thread, draw up the bobbin thread. Pull both upper and bobbin threads about 10 cm (4 inches) through thread guide (a) and ...pull toward the back of presser foot. 6. Raise the presser foot. 3. Lower the lever as far as page 30. If you want to start to sew without drawing up the bobbin thread as follows. 1. Bobbin thread will turn one complete turn. 4. The hand wheel will come up position. Special care ...
... will go . Hook will turn and the hook pin will turn and pass thread through the needle eye. 5. DRAWING UP THE BOBBIN THREAD This machine can start sewing with longer bobbin thread, draw up the bobbin thread. Pull both upper and bobbin threads about 10 cm (4 inches) through thread guide (a) and ...pull toward the back of presser foot. 6. Raise the presser foot. 3. Lower the lever as far as page 30. If you want to start to sew without drawing up the bobbin thread as follows. 1. Bobbin thread will turn one complete turn. 4. The hand wheel will come up position. Special care ...
Instruction Manual
Page 36
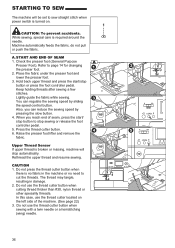
...other speciality threads. START AND END OF SEAM 1. Do not press the thread cutter button when there is broken or missing, machine will be set to sew straight stitch when power switch is required around the needle. Do not use the thread cutter located on . Check the presser foot...press the start / stop button to stop sewing or release the foot controller pedal. 5. While sewing, special care is turned on the left side of seam, press the start /stop button or press the foot controller pedal. A. STARTING TO SEW The machine will stop automatically. Place the fabric under the...
...other speciality threads. START AND END OF SEAM 1. Do not press the thread cutter button when there is broken or missing, machine will be set to sew straight stitch when power switch is required around the needle. Do not use the thread cutter located on . Check the presser foot...press the start / stop button to stop sewing or release the foot controller pedal. 5. While sewing, special care is turned on the left side of seam, press the start /stop button or press the foot controller pedal. A. STARTING TO SEW The machine will stop automatically. Place the fabric under the...
Instruction Manual
Page 38
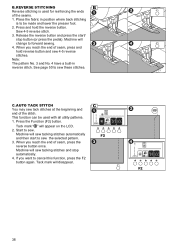
Place the fabric in reverse stitch. If you want to be used for reinforcing the ends of the stitch. Sew 4-5 reverse stitch. 3. Machine will change to sew. C. When you reach the end of seam, press the reverse button once. F2 38 This function can be made... press and hold the reverse button. B. AUTO TACK STITCH You may sew tack stitches at the beginning and end of the seams. 1. Machine will sew tacking stitches automatically F2 and then start / stop automatically. 4. Machine will sew tacking stitches and stop button (or press the pedal). Note: The ...
Place the fabric in reverse stitch. If you want to be used for reinforcing the ends of the stitch. Sew 4-5 reverse stitch. 3. Machine will change to sew. C. When you reach the end of seam, press the reverse button once. F2 38 This function can be made... press and hold the reverse button. B. AUTO TACK STITCH You may sew tack stitches at the beginning and end of the seams. 1. Machine will sew tacking stitches automatically F2 and then start / stop automatically. 4. Machine will sew tacking stitches and stop button (or press the pedal). Note: The ...
Instruction Manual
Page 40
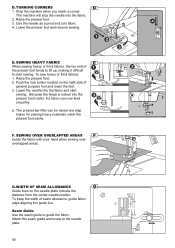
The machine will stop the needle into the fabric and start sewing. Raise the presser foot. 3. SEWING HEAVY FABRIC When sewing heavy or thick fabrics, the toe end of the presser foot tends to lift up, making it difficult to guide the fabric. F. Seam Guide Use the seam guide to start sewing. To sew heavy or ..., guide fabric edge aligning this guide line. Attach the seam guide and screw to the needle plate. 40 Lower the presser foot and resume sewing. Push the lock button located on the needle plate indicate the distance from the center needle positon. TURNING CORNERS...
The machine will stop the needle into the fabric and start sewing. Raise the presser foot. 3. SEWING HEAVY FABRIC When sewing heavy or thick fabrics, the toe end of the presser foot tends to lift up, making it difficult to guide the fabric. F. Seam Guide Use the seam guide to start sewing. To sew heavy or ..., guide fabric edge aligning this guide line. Attach the seam guide and screw to the needle plate. 40 Lower the presser foot and resume sewing. Push the lock button located on the needle plate indicate the distance from the center needle positon. TURNING CORNERS...
Instruction Manual
Page 42
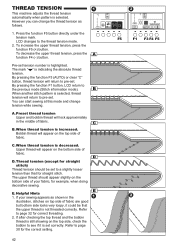
... Press the function F5 button directly under the tension mark. Pre-set to see if it could be that for example, when doing decorative sewing. When thread tension is selected. By pressing the function F1 button, LCD return to pre-set correctly. E. If after checking the top ...thread and the bobbin thread is indicating the absolute thread tension. THREAD TENSION This machine adjusts the thread tension automatically when pattern is decreased. However you can start sewing at this mode and change the thread tension as shown in the middle of fabric. LCD ...
... Press the function F5 button directly under the tension mark. Pre-set to see if it could be that for example, when doing decorative sewing. When thread tension is selected. By pressing the function F1 button, LCD return to pre-set correctly. E. If after checking the top ...thread and the bobbin thread is indicating the absolute thread tension. THREAD TENSION This machine adjusts the thread tension automatically when pattern is decreased. However you can start sewing at this mode and change the thread tension as shown in the middle of fabric. LCD ...
Instruction Manual
Page 46
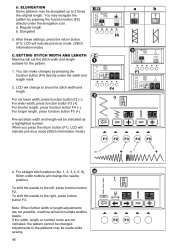
.... 1, 2, 3, 4, 6, 8), Stitch width buttons will indicate previous mode. (Stitch information mode) C. If the width, length or number icons are not possible, machine will emit multiple audible beeps. Regular length b. LCD will change to show the stitch width and length. SETTING STITCH WIDTH AND LENGTH...indicated as a highlighted number. Note: When further width or length adjustments are not indicated, the pattern cannot be made while sewing. 46 a. ii. ELONGATION Some patterns may elongate the pattern by pressing the function button (F4) directly under the elongation icon.
.... 1, 2, 3, 4, 6, 8), Stitch width buttons will indicate previous mode. (Stitch information mode) C. If the width, length or number icons are not possible, machine will emit multiple audible beeps. Regular length b. LCD will change to show the stitch width and length. SETTING STITCH WIDTH AND LENGTH...indicated as a highlighted number. Note: When further width or length adjustments are not indicated, the pattern cannot be made while sewing. 46 a. ii. ELONGATION Some patterns may elongate the pattern by pressing the function button (F4) directly under the elongation icon.

Instruction Manual
Page 50
... 2. Position the fabric under the presser foot and lower it . 2. Machine will sew 4-5 stitches forward and sew 4-5 stitches backward and continue sewing forward. 3. Left needle position (No.2) is most suited for sewing light weight fabrics. No. 1. Center needle with built-in reverse stitch ... reverse button. Center needle position No. 2. Press the thread cutter button. Machine will sew a few stitches backward and sew a few stitches forward and stop sewing. 4. Place hand lightly on the fabric while sewing. 3. Straight Stitch With Auto-lock Stitch (Pattern No. 3, 4) 1. ...
... 2. Position the fabric under the presser foot and lower it . 2. Machine will sew 4-5 stitches forward and sew 4-5 stitches backward and continue sewing forward. 3. Left needle position (No.2) is most suited for sewing light weight fabrics. No. 1. Center needle with built-in reverse stitch ... reverse button. Center needle position No. 2. Press the thread cutter button. Machine will sew a few stitches backward and sew a few stitches forward and stop sewing. 4. Place hand lightly on the fabric while sewing. 3. Straight Stitch With Auto-lock Stitch (Pattern No. 3, 4) 1. ...
Instruction Manual
Page 52
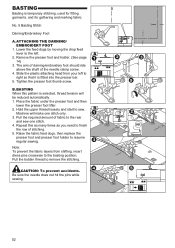
...Lower the feed dogs by moving the drop feed lever to the left to the rear and sew one stitch only. 3. The arm of darning/embroidery foot should ride above the shaft of stitching. 5. Machine will be reduced automatically. 1. Pull the required amount of fabric to right so that it is... selected, thread tension will make one stitch. 4. Hold the upper thread loosely and start to the basting position. Be sure the needle does not hit the pins while sewing. 52 Repeat...
...Lower the feed dogs by moving the drop feed lever to the left to the rear and sew one stitch only. 3. The arm of darning/embroidery foot should ride above the shaft of stitching. 5. Machine will be reduced automatically. 1. Pull the required amount of fabric to right so that it is... selected, thread tension will make one stitch. 4. Hold the upper thread loosely and start to the basting position. Be sure the needle does not hit the pins while sewing. 52 Repeat...
Instruction Manual
Page 78
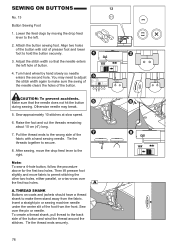
...two holes. THREAD SHANK Buttons on coats and jackets should have a thread shank to make them stand away from the front. Insert a straight pin or sewing machine needle under the center slit of the button. Turn hand wheel by moving the drop feed lever to secure. 8. Make sure that the needle enters... the left . 2. SEWING ON BUTTONS No. 13 Button Sewing Foot 1. Otherwise needle may need to adjust the stitch width again to make sure the swing of the needle clears the holes of...
...two holes. THREAD SHANK Buttons on coats and jackets should have a thread shank to make them stand away from the front. Insert a straight pin or sewing machine needle under the center slit of the button. Turn hand wheel by moving the drop feed lever to secure. 8. Make sure that the needle enters... the left . 2. SEWING ON BUTTONS No. 13 Button Sewing Foot 1. Otherwise needle may need to adjust the stitch width again to make sure the swing of the needle clears the holes of...
Instruction Manual
Page 96
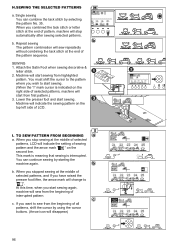
... You must shift the cursor to the pattern where you stop automatically after sewing selected patterns. When you wish to sew from the beginning of pattern, machine will indicate the sewing pattern on the second line. Attach the Satin Foot when sewing decorative & letter stitch. 2. b. I " mark cursor is interrupted. You can combine the tack stitch...
... You must shift the cursor to the pattern where you stop automatically after sewing selected patterns. When you wish to sew from the beginning of pattern, machine will indicate the sewing pattern on the second line. Attach the Satin Foot when sewing decorative & letter stitch. 2. b. I " mark cursor is interrupted. You can combine the tack stitch...


