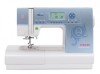
Singer 9980 QUANTUM STYLIST Support Question
Singer 9980 QUANTUM STYLIST Support Question
Find answers below for this question about Singer 9980 QUANTUM STYLIST.Need a Singer 9980 QUANTUM STYLIST manual? We have 1 online manual for this item!
Question posted by Dgmcmaster on June 29th, 2022
Machine Start Up
my quantum will not run the start up when turned on. It beeps but the needle doesn't adjust. I am unable to sew at all.
Current Answers
Answer #1: Posted by Odin on June 29th, 2022 5:35 AM
Odin

Member since:
April 10th, 2010 Points: 41,236,690

Member since:
April 10th, 2010 Points: 41,236,690
You may have accidentally lowered the buttonhole lever located just to the left of the needle bar. To make sure it is in the correct position for sewing, place your finger under the lever and push up.
Also make sure the needle is set at the highest position and the bobbin winding spindle has been pushed back to the left.
NOTE: To set the needle at the highest position, turn the hand wheel TOWARDS you, until the needle moves to the highest position.
Finally, push the reverse button a couple of times, this will reset the machine.
If none of the troubleshooting techniques above solved the issue, you'll need to contact a SINGER Service Center to have your machine serviced.
Hope this is useful. Please don't forget to click the Accept This Answer button if you do accept it. My aim is to provide reliable helpful answers, not just a lot of them. See https://www.helpowl.com/profile/Odin.
Answer #2: Posted by SonuKumar on June 29th, 2022 9:37 AM
SonuKumar

Member since:
May 9th, 2021 Points: 16,609,800
Member since:
May 9th, 2021 Points: 16,609,800
https://www.manualslib.com/manual/609840/Singer-Quantum-Stylist.html#manual
needle bar - Fix first
Please respond to my effort to provide you with the best possible solution by using the "Acceptable Solution" and/or the "Helpful" buttons when the answer has proven to be helpful.
Regards,
Sonu
Your search handyman for all e-support needs!!
Related Singer 9980 QUANTUM STYLIST Manual Pages
Instruction Manual - Page 2
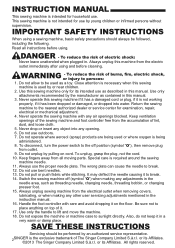
... (symbol "O") when making any adjustments in the needle area, such as described in the instruction manual. 16. Also, do not keep it in . SAVE THESE INSTRUCTIONS
Servicing should always be performed by pulling on cord. Always unplug this sewing machine is used or where oxygen is being administered. 8. To disconnect, turn the power switch to...
Instruction Manual - Page 3
... 38
EYELET
74
MODEL 9980 8 C. SEWING OVER OVERLAPPED
40
SEWING
ON
BUTTONS .........
78
MAIN PARTS 10 AREAS 40 A. ATTACHING THE EVEN-FEED FOOT 82 B. FREE-HAND EMBROIDERY 84
FUNCTION OF EACH PART .. 20
A. After darning or free-hand embroidery . 84
TWIN NEEDLE SEWING ........ 86 DECORATIVE & LETTER
C. SELECTING DECORATIVE & LETTER
E. TURNING OFF AUDIBLE BEEP 26
BOBBIN SETTING...
Instruction Manual - Page 8
...por parte del usuario no deberán jugar con este producto.
3.
The wires in this sewing machine when considered necessary without supervision. 4. Children shall not play with the letter N or colored ...mantenimiento. MODEL 9980
PREFACE Thank you for your purchase of this booklet for proper use and optimum service. This appliance can be connected to this sewing machine. Unplug the ...
Instruction Manual - Page 18
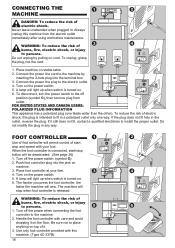
... the risk of start /stop button will sew. Do not modify the plug in . FOOT CONTROLLER
Use of foot controller will permit control of electric shock, this machine from outlet. CONNECTING THE MACHINE
DANGER: To reduce the risk of burns, fire, electric shock, or injury to persons. Always unplug this plug is turned on top...
Instruction Manual - Page 20
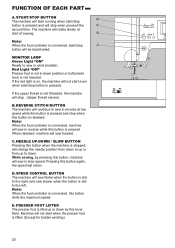
... the red light is on, the machine will start running when start /stop . (Upper thread sensor)
B. If the upper thread is slid to the left. REVERSE STITCH BUTTON The machine will continue to the right, and sew slower when the button is not threaded, the machine will stop when this lever. While sewing, by this button is lifted...
Instruction Manual - Page 30
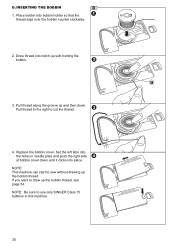
... use only SINGER Class 15 bobbins in needle plate and push the right side of bobbin cover down .
INSERTING THE BOBBIN 1. a
3. NOTE: This machine can start to draw up the bobbin thread. Set the left tabs into the holes in this machine.
30
If you want to sew without drawing up the bobbin thread, see...
Instruction Manual - Page 34
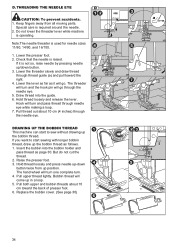
... as it is not so, raise needle by pressing needle up the bobbin thread as page 30. DRAWING UP THE BOBBIN THREAD This machine can start to start sewing with longer bobbin thread, draw up ... and draw thread through the needle eye. Hook will turn . 4. But do not cut the thread. 2. Keep fingers away from up the bobbin thread. If you want to sew without drawing up position. Lower...
Instruction Manual - Page 36
... upper thread is required around the needle. Lightly guide the fabric while sewing. Do not press the thread cutter button when
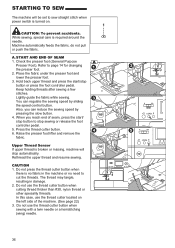
there is turned on the left side of seam, press the start /stop sewing or release the foot controller pedal. 5. STARTING TO SEW
The machine will stop automatically.
CAUTION: To prevent accidents. Machine automatically feeds the fabric, do...
Instruction Manual - Page 38
... back stitching
is used with all utility patterns.
1. Machine will appear on the LCD.
2.
See page 50 to sew.
Tack mark " " will sew tacking stitches automatically
F2
and then start /
stop
automatically.
4. When you want to forward sewing. 4. Press and hold reverse button and sew 4-5 reverse stitches. Machine will sew tacking stitches and stop button (or press the...
Instruction Manual - Page 40
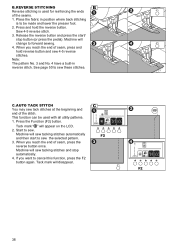
... foot tends to lift up, making it difficult to start
sewing. Push the lock button located on the needle plate indicate the distance from the center needle positon. D. TURNING CORNERS 1. Use the needle as a pivot and turn fabric. 4. The presser bar lifter can now feed smoothly. a.
Stop the machine when you reach a corner. F. To keep the width of...
Instruction Manual - Page 42
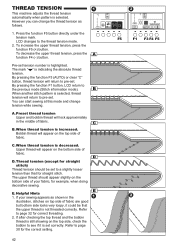
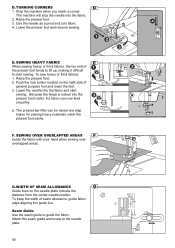
... button. D. The upper thread should be that for example, when doing decorative sewing. E. However you can start sewing at this mode and change the thread tension as shown in the middle of fabric... but bottom side looks very loopy, it is highlighted. THREAD TENSION
This machine adjusts the thread tension automatically when pattern is not threaded correctly. Preset thread tension Upper...
Instruction Manual - Page 50

... the reverse button. Press the thread cutter button. Machine will sew 4-5 stitches forward and sew 4-5 stitches backward and continue sewing forward.
3. No. 1. Center needle with built-in reverse stitch No. 4. Hold the upper thread loosely and start sewing.
Straight Stitch With Auto-lock Stitch (Pattern No. 3, 4)
1. Center needle position No. 2. B. Hold the upper thread loosely and...
Instruction Manual - Page 52
... stitching. 5. Hold the upper thread loosely and start to finish
the row of the needle clamp screw.
4. Pull the required amount of fabric to the basting position. Slide the plastic attaching head from shifting, insert dress pins crosswise to the rear
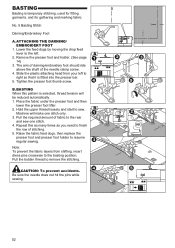
and sew one stitch only. 3. Machine will be reduced automatically. 1. ATTACHING THE DARNING...
Instruction Manual - Page 60
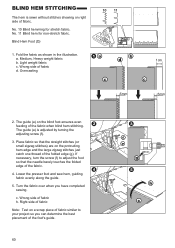
...turn the screw (f) to your project so you have completed sewing. No. 10 Blind hemming for non-stretch fabric. Fold the fabric as shown in the illustration. a. Light weight fabric c. The guide (e) on the blind foot ensures even feeding of fabric d. Lower the presser foot and sew... hem, guiding fabric evenly along the guide.
5. Turn...adjusted by turning the adjusting...to adjust the foot...
Instruction Manual - Page 68

...Decorative Buttonhole 114. If the button does not fit securely on the base, adjust the slide on the base to the diameter of the button, plus the ...start to sew. BUTTONHOLE SEWING
Select the buttonhole style you want to sew if buttonhole lever is not lowered properly or frame of buttonhole on fabric.
2. Both Round Ended Buttonhole 113.
Note: Machine will not start the machine...
Instruction Manual - Page 74
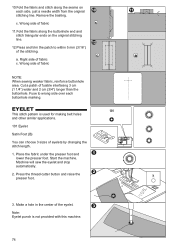
... fabric, reinforce buttonhole area.
Machine will sew the eyelet and stop automatically.
2. Wrong side of fabric c. Start the machine. Wrong side of fabric
11.Fold the fabric along the seams on the original stitching line.
12.Press and trim the patch to wrong side over each side, just a needle width from the original stitching line...
Instruction Manual - Page 76
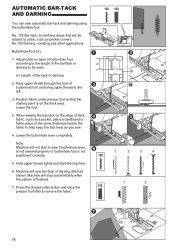
Adjust slide on base of buttonhole foot according to the length of the same thickness beside ...level as shown. No.103 Darning, mending and other applications. b. When sewing the bar-tack on the thick area. Machine will not start the machine.
6.
Note: Machine will sew bar-tack or darning stitch as you sew.
4. Lower the buttonhole lever completely. a= Length of buttonhole foot and...
Instruction Manual - Page 84
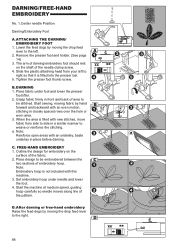
...(See page 14)
3.
Outline the design for embroidery on the shaft of the needle clamp screw.
4. D. Lower the feed dogs by hand forward and backward with...under needle and lower the foot. 4. Start the machine at medium speed, guiding hoop carefully so needle moves along line of embroidery hoop. Place design to the left to weave or reinforce the stitching. DARNING 1. Start sewing,...
Instruction Manual - Page 96
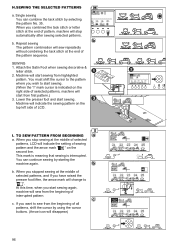
... time, when you stopped sewing at the end of selected patterns, machine will start sewing. Lower the presser foot and start sewing from first pattern.) 3. This mark is meaning that sewing is indicated on the right side of the pattern sequence.
Machine will start from highlighted
pattern. When you start sewing. (When the "I . If you wish to sew from the beginning of...
Instruction Manual - Page 102
... the buttonhole lever.
2
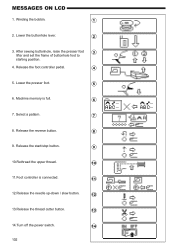
3. MESSAGES ON LCD
1. Machine memory is connected.
11
12.Release the needle up-down / slow button.
12
13.Release the thread cutter button.
13
14.Turn off the power switch.
14
102 Release the foot controller pedal.
4
5. Select a pattern.
7
8. Release the reverse button.
8
9. After sewing buttonhole, raise the presser foot
3
lifter...
Similar Questions

Cannot Start Machine It Keeps Beeping
not starting continues beep what do I do
not starting continues beep what do I do
(Posted by Jeanninebrideau 3 years ago)

Why Does The Thread Break On My Quantum Stylist 9980 ?
My machine will sew for less than a minute and the thread breaks and the needle becomes unthreaded b...
My machine will sew for less than a minute and the thread breaks and the needle becomes unthreaded b...
(Posted by Duhholloway 4 years ago)

Needle Will Not Reposition
When I go to turn the needle location knob to move the needle either left or right the needle no lon...
When I go to turn the needle location knob to move the needle either left or right the needle no lon...
(Posted by shawen 8 years ago)

Beeping From Singer Sewing Machine Stylist Ii 5625
My sewing machine will beep and stop sewing after three inches of sewing. I have taken it to be repa...
My sewing machine will beep and stop sewing after three inches of sewing. I have taken it to be repa...
(Posted by arusheria 9 years ago)

I Need An Extnesion Table For My Sewing Machine Singer 7258 Stylist
(Posted by loucksd 10 years ago)